andiesenji
-
Posts
11,034 -
Joined
-
Last visited
Content Type
Profiles
Forums
Store
Help Articles
Everything posted by andiesenji
-
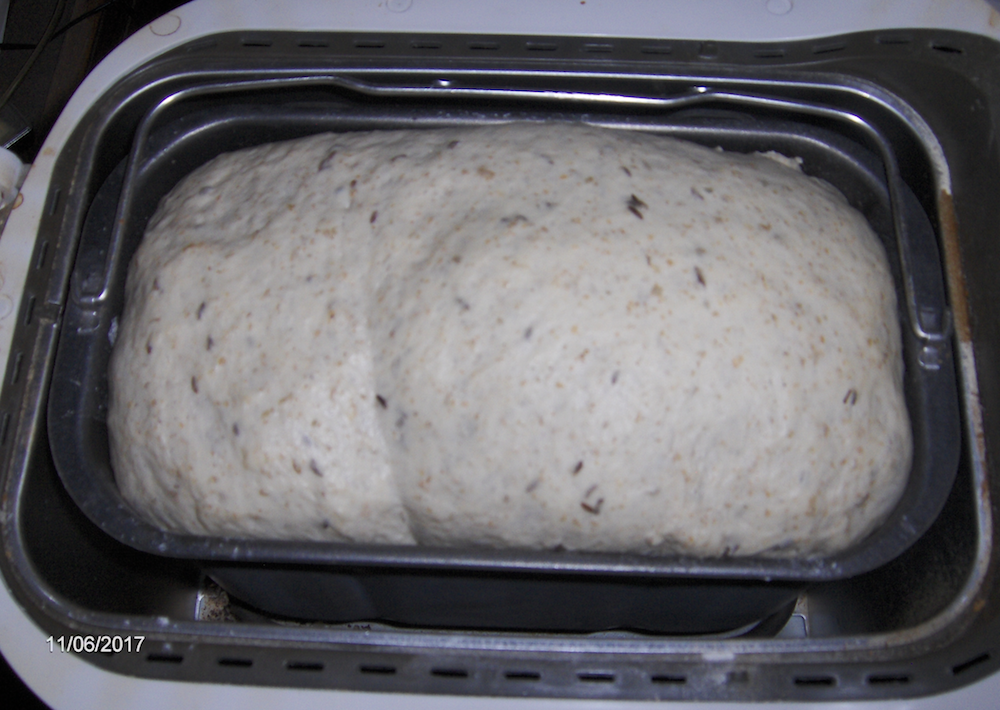
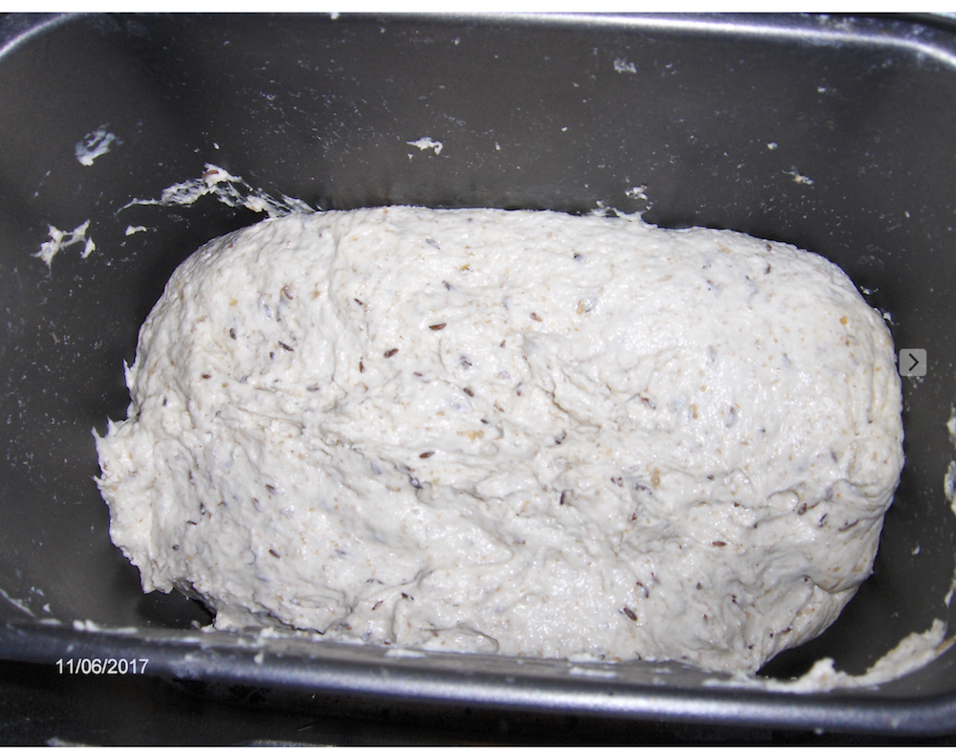
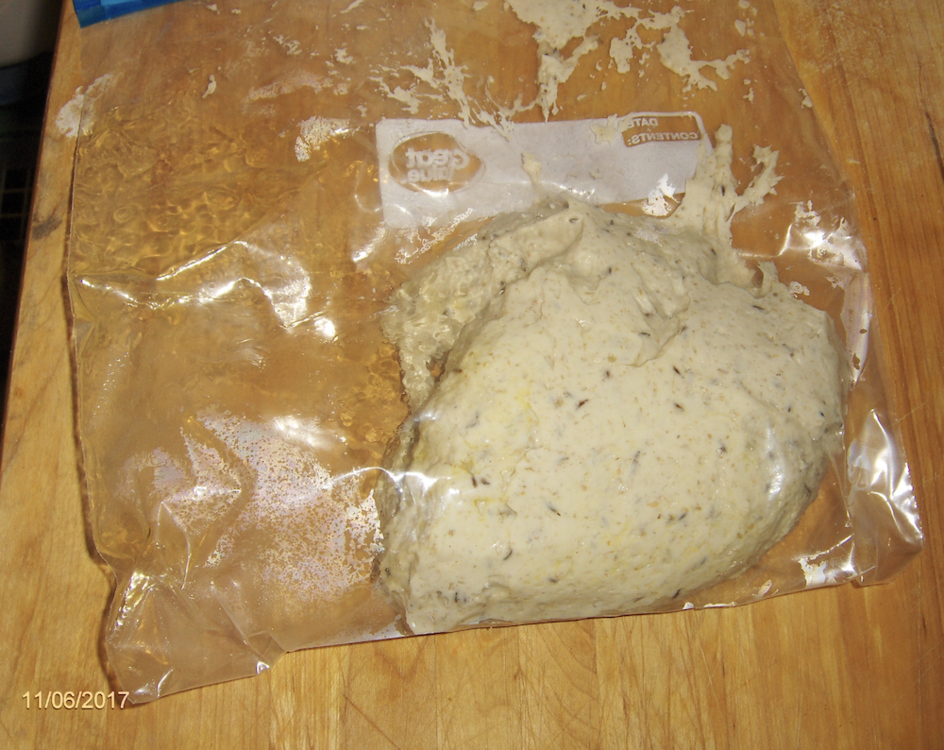
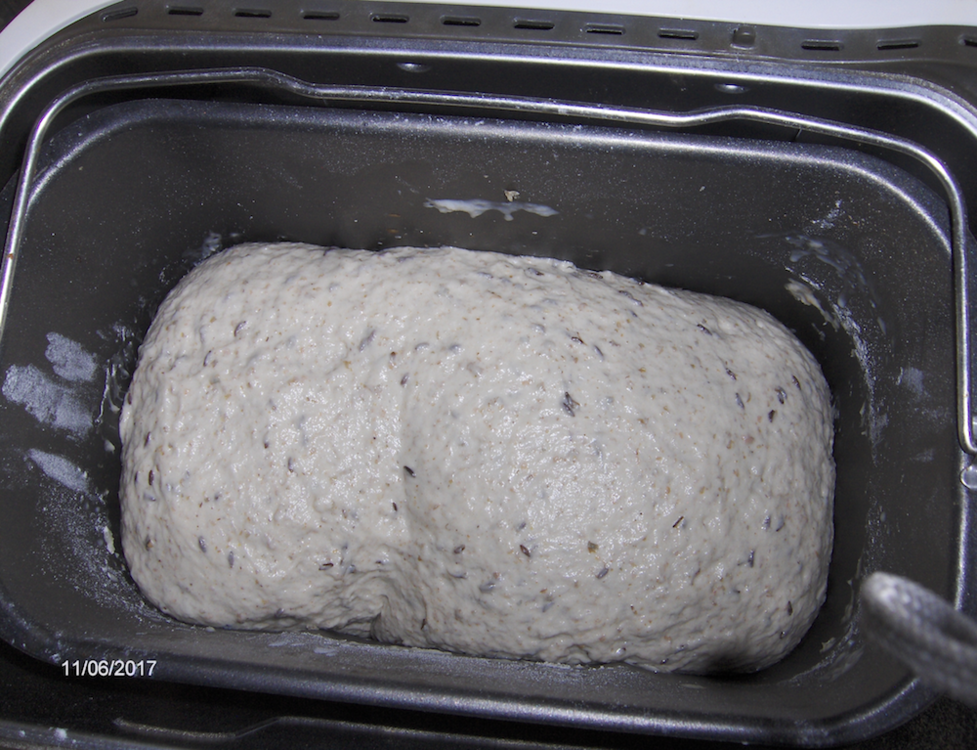
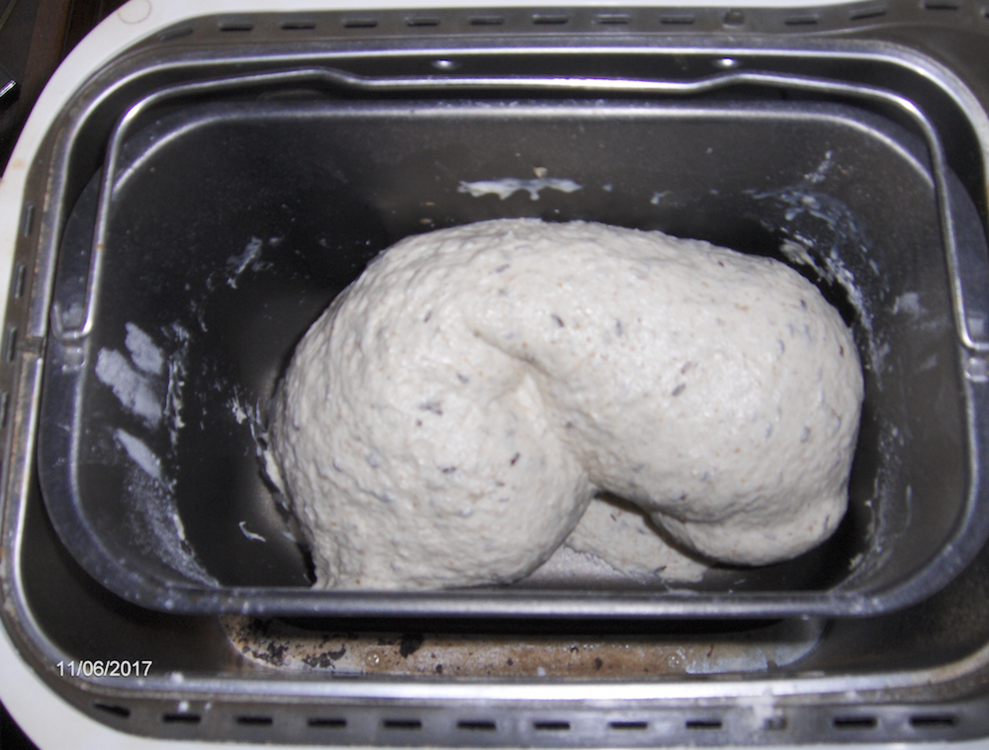
This is at the 155 mark, just before the final "punch-down" knead. Photo #1 As you can see, it is too high to bake like this, the oven "spring" will cause it to hit the top. This is after I have divided the dough, removing about 1/3 or so and returning it to the pan, with the paddle removed. The time shows 1:50 remaining to finish. And the last photo is the oiled plastic bag with the remaining dough. I will keep it in the fridge for a day or so and then make rolls from it.
-
Yard Sale, Thrift Store, Junk Heap Shopping (Part 3)
andiesenji replied to a topic in Kitchen Consumer
I have several. I have gotten excellent results with most of them. I don't care for the Panasonic with the yeast dispenser but that is just my personal thing. The Sunbeam has the best quick bake cycle, I've never bothers to check why, but it is and it does a great job on regular cycles. I gave one to my daughter a few years ago and she uses hers (the old one died and she bought a replacement) at least 3 times a week. I currently am using the Black & Decker 3-pound machine that seems to no longer be available. I love it. I have an older Zojirushi that still works like a charm. Most of the bread makers that have come and gone do a good job at the basics. Not all work well on the "rapid bake" cycle, but I never use that anyway. The big advantage is that you can use the "dough" cycle and let the machine do all the work of mixing, kneading, rising, punching down and then you have the fun of shaping the dough and baking it in a regular oven. -
This is 17 minutes after the prior photo. This is definitely rising rapidly and I will have to remove some of the dough (goes into oiled plastic bag and into the fridge) or it will hit the top of the machine.
-
I watch in the early phases, The dough should look like it is shifting from side to side and slowly folds in on itself. And remember, if it doesn't look like it has mixed enough and doesn't have the "smooth" appearance, you can always stop the machine completely, cancel the cycle and just start it again from the beginning, add a tablespoon or water, or if it looks too sloppy, add a tablespoon or two of flour. YOU control the machine. Here is what I am doing now. I started with one of the box mixes, calls for a cup of water and 2 tablespoons of oil I dumped in 1 1/2 cups of water, 3/4 cup of rye flour and three tablespoons of whole milk powder and some caraway seeds. After it had gone through the first kneading cycle, it looked a little skimpy (this is the 3-pound machine) I cancelled the program. I mixed separately, 2/3 cup of bread flour, 1/3 cup of milk and heated it in the microwave, beat it into a thick slurry and allowed it to cool to 106° I then added 2 teaspoons of fresh yeast. Mixed it vigorously and allowed it to sit for 15 minutes, the yeast was VERY ACTIVE. I then dumped that into the machine and reset it to the #1 program, plain white bread and turned it on. This is well into the second kneading cycle. It has the slightly glossy look I expect at this stage and everything has been incorporated into the dough. If it rises a lot, I will probably cut some off when I pull it out to remove the paddles at the end of the last kneading cycle. On my machine the timer shows 1:55 to go till done.
-
You want to make sure both paddles are turning before you put anything in there. If one is not turning or not locking down - I had one with that defect, the shaft was a bit out of round and it wouldn't go all the way down. I had bought it locally, took it back and they gave me another. And then you want to make sure the paddles are turning against resistance and not slipping if there is a drag on them. Yes, put the dough back in and let it continue. You don't need to stop the cycle. At that point I often take the dough out and either pan it to bake in the oven or do something else with it, like make rolls or cinnamon rolls, etc.
-
Run a cycle with the pan empty. When you start, make sure the paddles are pointing in different directions. Watch to see that the paddles are working, Sometimes you have to push down hard to get them to lock into position. If they appear to be working okay, mix some flour and hot water together to make a thick batter, 1 1/2 cups should work in your size machine, maybe 2 cups. put it into the machine and start the cycle The dough should be stiff enough to give some resistance to the paddles. If they appear to be working okay, dump out the stuff, clean the pan and start your bread. DON'T USE THE QUICK CYCLE it only works with some breads. For a good reliable test of your machine, go to the store and buy one of the boxed prepared bread mixes. That's what I recommend for anyone starting new with a bread machine. I use them myself for simple loaves or a base for adding other stuff. They are 100% foolproof and if they don't turn out right, it is the MACHINE that is at fault. I buy this Hodgson Mill stuff from Amazon - 6 boxes in a case. I get Krusteaz at Costco. I always watch in the early parts of a cycle to see what is happening. Sometimes the dough looks "ragged" and that shows it needs a bit more water, I add a tablespoon at a time. When the last knead cycle is finished - check the timer, write down the time left. On my machine it is 1:55 on the basic setting. PULL OUT THE DOUGH AND REMOVE THE PADDLES. Most instruction books are including that tip now.

-
It was unavailable for a long time. It was a blend of many varietals, nothing like a true Burgundy, but it was a terrific cooking wine. They brought it back a few years ago, I read a story about it awhile back. It is available in a 1.5 liter "jug" but at a much higher price than the original. We had Italian friends that loved to drink it. Said it was more like the "old-fashioned" Italian table wine that had disappeared in the '50s.
-
Never had a problem with it doing that and banging it on the side of the pan dislodges anything.
-
That was there mostly for ambiance. Neither my husband or I drank hard liquor. Mostly wine, though not a lot of that. We kept the booze for guests. I used some for cooking. I used a lot of wine in cooking. Gallo Hearty Burgundy (not really a Burgundy) was sold in gallon jugs and there was always one on the bottom shelf of my baking bench.
-
I have and use the OXO good grips in my enameled pots, skillets, etc., with no problems whatsoever. I have used it to mash potatoes, fruits of all kinds, celeriac, rutabaga and parsnips.
-
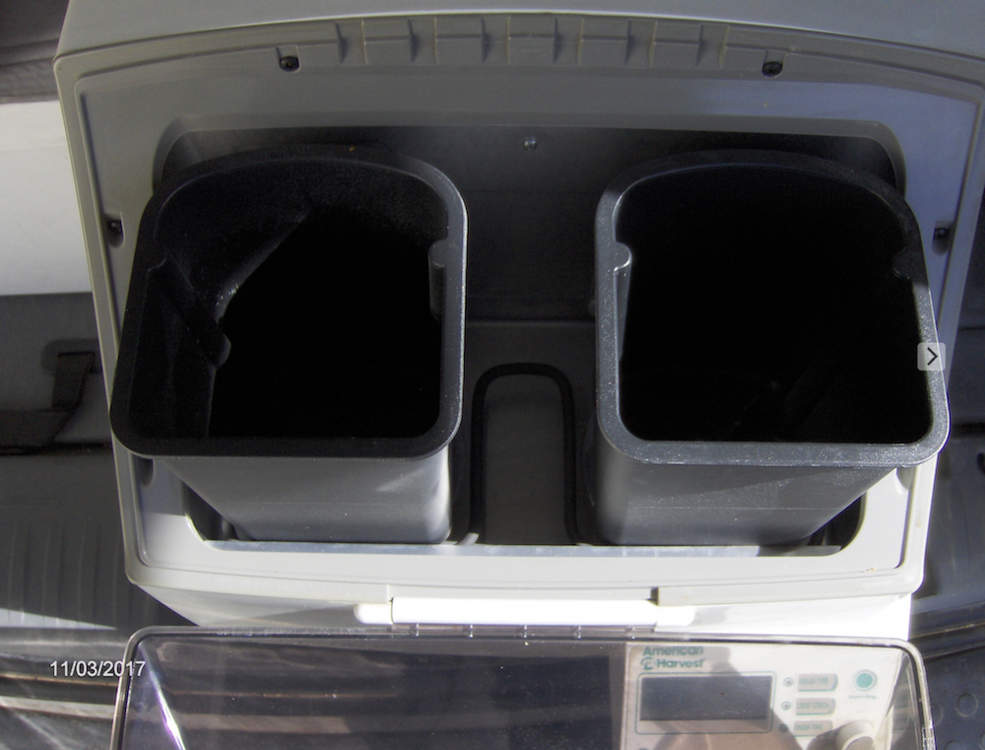
Currently I am using the no longer available Black & Decker 3-pound machine, which I use for double batches, usually removing about a third of the dough at the end of the last knead cycle, when I removed the paddles. I put the extra dough in a plastic bag in the fridge to be used in a day or three. However, I have several other bread machines, a Sunbeam that has a better quick mix and bake cycle than other machines I have used. A Zojirushi that is about 30 years old, still works fine. Also from KAF back in the catalog days. It has a "pin" which sticks into the pan and "catches" the dough to increase the kneading effect. This was a popular machine but was discontinued because people kept losing the "pin" and Zo was replacing them for free. A Panasonic with "yeast dispenser" that I HATE because it has a delayed start in most of the cycles, which I can't stand. When I push "START" I want to hear it start. I also have a double pan machine that I just got out of storage for some holiday baking. It's still in my van. I use it just for mixing dough. I'll take a photo. It never actually "baked" the loaves all that nicely but it does a hell of a job on mixing and kneading doughs that require extended kneading. American Harvest. There have been times, when holiday baking, that I have had several bread machines going at the same time with different yeast doughs. One for Stollen, that requires a "sponge" to start. One for a yeasted "Danish" dough with lots of butter. and etc. Photos of the double pan machine. Please excuse the dust.


-
I can't remember what the exhaust system cost but in addition to the ductwork they put in the attic and through the roof, we had to get a roofer to pull off all the shingles and install a 4' x 4' "seamless metal flashing skirt" through which the 10" exhaust pipe was mounted. Only the edges of the "skirt" could be covered and only with fireproof shingles. Since they were already ripping off shingles, we told them to go ahead and do the entire roof. The roofer was one of my dad's sub-contractors and my dad paid for it. (My dad was a general contractor in the L.A. area from 1947 until he retired in 1969.)
-
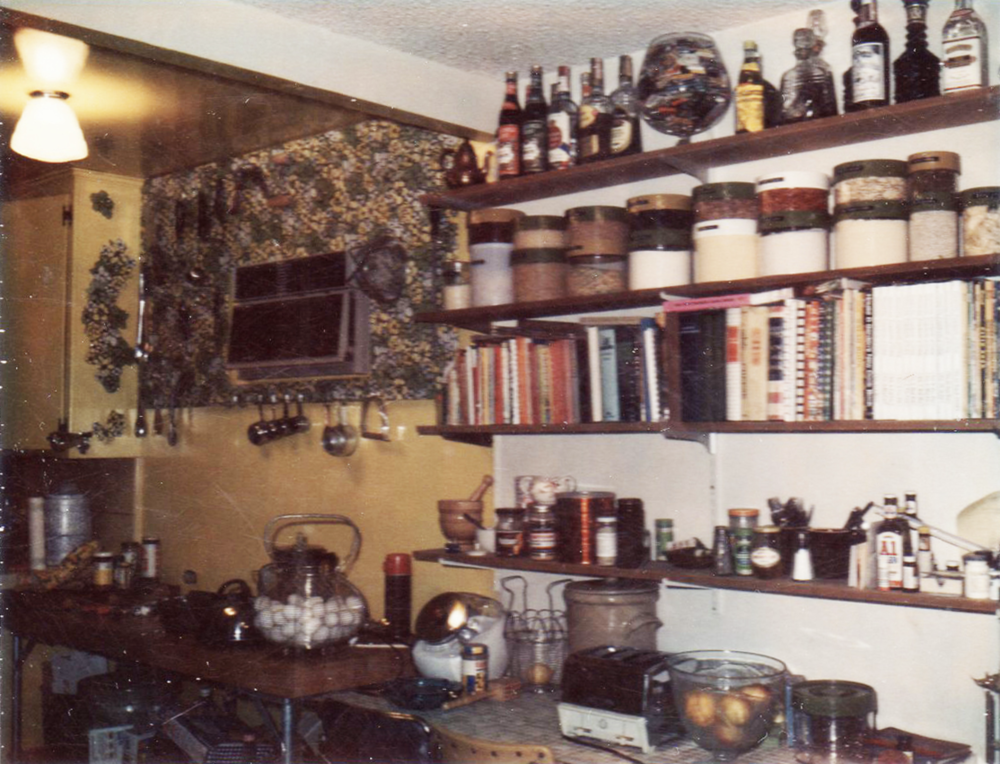
Having experienced tradesmen who had installed a lot of commercial equipment was not a problem. They wrote up the permit applications, the gas company installed a new meter with the larger 3/4" "demand" fitting with the automatic cut off valve for earthquakes and we had a quick cutoff in the kitchen with a bright red handle, the required 6 feet from the range. The floor, wall and ceiling was lined with fire brick covered with stainless steel panels. that extended 3 feet beyond each end of the range. And that section of the floor had to be lowered and the floor itself reinforced from below (we were on a raised foundation) to carry the weight of the range. My husband priced it out and had we had to pay to have all the work done, it would have cost us 18K and that was in 1967/68. We also installed a separate 40K BTU AC through the wall in the kitchen to handle the heat when we didn't need AC in the rest of the house. I can't find a photo that shows the range but this is the wall with the AC and my butcherblock bench. Beyond that was 12 feet of counter with a sink in the center and on the opposite wall this side of the range was another 12 feet of counters with cabinets below. At the far end we had what was originally a laundry room but we moved washer and dryer out to the attached garage, removed the big sink and put the big Kelvinator "food-a-rama" 32 cf fridge and an upright freezer out there. You see the eggs on the counter. We had a neighbor who sold eggs locally. They did not require refrigeration.
-
I have the Oxo good grips potato masher. Works fine.
-
In the late '60s we renovated the kitchen to make room for a huge Garland range with 8 burners, flat top with the salamander under it two ovens and the "warming shelf" above. I used that range a lot. I baked a lot of bread. My kids loved it. They would fire up the salamander to make snacks and impress their friends. I had one of the 10-quart Hobart mixers that was mounted on a low dolly so I could roll it out of the walk-in pantry. One thing I kept from those days was my 36 x 72 butcher block bench on pipe legs. When I sold the house in 1978, the buyers offered a lot more money if I left the range. I still miss it but the cost to make the floor, wall and overhead safe, along with an industrial sized exhaust system would have been very expensive had I not been married to a master plasterer and he knew a lot of other trades people who were happy to trade work for work. When I began catering in the '80s, I bought a Blodgett 10 tray oven that had been converted to 7 tray by the addition of a steam fixture. I loved the French doors on that oven. I also had a Hobart undercounter dishwasher with the 90 second cycle - sounded like a jet taking off but it finished so quickly, it wasn't annoying. Several years ago, since I was no longer using them, I sold the oven to a friend that owned a bakery. A couple of year later he opened a cafe next door to the bakery and offered to take the Hobart and buy me a new dishwasher and have it installed. I still have the 20 cup Cuisinart because I use it quite often. The last commercial item I sold on ebay was the adjustable pancake dropper. I no longer need to make dozens of pancakes.
-
I've had bread machines since the first Panasonic appeared back in 1989 just in time for Christmas sales. Since then I have had and still have "several" and have experimented with all kinds of yeast breads, quick breads, cakes &etc. I still use them for yeast breads, mostly, like chromedome, for mixing, kneading and rising and then shaping and baking the dough in a regular oven. When I do bake in the machine, I PULL THE DOUGH OUT AT THE END OF THE LAST KNEAD/PUNCH DOWN CYCLE and REMOVE THE BEATERS. Then stuff the dough back into the pan and let it continue through the last rise and bake. This way you don't have big holes in the bottom, just 2 small holes where the shafts are. I do have one machine in which the paddles were supposed to fold down flat before the baking cycle but that did not always happen, a good idea that didn't quite come off. There are a great many books and web sites dedicated to Breadmaker recipes, formulas, tricks and "secret lore" to get the best from your machine. Bread Machine Digest is very good. Another is Bread Machine Pros. Back before the internet, I collected a stack of books on bread machines. I haven't opened one for years because they all seem to be online. And you should join Bread-bakers Digest Reggie and Jeffrey Dwork have maintained this since 1990 and I have been a member almost that long.
-
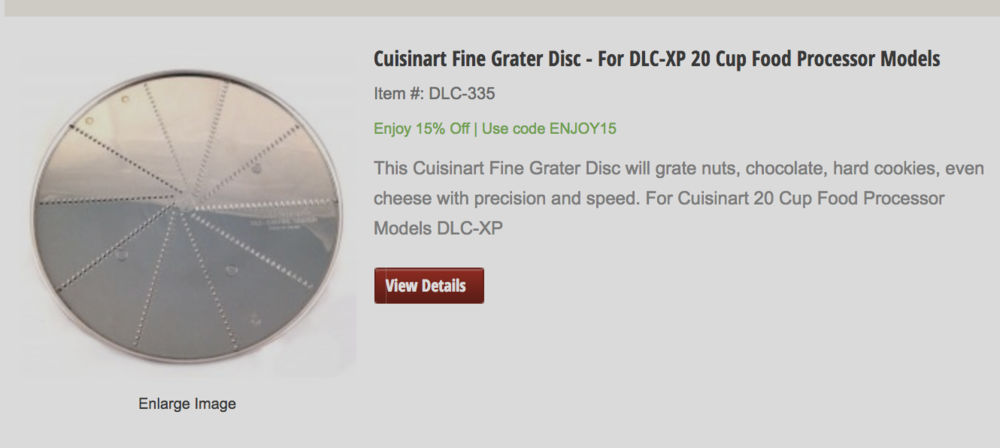
The fine grating disc is only for very hard cheeses. I use the large shredding disc for cheddar, colby, jack and I cut it to the size that fits the tube and then put it in the freezer for 30 to 50 minutes.
-
I used to have a friend who lived in Niagara, she was disabled and was a weaver who often crossed into the U.S. and the border people knew her very well and waved her through. She had a lot of friends and would pick up things for them shipped to a UPS facility, then ship them from home to her friends. Everything was marked GIFT just in case when she was crossing the border but she was never stopped. In return, she was the recipient of prepaid gas cards, gift cards for her favorite retailers and one year several of us got together and gave her a cruise to Alaska, which had been on her "bucket list" for a very long time. She has been sorely missed. I still have several of her weavings.
-
I'm afraid that I have "enabled" a lot of people into "acquiring" things that I wrote about and posted photos. Probably 10 years ago I posted a lot about my collection of vintage waffle irons and toasters and that seemed to incite a flurry of hunting for and purchasing those OLD appliances that actually work better than the modern ones. I still have never found a waffle iron to equal my Sunbeam W-2 and CG-1 irons.
-
For grating hard cheeses I use the Cuisinart - I have the DLC-XP 20 cup and it came with this fine shredding disc which makes quick work of parm, romano, asiago, etc. Cuisinart also makes fine grating ;discs for the 14 cup, 7 and 11 cups. I use a lot of these cheeses in my breads and it takes forever to grate 1 1/2 to 2 cups of the stuff. I use the microplane if I only need a little but for recipes, I use the machine.
-
There is this which has popped up on several "gifts for the homemaker" emails I have received.

-
I just stick the food processor innards and jug in the dishwasher and run "quick wash" without detergent, just some vinegar in the liquid holder. Then let it air dry.
-
Am I the only one who uses a food processor to "grate" - actually shred - large amounts of semi-hard cheeses. Every food processor I have owned, since I got my first one decades ago, has had a shredding disc and it works fine for cheddar, fontina, swiss, jack, colby, &etc. Just cut the cheese into a long piece that will fit in the tube, chill it in the freezer for at least half an hour to an hour if it is not real hard turn the motor on and gently push on the column of cheese. I use the larger for these semi-hard cheeses and I use the smaller for hard cheese.
-
I break the leaves and remove the center rib, crush them partly in a mortar and then finish in the spice grinder. I have a very fine mesh sieve I place over a steel canister, because it fits snugly. As I grind the leaves, I dump it into the sieve and load the grinder for the next batch. As the sieve gets about half full, I shake it so the fine stuff drops thru and I dump the coarser bits back in the grinder along with more leaf.
-
The Madagascar Black Pepper I have purchased in the past is hand-picked ripe berries, not the Piper borbonense. The product I just received is just like the product I have purchased before.