Wholemeal Crank
-
Posts
1,785 -
Joined
-
Last visited
Content Type
Profiles
Forums
Store
Help Articles
Everything posted by Wholemeal Crank
-
I've been assuming electric oven with induction cooktop.
-
Thanks for the tip, very helpful. I see I need to consider: -evenness of heating for larger pots and the marvelously seasoned cast-iron cookware I inherited from Dad -fine-grained temp controls -controls in general--would much rather have knobs than a touchscreen that is going to go to sleep and slow responses -auto-shut off: want to hold that temp sometimes overnight when prepping stock, can't be needing to wake up every hour....and moving a well-filled 16 quart stockpot in and out of the oven as a workaround would be not fun -oven preheat time, especially since I keep my baking steels in the oven full time....but this ought to be easy to build into my workflow -the cost of wiring up the spot for this kind of range--it's on an island built during a 2012 remodel with several then up-to-date grounded outlets, but I'm sure I didn't specify high voltage option for potential electric range, and this will likely require a several thousand dollar upgrade to the electric mains outside the house too (this was recommended but not affordable at the time I did the first remodel)
-
This topic has been quiet for a long time. I just got a rather pricey quote to repair my convection gas range, and I'm considering replacing it with an induction range instead of repairing. What features do you find key to best performance from your induction range? What features do you wish you had? I'll be reading through this topic because I've never seriously looked at induction options before. I'm probably pickier about the oven than the cooktop because baking is my real love. I use my convection 99% of the time (I'm not big on souffles or angel food cakes). I don't think I need a dual oven. I'd love to have steam but plumbing that would be a non-trivial exercise. For the cooktop, I definitely need to be able to manage several good sized pots at once--I cook & can large batches of stock, and cook and freeze lots of soups and stews for lunch at work. And while I'd love a wider range, I've got a 30 inch slot and not much flexibility on either side of it.
-
Nothing Fancy is available on Kanopy if your local library gives you access, at no cost. I watched it on Sunday in her honor, and it was a wonderful view into her life. Even my mother--not remotely a foodie--found it riveting. Glad we had her as long as we did, and glad too that the newest addition to my shelf of Latin American cookbooks is by chefs of Mexican heritage. It feels right that more of these voices are being heard thanks to her pioneering work.
-
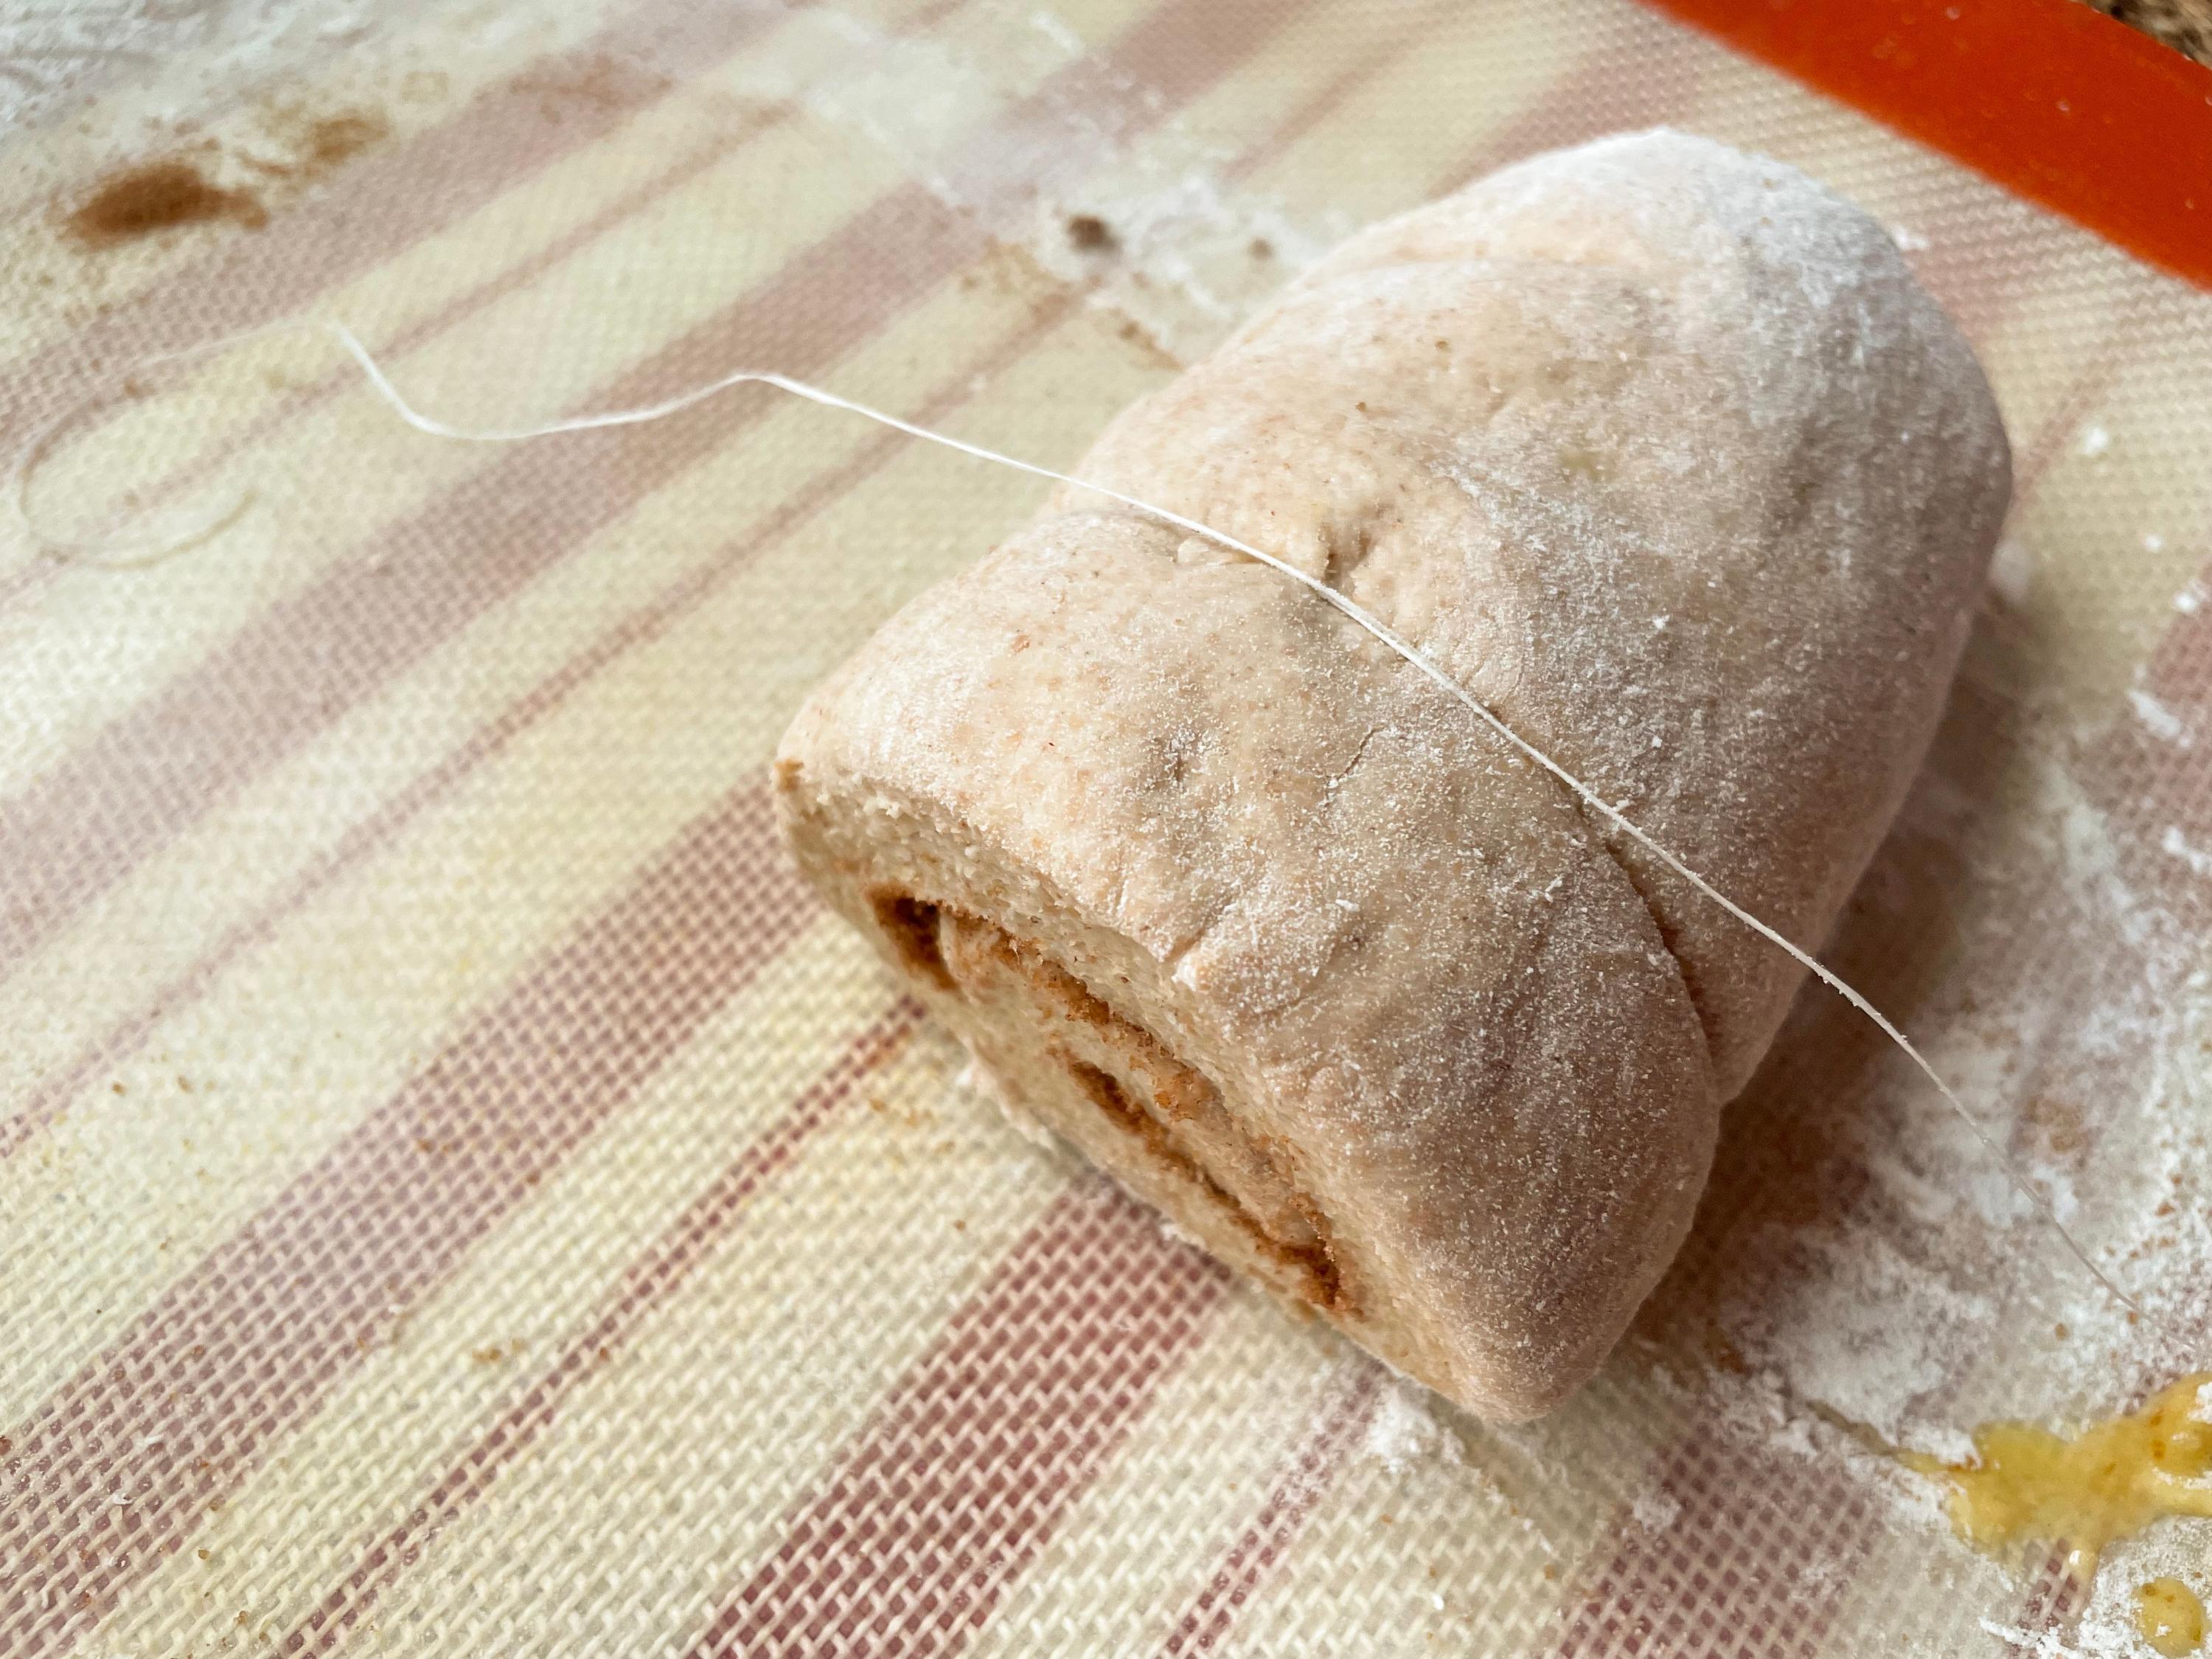
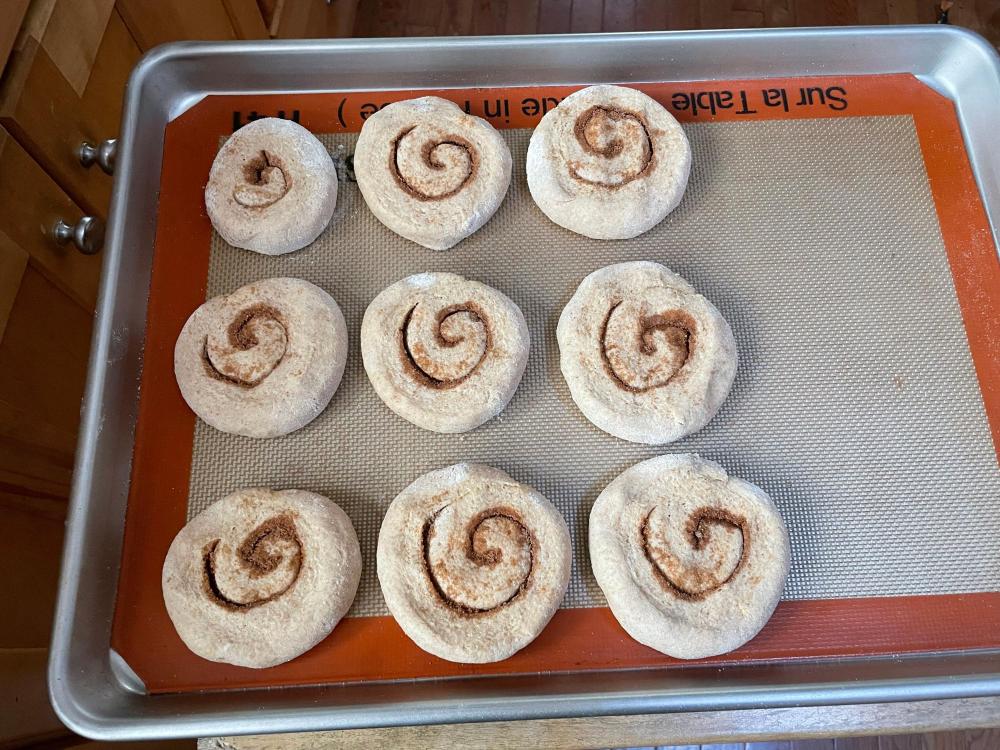
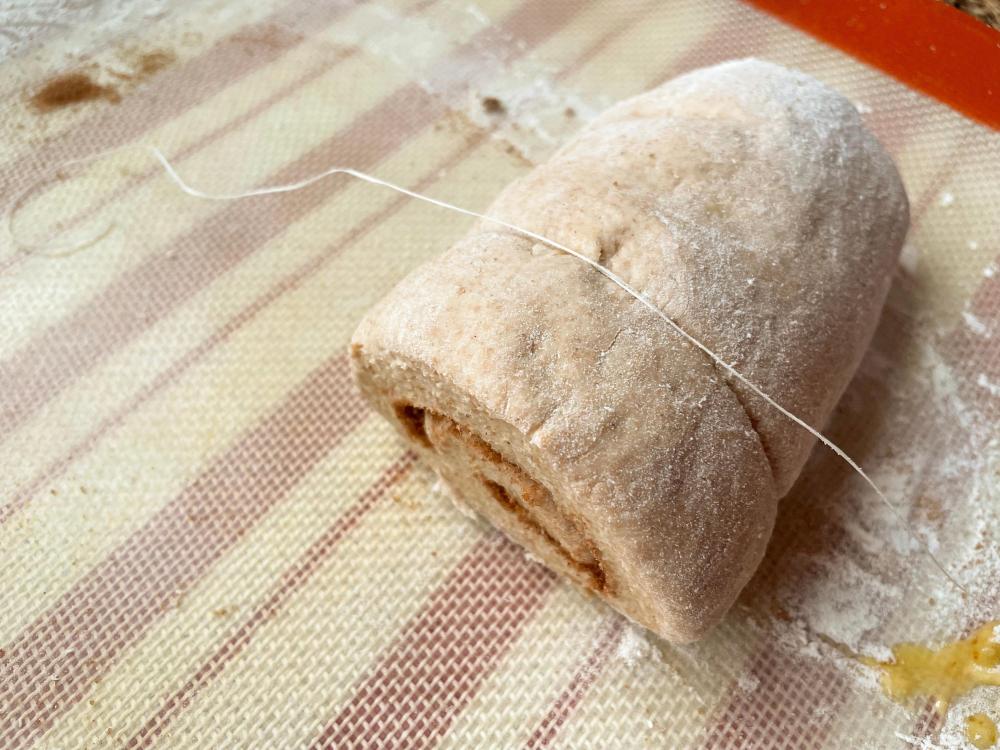
And on the same baking day, I made cinnamon rolls. This uses another favorite baking trick: I cut the rolled up dough with a length of waxed dental floss. It cuts it neatly and helps keep the shape nice after cutting: A little egg wash and proofing, and they went off to the oven. Mmmm. Editing to add, back on topic, that these were made with 70 or 80% Red Fife and the remainder soft white wheat.
-
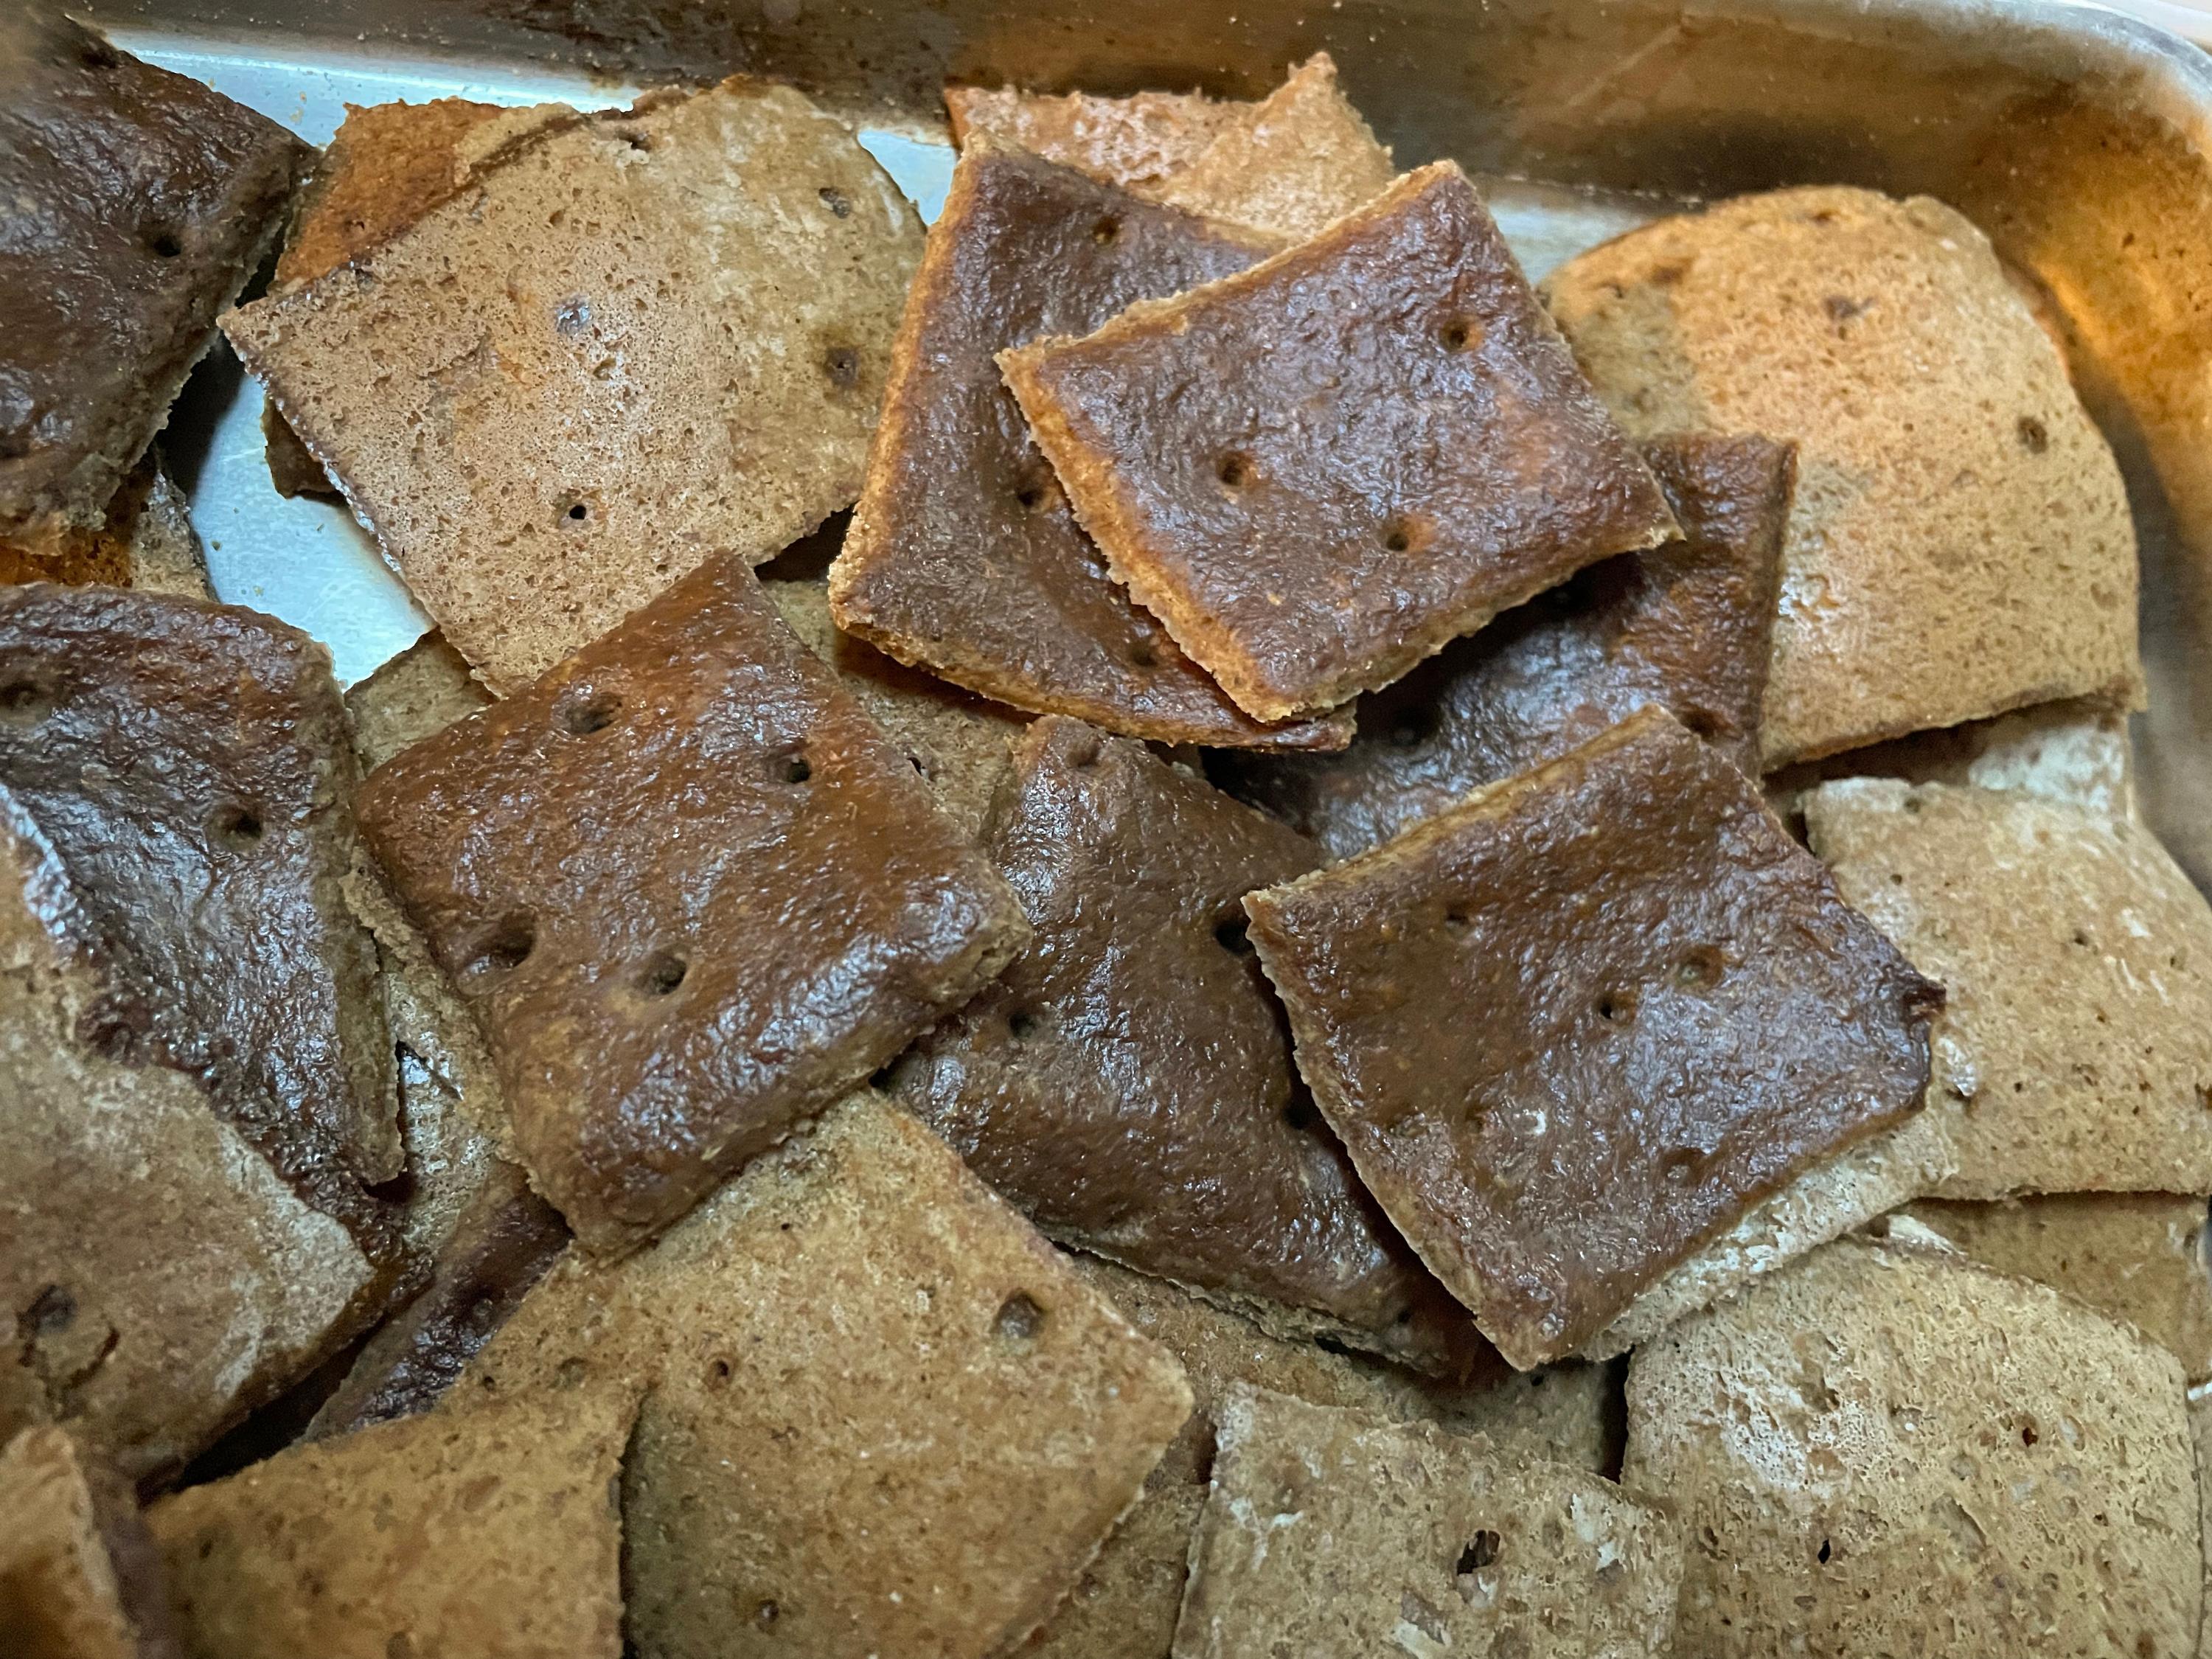
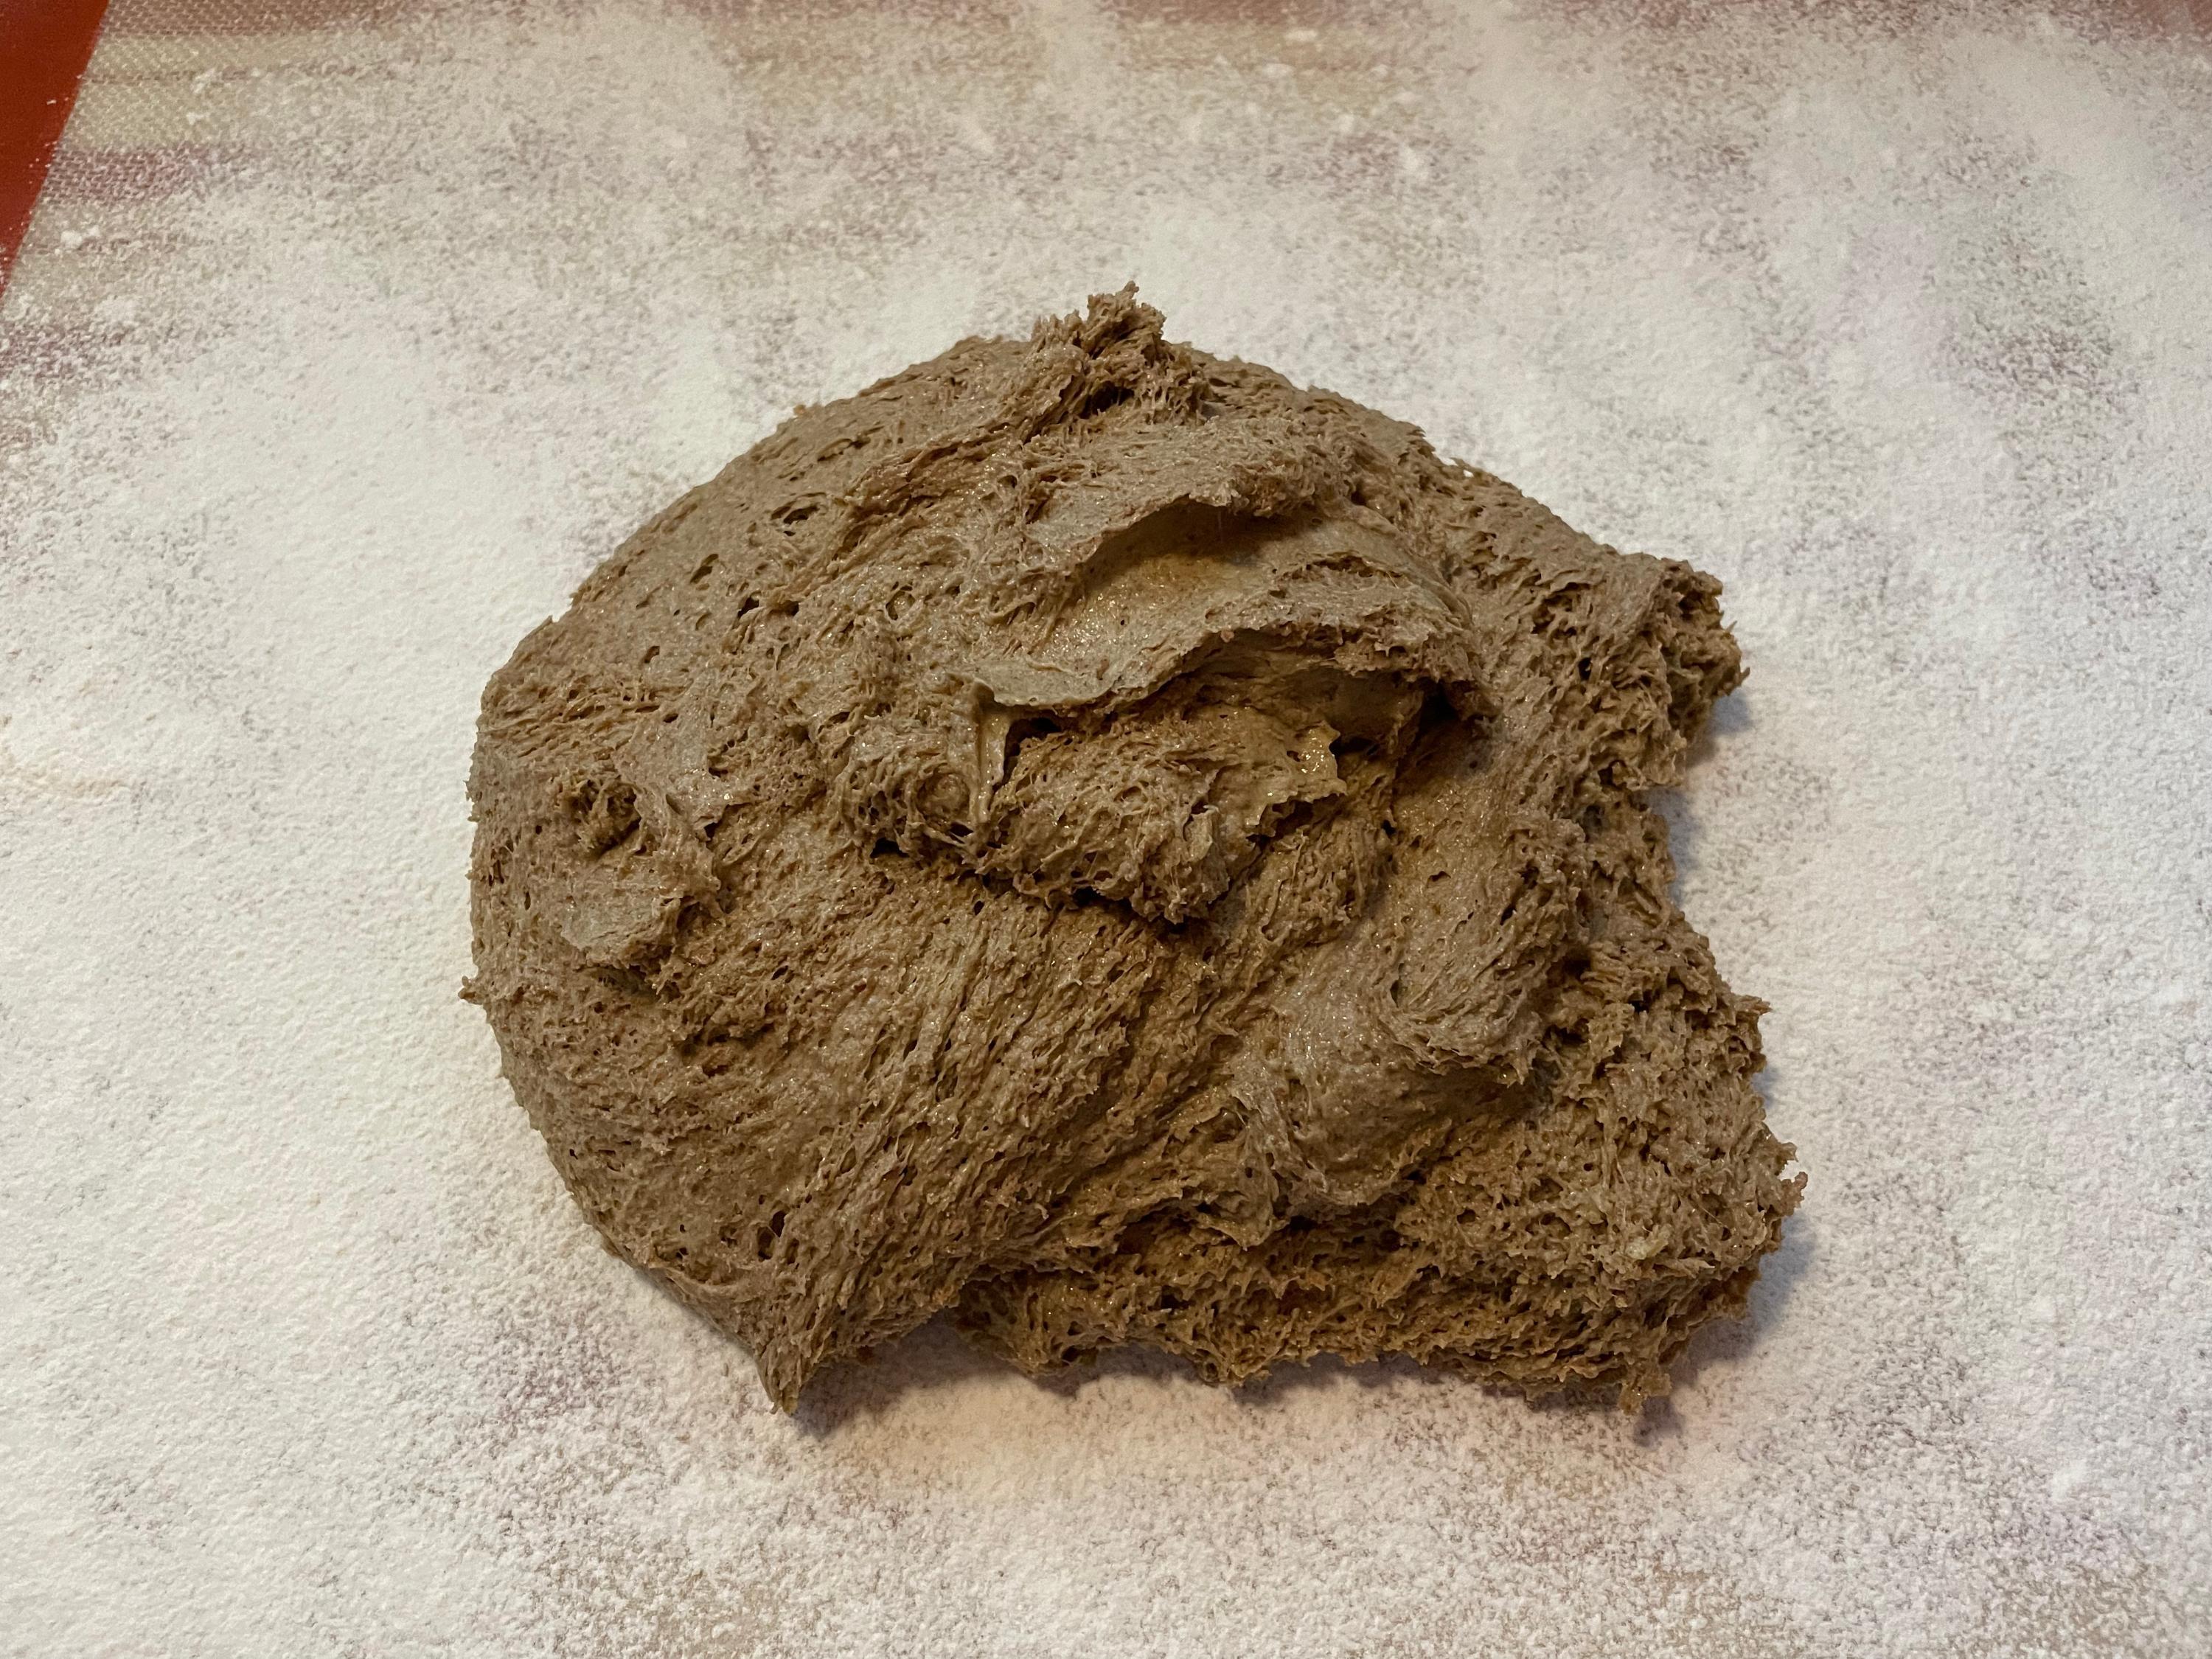
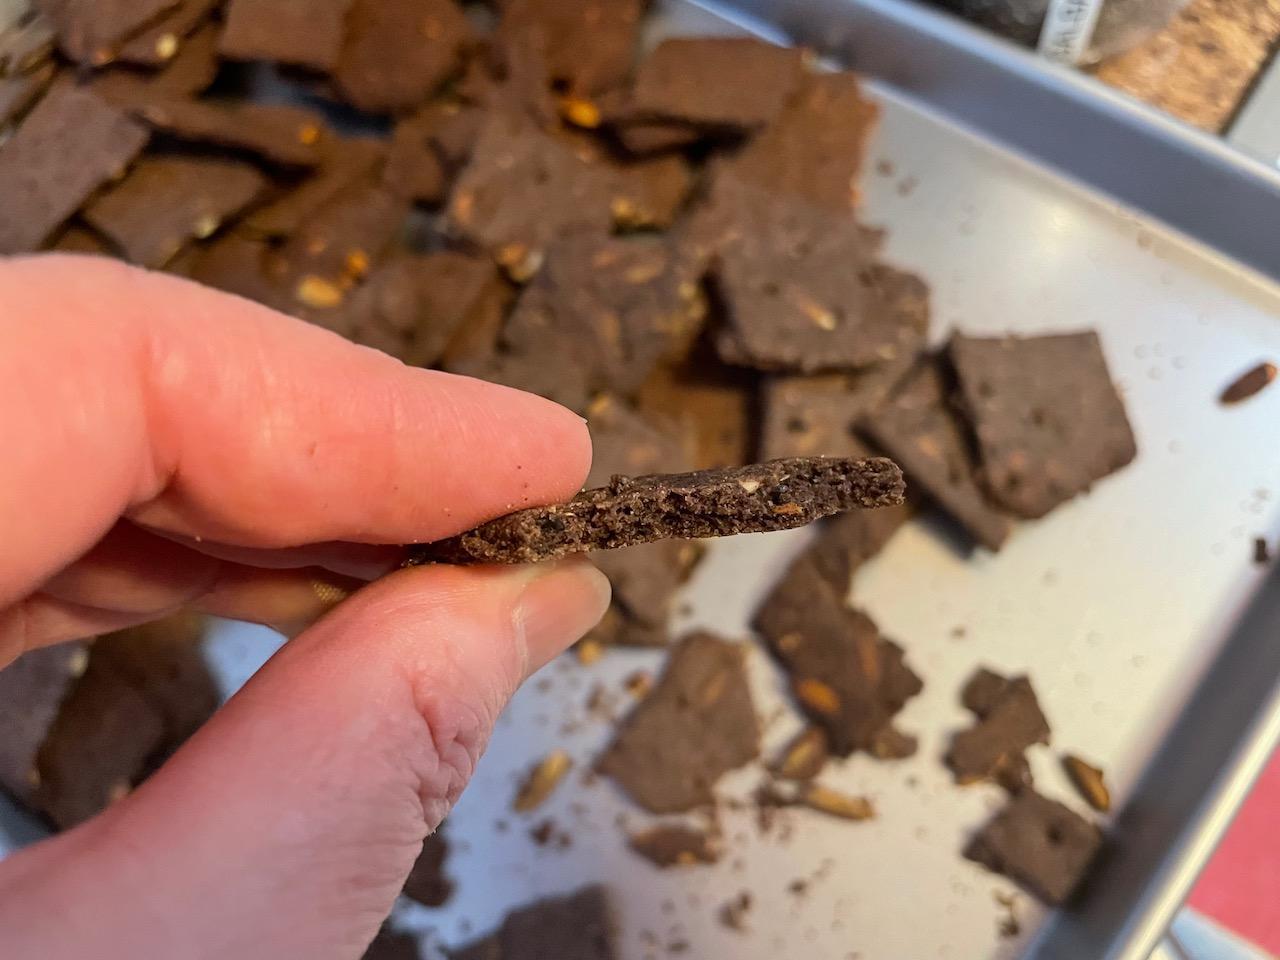
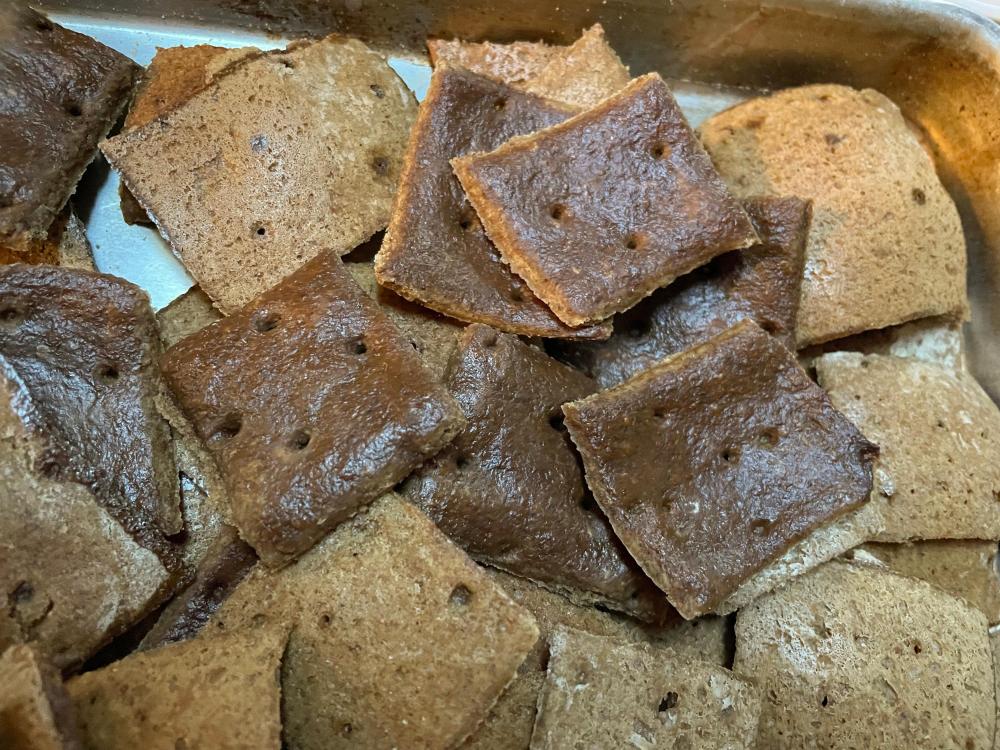
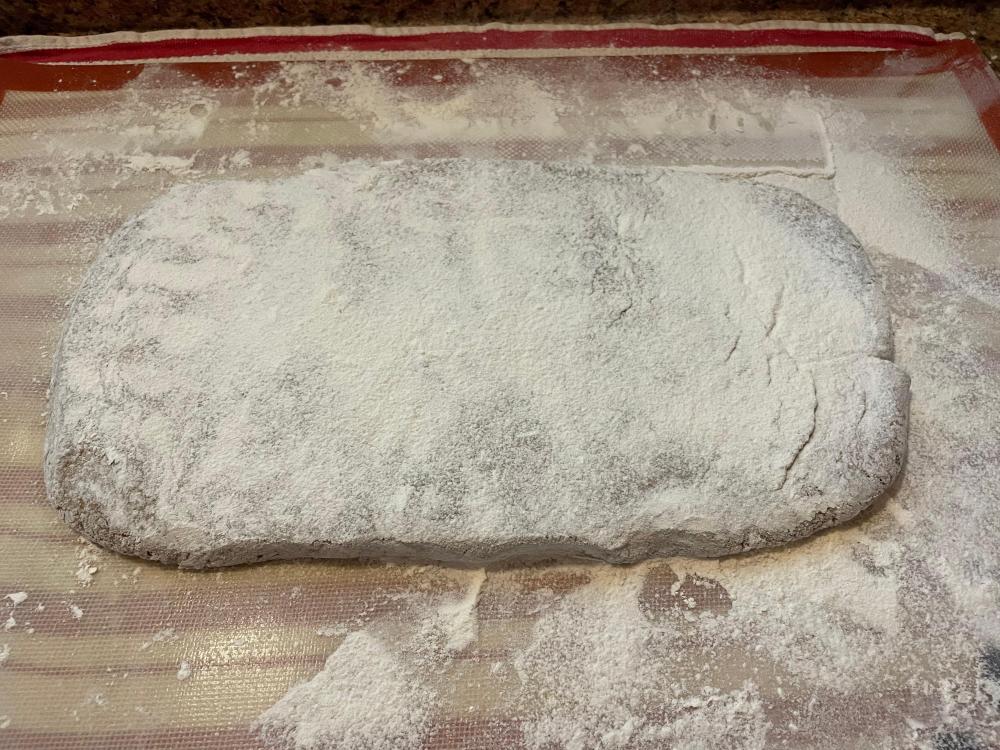
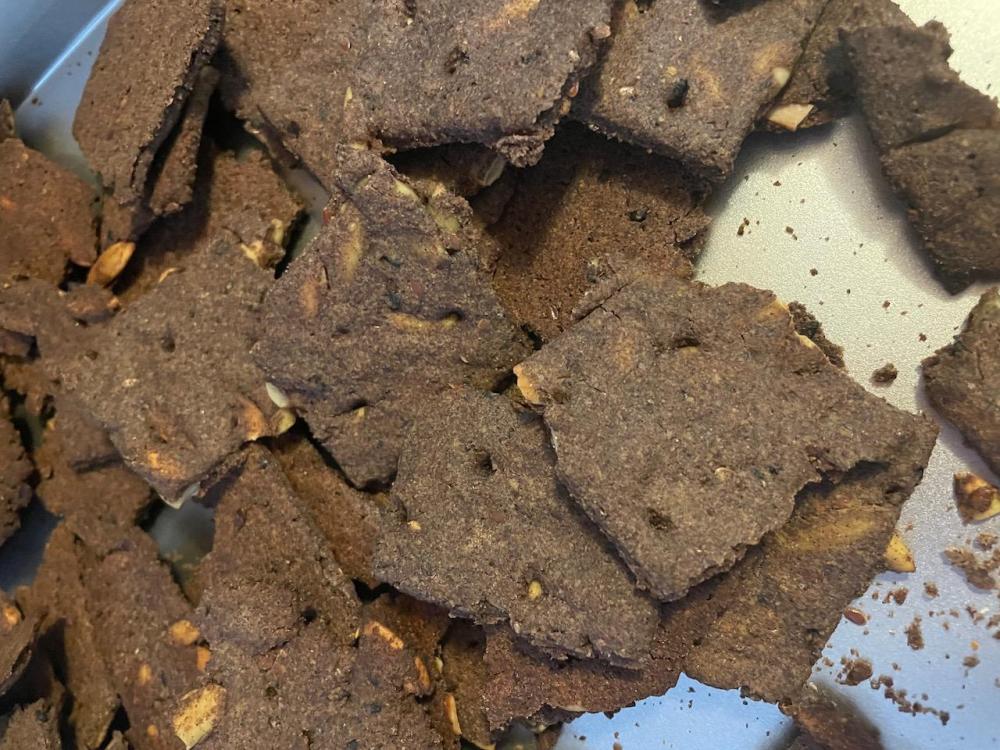
Made some Saltines this past weekend with part Kernza flour, and documented how I do the laminating step with flour (in contrast to butter layers in flaky pastry). The dough was very wet and soft because I was afraid the usual stiffer dough would tear with the Kernza giving more of a durum-like gluten character to the dough. And as I often do, I washed the top of the dough with food-grade lye to make them 'Pretzeltines', following proportions for the wash from Rose's Bread Bible Pretzel Breads (1 teaspoon food-grade sodium hydroxide pellets to 1 cup boiling water), wearing gloves while handling the bottle of lye and the lye wash, and using a mop-like brush to thoroughly wash the crackers before sprinkling with flaky salt. It gives a lovely pretzel flavor to the crackers and makes them just utterly irresistible. The very wet, soft dough after rising: Rolled out and one set of flouring/folding and rolling out again later: from the end showing the layers About 1/6th of the dough cut off the end of this and rolled, docked, cut, lye-washed before baking: and after baking, you can see the shiny hard finish the lye gives to the upper side of the crackers: And despite being made from a very soft dough without the strongest bread-type gluten, you can see that they're plenty light inside To make it all clearer, here's video of the laminating process Saltine Lamination Video


-
I heard back from the Perennial Pantry people, and they attribute it to genetic variation: "We've been looking into this ourselves, and with researchers at the U of MN. Different Kernza lots taste differently right now - it seems like genetics, location, crop year, and intercropped plants can have impacts. We've only experienced that unique flavor you're referencing in 2 lots of grain from southern MN, and haven't seen it again yet in the 2021 harvest." Now wondering if I should be saving and planting some of the little bit I just found left of that original batch!
-
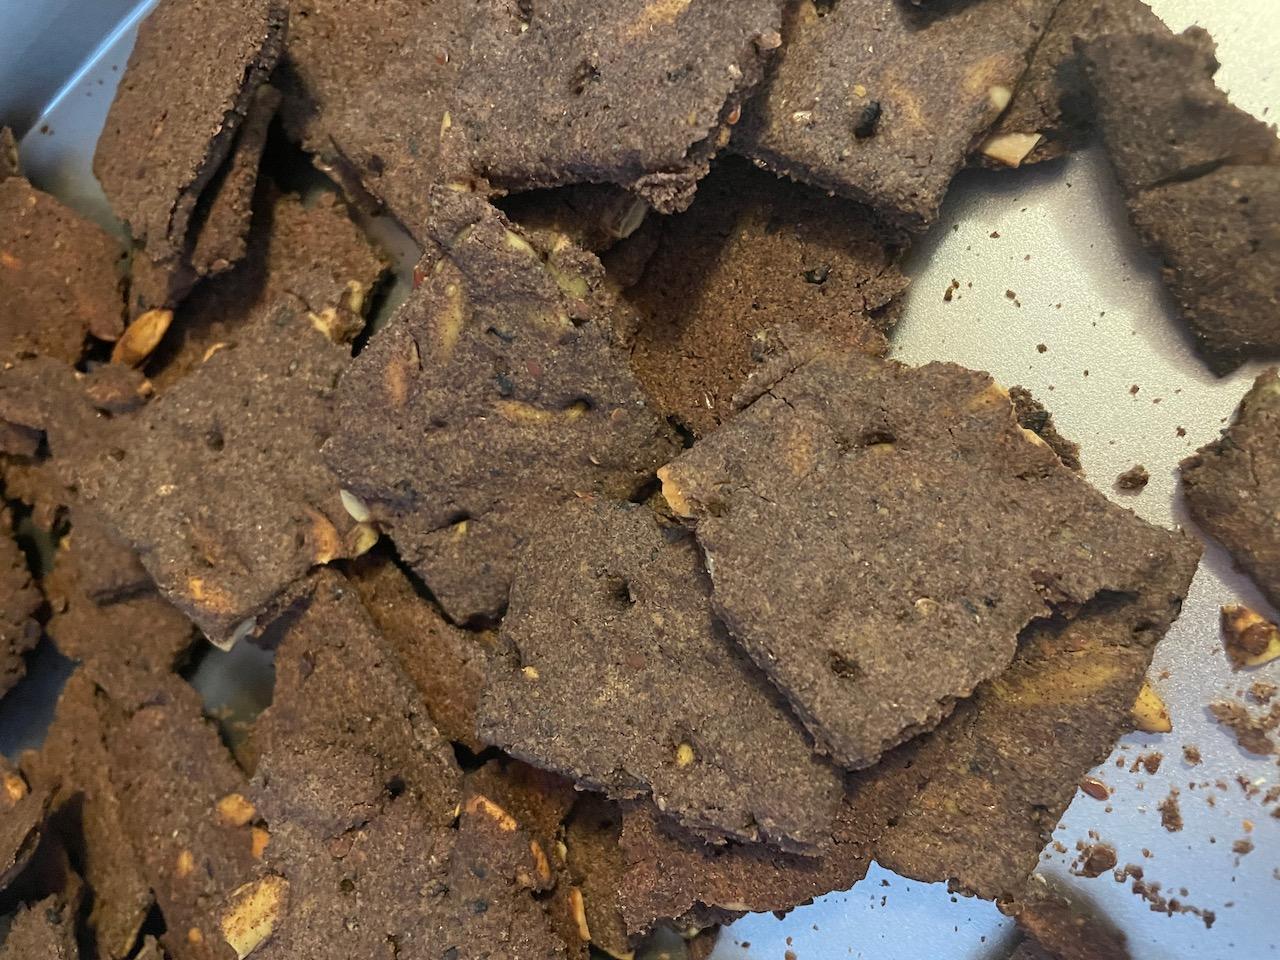
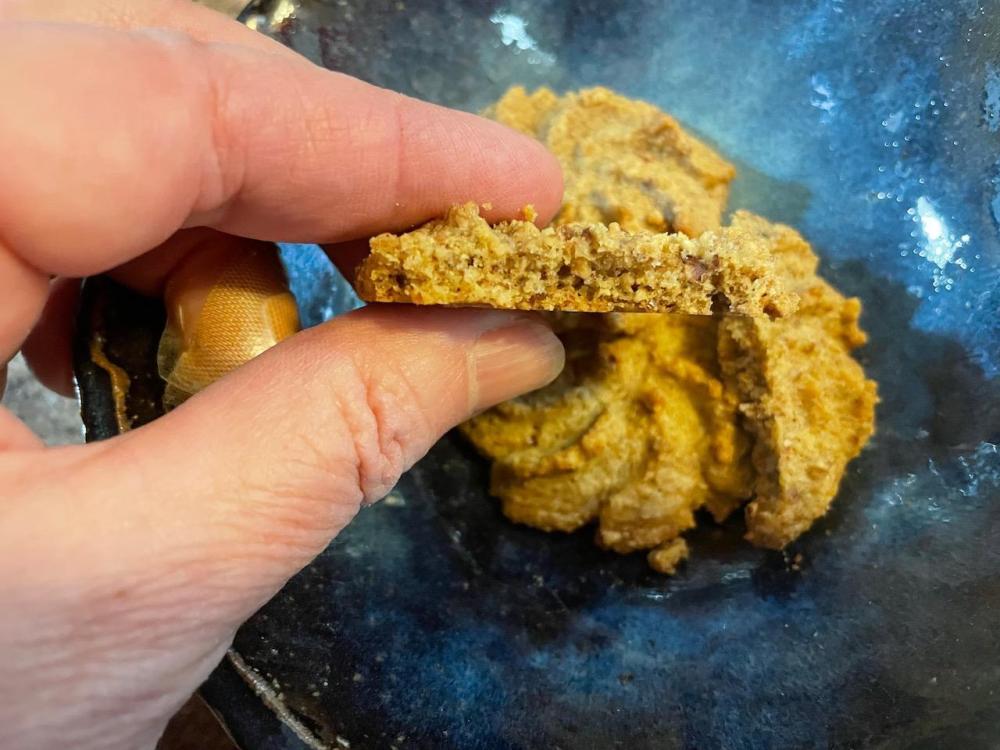
And before I forget, I also made the Tangy Aromatic Crackers from Flavor Flours again, which I mentioned upstream when someone asked about gluten-free crackers. I used Lundberg's Black Japonica rice for 100% of the rice flour in the original recipe, so these are very dark, almost black. I tried them once with brown basmatic rice instead, and it did make a difference in the flavor, so I have sought out the Black Japonica for these again and again. And I use some lemon juice in addition to the balsamic for more tang (this time I remembered the lemons!). And ammonium bicarbonate because I've been playing with it in things that I cook to adequate crispness. They're thick but light and crispy because no gluten and abundant fat plus seeds breaking things up

-
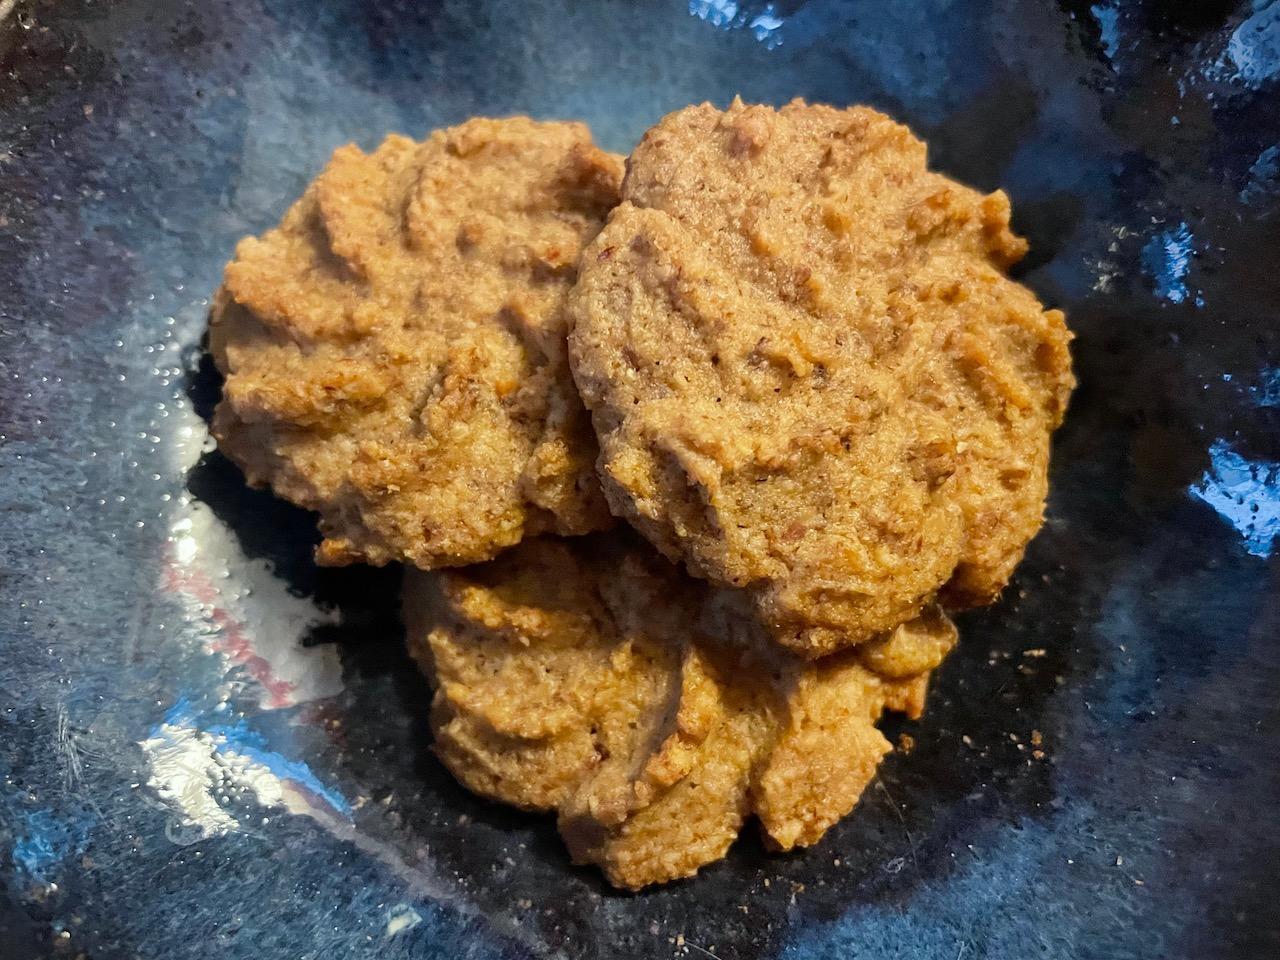
It's been a big baking weekend.... Last night I made what was going to be Rosemary walnut cookies, but there were no walnuts to be had at Trader Joe's, and I decided I should conserve what I have for the moment for a different use (walnut dip). So they are Almond Rosemary cookies, and I made them with corn flour and ground flaxseed to make them gluten-free because I hope to see my celiac buddy soon and wanted to have some of these available to share with him. And then I forgot the lemon, so that they're a little more nutty and a little less bright and citrus-rosemary-ish. Still quite tasty, and I'm very pleased with the corn/flax mix and finished texture. I based them on my Rosemary-walnut cookies but ended up with this: Rosemary-Almond Cookie Press Cookies with Corn Flour: Gluten free with corn flour and almonds 1 cup unsalted butter 2/3 cup light brown sugar 3 large eggs [Juice & zest of 1 small lemon (forgot)] (**1 teaspoon almond extract, if not using mahleb) If you mill the grain yourself*: 175 grams corn 2 teaspoon rosemary, dried 1 teaspoon fennel seeds 1 teaspoon mahleb** 350 grams of toasted almonds, finely ground If you don't have a nut grinder (grater), you can grind them in the food processor together with the rosemary and a couple of tablespoons of flour, which will help keep the pieces light and dry and not turning into walnut butter. They must be very fine to avoid clogging the cookie press, so you might need to sift the resulting meal to remove any larger bits. 50 grams flax, finely ground in spice mill 1 teaspoon ammonium bicarbonate 1 teaspoon salt Preheat the oven to 325 degrees F. Whisk together the almond meal, ammonium bicarb, salt, corn flour and ground flax (and spices, if not milled with the grain). Set aside. Cream the butter and sugar together until smooth and light. Beat in the eggs, and lemon juice & zest, and almond extract if not using mahleb. Stir in the flour/nut mixture and mix just until smooth. Fill the press and press onto silicone lined or ungreased baking sheets. Bake 325 degrees F for about 15 minutes, until the cookies are golden at the edges. *If you do not mill the corn yourself, you could substitute.... 175 grams corn flour, about 1 1/3 cups And add 2 teaspoons dried rosemary leaves 1 teaspoon of fennel seed 1 teaspoon of whole mahleb seed** To the flax before grinding it in the spice mill or use more or less volume per volume of ground spices.

-
I think I can hook you up with some.....I've got quite a bit still hanging about in the cookie jar, and you live in Los Angeles.
-
I forgot to report back that I did a second experiment with Lebkuchen in which I compared the standard preparation with a version where I did not mix and ferment flour and honey together. I prepped a batch with 500 grams of rye and 500 grams of honey, and at the same time I milled another 125 grams of rye that I vacuum-sealed and stored in the freezer. I pulled that out and mixed it with honey and then did my best to keep things as even as possible from that point, grinding the spices and mixing with leavening, and whisking liquids for both and then dividing for the two batches of flour/honey. I can't find the photos I took to compare them at the moment--there's been a switch of laptops, and when I find them I will post, but what I recall is that the fermented/aged dough was smoother when baked with a less cracked surface; it was slightly denser texture; and it has a subtle increased depth and richness of flavor. I brought a few slices for a taste test with my sister and my mother, and the fermented ones disappeared, and the non-fermented were leftover for me to finish on the drive back home. So the fermentation was really doing something, but I'm wondering now whether the practice of starting it months ahead was developed for the subtle improvement in flavor, because honey was harvested in the late summer or early fall, or....?
-
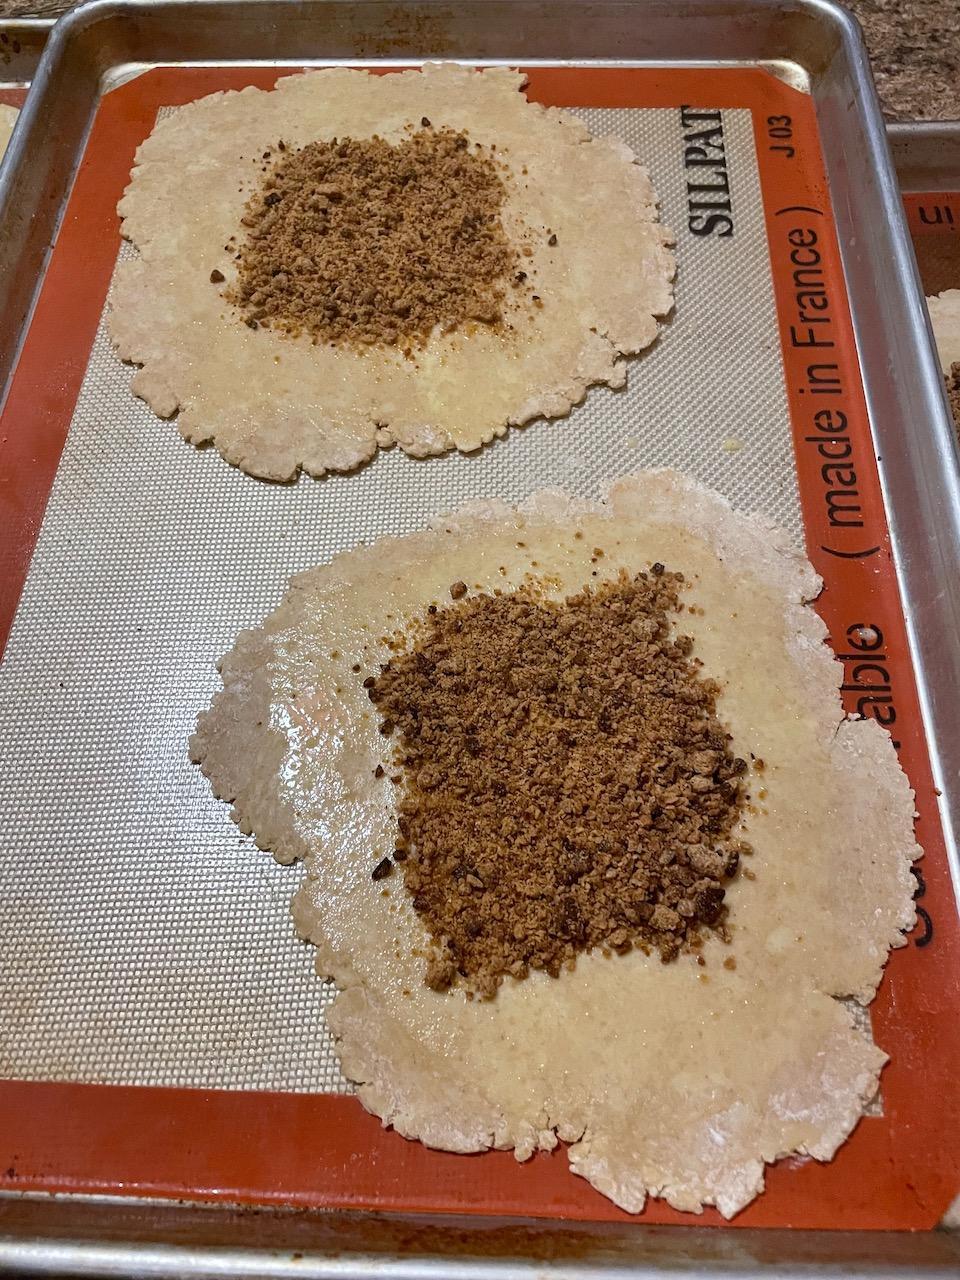
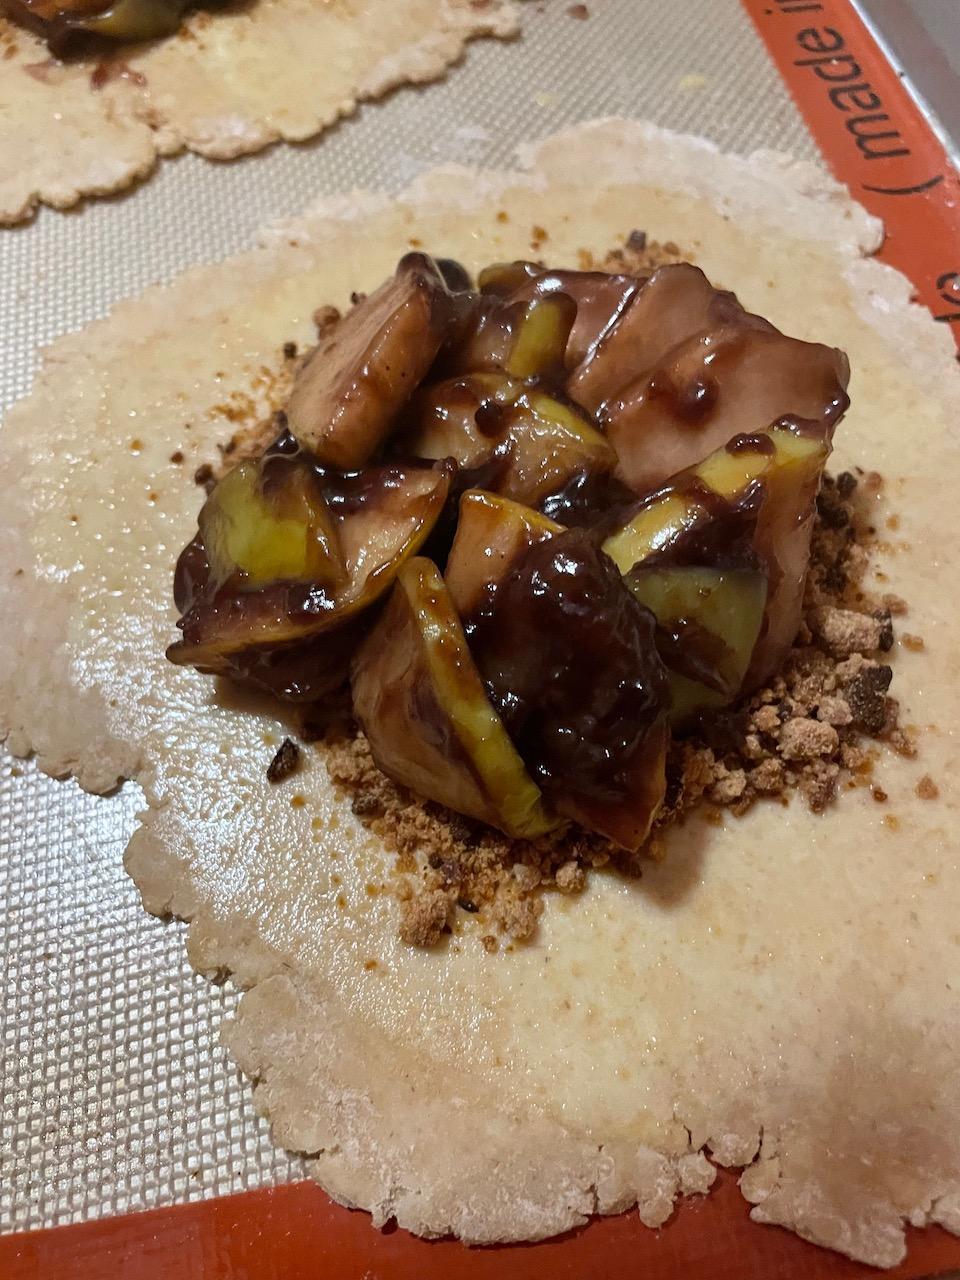
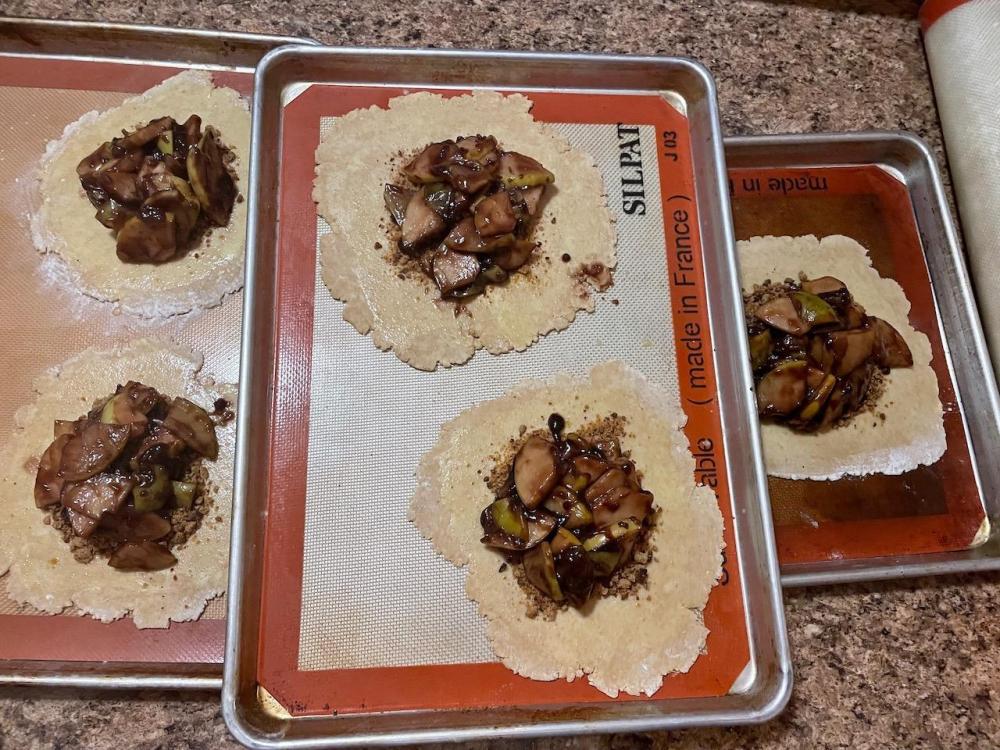
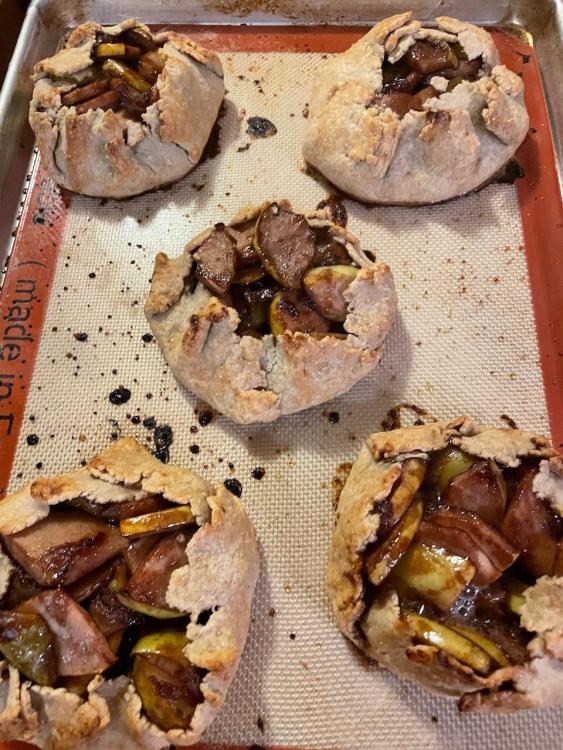
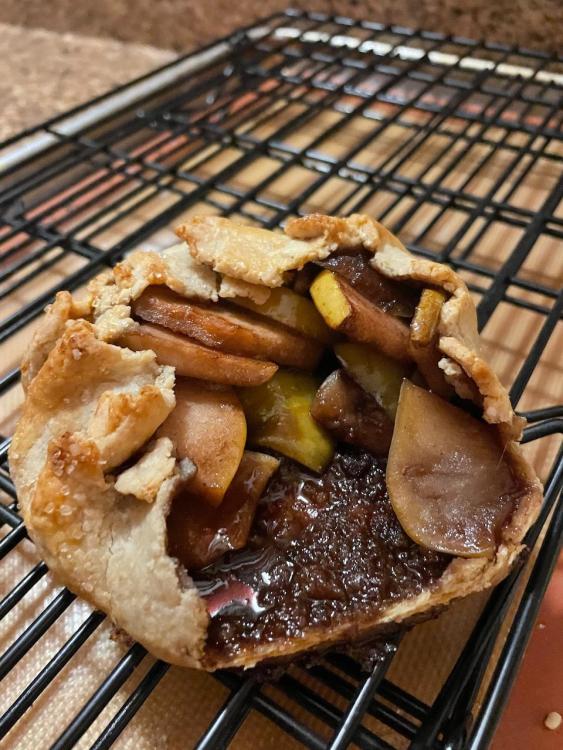
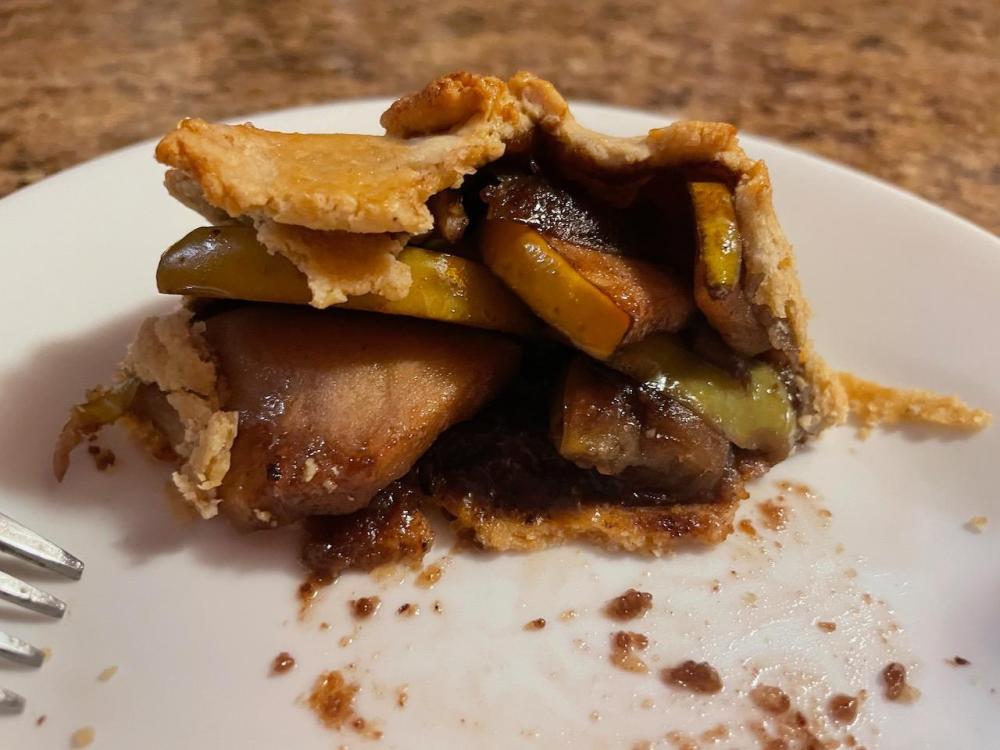
I repurposed some of the Lebkuchen I made (posted about them in another topic)--they're tasty, but a little goes a long way--as a crumb base to soak up the extra liquid in apple/pomegrante tarts this week. Whirled them in the food processor to make fine crumbs, then sprinkled them down before covering with the apple/pomegranate mixture. I spiced up the apples and pomegranate (cooked down pomegranate juice with a sprinkle of sugar and some agar) with ginger and cardamom and a tiny splash of rosewater to complement the seasonings in the Lebkuchen crumbs. Very fine. The pastry was made with fresh milled bulk soft white wheat with a bit of mahleb, and I used 50:50 vodka:water and 100% butter, and it came out very crumbly/flaky and delicious.


-
Sadness: I have to come back and report that the 50 pound bulk bag of Kernza perennial wheat that I recently bought is very different from the smaller bags that I purchased originally. The wheat in those first bags had and incredible scent and taste, as though ordinary wheat had been crossed with vanilla orchid. It's textural and mechanical baking qualities were otherwise not as easy to work with as other commercial and heritage wheats, although its nutritional and sustainability profiles were remarkably attractive in their own right. It was that magical flavor that got me most excited, and that magical flavor is absolutely missing from the bulk bag. It is still wheat that has great promise to help with climate change because it is a perennial and that is going to sequester tremendously more carbon in the soil than conventional annual grain crops, but it is not the recipe magic found in those smaller bags. So now I'm left wondering what happened. I know that one or two of the reviews I read originally mentioned that it is still a highly variable crop, and that they do expect variability in flavor and baking properties because of not-yet-fixed genetics, and there were even allusions to more than usual impact of soil conditions on flavor from one field to another. So is that incredibly flavorful version lurking in the genetics with a potential to become the standard if it is bred for that? Was it something about the soil of a specific crop that was packaged in the smaller bags? Or did the grain in that first crop spend a lot of time mixed with wildflowers while between field and cleaning, like a hay from a mixed wildflower meadow being cut and stacked and dried as one for days or weeks, and only threshed and cleaned for packing after having been thoroughly scented? Here I'm thinking of the tradition of scenting tea with jasmine flowers, where are you traditionally layer tea leaves with jasmine flowers in a box for a day or two, remove the jasmine flowers and then add more, repeating the process seven or more times for the top grade of jasmine tea. I'm going to give these folks the benefit of the doubt and not assume that they deliberately sprayed the wheat with some perfumed extracts before it was packaged...but my runaway enthusiasm has tempered a bit. Meanwhile, I've gotten some lovely results with yeast breads by using plenty of fats for tenderizing, and making dough that is more batter-like in being very very wet, and baking it in muffin tins, not quick breads with chemical leavening, but also not standalone loaves.
-
Closest yet to brownies without being brownies, AND gluten-free!: Fudgies based on a recipe from Alice Medrich's Bittersweet....but messed with considerably to be whole grain, gluten-free, and lower sugar because that's how I roll... 8 oz 70% sharffenberger chocolate 3 tablespoons butter 3 eggs 1/2 cup sugar 40 grams teff ground into finest possible flour 5 grams ground flaxseed 2 inches vanilla (about 2 teaspoons vanilla extract) 1/4 teaspoon mahleb (or 1/2 teaspoon almond extract) 1 tablespoon buttermilk powder 1/4 teaspoon baking powder 1/8 teaspoon salt 2 cups toasted pecans 100 grams dried sour cherries Melted the chocolate and butter in the microwave, slowly/low power with stirring, to avoid hot spots/scorching. Milled the teff separate from the spices and flax because it would have gummed up the mill; ground the flax, mahleb and vanilla bean in the small spice grinder aka coffee grinder (never used for coffee beans); and whisked these together with the baking powder, salt, and buttermilk powder. Whirled the nuts and cherries briefly with the flour. Beat the sugar and then the eggs into the chocolate/butter mixture. Stir in the flour/nuts/cherries mixture. Let sit 30 minutes at least to thicken briefly. Slightly rounded tablespoons dropped onto silpat lined pans (little spread), oven preheated with convection & baking steels in place, 350 degrees at 12 minutes. Must be cautious re: scorching of bottoms in these chocolate-rich cookies.
-
Thanks for your reply. Turns out the back said, 'no drive', so I'll get to Hollywood FM tomorrow. Still would love to know about anyone's favorite produce gems.
-
I’ve been living in LA for over a decade, end it just occurred to me today that I do not have a go-to brick and mortar store that carries a really wide variety of high-quality and unusual produce reliably. I know places to get specialty produce for cooking specific cuisines (99 Ranch for most Asian cuisines, Koreatown market for Korean produce, Jon’s and local hispanic markets for less common Mexican herbs, SuperKing Market in Glendale has lots of Middle Eastern specialties, etc). The Hollywood Farmers Market is excellent, but for various reasons I can’t always get there: I am trying to decide if my back will tolerate a drive to visit family in the SF Bay Area for the weekend, which would keep me away from the market for another week….but could facilitate a trip to Monterey Market or the Berkeley Bowl. Is there anything like Berkeley’s Monterey Market in Los Angeles, a hidden gem with the best versions of produce of every origin, that I have just missed?
-
And back to baking: I had more adventures with Kernza perennial wheat 2 weeks ago: I made some yeasted rolls, unyeasted flatbreads, and sugar cookies. For the breads, I wanted to use 100% Kernza flour to see what it could do, and I made very plain doughs. Because it looks so much like durum, and all the notes I found on it suggest it's gluten is high in concentration but more like durum in being too tough for the usual yeasted bread, and thought it might do well in something more like chapati, which are made with a durum flour. I used about Kernza, milled fine, a teaspoon of salt, and water to make a soft dough; let it rest overnight; and rolled out small balls of dough very thin and baked on silpat-lined trays. The dough kept that Kernza scent and flavor, and the flatbreads are quite tasty whether dipped in hummus, or in honey-butter, as here. I made the yeasted dough very wet and soft, more like a stiff batter, and prepared little rolls in a muffin tray. These were made with a bit of old sourdough starter and some instant yeast, and again, the kernza scent and flavor comes through quite pleasingly along with a fine hearty taste. When warmed up, they've got a very pleasant texture with plenty of air to absorb soup, bean broth, or as here, more honey-butter. I started with 250 grams Kernza 3 tablespoons sourdough started that had been refrgerated and not recently refreshed 1/2 teaspoon salt 1/4-1/2 teaspoon instant yeast and water (I didn't keep track of the exact quantity, there were spills involved, but it was probably close to 100% hydration). I mixed the dough in the Cusinart, let it rise for several hours, refrigerated it overnight because it was getting too late to bake, let it warm up the next day, punched it down a bit, and then dropped balls of the batter into the ungreased muffin trays. I let it rise an hour or two, and baked about 20 minutes at 350 in my convection oven. I also prepared a very soft plain butter cookie, in which I cut the Kernza with some rice to give a more delicate and crunchy crumb. I made the dough into icebox cookies--shaping the very soft dough into rolls was not easy!--and sliced and baked. I milled together 225 grams kernza 75 grams short brown rice strained/whisked in 1/2 teaspoon soda 1/4 teaspoon salt 1/4 cup buttermilk powder 1/2 cup brown sugar beat in until loose crumbles 3/8 cup (3/4 stick) unsalted butter and then beat in about 1 cup water Shaped into logs, chilled, sliced thin, baked. I shared some of these cookies at work and they were popular.
-
Digression for cooked whole Kernza: Had a breakfast of Kernza perennial wheat cooked as....not quite porridge, but cooked for breakfast. It was a trial to see how it is best managed, and there was so much adjustment that my notes are no longer as precise as I'd like them to be. For example, I was planning to weigh the water used before and after cooking it with an excess of water just to keep track of how much water was absorbed, but I not only forgot to measure it at the beginning, I ate some of the grain at early on and decided it was not done enough and returned the rest to the pot to keep going. So....I can tell you what I did, but I would not follow this as guidance on porridge or pilaf prep! But: my nose was filled with the lovely sweet fragrance, although eating it plain without even a dollop of honey, cream, or fruit meant that scent was not backed up with much sweet taste. It is nutty, fragrant, and it cooked up rather unevenly as I did this batch. I'm not sure how much of the unevenness is because it is not very genetically standardized yet, or my cooking. Still, it seems like it will be just lovely in soups and pilafs when I have figured it out better than this. What I did: Because I did not know how much water it might need, I did not try rice cooker or pressure cooker. I started with 50 grams of Kernza. I heated a small saucepan, added a teaspoon of butter, let it melt, and added the Kernza. I stirred it until there was a lot of popping sound (and indeed, a few kernels flew out when they popped), and it smelled toasty. Then I added 400-500 mL of water and brought it to a boil. I cut the heat to a gentle simmer and turned off after 5 minutes, let sit 5 minutes, and tested. The tested kernels were soft so I drained it (saved the water, fortunately), and started in but it was overall still quite chewy. I put it back on, back to boil, to low heat, simmered 10 more minutes, and noted a lot of kernels had opened up; I let sit 5 minutes and tested again. It was quite edible but about half were still quite small/narrow and a bit too crunchy. This time, at least, I had not drained it all. 10 more minutes to simmer, and then I turned off the heat and let it sit on the stove overnight. This morning I drained it, warmed in the microwave, and ate it. Obviously not the optimum prep, but it's a start. I think this represented the drained after 5 minutes' simmer version: And this was as I ate it utterly plain this morning:
-
And just in case someone is looking for an update about cooking the kernza for breakfast: I let it go dry during cooking in the microwave and clearly need to work on my technique, little bit by little bit. Next time, stovetop for easier monitoring.
-
I milled and baked with Kernza perennial wheat for the first time last night. I was absolutely thrilled to discover the fabulous scent carries through in the milled flour and the baked product--cookies, naturally, for the first go-round. And the flour is a remarkably rich shade of yellow, like semolina or even a bit brighter. I was not thinking fast enough to include something in these photos to correct the white balance, but still the color difference vs some soft white wheat flour should be pretty obvious with the two flours side by side: I made a simple shortbread cookie, without any seasoning or spices or seeds or nuts or fruits or anything: just flour, butter, buttermilk, brown sugar, salt and leavening. The cookies smell and taste like the flour did: vanilla, almond extract, floral, and a bit of cinnamon and cloves. The shortbreads came out rather dense and hard, because I wanted to stick as closely as possible to the Kernza flour alone and avoid diluting the flavor with other grains, so I did not mix in oat and rice for softness & crumbliness as I would have otherwise. But their flavor is marvelous! I can't wait to try the Kernza just cooked up as breakfast porridge (will be soaking them overnight for a treat tomorrow morning); and as some kind of flatbread that won't depend so much on having the usual bread-flour type/proportion of glutens. Because it's still quite remarkably pricey (about $10/lb), it's not yet going to replace my other staples just yet....but I am going to keep playing with it to learn about it's culinary qualities, and figure out some places to use it to best effect for sharing.....for those potlucks we're going to have again someday post-COVID. It gives me hope for the future of perennial grains.
-
I am staring at almost 2 kg of Kernza branded perennial wheat https://landinstitute.org/our-work/perennial-crops/kernza/ and trying to figure out what to do with this preciou$ $tuff ($$$ but this is my kind of shopping therapy) to really figure out what it can do. I am thrilled to try a perennial wheat crop, so much potential (carbon capture! low/no till! so many benefits!), although these little tiny kernels do make me a bit wary. It's so small, and clearly has a much smaller surface to volume ratio than durum, spelt, emmer, einkorn, hard red or soft white wheats. Here's the Kernza, including one cut in half for a view of the endosperm: And here is durum wheat, not to same scale: Hard Red Fife Wheat, ditto And plump soft white wheat, ditto I went a bit crazy today and shot all the grains I had in the pantry at present...usually there's millet too but must have run out. I made a flickr album with very up-close macros of all of them. It's baking qualities will likely be quite distinctive: (*) And this Civil Eats article describes some things to watch out for, but it's hard to know if the wheat I've got is the same as was being discussed in 2015: Metallic taste would be unpleasant, but I've been playing a lot with gluten-free baking because of a friend's Celiac diagnosis, so this is not necessarily a major problem for cookies, cakes, pancakes, muffins, scones, crackers, and flatbreads, because flax and chia do wonders to stick stuff together....and certainly not an issue for soups. And this stuff has such an intoxicating sweet and spicy scent when I opened the package that I could hardly believe it until I had decanted the packages into a glass jar and left them overnight--and the scent is still there. I don't have 40 lbs to play with, but I've got mills and lots of practice mixing and matching grains to recipes. I'm thinking first a plain crisp flatbread or cracker (flour/water/bit of butter or oil/salt/ammonium carbonate (to keep them from being like rocks)); a simple cookie or scone without a lot of fruit, nuts, spices; something like zuppa di farro to enjoy it cooked whole.....and making each of these in small quantities, in parallel with 1-2 other wheats to compare. *Version of Record: https://www.sciencedirect.com/science/article/pii/S0733521018303771 Manuscript_d9bd1455f820fb61bf71577f53554980 Chemical characterization, functionality, and baking quality of intermediate wheatgrass (Thinopyrum intermedium) 1121 Citra P. Rahardjo , Chathurada S. Gajadeera , Senay Simsek , George Annor , 1 1,3,* 1,* Tonya Schoenfuss , Alessandra Marti , Baraem P. Ismail 1 2 3 Department of Food, Environmental and Nutritional Sciences, Università degli Studi di Milano, Milan, Italy *A. Marti: Department of Food, Environmental and Nutritional Sciences, Università degli Studi di Milano, Via G. Celoria 2, 20133 Milan, Italy; email: alessandra.marti@unimi.it *B. P. Ismail: Department of Food Science and Nutrition, University of Minnesota, 1334 Eckles Avenue, Saint Paul, MN 55108, U.S.A; email: bismailm@umn.edu Department of Food Science and Nutrition, University of Minnesota, Saint Paul, MN, U.S.A Department of Plant Sciences, North Dakota State University, Fargo, ND, U.S.A Keywords: perennial crop; Thinopyrum intermedium; chemical and functional characterization; baking quality 1 © 2018 published by Elsevier. This manuscript is made available under the Elsevier user license https://www.elsevier.com/open-access/userlicense/1.0/
-
Not the Diana Kennedy, but rather Oaxaca by the Guelaguetza restaurant family, Bricia Lopez and Javier Cabral.
-
I asked elsewhere and got the same answer: beware the grit with volcanic rock versions. And since I can’t touch it first while buying online, granite Seemed safest.
-
Did it! Got a granite molcajete. Shipping by Amazon. And a “good” used copy of Oaxaca.
-
Very helpful, thanks!