

Trufflenaut
-
Posts
36 -
Joined
-
Last visited
Content Type
Profiles
Forums
Store
Help Articles
Everything posted by Trufflenaut
-
The styrofoam block idea might work, though it would have to be a fairly large block and/or clamped down to the table, or else it would topple over too easily
-
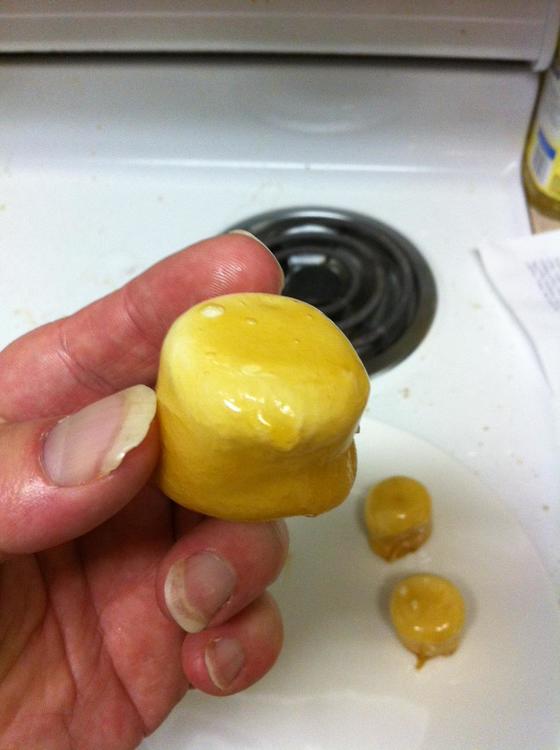
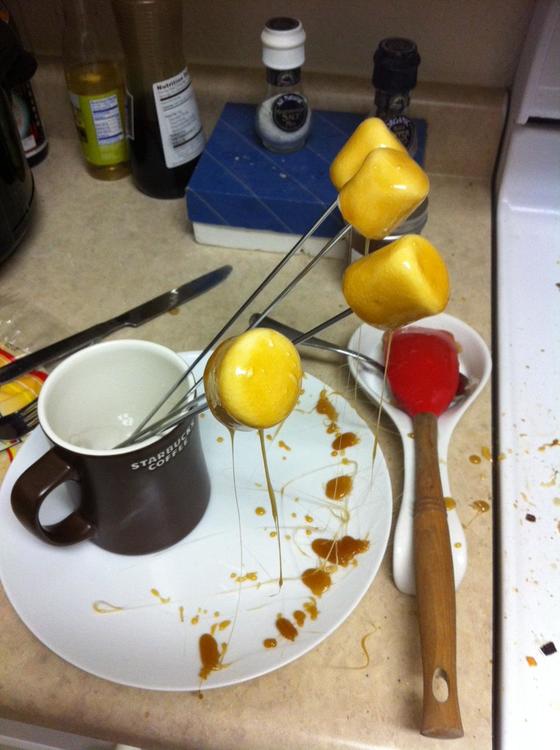
Here's a fun little recipe I put together - it's a bit casual and unrefined, so I won't be at all offended if any experts jump in with improvements, but it's pretty easy to make, and makes a really tasty treat Toffee covered Marshmallows: 1 lb. bag large marshmallows (large homemade marshmallows should also work - feel free to give it a try) 1 1/2 cups sugar 1/4 cup light corn syrup 1/2 stick butter (or 1/8 lb., for non-US people who wonder what the heck a stick of butter is) A splash of water (yay for exact measurements! ) Also needed: 4 or 5 skewers (preferably metal), and a reasonably heavy coffee mug 1. Remove the marshmallows from the bag, separate them, and put them in a plastic bag or other suitable container in the freezer. It's OK if they are touching in the bag, but make sure they're not squished together. 2. After a few hours, add the rest of the ingredients to a saucepan (use just enough water to wet the sugar so it doesn't burn as easily) and cook on medium heat, stirring occasionally. 3. Cook the mixture until it just starts to turn brown - if you have a candy thermometer, this will be around 290F/143.333C. If you don't have a candy thermometer, just occasionally put a drop of the mixture on a white plate to check the color (then put "candy thermometer" on your shopping list, because candy thermometers are awesome) 4. Once it starts to just barely (but definitely) start to turn brown, take the pan off the heat, turn the stove burner down to very low heat, and put the pan back on (you want just enough heat to keep the mixture from cooling too much, but not so much heat that it continues cooking) - this is the toffee that you will dip the marshmallows into 5. Take the bag of marshmallows out of the freezer, stick a marshmallow on the end of a skewer, and dip it into the toffee. You must dip it quickly, so that the marshmallow doesn't melt, and also try to avoid dipping it in far enough that the toffee gets on the skewer (toffee on the skewer makes it really hard to remove the marshmallow cleanly) 6. Find someplace to stick the skewer while the toffee cools (this only takes a minute or so, but the toffee will stick to anything it touches until then, and it will probably drip until it cools). My recommendation is to put the aforementioned coffee mug on a plate (to catch drips), and place the end of the skewer in the coffee mug (see photo below) to hold it. 7. Once you've dipped the fourth or fifth marshmallow, the toffee on the first one you've dipped should be hard, and you can use a fork to ease it off the skewer so you can dip another marshmallow 8. Continue dipping marshmallows until you run out of marshmallows or toffee, or get tired of trying to keep them from sticking to each other in the coffee mug. Notes: -The heat from the toffee mixture slightly cooks the marshmallow, so you'll end up with a slight campfire-marshmallow flavor once you get through the thin candy shell - it's really quite tasty! -The toffee should drip off in long thin drips like in the photo (these easily snap off once the toffee cools. If you are instead getting thick oozing drips that make it look like the marshmallow is trying out for the part of "elephant" in the school play, you are dipping the marshmallows in the toffee for too long and they're melting - dip quicker -keep the marshmallows at least one inch apart in the coffee mug - if they make the slightest contact with each other, they'll stick permanently (and they make this really cool marshmallow-toffee bridge when you try to pull them apart). This will happen at least once in the process - just consider them samples for quality-control purposes -For those who are afraid of boiled sugar recipes, try this one out - just take your time and be very careful not to drip any toffee on yourself, and you should do fine. Feel free to message me if you have any concerns - I'm happy to help people get into candymaking -The toffee shell is quite happy to suck up any humidity in the air, so once they're made, they need to be eaten within a few hours or they start getting sticky on the outside - this is either a good point or a bad point Enjoy!
-
That's helpful info. Thanks!
-
Is that "a number of days" *after* the rehydrating/finishing, or *before*?
-
OK, the book I have mentioned a "finishing syrup" of that composition prior to polishing, but it mentioned making sure the candies were fully crystallized first, and it was unclear whether that meant to make sure they were crystallized before adding the finishing syrup, or after the finishing syrup is applied but before polishing. Am I correct in assuming you add the syrup to the candies in the pan just like the rest of the panning process, then let them tumble til dry?
-
Yeah, the blueberries are soft-panned (and left in cool dry spot overnight to fully crystallize) What do you mean by rehydration? I tried a couple of things just to test: -flakes of wax in the pan, heating the outside of the pan: hair dryer didn't heat it enough, heat gun got them to start sticking to the side of the pan, but I think since the pans I am using are very thin gauge steel, there's not enough thermal mass for it to retain any heat, so they just barely heat enough to stick, then cool down again as the pan rotates - adding a handful of blueberries to see what happens just knocked the wax off the pan in hardened flakes -melted wax poured in the pan, heat gun to keep it warm: the wax cooled too quickly and was instantly knocked off by the blueberries once I added them -blueberries in the pan, melted wax poured on top (just to see what happens): it almost sorta worked, but got major clumps, and too thick of a coating on the blueberries, which I imagine wouldn't thin out on its own. I'm thinking I'll have to get some beeswax to mix the carnauba with to soften it. Ideally, how does the wax get applied? Is it supposed to create a complete coat as the centers tumble across it, or is just a little bit of wax picked up at a time, eventually creating a complete layer?
-
Thanks! I do a decent bit of cooking - but generally just food to stuff in my face - nothing too exciting, but every year I do a multi-course feast for family and friends on New Year's Eve, where I try out a bunch of recipes that are usually too involved, difficult, or expensive for day to day cooking. I'm generally most interested in learning how to do things I haven't done before, to get a little bit of knowledge about everything - such as how to smoke meats, how to make lollipops, how to make bread, how to infuse sugars, etc. I want to know stuff like *why* this technique creates more flavor than that one, or changes the texture of this ingredient, or makes this neat trick possible - I find that the more I learn about new things, the better I understand the things I already know, and it leads to more interesting, creative, and fun foods.
-
Thanks for the info! 1. Will concentrated liquid colors be sufficient to get good color (the amounts I use for coloring lollipops seem to be WAY too dim for sugar panning)? If so, do I just dump a whole lot into the syrup? Or is powdered coloring generally needed? 2. By "dry" I'm assuming you mean unmelted? I have a batch of candy-coated dehydrated blueberries I want to wax-coat (for a friend's birthday tonight), but I only have carnauba flakes, no beeswax - based on what you're saying, I'm thinking of tossing some wax flakes into the pan, and heating them (should I use a hair dryer or a heat gun?), then putting the blueberries in - any advice on what to look for when the wax is ready? Would any reheating be needed during the panning?
-
In case anyone is interested, I made my own panner similar to this one, and it seems to be working fine (it's a great machine for learning how to pan and for small scale stuff, but if you are doing panning of any significant quantity, I would recommend a commercial unit). If anyone wants to make their own (they cost between $100 and $200 for all-new parts, less if you have patience and salvaging skills) and wants advice, feel free to reply or message me.
-
I'm a small-scale hobbyist candymaker (making things for myself and friends, not for sale), and I'm interested in learning more about sugar panning (mostly soft sugar panning, but also interested in hard panning). I recently made myself a panning machine, and understand the very basics of the process, but I'm finding it difficult to find thorough information on the process that is useful for home candymaking - most of the information I have found so far has been of the sort "here is how to use this product that you can only buy in 100-lb quantities", or "this $200 industry manual has a section on panning techniques that may or may not be useful, but you can't tell until after you buy it". Is there a good book/website/other source that thoroughly explains all parts of the panning process with enough detail to figure out how to do things with the materials at hand, and more importantly how to know at each step if things are going right? I have access to the book "Confectionary Science and Technology", which has been a HUGE help, but there's still quite a bit that it doesn't talk about. I also have a couple of specific questions, and would appreciate any info: 1. How do I add color? Adding gel food color to the syrup only provides slight coloration, and I have food color powder but am not sure if I should add it to the syrup, to the sugar, or just it to replace the sugar. 2. I have some carnauba wax to use for polishing, but I can't find any info on how to use it - do I just pour a small quantity of melted wax to the centers in the pan? Do I need to mix it with anything? Huge thanks in advance for any information you can provide.
-
Hello everyone! I'm a hobbyist baker and candymaker currently living in San Diego. I have lurked these forums numerous times to find information on ingredients and techniques that are not easy to find elsewhere, and I look forward to actually joining in the conversations!


