TonyC
-
Posts
40 -
Joined
-
Last visited
Content Type
Profiles
Forums
Store
Help Articles
Everything posted by TonyC
-
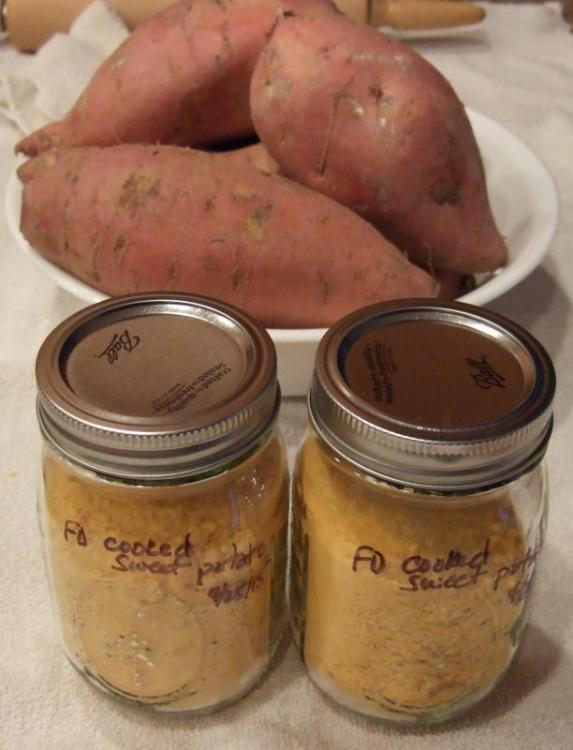
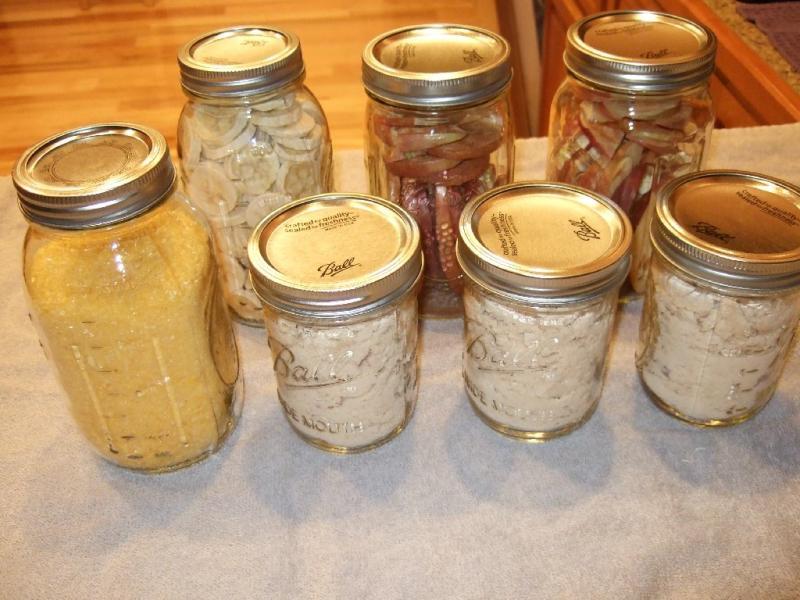
Instant Mashed Sweet Potatoes The latest Freeze Dryer test was with cooked sweet potatoes. We baked 7 large sweet potatoes. When done we used a mixer to create mashed sweet potatoes. We then placed the mashed sweet potatoes into a single FD tray and freeze dried them. Once the freeze dried process was completed, we broke up the pieces into 1" sections and used a blender to create a powder. The powder went into two pint jars. There are 4 adult servings in each jar. There are 7 sweet potatoes in the big bowl behind the jars. Each one is bigger then the individual jars. Add a little water and these are good to go! We have not tried to reconstitute them yet, but I don't foresee a problem.
-
Hi Deryn, Thanks for the information. I have just started using O2 absorbers and I have several questions that I am hoping that you or someone else can answer? How do you size the O2 absorber for a given bag and its contents? How do you know if the O2 absorbers are still good? Do they have a shelf life even if unopened?What is the best source for mylar bags and O2 absorbers?Any assistance is appreciated
-
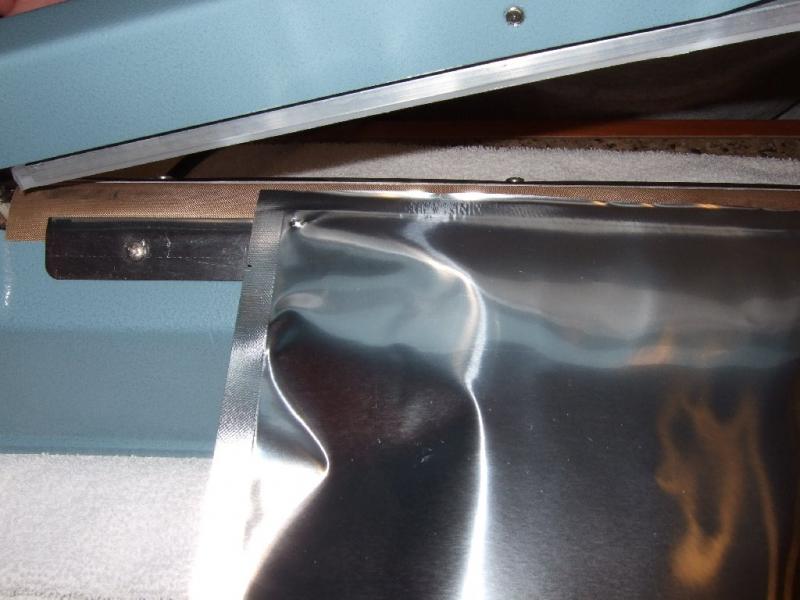
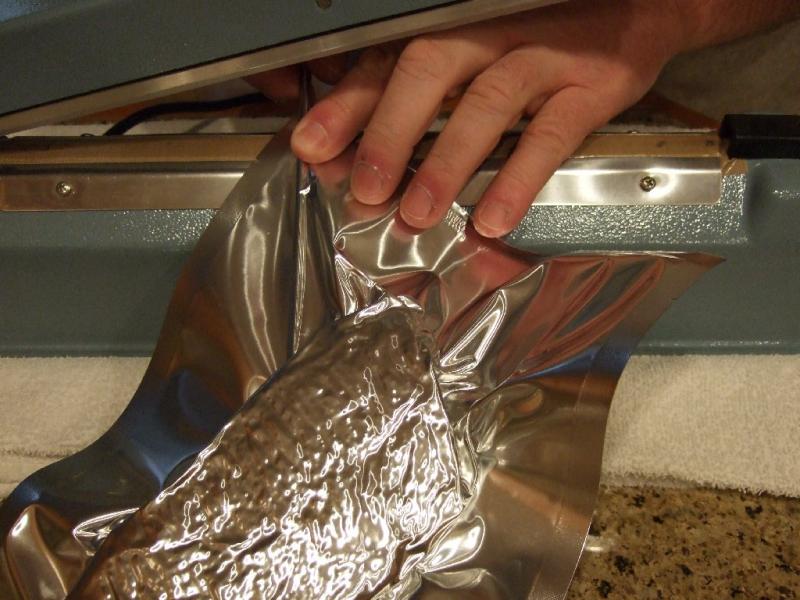
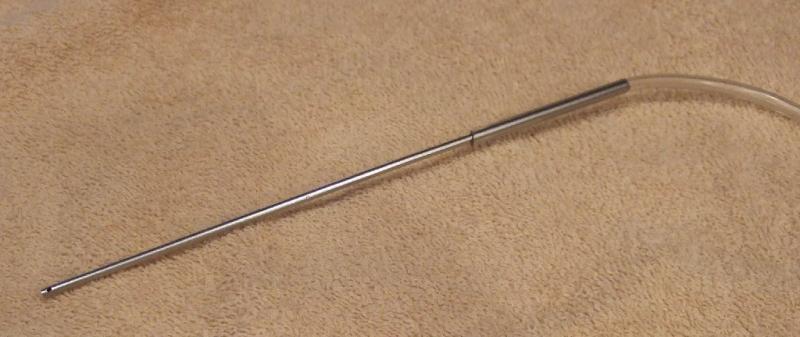
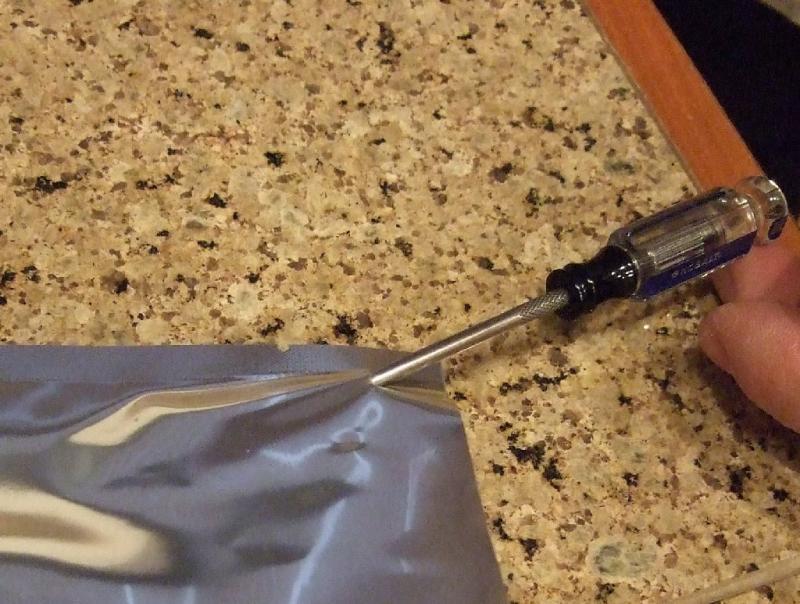
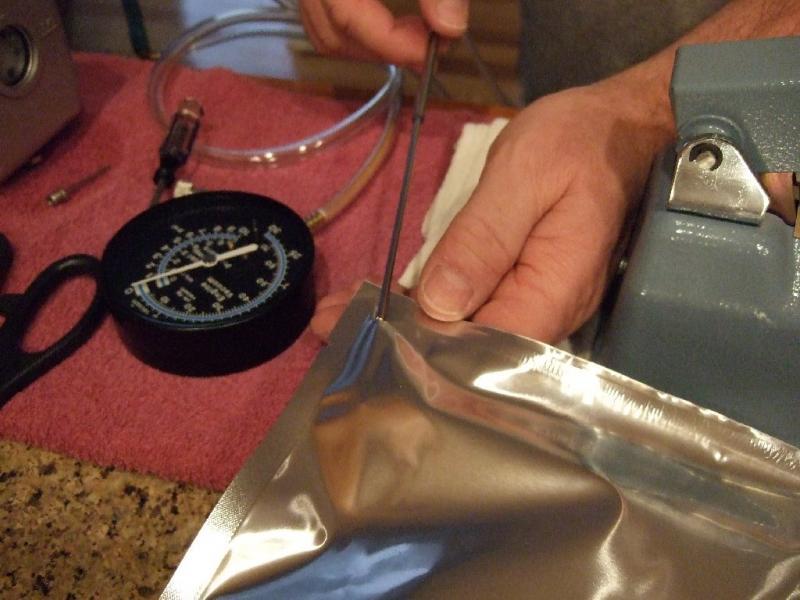
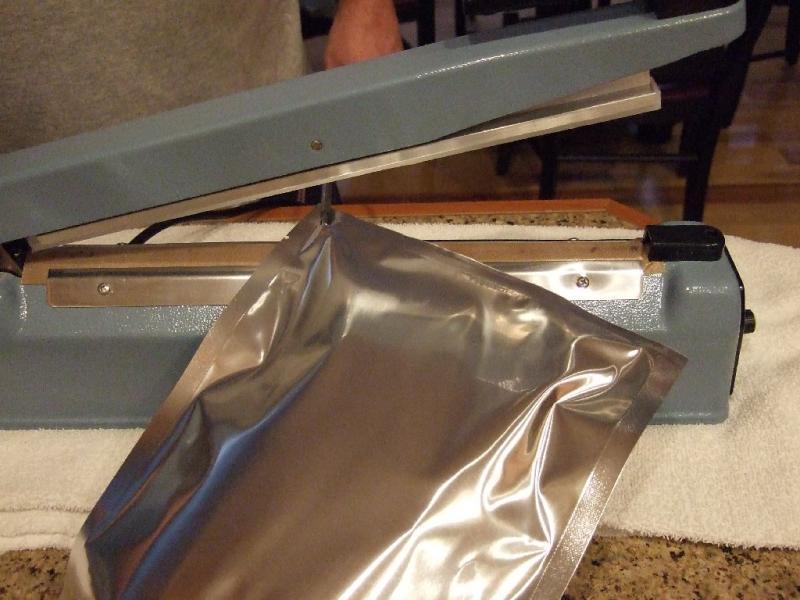
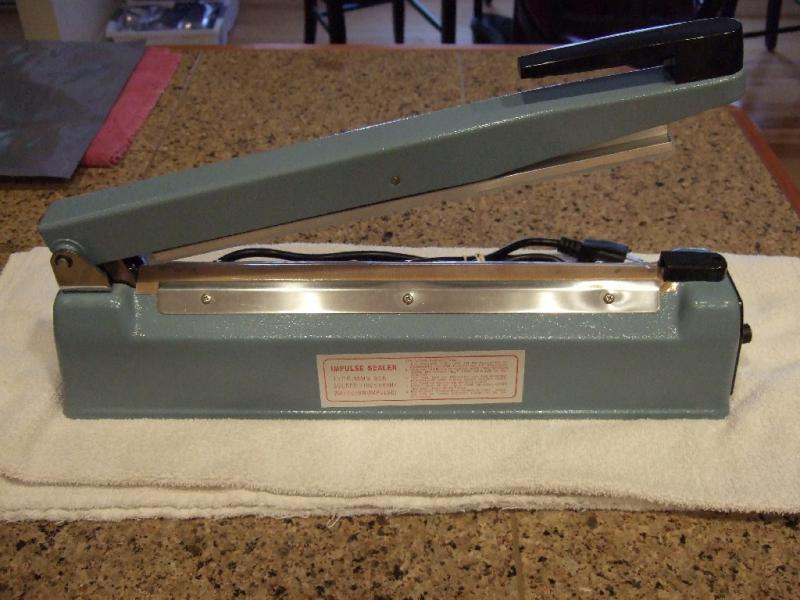
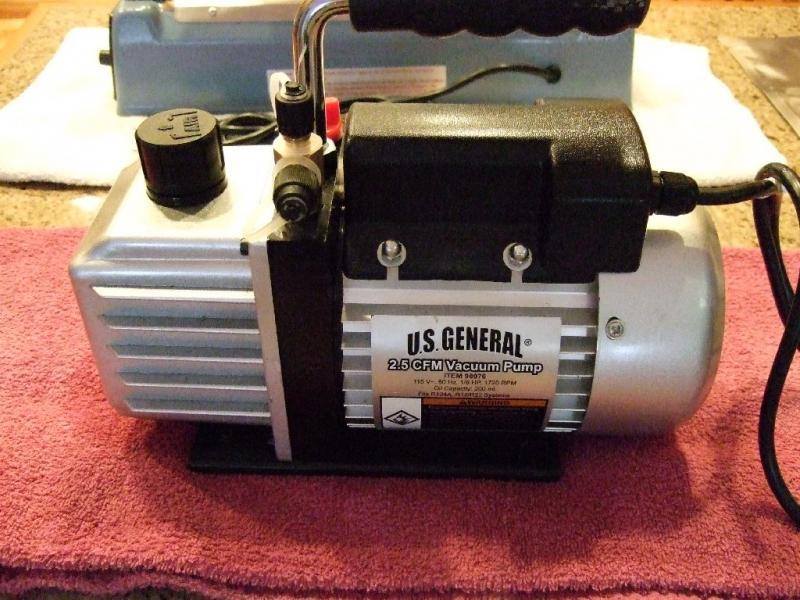
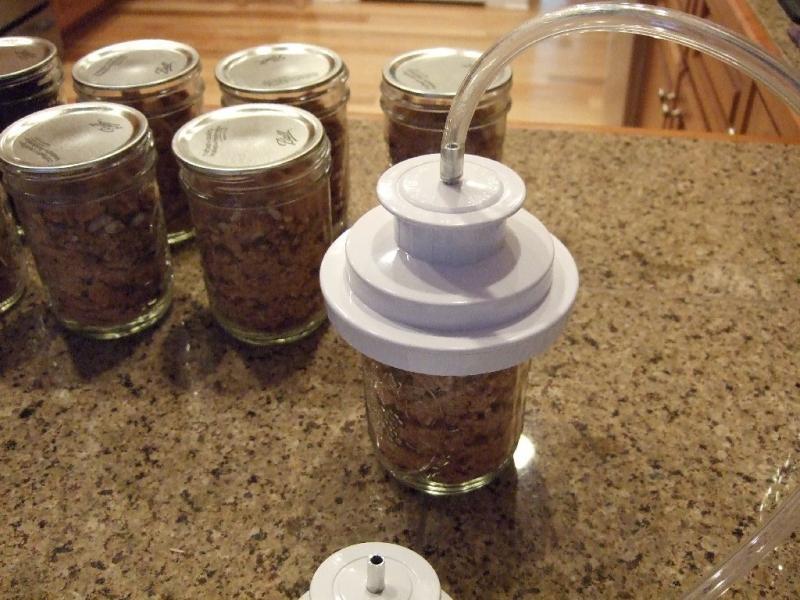
This is the easiest way that I have found to vacuum pack Mylar bags. I think I'm going to stick with it. Using an Ice Pick puncture one side of the bag 1/2" from the top corner. I poke through from the inside out to insure that I don't damage the other side of the bag. This picture shows the location of the hole. It insures no waste to the bag. Next Insert product and O2 packet and seal the entire edge of the bag between the outer edge and just beyond the hole placed in the corner of the bag. Insert the trusty suction tube into the bag. Whatever tube you use needs to be stiff and long enough to get deep into the bag close to the product, otherwise you will seal off a small portion of the bag and leave a lot of air inside. I push the tube near to the product. Further down I go into detail on how I made my suction tube. Position the corner of the bag with the hole across the impulse sealer. Turn on the pump and slowly remove the tube from the bag as the bag is sucked down round the product. As you approach the hole with the end of the suction tube, place your finger over the tube hole and seal the corner of the bag with the impulse sealer. The picture below shows the completed process with a sealed Mylar bag. Step 1 shows the hole in the bag Step 2 shows the seal across the entire opening of the bag Step 3 shows the corner seal isolating the hole ( I actually seal over the hole as well) Hope this helps you. This is the easiest most inexpensive way that I have found to pull all the air from the bags. I don't think I even need the O2 packets as I pull 29+" Mg of vacuum. The above was done with raw steaks and pork a few weeks ago. Here are the tools I used. My home made suction tube. This is the smallest diameter section of the cheapest available TV antenna that I puchased from Walmart for less than $10. To disassemble the antenna, extend it, Snap off the largest end of the antenna at the bottom with a pair of plyers ( don't cut it, snap it off - it separates easily), cut the ball off the smallest end, and push all the sections out the big end that you removed earlier. This will leave you with 5 or 6 sections each about 1 foot long. I use the smallest diameter size. The Ice pick The 5MM wide 12" long Impulse sealer The $79 HF 2.5 CFM Single Stage Vacuum Pump. Any vacuum pump will do, but the closer you get to 30" Mg vacuum the longer your food will last. You pull out moisture as well as O2. The bags quickly compress around your food. I found freeze dried pulled pot roast poked holes through the 5mm bags when I pulled a tight vacuum so be careful and insure the food has no sharp ends. If the food does have sharp edges, it best to use jars to store your food. For sealing using canniong jars we use the Food Save Lid Adapters. They're available from Amazon and other retailers for around $10. A small clear hose adapter for the adapters sells for around $6. You'll need it as well. I pull 29.5" of vacuum using these adapters and each jar is sealed in about 15-20 seconds. I have opened jars with saltine crackers that were put away without O2 packets 8 years ago and they were as fresh as the day I placed them in the jars. Just be sure to store them in a cool dark place. Mine stay between 60F and 72F all year long. Any food product with less the 5% water ( all dry goods and staples such as rice, powdered milk, pasta, flour, cereal, pancake mix, etc) store fine this way. We have even stored candy such as M&M, and Snickers candy bars, as well as scrambled raw eggs without trouble using this technique. Have fun and good luck freeze drying your food! Tony


-
Hi Deryn, Re: almost double the price I purchase from both Amazon.com and Amazon.ca all the time. I check prices, shipping, and exchange rates... and purchase from the lowest. The Logon info is the same at both web sites. Re: Cleaning the vacuum pump All you need to get into the pump is a set of allen wrenches. You'll need the 3/16 one (a SAE set can be purchased for 6.99 from harborfreight.com, item number 69369). For our purposes these are just fine. There are 6 allen screws around the front cover. Drain the pump oil ( open the valve and let it drain completely...even when you think it is finished dripping let it sit another 30 minutes or so ) I use disposible nitrile gloves ( $7.99 at harborfreight.com item number 68496 - 50 pair) to keep the oil at bay. Just pull the cover off and wipe the inside down with an old cotton rag. Do the same for the areas that appear to be grubby on the inside of the pump. I used a small putty knife to get all the loose rust and oil off the top plate. (if you remove your filler cap and look into the hole, the metal you see is the plate that rusted up on my pump. Remember that there is nothing loose under the cover, so you can't hurt anything. Once everything is cleaned up check to see that the rubber gasket seal on the pump housing is still in its channel - mine tends to fall out of the channel at the bottom. I simply place it back in the channel and reinstall the cover. Tighten the allen bolts as tight as you can using the T handle allen wrench and you're good to go. Takes about 15-20 minutes to complete the entire task. The next time that I'm in there I'll post a simple procedure with pictures if you are still hesitant to attempt this. BTW, the plate that I replaced was held in place with the same 3/16 allen bolt as those holding the cover in place. One final thought. harborfreight has 20% off coupons around almost continuously (searh the coupon sites on the web), and you may have a store local to your area. Have fun! Tony
-
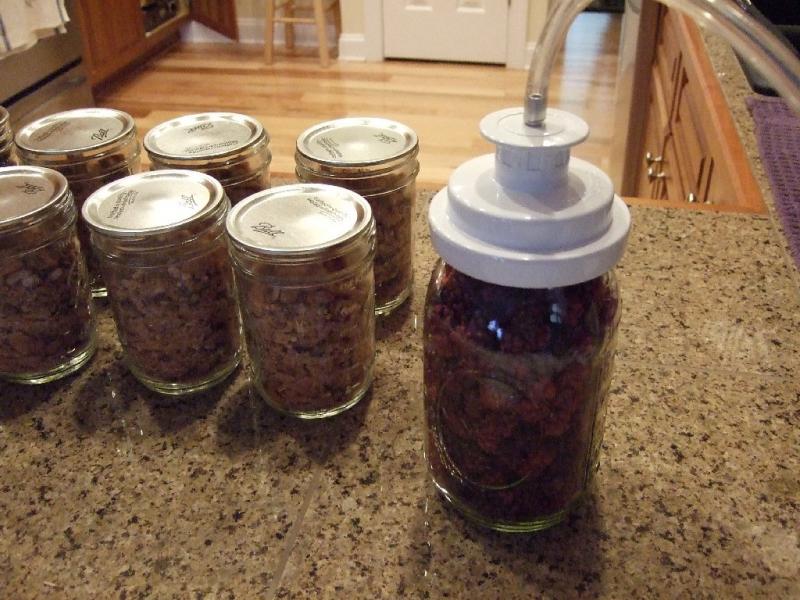
I am not sure if anyone has done this yet but we prefer our eggs to be freeze dried raw and then vacuum packed in jars. We can make great omelets or use the eggs in recipes this way every easily. We located 4 small 11" x 7" x 1.5" deep pans to freeze our raws eggs in (15-18 eggs at a time depending on the size), then we transfer them over to the FD pans. This makes the task easier. Here is what we do: 1) We line the pans with parchment paper and pour the scrambled egg mix in and freeze. The 1 1/2" deep pans keep you from spilling them on the way to the freezer, and are just the right size to fit the FD trays.. 2) Once frozen we transfer the contents over to the freeze dryer trays. No need to add addtional parchment paper. 1 2/3 pans will fit per FD tray. The eggs cut easily with a knife. Here is a picture of the eggs removed and placed in the FD tray ready to go into the freeze dryer 3) Once out of the Freeze Dryer, we place the eggs into a zip lock bag and use a roll pin to break them up into crystals. You can mash the zip lock bags with your hands just as easily. 4) We then pour the contents into our canning jars and vacuum pack them. This Freeze Dry batch consisted of a quart jar of 18 eggs( Left Jar) , 3 pint jars of cooked lima beans with ham (front right), 2 jars of apple slices, and a jar of banana slices. We pull a miminum 29.5" vacuum on the jars. The pans that we used are "Wilton Recipe Right 11 Inch x 7 Inch Biscuit Brownie Pan" from Amazon for $4.99 each

-
One other warning about placement of the vacuum pump in relation to the freeze dryer. I had my pump within 6" of the freeze dryer on a counter. It worked there fine through the cold winter months, but as spring came and my garage reached 70F-80F I noticed that my FD cycles were taking longer and that the condenser of the Freeze Dryer was much warmer. Even after extending the post Drying Time by 5 - 6 hours I would still not see the XXX that indicates < 10mTor, that had been normal. I moved the pump below the counter to isolate the pump heat away from the Freeze Dryer intake. My cycles times and mTor reading are back to normal. I think the vacuum line should exit the left side of the Freeze Dryer. This would allow the condenser fan exhaust to cool the vacuum pump the same way it cools the compressor. I know the exhaust air is roughly 100F-105F as it is slightly warm to the hand, but the pump is quite a bit hotter then that, and moving air helps to dissapate heat. I also had a few water drips coming from the front of the unit - usually during defrost. I traced them to the inside front of the chamber where the insulation stops/thins near the front panel. I also noted that the circuit board was mounted at an angle and the water drops were in direct line of where the board would be if it were mounted flush (right where a mounting hole is located for flush mount of the control board). I suspect the board was relocated slightly to avoid the possibility of these drips. I cured this problem by placing 1/2" thick x 1/2" wide x 18" long strip of stiff closed cell foam between the front panel and the insulation on the bottom half of the chamber.... It easily went in place. No condensation collecting on the outside of the chamber means no more drips! Worked like a charm.
-
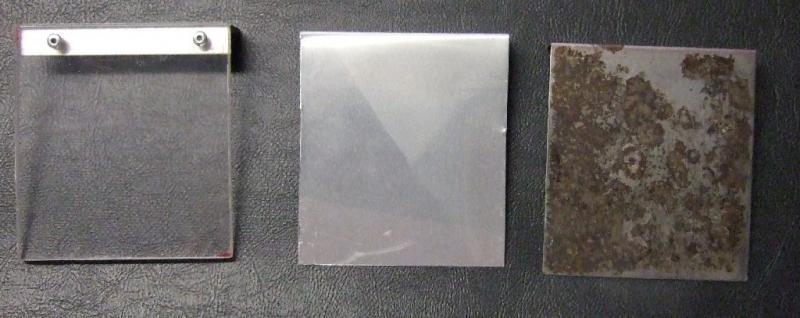
I agree. I have taken my pump cover off both times that I have changed the oil. I change on the 8th cycle. On cycles 1-7 I drain out the water and top off the oil level. Just an ounce or so. When I took the cover off the first time the rust was flaking off the top steel plate. I removed it and scrapped / cleaned it up, then reinstalled it. Water vapor condensates on the top of the cover and then drips onto this plate where it sits, jells with the oil, and starts reacting with the steel plate creating quite a lot of rust. This morning I changed the oil for the second time and replaced the rusted steel plate with an aluminum one that I made. Aluminum will oxidize as well and when it does it will show as a white powder. The plexi glass should hold up to the water and the oil, but the temperature may be a problem. The flash point of Robinaire pump oil is 420F, the melt point for plexi glass is 275F. I know the pump reaches about 120F, but I need to test to see just how hot the oil becomes before I go with the plexi glass option. I'll be measuring the oil temps in the next few days to see just how hot the oil becomes. If it is well below 200F the plexi glass will go in next oil change (if I see aluminum oxide on the new plate). The pump housing is showing rust as well, but not as badly as the plate. If you look at the picture below you can see the original part on the right after being scraped and thoroughly cleaned, and the two replacement parts that I made. The middle one is all aluminum, the one on the left is aluminum angle with 1/4" plexi glass. The pump has 3 months use on it. I suspect a lot of the orange brown gunk in the bottom of my used oil jug is simply desolved rust. I am going to find out just how much as I am dropping a magnet into the oil jug and will see how much iron oxide accumulates around it.
-
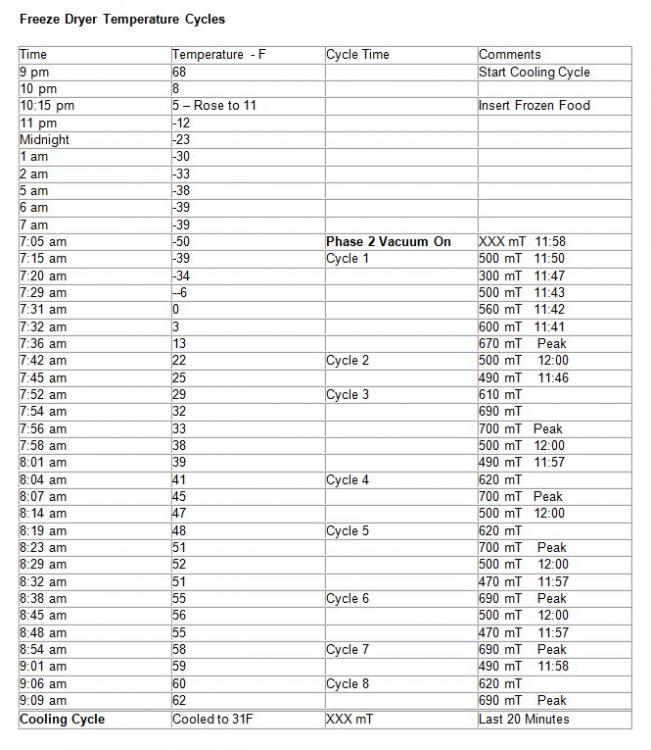
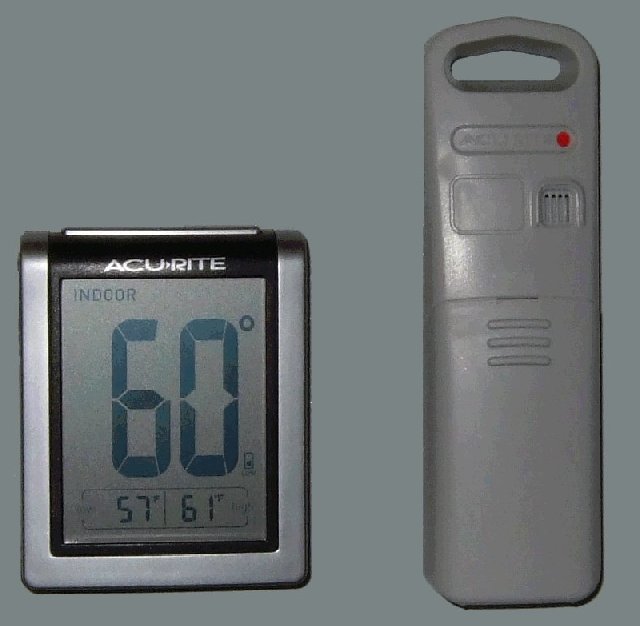
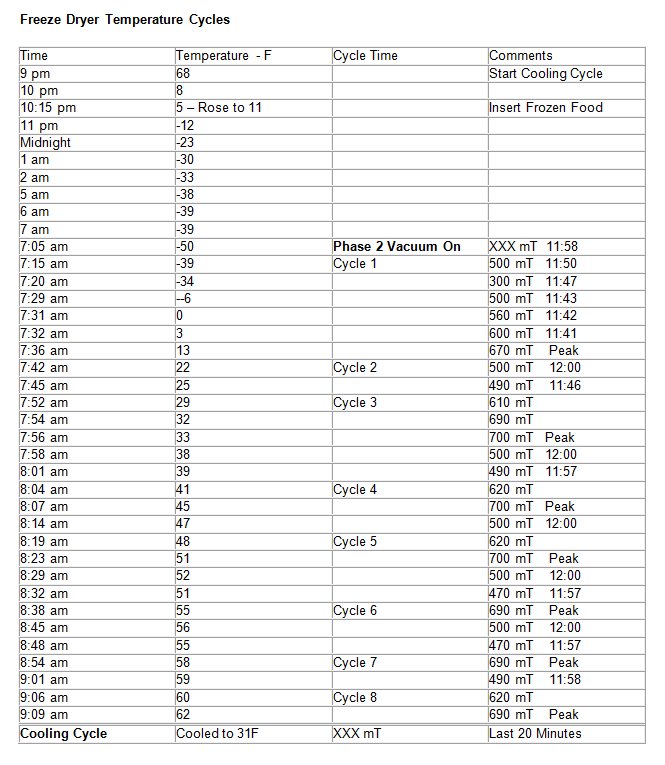
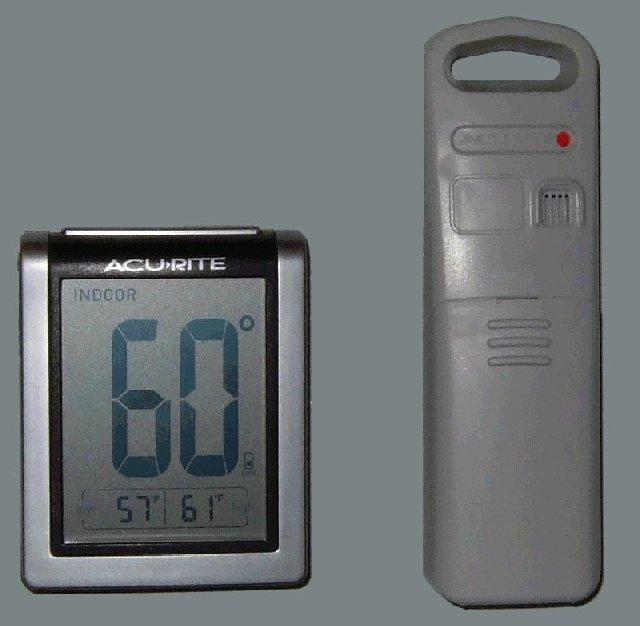
Deryn, I ran the test twice with very similar results. The first test I placed the sensor on top half way back. The 2nd test I placed the sensor upright between the trays and the door plug (not on a shelf). I may have inadvertantly confused you because this is not the entire cycle. The table shows the freezing (phase 1, 9PM- 7AM) and only the first two hours of the cooling / drying cycles (phase 2). I then went to bed. At the end of phase 3 the temps were ~60F and at the end of 20 minute cooling cycle they were just below freezing. I ran the phase 1 cycle long enough to see just how cold the compressor would get the freeze dryer. When it leveled out for 2 hours at -39F I started in on Phase 2 at 7AM. The temperature changes from 7am to 9:09 am are quite dramatic. I believe that even though the "air temps are high, the chamber walls are well below freezing all the time (I surmise... I have not measured them, but ice buildup makes a compelling case that this is so). I hope this clarifies what I measured. I should have explained the chart better. I 'll try to run the test from beginning to end with high density readings early on where temp fluctuations are greatest and then fall back to hourly measurements Freezing - Phase 1 - Hourly readings Dry/Cooling cycle - Phase 2 - High density readings the first two hours, then hourly Post Drying cycle - Phase 3 - Hourly until completed Cooldown - Phase 4 - Temp at Beginning of cooldown and at Beep I did not expect to see temps above freezing... but quite frankly I don't care... the system works very well, and the final freeze dried product is excellent... and we are "pleased as punch" with our freeze dryer. These Harvest Right engineers are quite clever. There are several ways to control what's going on within the chamber and they took the simplest most cost effective method to do it with the least wear and tear on components, and on your electrical bill. I am sure there have been many incremental changes from the first design to what we see today. As an aside, Our Freeze Dryer cycles between 500mT and 620mT. I have had food complete in under 20 hours. We have since started double loading 1/4" - 5/16" thick banana and apple slices on the trays stacking them like shingles. We pre-freeze everything first and typically set the dry time to 12 hours. It normally take 30 - 34 hours using this technique. We've never had too much icing either. It's been almost an 1' thick on the sides, but no where close to that on the top or bottom. Corrected a few errors... I am sorry to have been away so long after posting that chart. Didn't mean to cause any confusion and I could have further explained things sooner. I used an inexpensive Acu-Rite Indoor Outdoor thermometer Model Number 00606tx. The transmitter is 5"L x 1.5" wide x .75" thick. I measured twice - the first time above the top of the trays on the white corrogated plastic. The second time it was placed upright between the black plug and the tray frame seated on the bottom of the chamber cylinder.
-
You are very kind Deryn, My thermometer's low range limit is -50 so it is possible that the temperature dropped even lower. But it would not have stayed there long as within 30 minutes it was right at 0. I worried most about the severe cold weakening the batteries enough to stop the radio transmission to the receiver, but ti work very well. My wife and I both love the machine, It has been running non stop since we installed it. Tony
-
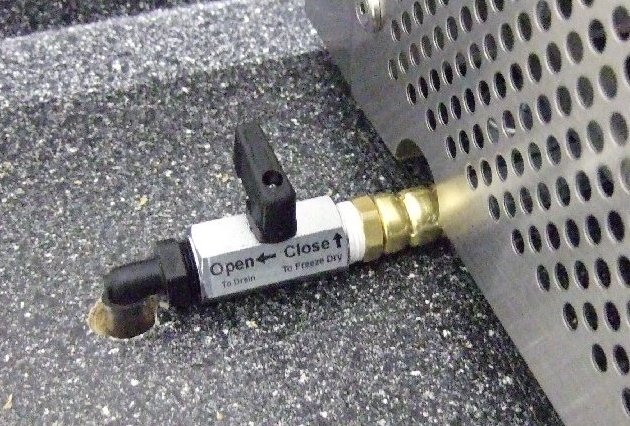
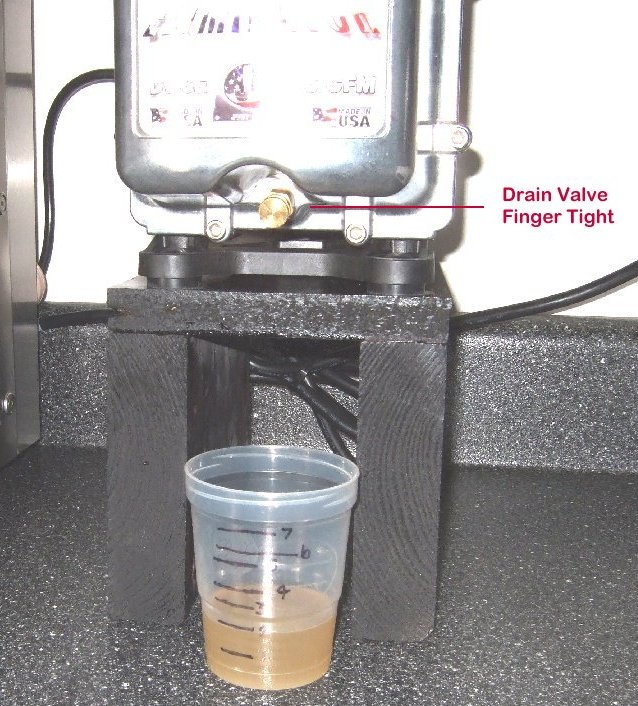
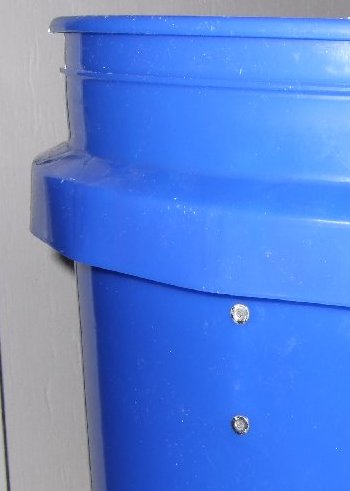
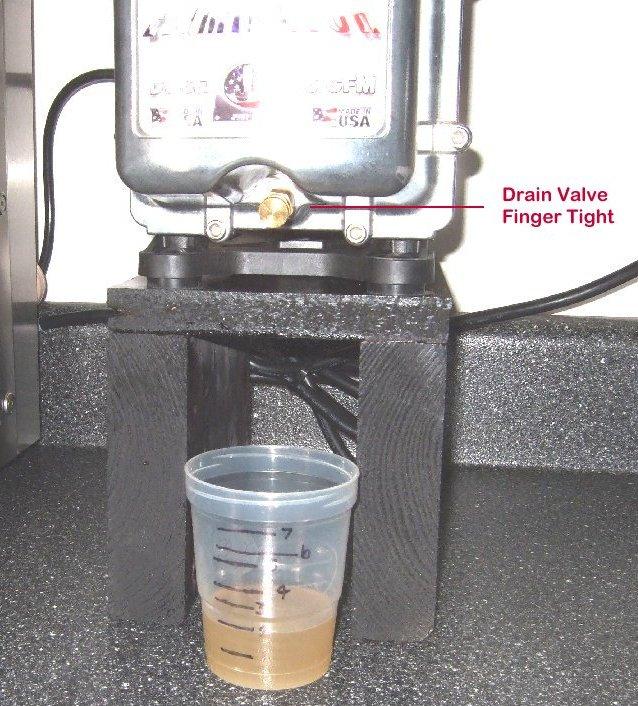
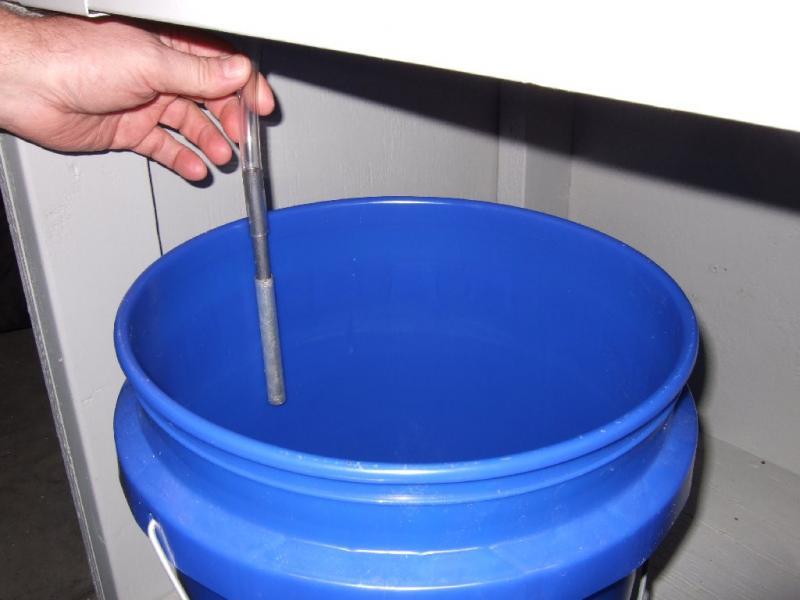
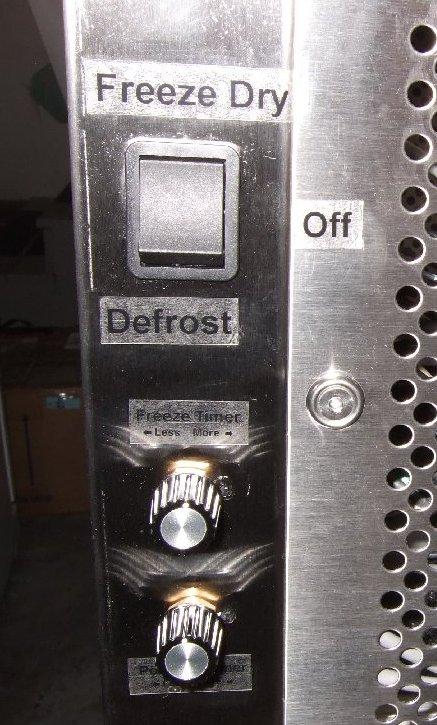
Here are a few things that I did to make our freeze dryer easier for us to use. Hope this helps others. First I labeled everything. I used black on clear labels. Here is the drain valve Here are the Freeze Dryer Controls Next thing I did was build a little stand for the Vacuum Pump and label an oil catch cup in 1 oz increments. This makes it easier to drain and replace an ounce from the pump after each Freeze Dry cycle, and to keep track of how many times I have drained and added the oil. When the cup is full (on the 8th cycle), I do a complete oil change and empty the 5 gallon drain bucket. After reading of the horror stories on water being sucked back into the freeze dryer on this list, I decided to try to keep this from happening to us. I placed a nice big 5 gallon Lowes bucket under the counter below the freeze dryer. I then attached a couple of pieces of aluminum tubing (one with an inside diameter larger then the outside diameter of the smaller) that I had in the garage to secure the drain line high enough in the bucket so that I could dump the water the same time I complete a vacuum pump oil change (every 8th cycle). It appears to work fine as the water was a good 8" from the tube after 7 cycles. I secured the tube to the bucket with 2 rivets. Hope this is of benefit to someone... Regards, Tony


-
Thanks Mike! Off to go read up... This group is great!
-
-
Host's note: this topic is continued from Freeze Dryers and Freeze Dried Food (Part 1). Hello everyone, We are new to this discussion having just purchased and rec’d our freeze dryer a week ago. I have read with interest the exploits from all of you over the last 20 pages and simply want to thank all the participants for sharing their knowledge. We have now completed our 7th batch of freeze dried food with great success (thanks in no small part to the knowledge obtained here). It has inspired me to give back as well. I have two thoughts to contribute to this discussion. The first is a warning and the second is an observation. First the warning – Botulism For anyone who has canning experience beyond making jams or jellies, you know the dangers of botulism. We use pressure cookers and proven recipes to insure we kill the bacteria before we can our food. These recipes include not only the ingredients, but the cooking pressure and the minimum time to cook the food. The “USDA Complete Guide to Home Canning” is the bible when it comes to this method of preserving food. A quick google search will turn of quote above will get you to the guide. Why am I bringing this up? Because the bacteria that causes Botulism thrives in an oxygen deprived moist environment. Putting away food that is not completely freeze dried in Mylar bags or canning jars by pulling a vacuum or using O2 packets can potentially put you and your family at serious risk. With the above said, we have successfully vacuum sealed dry staples for years by simply pulling a vacuum. We have also canned meats and stews with pressure cookers successfully, but we have always erred heavily on the side of caution. I urge you to do the same when you freeze dry your food. Err on the side of longer cycles to insure that the food you remove is completely dry (under 5% moisture content – the lower the better). If any of your freeze dried food has a frozen center and you store it in an oxygen free environment, you are putting yourself and your family at risk. Botulism is odorless and tasteless. And you won’t know that you are infected until you are ill. This is serious! From Wikipedia Botulism is a rare and potentially fatal paralytic illness caused by a toxin produced by the bacteria Clostridium botulinum. The disease begins with weakness, trouble seeing, feeling tired, and trouble speaking. This may then be followed by weakness of the arms, chest muscles, and legs. The disease does not usually affect consciousness or cause a fever.[2] Botulism can occur in a few different ways. The bacterial spores that cause it are common in both soil and water. They produce botulinum toxin when exposed to low oxygen levels and certain temperatures. Foodborne botulism happens when food containing the toxin is eaten. Prevention is primarily by proper food preparation. The toxin is destroyed by heating to more than 85 °C (185 °F) for longer than 5 minutes. It is not recommended to give honey to children who are less than one year of age due to the risk with this food. Treatment is with an antitoxin. In those who lose their ability to breathe on their own, mechanical ventilation potentially for months may be required. Death occurs in 5 to 10% of people. In all cases, illness is caused by the botulinum toxin produced by the bacterium C. botulinum in anaerobic conditions, and not by the bacterium itself Improperly preserved food is the most common cause of food-borne botulism. Fish that has been pickled without the salinity or acidity of brine that contains acetic acid and high sodium levels, as well as smoked fish stored at too high a temperature, presents a risk, as does improperly canned food. Foodborne botulism results from contaminated food in which C. botulinum spores have been allowed to germinate in low-oxygen conditions. This typically occurs in home-canned food substances and fermented uncooked dishes.[10] Given that multiple people often consume food from the same source, it is common for more than a single person to be affected simultaneously. Symptoms usually appear 12–36 hours after eating, but can also appear within 2 hours to 10 days. Although the botulinum toxin is destroyed by thorough cooking over the course of a few minutes,[19][20] the spore itself is not killed by the temperatures reached with normal sea-level-pressure boiling, leaving it free to grow and again produce the toxin when conditions are right. 2nd The Observation Being the curious sort that I am I placed an Accurite Thermometer in my Freeze Dryer to see what was going on inside this great little box. I followed the cycles through the Freeze cyle and into the two hours into the Vacuum cycle I had previously moniotored the 3rd phase. I was surprised by what I found and had to go do some reading on freeze drying techniques to begin to understand what was happening. I set the cooling cycle to 10 hours so I could achieve maximum cooling. Post Dry time was set to 12 hours. See my observations in the table below. The temperature probe was placed behind the insulation disc seated on the bottom of the cylinder in front of the trays. I secured the temperature gauge to the door with a magnet. It was within inches of the sending unit inside the chamber. I wanted to know how long it took to reach maximum cooling. The answer is 8 hours. Best time to put in pre-frozen food? The answer is 1 hour. The temperature in the Freeze Dryer will be very close to the temperature of your freezer at that point. I was amazed at how fast the temperature dropped when the vacuum pump first kicked on. The temps literally dropped dramatically by 11F from -39F to - 50F in less than 2 minutes. There was a frost line completely around the bottom of my door gasket from 2 o’clock to 10 o’clock. I was equally amazed to see the internal temperature rise from -50F to +60F in 2 hours. The temps at the time in my garage were 62F. I surmise that the chamber walls stay well below freezing while the food dries out above freezing in a near vacuum. I set my freeze dryer to reach below 10 mT for a few hours before completion in the hopes that the almost complete vacuum helps to sublimate the moisture in the food. There is a great deal of engineering going on that I am not sure I completely understand. I fully expected to see temps well below freezing through all three cycles. This is obviously not the case. All this said, I love the function that the machine brings to me. I think better understanding of the strengths and limitations of the unit will aid each of us in setting our expectations realistically, and insures that we optimize the machine to its fullest. We all want freeze dried food that is nutritious, and safe to eat. Understanding the process will only help us make intelligent decisions. I hope my contributions are worth something to someone. Thanks again for this group leading the way. Kindest Regards, Tony Edited to change table to picture for proper viewing and cleanup text... I'm trying!