TonyC
-
Posts
40 -
Joined
-
Last visited


-
Hi Jen, Sorry to be gone so long. I did exactly as you proposed. I purchased a brass reducer and pushed the blue hose over it. I have no adverse vacuum performance change with the catch can in place. It just catches any oil. I still smell oil vapor when the pump first starts up, but not nearly as much. I've only emptied the can once or twice since I've had it installed. I slightly over filled the pump and it blew out into the can, then ran it with the FDer valve open for a few minutes. Nothing got past the can. I used the outside port as IN and the middle one as out. I did take the port off and the longer one should be the inlet port. It's not a great deal longer. Tony
-
DriedUpStuffs, Based upon your work experience you probably know more about vacuum pumps than most of us. Chasing a vacuum leak can be frustratingly difficult. You seem to have narrowed down all the failure points. Without an pump isolation valve I would expect some air to flow back into the chamber through the pump resulting in the steady rise you witnessed. I saw the same phenomenon before I installed an isolation valve on my pump. Do you have any vacuum gauges at all to test the pump? ( Though I doubt that is the problem based upon your tests ) I did have a vacuum hose fitting leak at the FDer port once. I had similar symptoms to yours. I found that the hose would slightly rotate even when the fitting was snug. It allowed air into the system. If there is any play in the brass fittings on the hose, either lateral wobble (up and down) or rotation (spin), the hose will leak. I now only remove those lines when absolutely necessary. I would prefer those fittings to have internal O rings and knurled thread on ports (similar to R134a vacuum gauge sets) that do not require high torque compression fittings. Finger tight and you are good to go. You spot a leak, change the O ring and you're back in business. Odds are the problem is the vacuum hose or its end connections, the drain valve, or the door gasket. Based upon my experience I'd double check the fittings while installed on the FDer. Good Luck! Tony
-
Hi Brent Re: Shortening Cycle Times I think that we are on the same page... The temps didn't get any colder, just peaked faster. Drying things out played a roll as well as the added insulation. We had 3.5 weeks of constant rain here in central NC with humidity over 95% and temps near 95F in the beginning and tapering down to 80F by the end of the rain. The condensation on the front panel around the seal had water running down the front of the Freeze Dryer constantly during the entire cycle, not just the freeze cycle. I initially went into the FDer to simply stop the humdity from reaching the outer chamber shell and freezing... Hence the vapor barrier. But once I opened it up I figured I may as well insulate the bare ports as well, and insure that the water was diverted away from the electrics of the system. Once I sealed up the insides I noticed that the condensation on the front panel increased dramatically as the air was trapped between the plastic vapor barrier and the back of the front panel. That was when the drip rail was installed on the front of the unit. IMHO, Improvements in drying times result from: Removing the ice from between the chamber wall and the insulation (hopefully will never have to do this again)adding a vapor barrier to keep the ice out (one time thing)adding insulation on the 3 ports on the chamber (One time thing - the drain and vacuum ports are very easy to get to)Adding insulation to the cold compressor line (one time thing and easy to do)Never allowing the unit to heat up to ambient temps - Quickly removing the ice from the chamber and starting the next cycle while the chamber unit is still very cold. Remember the minimal off time is 5 minutes... compressor pressures must drop before restarting the unit... You can blow seals starting it up too soon. Prefreezing the food in FDer trays to -7F to -10F in a staging freezerMonitoring the FDer internal temps and once I see -40F I start the dry cycle, except for high sugar content food which I give an extra hour. I'm still experimenting with Ice cream and a few fruits to determine optimal freeze time to get the best results. The cooling cycle ends up much shorter.Remove all ice every 8 hours of drying time. It is amazing how much faster the drying time drops doing this. A side benefit is water vapor does not contaminate the oil as fast. I've gotten up to 20 cycle per oil change by carefully monitoring the oil and water. Re:Monitoring Temperatures I honestly think putting a thermometer inside the unit is an excellent idea. I sent the following note off to Harvest Right Support in an effort to gain a little better understanding of the process. How long after the FDer reaches -40F does HarvestRight recommend freezing the food? I'm trying to optimize FD time. I noticed on one of your videos where Dan Neville mentioned that the FDer "freezes the food to -40F" (15 seconds into the video). I have also noted this on my FDer. I'm tracking my FDer right now... and it hit -30F in the first hour, -40F somewhere between hour one and two, and has held constant since (I'm presently approaching hour 4). The food was pre-frozen to -7F (for days so I know that the food was at -7F) before it went in the DFer. Logic dictates that once the food freezes to -40F, cooling it any longer is a waste of time, electrical energy, and wear and tear on the FDer. I realize that the food freeze curve follows the FDer internal temp curve, and I am asking by how much time it follows that curve. I am looking for a more defined "heuristic" curve based upon the internal temperature. I am sure that your engineers probably have tables for such things. I also know that different foods freeze at different rates, that is why I am asking for a heuristic answer. I know HarvestRight states "trim two hours off frozen food from the default 9 hour freeze time", but this seems excessive... After all, I'm only dropping the food temps by 33F, not 110F ( from 70F to -40F ). Let's do a simple math exercise. Non Frozen food put in freeze dryer at an ambient temp of 70F needs to be at -40F before the dry cycle begins. <If> things go linear, each hour the temps would drop the food by 12.22F, achieved by dividing 9 hours by 110F (the difference in food temps). We both know that the FDer doesn't do linear as the temps fall faster early on and slowly peak to max low temps, but the food freeze time might be a tad more linear than the FDer as food is denser and must be frozen throughout. Now lets plug in the same number with the food going in at -7F... again "assuming" a linear approach, we need to drop the temp by 33F. If we use the same 12.22F degree drop rate we get a 2.7 hour freeze time to drop to -40F. As mentioned earlier, my FDer drops internal temps to -15F in 30 minutes, -30F in an hour, -40F in under 2 hours. The food freeze rate is going to lag a little behind this temp drop rate curve. I'm asking how much is the lag in time? Again, a heuristic is enough for me. Thanks for the help. They replied with some good information, but didn't really directly answer the question. I know that there is no one answer for all foods, but a rule of thumb is certainly within reason. The evaporator coils that touch the surface of the stainless steel vacuum chamber reach about -42 F. With food in the chamber and because the location of the thermister is on the middle shelf of the four shelves, the temperature it records is going to range from -25 to -30 F in the 9 hour default freeze time. This temperature is very adequate for freeze drying the food. In fact, some foods can be freeze dried once they reach about -10 F (corn, green beans, spinach, kale, meats of various kinds, yogurt bites, sauces and soups). The more sugary foods like grapes, mango, papaya, pineapple, berries, cherries, and the like, require lower temperatures so reaching -25 F is important. In the hot temperatures the freeze dryer will only reach about -25 F while in the winter it will go lower. Let me know if you need any other information from Engineering on this matter. Re: Thawing out the FDer I have one of those hand held heat guns (inexpensive from HF), but I was afraid of accidently burning the insulation. My gun gets very hot! I do the same technique with a fan, shock the ice and listen for the cracks as it separates from the chamber wall. Then I hit the Ice edge with a large flat blade screwdriver and the entire sheet comes loose in one piece. I may try the gun again using your technique. Tony
-
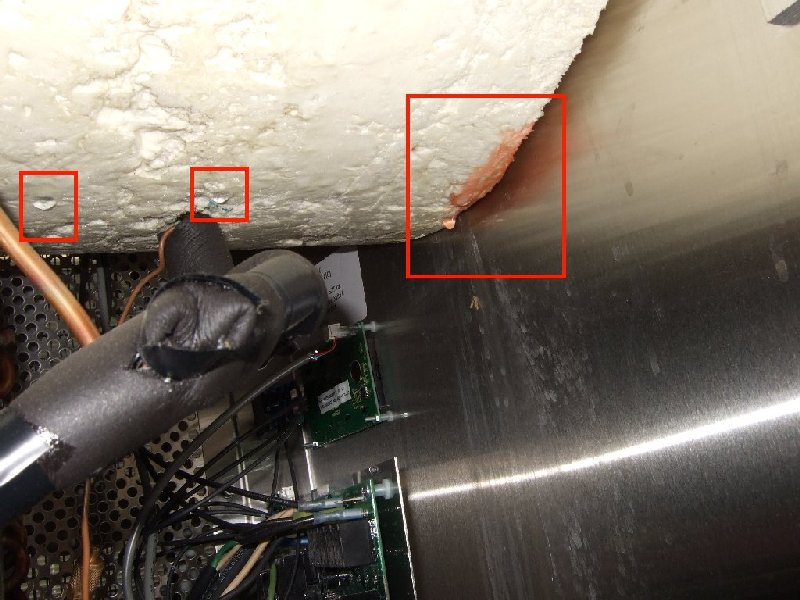
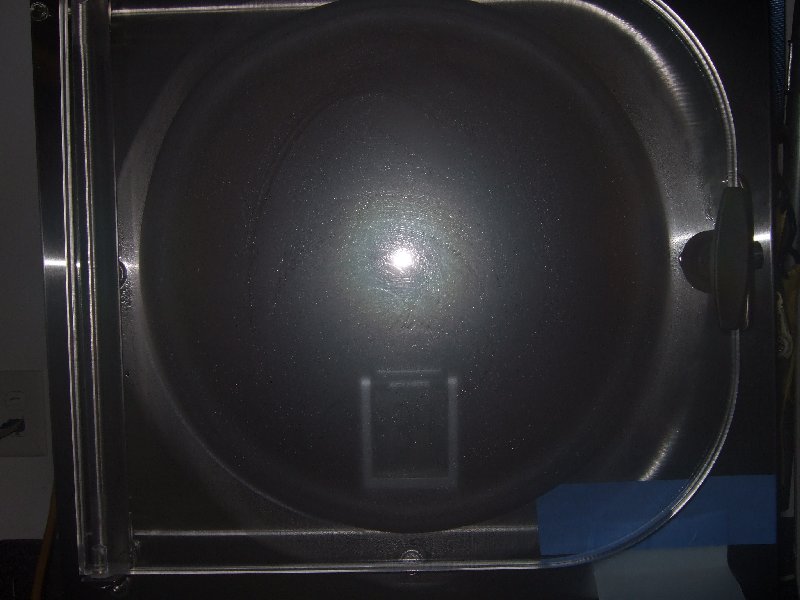
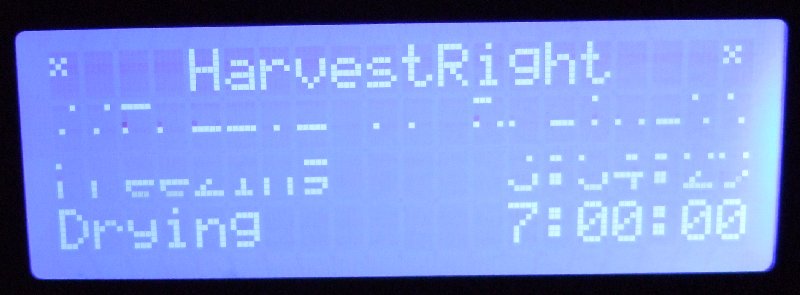
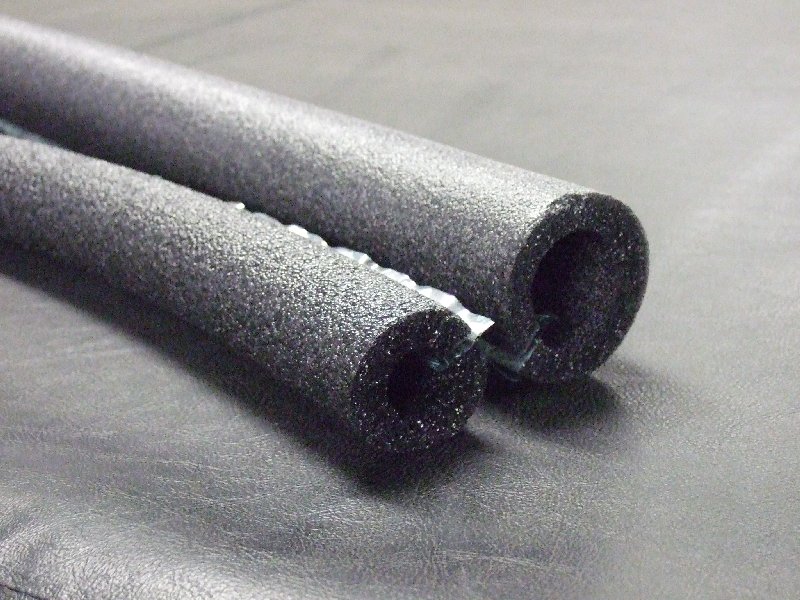
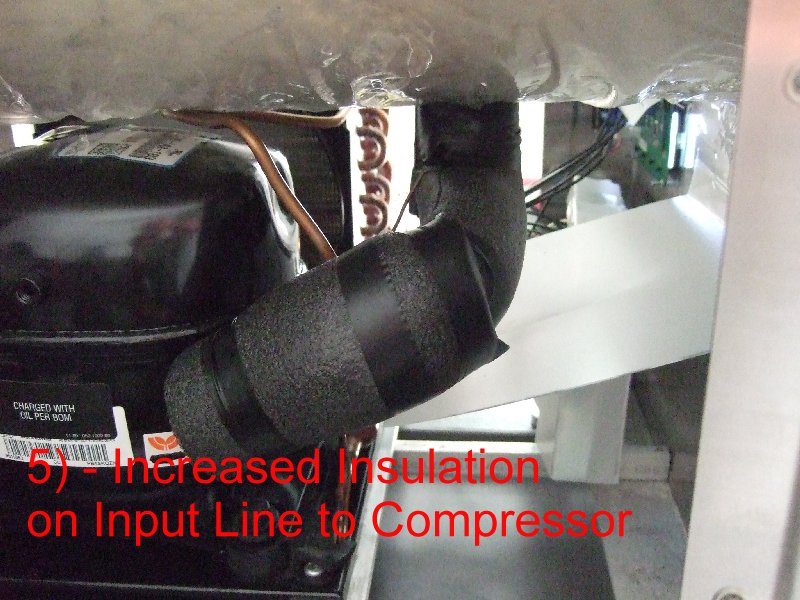
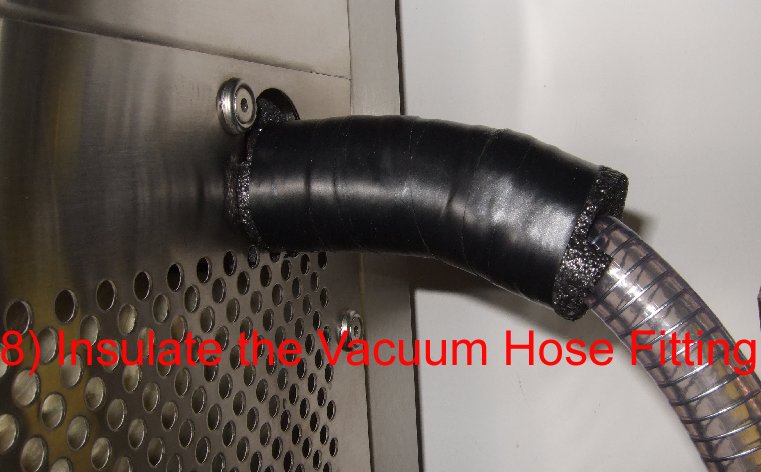
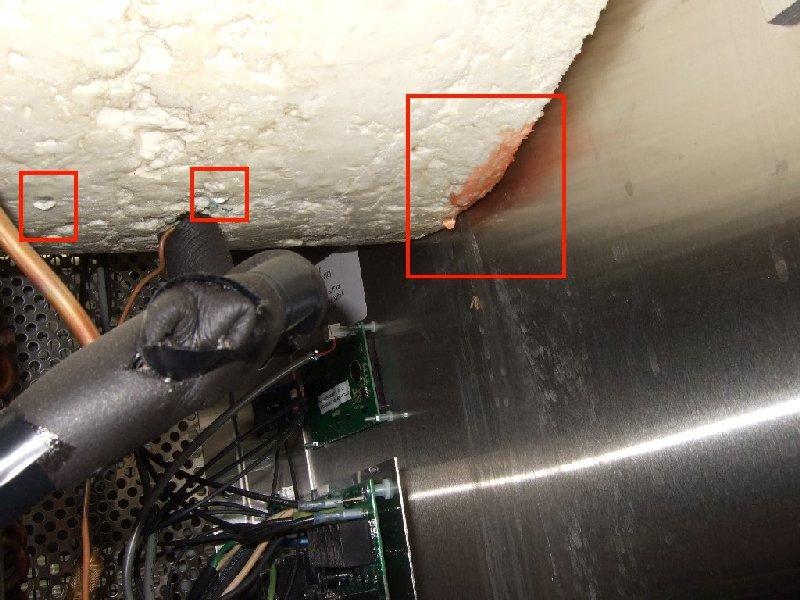
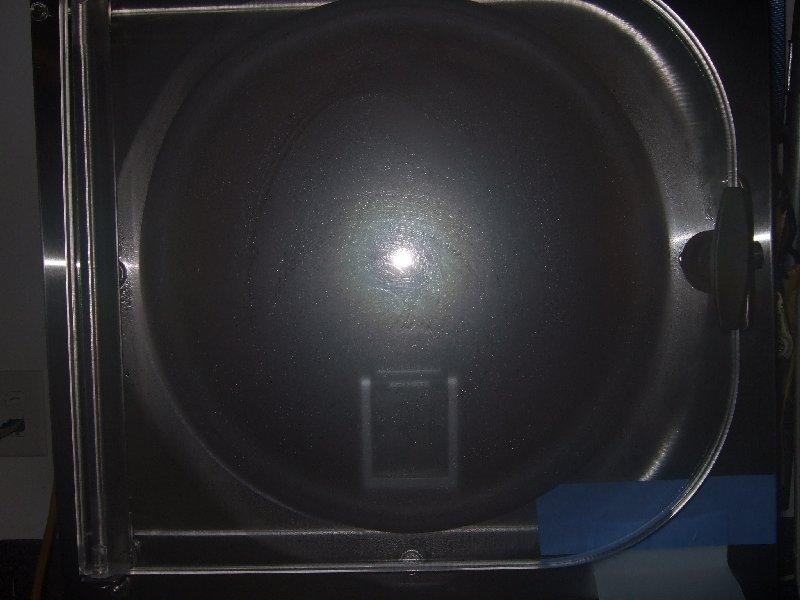
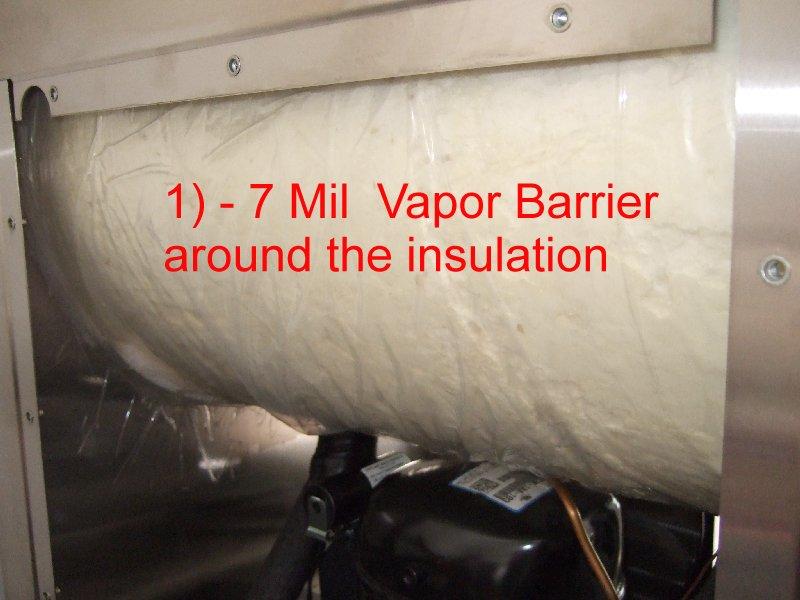
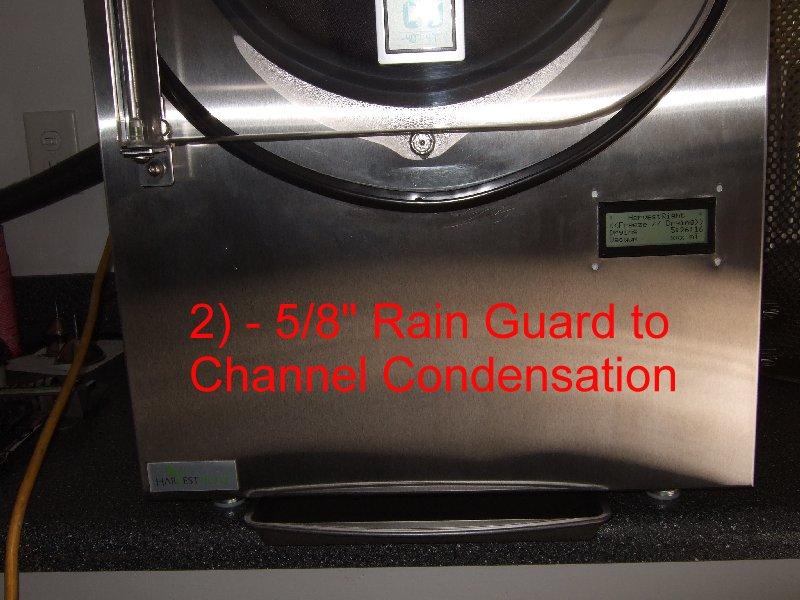
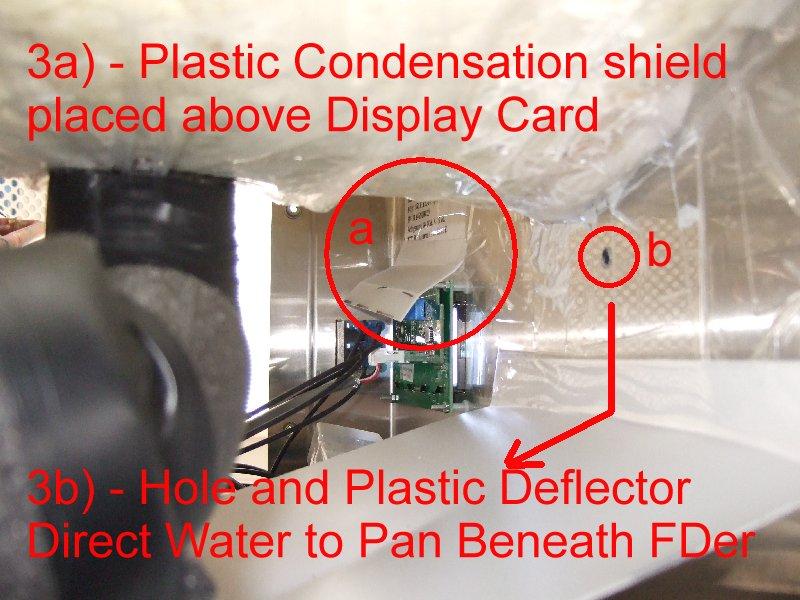
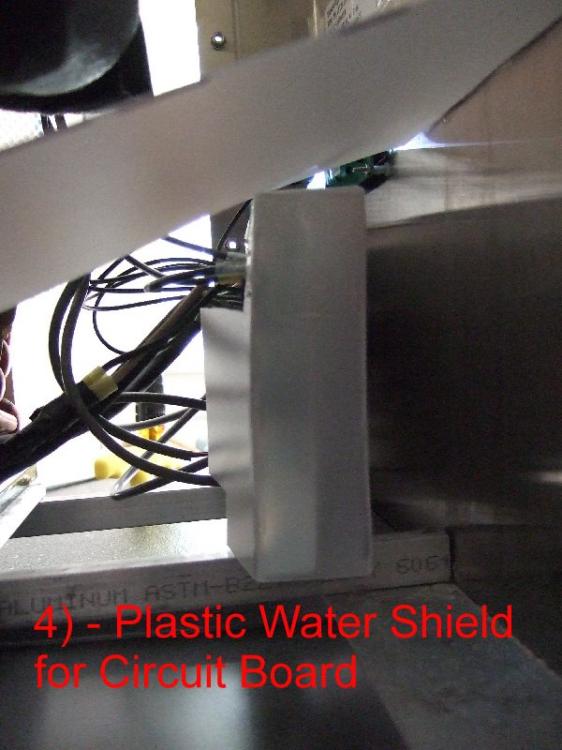
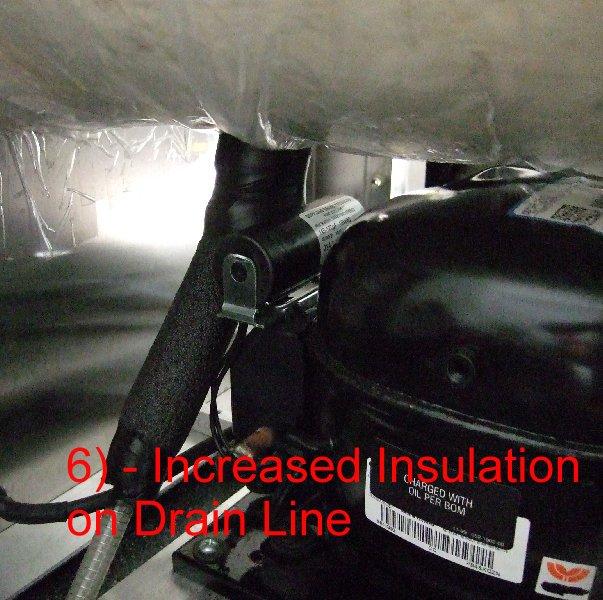
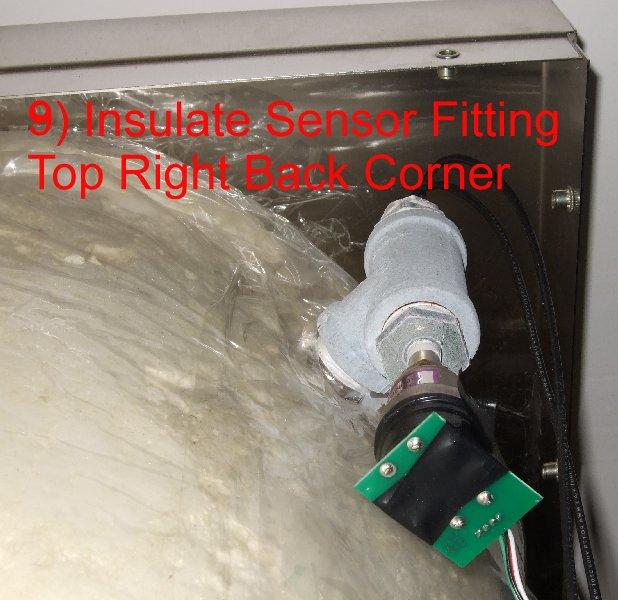
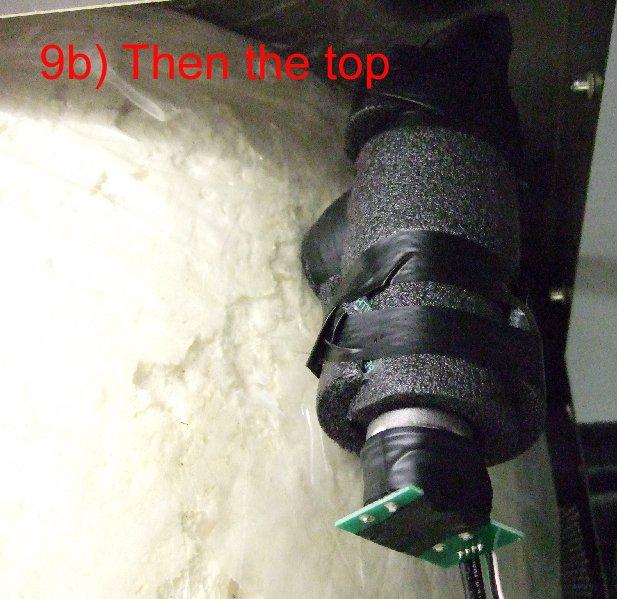
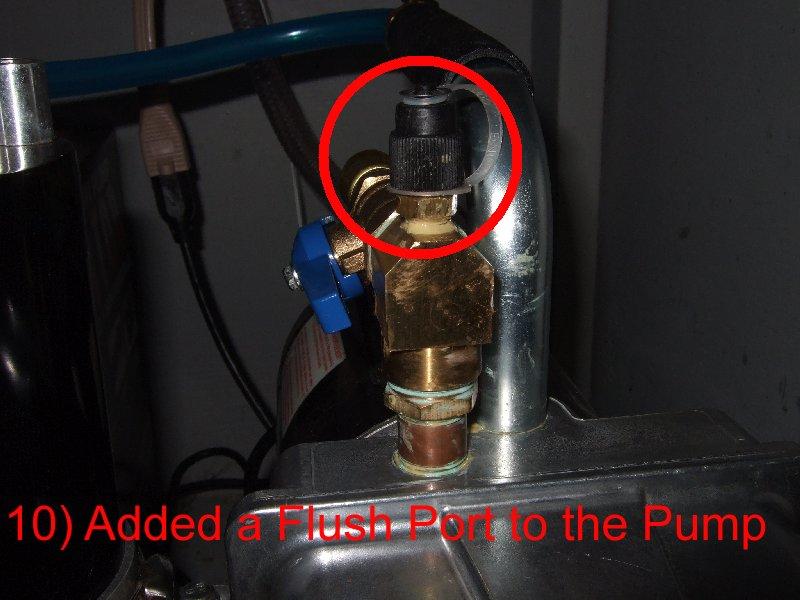
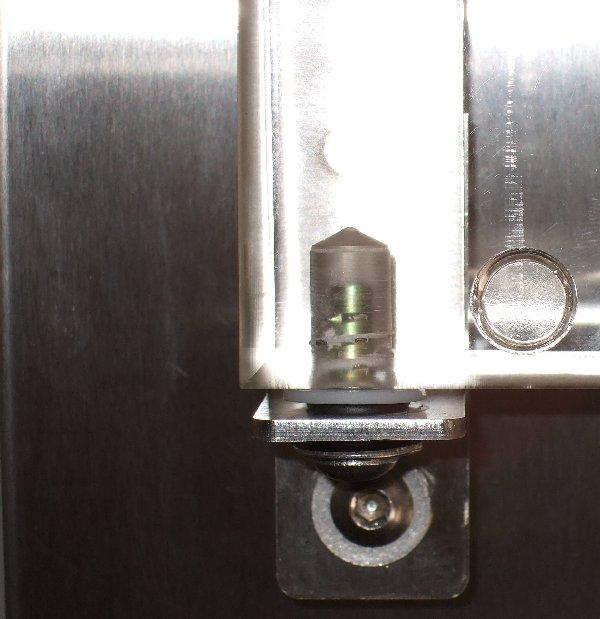
This is going to be a long post... so sit back and take your time reading...or skip over it if you like! We purchased our FDer January 2015 and it has been running 24/7 with 30 minute defrost cycles since that time until a few weeks ago when we had to travel for 5 days. We live in central NC and the summer is full of dog days with 95%-100% humidity and +90F days. Our FDer is located in our garage and with outside temps in the high 90's the garage temps soared to 100F on many days. We have two freezers in the garage as well. All of these machines generate heat and humidity. Our FDer front regularly sweats up an storm and water drips off the door and from around the entire chamber perimeter down the front of the unit. It got so bad that I taped a plastic shield above the display to route the water around it. You can see the water on the door and on the stainless steel front past the 4 screws on the unit. Now that you understand the conditions, you can better understand what happened when we finally turned off our FDer after an extended use in these conditions. Over night the FDer warmed up and the next morning we had a massive puddle under it - running off the counter onto the floor. I cleaned up the mess, but the next day the puddle was even bigger. On the 3rd day it was back again just as large even though I left a large towel under the FDer. I removed the side covers and found the water dripping from the chamber insulation. I called up HarvestRight to ask for ideas on how to avoid this in the future. They sent me a roughly 2' length of 1/2" or 3/4" foam rope to place in the gap between the bottom of the insulation and the front panel. The only problem is that I had tried this earlier and it simply backed up the water and it leaked out. What I presume was happening was that condensation was building up on the cooling coils between the insulation and the chamber and freezing. When I finally turned the FDer off it took 3 days for the ice buildup to melt and slowly soak through the insulation and drip onto the counter. Looking at the picture you can see the water drops on the insulation and where the water had flowed down the back of the front panel. Back from our trip I turned the unit on and to my dismay found that the display was missing the middle two lines. I sent Harvest Right a note with a picture and they immediately shipped me a new display. Great Service again from the support team there! I think water had dripped down the front and the back of the unit and onto the display card shorting it out. While I had the unit apart to replace the display I decided to correct the water condensation problem. If you find yourself using your FDer in the same conditons as we do you may want to consider modifying your FDer to keep the condensation from your FDer control circuit and display cards. Here are the steps that I followed to minimize what the NC high humidity climate does to my FDer. 1) I installed a 3/4" wide high density closed cell foam in the gap between the front of the chamber and the back of the front panel - just what Harvest Right suggested except all the way around (the first picture shows the gap). Use your fingers to push it into place. It needs to be tight against the inside panel. I then installed a vapor barrier around the entire FDer chamber. I used 7mil plastic and clear packing tape. There are 3 ports on the chamber that I made slits in the plastic to get around and taped them up once around them. Do not tape to the insulation. Tape only to the vapor barrier plastic. It doesn't take long, just be careful. After the plastic is in place and secure around the chamber I sealed the plastic to the back of the front and back panels using the packing tape. All the way around the front and back of the chamber to completely seal the chamber from outside air and humidity. 2) I placed an 5/8" auto rain guard 2.75" below the door opening seal to route the external condensation away from the display and into a pan beneath the FDer. At the lowest point of the rain guard I drilled a small hole through the guard and the SS panel (I hated to do this!) that allows the collected water to drain to the inside of the FDer. The alternative was to simpIy cut a small section from the guard at the lowest point and allow the water to run down the front of the panel in a single stream. I am not crazy about the look, but it is absolutely necessary to protect my investment and the electronics. If you look carefully you can see the hole in the gutter beneath the center screw. 3) Inside the front panel I installed a plastic shield over the display card and a water deflector just below the hole to route the exterior condensation to an 11x17 pan beneath the FDer. I cut up a thin flexible cutting board to make the shields and secured them with clear high grade packing tape. The cutting board is stiff but it will fold and hold a 90 degree crease. The shields are not going anywhere, but are easy to remove if necessary. 4) I made a plastic shield to protect the main circuit board of the FDer. it simply slides into place and protects the top and both sides of the board from condensation. 5) Next up I insulated the pipes where condensation forms directly from the compressor. I used inexpensive water pipe insulation from Lowes or Home Depot to wrap all exposed parts that had potential for condensation. 6) The first place was the cold return line into the compressor. It had insulation, but a second layer helped stop the constant drips. I used black electrical tape to secure the foam. 7) Next up the drain line. This not only deminishes condensation but also eliminates an unnecessary hot spot into the chamber. 8) The vacuum port was up next. You can see the condensation on the brass fitting. That means cold is escaping and heat is getting into the chamber. This small section was placed inside the panel. and this piece was placed on the vacuum hose fitting. I can still remove the panel without removing the hose to clean the coils. Simply remove the screws and slide the panel down the vacuum hose a few inches. 9) The last port to insulate required the top be removed. Before I removed the top cover I replaced the side covers. This keeps the back and front panels structurally rigid. Do not remove both the side panels and top or you will have problems reassembling as things get very loose. Here is the fitting before insulation is applied. After the bottom of the sensor port is insulated. And the top is of the sensor port insulated. I have used the FDer 3 times since these mods, and have found it is much faster drying foods. Nothing has taken over 26 hours so far, and we were routinely running 36 hours on some foods. 4 trays of mashed potatoes used to take 36 hours, now only 26 hours. 4 trays of corn takes only 16 hours, I would estimate that we have cut our FD times by 30% or more! Condensation has been decreased by 90% - no more dripping down the interior front panel and collecting on the aluminum base. There is still condensation around the front door seal, but it no longer drips down the front onto the floor. FDer cooling times are (from ambient temps of 70-85F) 30 minutes to -15F, 1 hour to -30F, and under two hours to -40F. The only downside is that the interior is now so cold that defrost time has doubled! I use a large high volume fan to defrost the unit, not the heat trays. It used to be a 15 minute job, now it is closer to 30 minutes. After the 3rd cycle I had hit my 20 cycle oil limit so it was time to change the oil. This time I took the time to add a flush port to my pump. When I replaced the plumbing with larger diameter brass and a cutoff valve I did not think to add the oil flush out port. So I corrected the oversight - I drilled and tapped the elbow to add the port. Here is a picture. It worked great today when I flushed the pump to clear out the gunk. BTW, I have found that defrosting the unit every 8-10 hours of drying time results in less water in the oil and faster drying times. It appears that the ice build up inside the chamber sublimates as well as the ice in the food. Eliminate the ice and the process is faster, and less water ends up in your oil. Forgive me for the extremely long post but I thought other southerners may also face this problem and could use this information. Tony


-
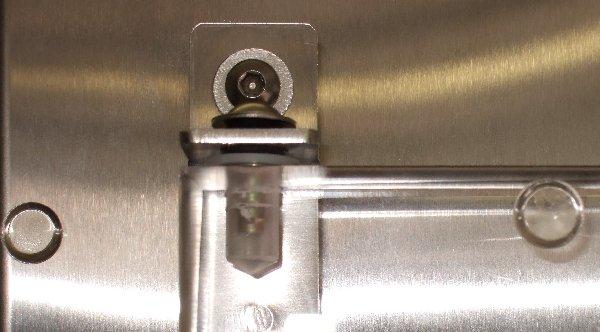
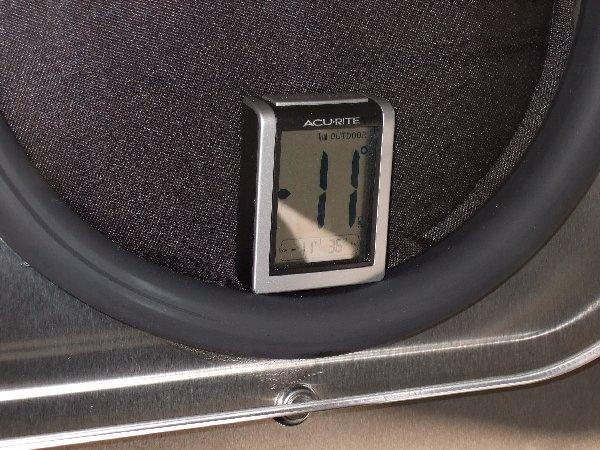
I've noticed a small problem with my FD door over the last few weeks. I tend to open the door all the way up when I am defrosting or inserting/removing food trays. After several months I started to see a scuff developing on the bottom of the door near the hinge. I thought that maybe I had overlooked it when I purchased the FD, so I kept an eye on it and noticed that it was becoming more pronounced. I took a closer look and noticed that the door, when fully opened, rubbed at the top of the FD at the edge, and more importantly the bottom of the door rubbed up against the hinge frame assembly. The door is designed to slide about 1/4" (the hinge hole is oblong) to allow positve seating on the black vacuum ring gasket. When the door was extended all the way out it never rubbed, but if it slid in that 1/4", the top would hit, and the bottom of the door would scuff. The scuff was 1/8" wide and 1 1/4" tall when I finally decided to do something about it. I corrected this by adding two soft clear silicone adhesive feet, at the top of the door and the adjascent FD edge. When the door opens fully, these two contact each other (You can find them at your local home improvement box store). The one located on the bottom is the more important to add as it stops the scuffing from ocurring on the door when it is fully opened. Using a flash while taking the picture allows the scuff to be seen. It is invisible under normal light now but it was very pronounced until I buffed and polished it out. I also had to replace the black rubber grommets in the door hinge. They were falling apart and my hands were blackened when I removed them. Luckily I had the correct size on hand! To be fair, our FD has run non stop since we purchased it 9 1/2 months ago, and I consider these to be wear items - although teflon inserts would wear much better here. Re: Thermometer Placement I use a $10 AcuRite thermometer from Walmart to keep an eye on FD temps. I place the display between the door and plug insert at the base of the gasket. I place the outdoor sensor under the tray stand. It registers down to -51F.
-
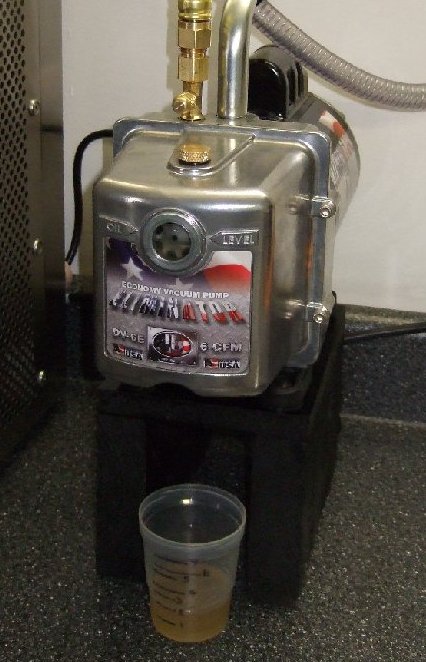
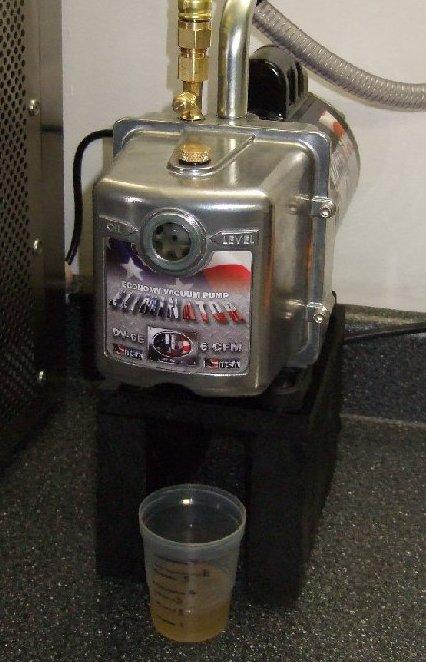
I made an inexpensive pump stand that allows one to easily drain the oil. I used 2" x 8" lumber for the side legs and 1" board on top. I used 1 1/2" decking screws to secure the top to the 2'x8" sides. Painted it black. I built it tall enough to allow me to place a cup or small pan under the oil drain and allow it to completely empty before removng the cover to clean it up. It is sturdy and stable, and simplifies the messy oil change issue. Here a picture of my simple pump stand. Re: Ice Buildup As ice builds up inside the unit I defrost it...usually about 10 hours from when the pump starts running ( an d10 hours from the last defrost if the food still isn't dry. After turning the unit off I use a fan to defrost and remove the ice. I can defrost the system and have it back up in running in about 15-20 minutes. Food trays are placed in an adjacent freezer and the tray frame is laid on top of the freeze dryer while I defrost. I note the temperature within the freeze dryer before I shut it off, and when I turn it back on I allow it to reach 10F lower then what it was when I stopped it, then I manually kick it over to the drying cycle. Usually the cooling cycle is an hour or less. Benefits are less water vapor in the pump & faster drying times. Drawbacks are you need to defrost it once a day. Sometimes twice for extremely wet foods. Another benefit is that I now go up to 20 cycles on the same oil before changing it. Re: Freeze Drying Peanut Butter We use natural peanut butter only.... has anyone tried freeze drying it. If so could you share your experience. I am tempted to try but a little nervous about doing it. I don't want a butter type explosion (except with peanut butter) all over the inside of our freeze dryer. Tony
-
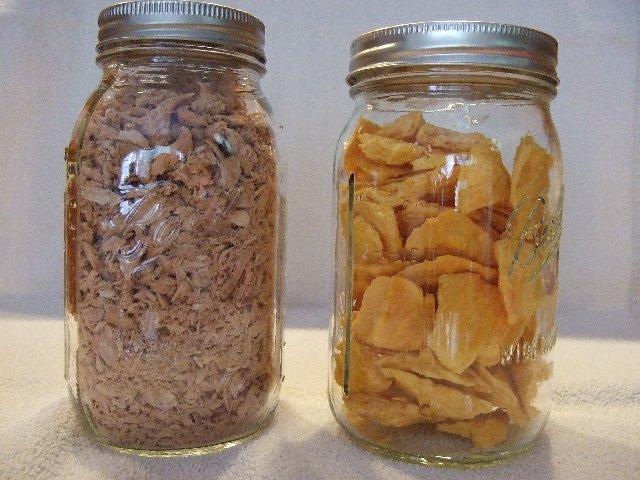
Recently received mangos from a friend in S Florida. They were great! We let them ripen up and tried freeze drying them. He mentioned that the very small variety was quite fibrous, but FDing them seemed to take care of that issue. They turned out fantastic! Both Tender and flavorful. Mangos are great FDed.. We also wanted to try FDing Tuna Fish. We puchased 4.5lb cans of Chunk Light tuna in water from Sams. Two cans filled the 4 trays quite nicely. The tuna FDed excellent as well. The Tuna FDed very quickly. We placed both in Mason Jars and pulled a vacuum to seal them. Here's a sample of each.
-
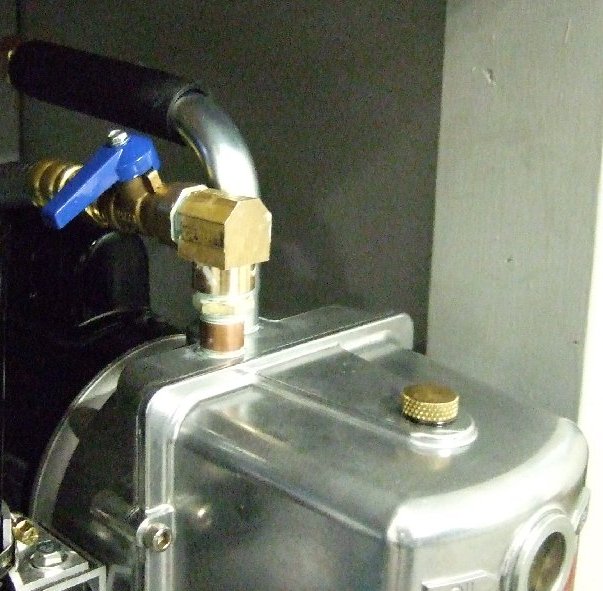
I try to be home when I think my FD will complete it's process for several reasons. First I don't like the food refreezing in the last 20 minutes of the final cycle when the pump shuts off. If the food is cold and I pull it out in a hot humid climate, condensation immediately begins and the food will start sucking up that moisture. Second, and more importantly to me, I don't like the pump shutting off before I close a valve that I have installed on the inlet of the pump. When a standard oil based vacuum pump shuts off without a valve on the inlet side of the pump the air seeks to equalize throughout the system. AIr will flow back up the vacuum hose into the food chamber. It will flow from the atmosphere through the pump exhaust through the oil chamber out the pump inlet back into the the food chamber. This brings very small amounts of oil vapor into the food chamber. How much? I don't know. But any is more than I want in my FD food. A statement here from me... This is my conjecture and conclusion... and we all know about opinions - we all have them. This precaution is known in the refrigeration repair business as you do not want to contaminate the freon in the system with pump oil. Valves are on the vacuum lines and on gauge sets to prevent just such a scenario from ocurring. I may be making more if this issue than necessary, but I chose to err on caution. Here's a picture of the valve that I added to my pump. Adding the valve also allows me to easily isolate the pump, and open the drain valve to check the food dryness or ice build up without turning anything off. After I check conditions in the chamber I simply close the drain valve, and open the pump valve and everything goes on normally other than having the FD drying timer reset. I also changed the pump inlet ports to larger diameter. All parts came from Lowes Home Improvement... under $20 total. After having your freeze dryer for a while you'll start becoming quite good at estimating accurately when your FD cycle will complete. We can judge pretty accurately now when a given type of food will be done and schedule around it or postpone / increase the drying time to meet our schedule requirements. Adding / substracting a couple of hours on the cooling or drying time to insure the machine stops when you want it to.

-
Are there any maintenance issues with the scroll pump? I've seen rebuild kits for them, but I have no first hand working knowledge of them. How long do they typcially last? They are quite expensive! Being quiet and no need for oil are nice benefits. Will the pull the same level of vacuum? Do they heat up as much as you original pump?
-
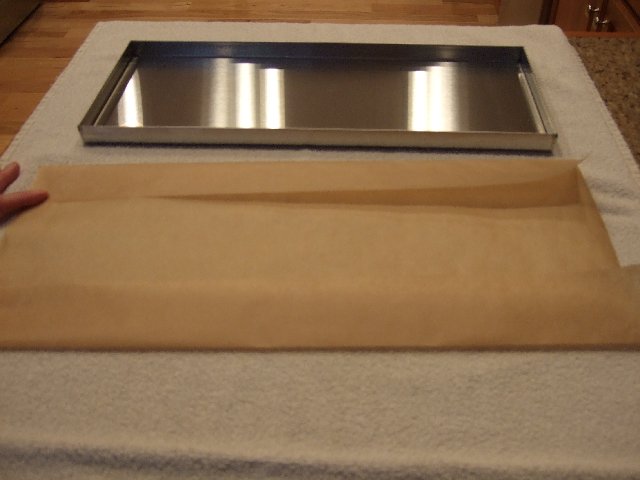
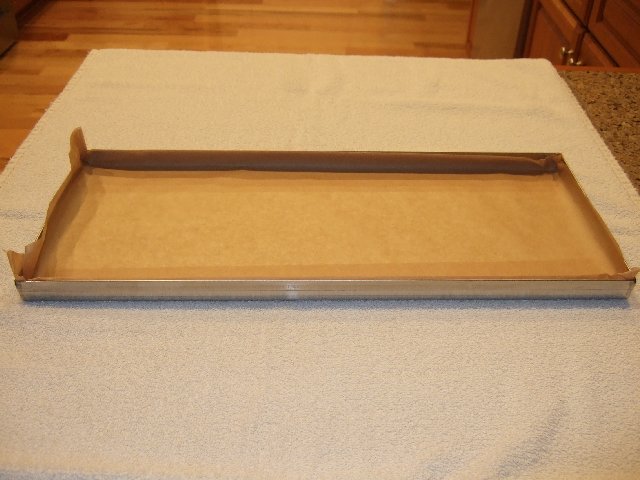
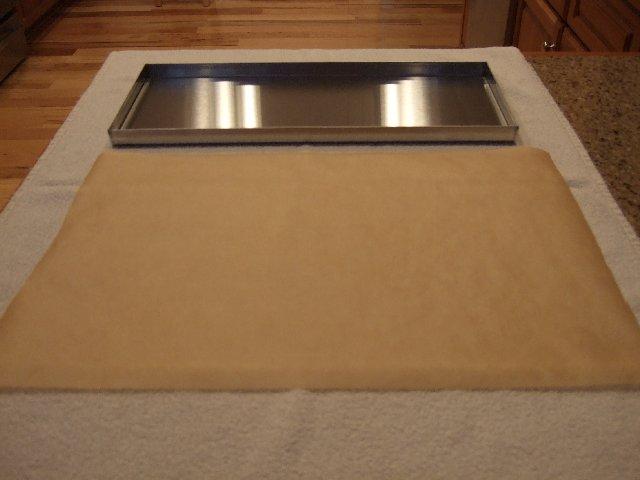
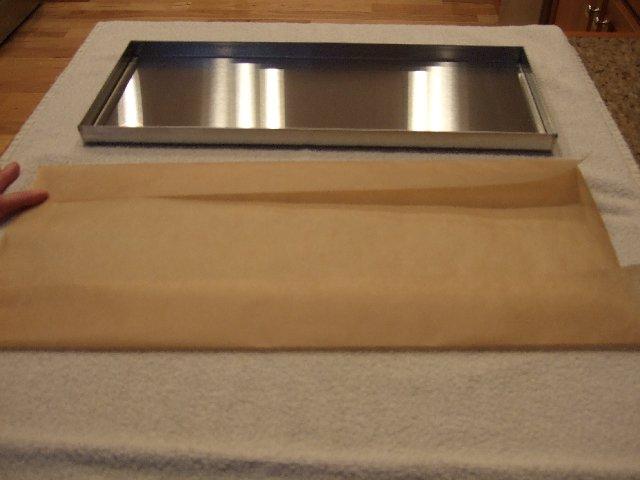
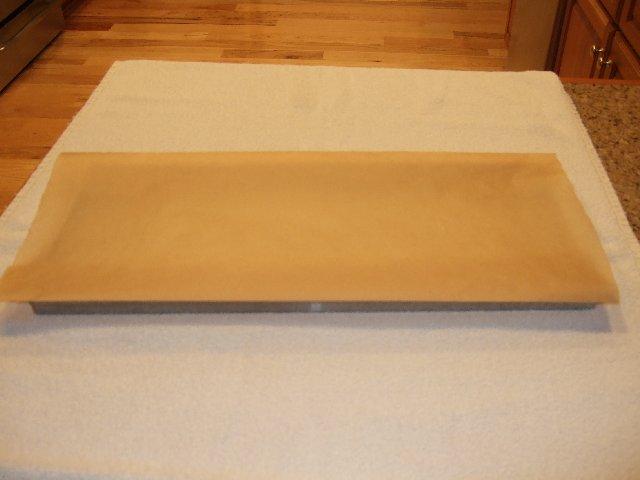
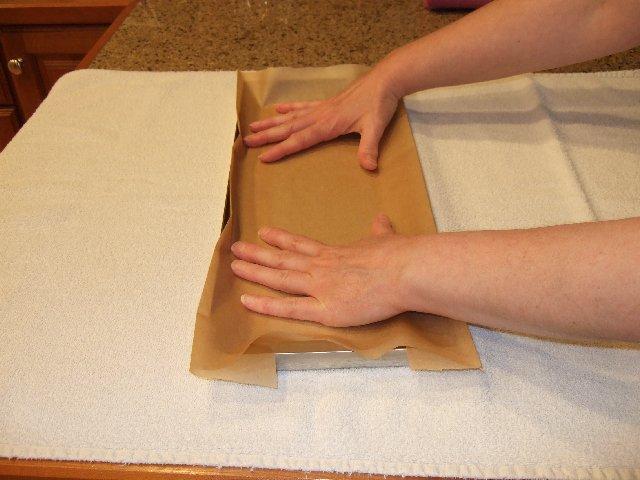
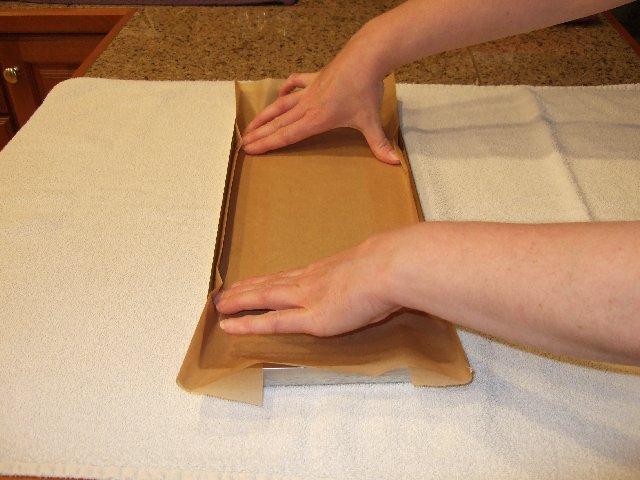
We buy our parchment paper from ifyoucare.com. Here is the link http://buy.ifyoucare.com/Products/Eco-Friendly-Baking-Cooking/If-You-Care-Parchment-Paper-70-sq-ft My bride has perfected the tray lining process and can line them perfectly in under 20 seconds! Here is how she does it. She lays a tray down on the counter and unrolls, then cuts the paper 1"-1.5" longer then the tray. She never measures, just eyeballs it. Next she folds the edges up about 2"- 2.25" on each side Next she flips the paper over and centers it on the tray folds side down She then presses the paper into the tray. Then starting from the center of the tray working out she creases the front and back edges simultaneously with her thumbs and fingers When she reaches the end of the tray and creases the corners, the short edges crease automatically. The tray is ready to be loaded. We place meats, fruits, and veggies directly on this surface. Also pour in thicker sauces and pastes ( tomato pastes, mashed potatoes, sweet potatoes, stews, and chili). If the item is liquid such as beaten eggs, we freeze them in another pan with higher sides and once frozen place them in the tray. The paper can be reused and we do if we have a batch of the same food going into the FD. Right now we are FDing peaches, cantelopes, and other fruits locally in season. The paper does become stiff and brittle after going through the FD. This method saves paper and money. We buy our paper 12 rolls at a time and I'm placing our 3rd order for 12 more rolls today. We store our FD food in our pantry, generally in mason canning jars. Once we had our pantry levels in stock, we rotate and eat our freeze dried foods regulary. Hope this helps others in their FD adventure. Tony

-
Not sure if you know this but you can use your freeze dryer to pull a vacuum on your jars. Harvest Right has a write up on it. Basically you remove the heated tray rack from the FDInstall a tray upside down in the bottomPlace your jars on the tray with canning lids installed and ring looseClose the FD door - no need for black insulation plugPlug your vacuum pump into an outletClose the drain valveTurn on the pump and let it run until you 10-20 minutes (my pump takes 20 minutes to reach 0mTor)Turn off pump and open drain valveYour Jars should be sealed. After telling you all this I prefer to pull a vacuum with a small inexpensive vacuum pump. I purchased a small vacuum gauge and the food saver lid adapters. I pull at least 29" of vacuum on each jar. Takes less than 30 seconds per jar. I wrote about it in detail in an earlier post in this thread... may have been in Part 1. Tony
-
Re OIl spray when valve left open Today I left the drain valve open accidently... the first time since I added the oil catch can. The can did its job and I had no oil outside the pump at all! The pump ran an hour with the valve open before I caught it. The oil was foaming a bit and the pump was loud. I closed the valve and the pump quieted down. Re Oil Change intervals I got 20 cycles out of the last oil before it was necessary to change it. Re Kerry's Pump I'll be watching Kerry 's post to see the ramifications of her pump change. No oil is a big plus as is the quiet factor. Re Pump Noise My pumps starts off quite loud, quiets down once I see vacuum, then gets a little louder as it runs through the cycle. I found that if I can keep it cool (within 10F of ambient temps) that the pump is much more efficient. Quick question: Has anyone noticed that fruit tends to flatten and dry out almost like it does in a dehydrator? I have placed fresh cut 1/4" sliced peaches on the trays and found them shrunken at then end of the FD cycle as if they had dehydrated on several occasions. I wonder if I am doing something wrong. Here in central North Carolina the temps in my garage do tend to get into the mid 90's with the FD running, and I have taken to using a fan to keep things cooler in hopes of fixing the problem. I have noticed that FD temps don't get as low in the summer as they do in the winter. I saw -50F in the winter, best I've seen in the summer is -39F. I have had the same experience with Pineapple and Cantelope. Curious thing about the Cantelope, the Cantelope in the lower two trays held their size and dried as expected, while the upper two trays the cantelope looked more like chips... there was also movement of the slices as if they popped like popcorn. I found one slice outside the tray and several others layered on top of others and the adjacent space empty. If you have successful settings for peaches, cantelopes, and pineapples I'd love it if you could share them. Tony
-
Hi Harris, re: Defrost Time There are three phases that HarvestRight uses to define the FD process Phase 1 - Cooling - Only the Freezer is runningPhase 2 - Drying - The cycle time between 500 mTor and the upper limit (can be as high as 800 mTor)Phase 3 - Post Drying - The final period when the drying timer begins counting down and the vacuum reading is 500 mTor or lessDepending on the food and how much / wet it is determines in what cycle I defrost. It is from 8-10 hours from when Phase 2 begins. If the food is high in moisture (typically the heavier the tray the more moisture in the food) the FD may still be in the phase 2 drying period, but with lighter less wet foods it may be in phase 3. Note: I have actually had my FD stay in Phase 2 indefinitely from too much ice buildup. This happens when you overload the machine with too much wet food. My freeze dryer is rarely not running so defrosting in mid cycle is not an inconvenience for me. Defrosting in the middle of the process simply means that there is less ice to remove at the end of the process. I've gotten to where I have the system back up and running in 15 minutes or less. After defrosting the unit and restarting, the Phase 3 Post Drying cycle begins very quickly. I added a valve just in front of my vacuum pump inlet that allows me to check the food without shutting down the FD or pump. I simply close the pump valve, open the FD drain valve and check my food. If the ice isn't heavy I close the FD door, close the drain valve, and open the pump valve. I don't want to turn off the FD if I don't have to. If the ice build up is heavy I turn the unit off, pull out the food and place in a nearby freezer, remove the tray heater and place on top of the FD, and use a fan to defrost the unit. I then wipe down the interior and reinstall everything, close the drain valve, and start it all back up. I set Phase 1 cool time to 1 hour and have found the walls of the FD chamber will be at -20F by that time. I keep a $10 thermometer in the freezer so I am aware of where the temps are all the time. After watching it for a while you start to see a pattern emerge. I use an Accu-Temp indoor / outdoor model purchased at WalMart - the most inexpensive model they had. I place the sensor under the tray in the bottom of the FD chamber and the display between the door and the black insert. It sits on the rubber gasket. It reads to -50F. Re: Vapor trap I'll let you know the results of my batting experiment when I get the time to try again. But first I'm going to powder coat my pump housing. That means dissasembly of my pump for a day or so. Sand blasting the exterior of the pump, cleaning it all back up in prep for the coating, applying the coating and then reassembly. I must be sure to keep all the abrasive sand blasting powder out of my pump internals, otherwise I ruin my pump. I'll replace the bolts with stainless steel ones that resist rust and humidity. Tony
-
Deryn, Have your tried freeze drying all natural peanut butter? I'm thinking that it will go to powder and reconstitute with water. But I have not tried it yet. Tony
-
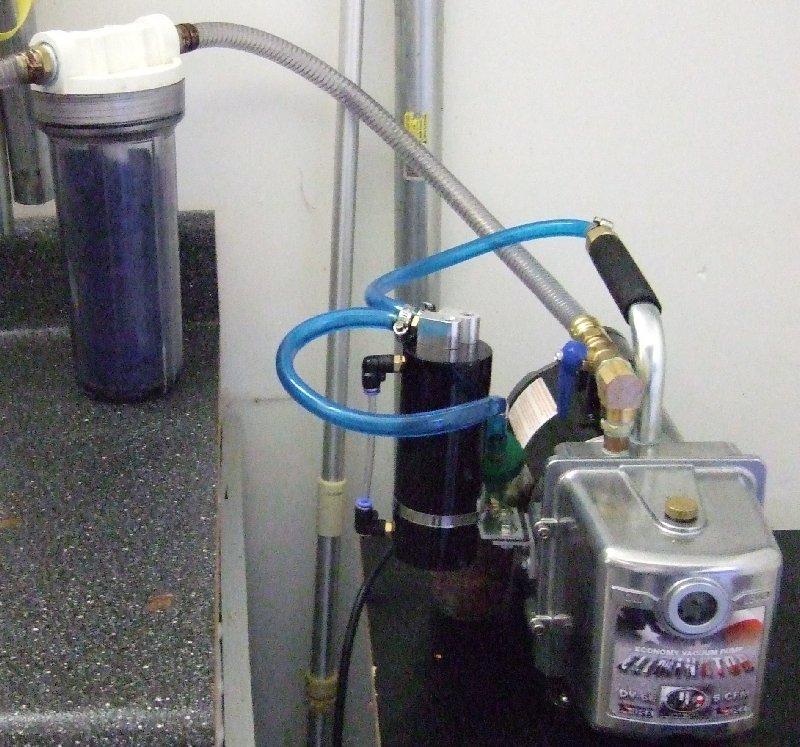
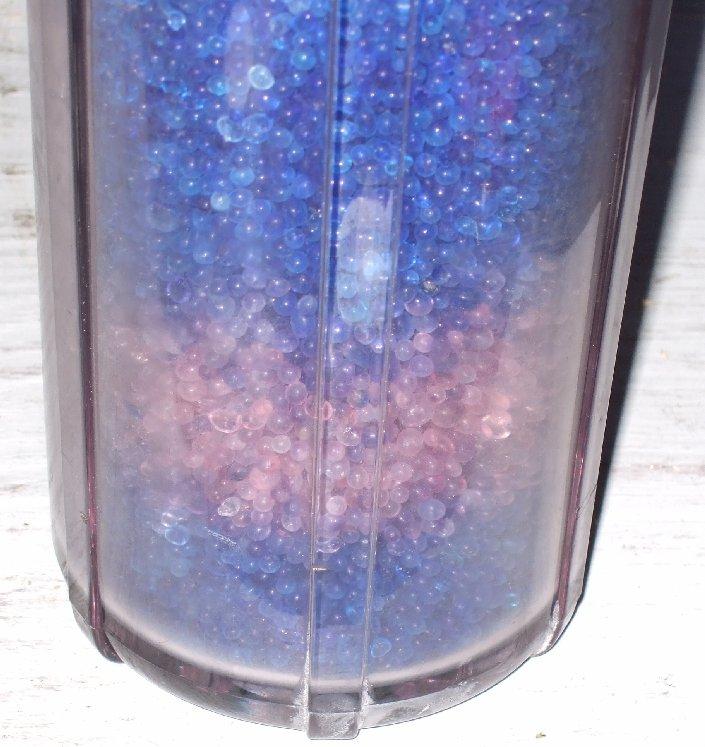
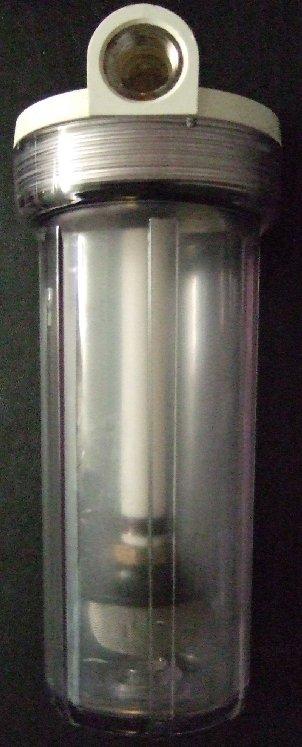
Hi Deryn, Here is my first pass on a Vapor Trap... it is an old whole house water filter that I modified. It failed to reduce the moisture in the oil... I'm in the process of modifying it to catch and suspend the moisture in the container long enough for desiccant beads to absorb the water. The air flow comes into the inlet, down the central pipe to the bottom of the screen and filters up through the beads and out the top. I added this inline and filled it with 1/8" desiccant beads. When blue they are dry, they turn pink when full of moisture. Heat them up and they release moisture and turn blue again. This is it all hooked up. I didn't see any measureable drop in vacuum pump efficiency so that is a plus. And after running the pump through a cycle this is what I got... almost all of the moisture passed through the unit and into the pump. I removed the unit and left it open to air with the hoses attached... in 3 days all the beads were bright pink. So the concept will work if I can trap the moisture long enough to allow the beads to do their thing. Next step is to machine quilt several layers of quilt batting in a donut configuration - maybe 10 or so to get 3-4" of material, enough that they will trap/absorb the moisture and allow the beads to function. This may not work either, but it is fun trying. Tony