

fooey
-
Posts
281 -
Joined
-
Last visited
Content Type
Profiles
Forums
Store
Help Articles
Posts posted by fooey
-
-
I bake it, I'm going to eat it, but I guess I should bake it after I went through all of this.
Preheating oven presently.
UPDATE: No leakage after 20 minutes and it looks beautiful. I just covered with foil so it wouldn't get too brown.
And after baking???? (It's so magical how the cuts turn out in the end!) -
And here it is. Sorry, but I was having a bad camera day.


My roommate said, "Oooh, cool UFO! When do we get to eat it?"

-
Two lessons I learned from previous posts:
1. Start with a high oven temperature
2. Bake a long time and then bake some more, or you'll end with soggy dough or subpar puff in the pastry.
More detail of these two from research (Beranbaum, Torres) as**:
1. Oven rack at lowest level; baking stone on rack.
2. Preheat to 500 F for 20 minutes before baking.
CAUTION
[be very careful to avoid heat blast from the oven]
[use pizza paddle or bread peel AND oven mits for next step]
3. Put Pithiviers and parchment on baking stone and immediately turn oven down to 425 F (you will lose 50 F just by opening the oven).
4. Bake for 20 minutes at 425 F.
5. Cover loosely with foil to prevent Pithiviers from browning too fast.
6. Turn oven down to 375 F and bake for 45 minutes more.
7. Turn oven off.
8. Prop oven door open with wooden spoon.
9. Allow galette to cool in oven for 15 - 20 minutes.
**Note: These directions are for a 11" Pithiviers made with 650 g (1 lb, 7 oz) puff pastry (cut into two layers) and a generous amount of frangipani filling (140 g unsalted butter, 145 g superfine sugar, 2 eggs, 2 tablespoons rum, zest of 1 lemon, 140 g ground almonds, 1 tablespoon flour)
-
Water did the trick, me thinks.
I also constructed differently, cutting both layers at once, after the seal is complete.
The old way: roll pastry layer 1 square, cut layer into round, add filling, brush perimeter with EGGWASH for seal, roll pastry layer 2 a little larger than 1, square, cut layer into round, place layer 2 on top of filling, make a mess trying to get the seal just right, cut vent hole, do pattern work with pearing knife.
This time: roll pastry layer 1 square, (do not cut) add filling to center, brush perimeter with WATER for seal, roll pastry layer 2 square, cut vent hole in layer 2, place layer 2 on top of filling, seal (with water, seals perfectly), THEN cut both layers at once.
This was much easier and the water worked very well.
Conclusion: Use water to seal puff pastry.
Another thing that helped was chilling the frangipani. If it's at room temperature, pastry layer 2's weight causes the filling to spread to the edge...and that's really what makes a mess of the seal.
For cutting, I just remove the bottom from a aluminum tart pan and turn it upside down. I like the pattern it makes, even if it isn't the more traditional pattern of the Pithiviers.
Oh, as for cutting the vent hole before you place it on top, that really helps by letting trapped air escape through the top. Otherwise, you end up with big pockets of air (don't laugh: that I usually remove with a hypodermic needle).
I'll post pictures of the unbaked Pithiviers once I get them off my camera. I'm not going to bake it, as I can't possibly eat yet another Pithiviers.
Thank you all.
-
No, this thread has nothing to do with the differences/purposes of butter and shortening in cookies.
The original question was: "Many of the recipes I have from my grandmother call for "oleo" (shortening) instead of butter. These are recipes that have eggs and leavening, not shortbready type recipes. Do we suppose this is a holdover from the days of rationing during the war years, or is there another reason?"
--
Wikipedia has some information on oleo here.
http://en.wikipedia.org/wiki/Margarine
Select quotes, with 4. and 5. providing some some insight.
1. Recipes sometimes refer to margarine as oleo or as shortening.
2. French chemist Hippolyte Mège-Mouriés invented a substance he called oleomargarine, the name of which became shortened to the trade name "Margarine". Margarine now refers generically to any of a range of broadly similar edible oils. The name oleomargarine is sometimes abbreviated to oleo.
3. Manufacturers produced oleomargarine by taking clarified vegetable fat, extracting the liquid portion under pressure, and then allowing it to solidify. When combined with butyrin and water, it made a cheap and more-or-less palatable butter-substitute.
4. With the coming of World War I, margarine consumption increased enormously, even in unscathed regions like the United States. In the countries closest to the fighting, dairy products became almost unobtainable and were strictly rationed.
5. Margarine became the staple spread, and butter a rare and expensive luxury.
--
This sounds similar to the original poster's suggestion: butter was less available during the great wars of the 20th century. Oleo/margarine/shortening increased in popularity in butter's absence. When the war ended, butter returned to the market, but by now, the cheaper oleo/margarine alternative had had years to establish itself as a valuable and less costly alternative to butter, a price advantage that insured its continued success.
I am not a butter historian, however, so take that opinion as you will. The history around this sounds interesting, and the political maneuveurings of the butter (political) lobby sounds like it tried to limit margarine/oleo popularity, but failed.
The 1950s was the age of the wonder kitchen, a time when industrial products, gadgets, and solutions were welcomed and, more often than not, deemed superior to their more natural cousins.
--
It usually comes down to market forces, cost, basically.
The reason butter is as expensive as it is is because there's less demand. The reason there's less demand is because of the competition's cost-pressure from those awful, but much cheaper margarine/oleo/shortening products.
Personally, I welcome a shortening/oleo/margarine "rapture". If all of these chemically-enhanced products disappeared overnight, I would be one happy baker.
I would never have to look as those underbaked, shortening-laden, chemically-leavened, machine-rolled puffs of dough Costco dares call a croissant.
This topic was started to learn about the differences/purposes of butter and shortening in cookies. If someone wants to start a topic on the health issues/concerns, or ethical issues, etc, I would encourage them to do so. Thanks. -
Well, then, by all means, keep eating it, eat lots.
Bullshit. Sugar is at least as bad for us as trans fats and is not only much more widely accepted it is also in thousands more products. Shortening is an ingredient. Most ingredients contain lots of things including chemicals. Salt is a friggin chemical. -
The egg wash for this recipe is "beaten egg", that's all.
I've tried it, but it leaks terribly.
I tried another that's (2 egg yolks, 1 egg, and 1/4 cup milk) [Torres, Jacques].
That's better, but it still leaks.
I will try this next, unless I get other advice:
(1 large egg yolk) + (1.5 teaspons heavy creme) (Berenbaum, Rose Levy).
-
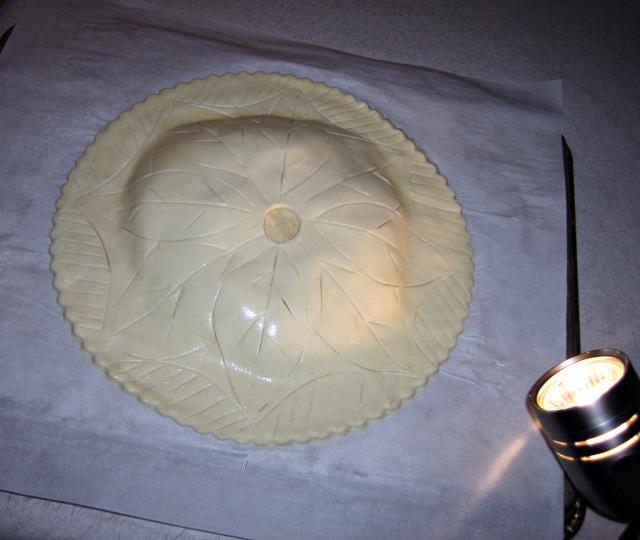
I'm making Pithiviers. I need advice/help on sealing the two puff pastry layers.
If you're not familiar with it, it's basically:
Puff Pastry: TOP LAYER
Frangipani : MIDDLE LAYER
Puff Pastry: BOTTOM LAYER
The puff pastry layers are usually sealed at the edges with egg wash, but it's not working for me. The filling is a mound in the center and there's usually a vent hole cut in the top.
One of my unbaked ones
http://www.flickr.com/photos/fooey/2090210578/
Here's one of my less-than-successful baked ones (if you look closely, you can see where the filling leaked out onto the parchment):
http://www.flickr.com/photos/fooey/2084829...in/photostream/
I've made three of these so far, and the filling always leaks out. The first time was a disaster, the second and third less so.
Does anyone have advice on how to properly seal the puff pastry layers so the filling does not leak out?
Note 1: I freeze them before I bake them. Is that a potential cause of the problem, the extreme cold renders the egg wash seal useless?
-
Lovely trans fat cookies...
NOT.
Use butter, not chemicals.
-
If money is an important factor, pastry is not for you. If you want to make money in pastry, the best route is to own a business and have other pastry chefs working for you. Money in pastry, like baking, only comes from volume (or specialization, like chocolatier or catering).
I think the most important question one has to ask oneself is "Can I deal with the drudgery, the repetition?" because, like most jobs in the food industry, pastry is all about consistency, or baking the same things over and over again. That's the one thing most aspiring pastry chefs don't realize. As a career, you have no where near the creativity options you have in a home kitchen. You make a standard set of pastries or cakes or breads, and that's it until you find your next job. If this type of production work does not appeal to you, then you are in for a big surprise, as well as a mediocre wage.
Yes, you will find yourself making the tart tatin 1000 times, and that means peeling the apples too.
I don't mean to scare you off, but you really have to love it, the good and the bad, to make a life of it. It's had work for low money. And by asking money questions up front, I recommend you think a lot about what you're about to get yourself into.
Pastry school, a good one, will run you $30-$60,000 for an associates degree. On a pastry chef's salary, it will take you a near lifetime to pay that off. That's why most people who go to pastry school end up working in a completely different field, to pay off student loans.
Sorry if I've scared you away, but these are lessons best learned upfront.
But if you really love it, it's a field worth its toil and sacrifice.
-
This response should be framed.
In fact, I think Peter Reinhart recommends the exact same method (hot pan / boiling water) in his book Crust & Crumb.
It's how I do it and I get great results everytime.
Thanks, Doug.
Personally, I generate a hot, humid oven atmosphere by preheating a thick pan with the oven (actually at the bottom of the oven), and I splash boiling water into the pan (leaving only a very little in the pan) and close the door, while I slash the dough, then reopen and load the oven.After 10 minutes or so, I open the oven to remove the (maybe already dry) pan (and release a lot of hot damp air - even though its not visible steam, its still pretty moist!) - and by then, I'm not too worried about the brief cooling this causes.
Water vapour in the bread oven doesn't have to be visible steam.
Its actually better if it isn't visible.
Which is why using ice cubes (or opening the door every 30 seconds to spray cold water) isn't the best way to get it.
-
Edit to add: gfron, re: using Everclear - I wonder why they don't just use straight vodka instead of 1/2 vodka and 1/2 water, since there is quite a bit of water in the alcohol. Maybe it turns out too boozy? Certainly worth experimenting.
-
So try to get your oven as hot as possible, 550 or 500, then steam for less time. Then bake until the loaf is at least 205 internally.
josh
I agree with josh. Your oven is not hot enough.
Everytime you open your oven, you lose about 50 F, so if you start at 550 F and steam 3 times, you're already down to 400 F or less. Your oven needs to be really hot and you need to steam it two or three times in the first few minutes.
I use one of those garden pump sprayers you can buy from home depot for $10-15.
One caveat, and I hope someone more knowledgeable here will comment, but if the recipe you are using calls for milk or fat (oil, butter), you'll never get a hard crust. Be careful with the oil you use on the dough, as you need very little, just enough to lightly coat the dough, to prevent it from drying.
Re: baking in a pot or no knead bread: I wish these ideas would just vanish from the bread baking lexicon. It works to a point, sure, but it teaches you absolutely nothing about the art of and joy of baking bread. It's the lazy way out, the Walmart version of bread baking.
-
You might also want to test your baking soda to see if it's still reactive.
To a large bowl, add 3-4 tablespoons vinegar. Then add 1/2 teaspoon baking soda.
It should fizz a lot.
If it doesn't, throw it out and buy more. It's kaput.
-
I've made five trays of these %$^ things now and they all have craters.
5. Combine sour cream with baking soda.
Are you sure the recipe didn't call for baking POWDER?
The sour cream (acid) and baking soda (base) will react immediately. If you combine them as directed, you need to get your batter in the oven immediately. Even then I'm not sure you could do so in time.
If you leave the batter on the counter for more than a couple minutes, forget it, no more bubbles, all gone, cupcakes cave.
copy/paste from google: "The chemical in baking soda is bicarbonate of soda (NaHCO3). When combined with an acidic ingredient, such as vinegar or the lactic acid in buttermilk, baking soda releases carbon dioxide which forms into bubbles in the food. When heated, these bubbles then expand and help to rise or lighten the final product."
-
If I'm reading this right, it sounds like I just haven't had enough practice. That could certainly be a contributing factor, but after several hundred macaroons, there certainly is a related frustration.
Maybe I just have a cheap pastry bag/tip. I don't think I paid very much at all for what I use.
I'll do some research to see what I can find on modern pastry bags.
-
fooey, what exactly is it that you don't like about pastry bags?
I don't like the lack of precision. I wanted my macaroons to similar in size/weight, but can never make this happen with a pastry bag. Even if the amounts I deposit look nearly identical, the end product always has too much variation.
I've taken to piping onto a scale, and that seems to work, but it's much more involved.
I guess I don't like the lack of precision.
-
I was making macaroons yesterday when I made an executive decision:
"No more pastry bags for me. I must find an alternate solution to the tedious, messy, manual, and slow duties necessiated by the pastry bag."


Surely there's a tool (or other solution) available that makes the pastry bag a less essential tool in the pastry chef kitchen.
Is there?
Glue guns, nail guns, both examples, have long replaced the glue bottle, hammer, and we're still stuck with "pastry bottles".
What do large production kitchens use?
Thomas.
Creations from The Art of the Dessert
in Pastry & Baking
Posted
I haven't purchased the book yet, so I don't have the recipe, but it's on my Amazon.com wish list.
What rice is called for? Which did you use?
I think the age of the rice is probably less important the the type of rice. I once tried to make risotto using something other than the usual Arborio Rice, and no matter how much I stirred, the right textire evaded me.
Look forward to the book!