

cmflick
-
Posts
210 -
Joined
-
Last visited
Content Type
Profiles
Forums
Store
Help Articles
Everything posted by cmflick
-
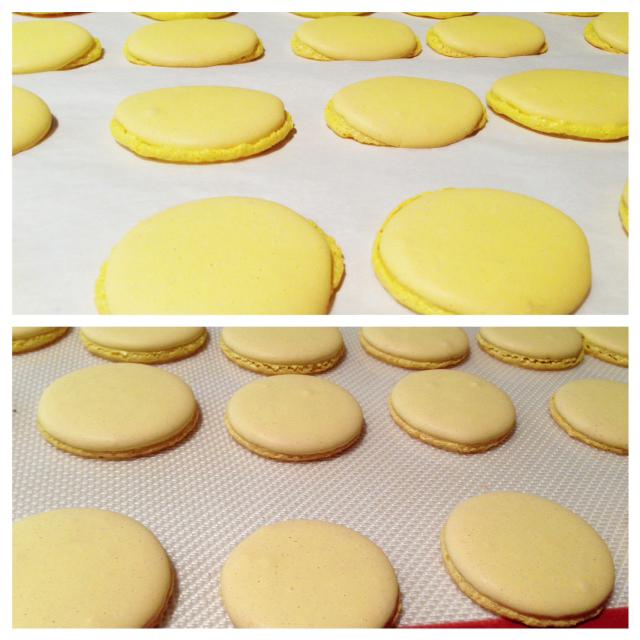
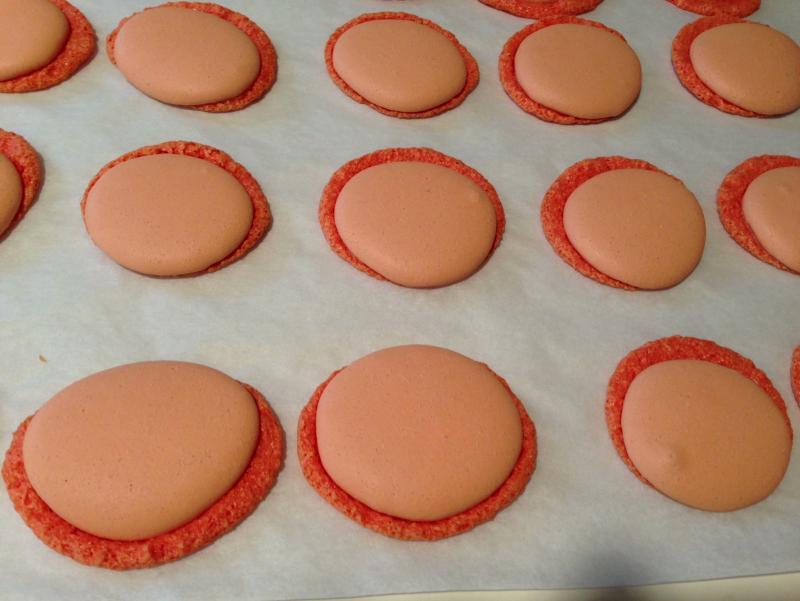
To continue the saga of my woes making macarons! For those of you new to the saga, I have made macarons with no problems for many years until last fall when all of a sudden things went haywire, i.e., the feet keep blowing out on the shells (see previous posts). I had taken 2 macaron courses and incorporated some of the things that I learned in the courses when things went awry. I made several changes and things are looking better. 1. Did not dry the almond flour overnight in the oven. I just let it dry at room temperature in a bowl covered by cheesecloth. It is really dry in my house in the winter, so maybe I'll readdress this issue when the humidity inside is higher. 2. Went back to my old mixing method that is just folding until a desired consistency is reached. No vigorous stirring at the end as I was doing when the problems started occuring. In my old method, you don't premix the dry ingredients and the unwhipped egg whites. You just add about half of the Italian meringue and fold until everything is incorporated, then fold in the rest of the meringue. 3. Used liquid food coloring instead of powdered and added it to the dry mix and unwhipped egg whites prior to folding in the meringue. 5. Added 1/4 tsp dried egg whites to the 55 grams of whites used to make the meringue. I was suspicious that my meringue was weak. 6. Baked half on parchment paper and half of a silpat. About the time that my problems began I changed supplier of parchment sheets. Obviously, I made too many changes at once to pin down anything as really helping except for the silpat advantage over the parchment paper. The difference between baking on parchment and a silpat really surprised me (see photo: top is parchment, bottom silpat). The macaron shells baked on parchment are better than what I've been making over the last several months, but still are tipsy (see previous posts). At least the foot didn't completely blow out. Obviously with so many variables changes, I can't pin down which helped. The shells baked on the silpat are entirely respectable, though. I'm definitely using silpats from now on! My current theory is that baking on a silpat must help cover up other problems that you're having! I'm having trouble believing that my new supply of parchments sheets is the root of my problems, but I guess that it could be. Stay tuned as I try to parse out what of the other changes made a difference. At least I know that I have a method again that will make good macaron shells!
-
I too have a crappy oven, but mine's electric. When you double pan, do you preheat one of the pans in the oven and then put the other on top of it in the oven or just double pan before it goes into theoven? I use L'Epicerie's almond flour. It is very fine and even without using the food processor there was very little left in the sifter.
-
For this new batch, have you switched back to your previously successful mixing method, or are you still using the new method you mention above? The only difference between the old method and the new method of mixing is that the new method stirs a little bit more vigorously for the last 5-10 folds. That said, I am still using the new method. Maybe I need to go back to the old method of mixing, i.e, all gently folding. I'll add that to the list of things to try.
-
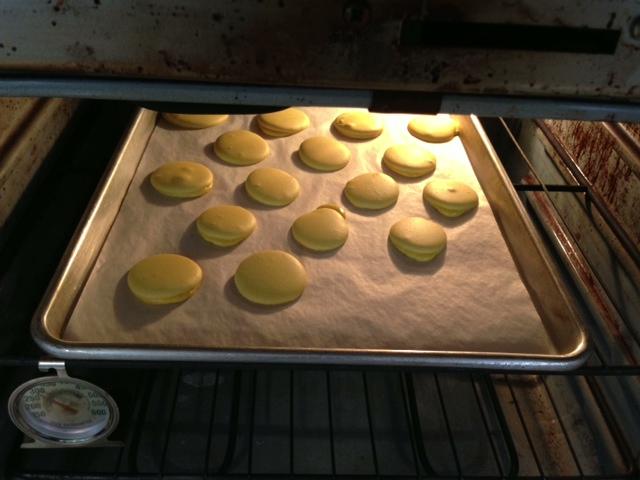
I really don't know what to do. I looked around on the web and a lot of people said that what I was seeing was probably due to too high of a temperature in the oven. I had noticed that my oven tends to over shoot the set temperature by about 25F and since I usually bake macarons at 350F that could be a problem. I reduced the temperature to 300F and kept a very close eye on the macarons and the temperature as they baked. The top photo shows the macarons in the oven after about 4 minutes of baking. It looks like the top shell has formed and the foot is starting to ooze out of the sides of some of the macarons. The second photo shows the end of the bake at about 15 minutes. I just don't know what to do. This is worse than when I baked at 350F. I used to be able to make macarons, but I'm ready to give up! Help!!! I wish I could be of help. I've made these things for years and thousands of them, sometimes they just screw with you. I had that happen at Christmas. I set out to make Christmas presents, and I had so many not work. I was not pleased by all the nut flour that was wasted. The day after I started again, and I found that I wasn't whipping the whites stiff enough (I use the French meringue method). After that, every batch came out perfect. But, a couple of weeks ago, I needed to make some for my step-sister's mom, and the same problem, even whipping the whites just like before. I have some old whites in the fridge, I'm thinking about experimenting today for the heck of it. Maybe I can figure out the problem. I'm just a novice at macarons, but I'm a thorough researcher and here are my thoughts, based on what I've read: 1. Macaron recipes vary, thus techniques / directions vary: what works for one, may very well not for another. For instance, I read that if you can lift the macaron off the baking sheet while it is in the oven, it's done. This is not the case for the recipe in this link: http://www.eatlivetr...rk-in-progress/ I baked one tray for an extra four minutes. This resulted in very hard cookies. The advice of Mardi using her recipe above is right on: once the macs are cooled, they are easy to remove from parchment paper...take them out at 16 minutes even if they stick. 2. The best temperature for macs varies according to the recipe. Mardi's method/recipe was spot-on at 300 degrees Fahrenheit. When I baked a tray at that temp (using a thermometer in my oven, rack in the middle), the cookies were excellent; the first tray that went in at a slightly higher temp produced tough cookies. 3. Resting the macs is essential. But the best way to tell when they are ready is by touching them; if they are no longer sticky and don't make an indentation, they are ripe for baking. 4. Beating the egg whites to stiff, of course, is essential. There is a difference between a "normal" stiff peak and the "stiff" necessary for macarons. Someone explained it best: if you can hold the bowl of whites above your head without it falling on you, it's stiff enough. Also, some recipes say fold gently, others say get the air out! Mardi, again, was spot-on as the batter with more vigorous "folding" tended not to be hollow and had more dainty feet. 5. When I bake pie crusts, I keep a cookie sheet in the oven while the oven is preheating; this very hot sheet helps to set the pie crust more quickly than simply putting the pie crust on an oven rack or on a cold cookie sheet (less bubbling). Mardi suggests doubling on on the baking sheet for macarons. This probably helps to set the macarons too. 6. Weigh everything on a cooking scale, digital preferable. 7. I always keep several dozen eggs in my fridge for two weeks; I also keep a dozen on my counter on a daily basis so they cook quickly for breakfast since they are at room temperature. They are still "good" for consumption. All I did for Mardi's recipe was use the eggs that were on my counter; at least seven days old in my house between fridge time and counter-top time. I'm not sure if this is the same as aging egg whites by separating them and keeping them in fridge for a few days, but...they are "old" eggs. Since you've used the same recipe for a while, perhaps your oven needs to be calibrated. Did you get new baking pans, try a new brand of sugar or almond flour, change your type of coloring agent, baking in a different place, is a storm brewing? Good luck, hoped this helped and keep us posted! paulaq Paulq, thanks for all of the suggestions. I've been making macarons for years using Pierre Herme's Macaron book with no problems. I did take a couple of courses on macarons this year and as a result made some changes. My problems started after the second of these courses. In answer to some of your questions: 3. I do rest the macs. Usually for about 45 minutes before baking. This has always worked in the past. I have a small oven that will only take one half sheet pan at a time so I usually have to bake one after another so some pans get a rest of over an hour. 4. The strength of the meringue could be an issue. I do use the trick of turning the bowl upside down and nothing falls out, but my peaks have never been super stiff. But then, the meringue always worked up to the last couple of batches! 5. Maybe I'll try to extra sheet pan preheated in the oven. I use this technique to make madeleines always. 6. Every thing is weighed on a digital scale. 7. Prior to the first course on macarons that I took last year, I aged my egg whites for a week in the refrigerator. At that first course, they suggested aging egg whites for 24-48 hours at room temperature covered by cheesecloth. The first couple of batches of egg whites that were aged that way posed no problems. These were the macarons that I made between the first and second courses. I should mention that I buy eggs when they are on sale, separate them all and freeze the whites. To use them I "saw" off however many grams of egg whites that I need while the egg whites are still frozen and let them thaw. I have used egg whites stored this way for years with no problem. A few things have changed in the way that I do things and I don't know if any are significant. 1. I started using powdered food coloring and boiling the food coloring with the sugar syrup (I use an Italian meringue method). Prior to that I used liquid food coloring added while folding the batter. Boiling the powdered food coloring worked the first couple of times that I tried it. I plan to go back to liquid food coloring in the next batch and see what happens. 2. I got a new source of parchment paper, although I can't imagine how this could matter. I haven't noticed anything different about the behavior of the parchment paper in any other applications though. Next batch I'll try baking one sheet pan on parchment and a second sheet pan on a silpat. This may not help much because I've never baked macarons on a silpat before, but I don't have any more of the parchment paper that I used to have. 3. The second course that I took made a big point about drying the almond flour before use. I should mention that I store my almond flour in the freezer. They said to preheat your oven to 200F, process the almond flour and powdered sugar in a food processor, put the processed mix on a sheet pan, put into the oven, turn the oven off and leave it there for 24 hours. Then sift before using. Prior to taking this second course, I would simply take my almond flour out of the freezer, let it warm up for 24 hours at room temperature, then combine it with the powdered sugar and sift. Next batch, I'm going back to the original way of treating the almond flour. The plan is to try the things that I mentioned above after I get another batch of egg whites aged. I'll keep you posted.
-
Petit Macarons is one of the books that I consulted from troubleshooting and that's where I got the idea that temperature was a problem Actually, though, I think that my oven is running too hot. That's why I tried this batch at a lower temperature than usual (300F vs. the usual 350F). I don't turn the pans, but I do open the oven twice during baking to let out built up humidity (got this tip from Pierre Herme's macaron book). I'm at a loss.
-
I really don't know what to do. I looked around on the web and a lot of people said that what I was seeing was probably due to too high of a temperature in the oven. I had noticed that my oven tends to over shoot the set temperature by about 25F and since I usually bake macarons at 350F that could be a problem. I reduced the temperature to 300F and kept a very close eye on the macarons and the temperature as they baked. The top photo shows the macarons in the oven after about 4 minutes of baking. It looks like the top shell has formed and the foot is starting to ooze out of the sides of some of the macarons. The second photo shows the end of the bake at about 15 minutes. I just don't know what to do. This is worse than when I baked at 350F. I used to be able to make macarons, but I'm ready to give up! Help!!!
-
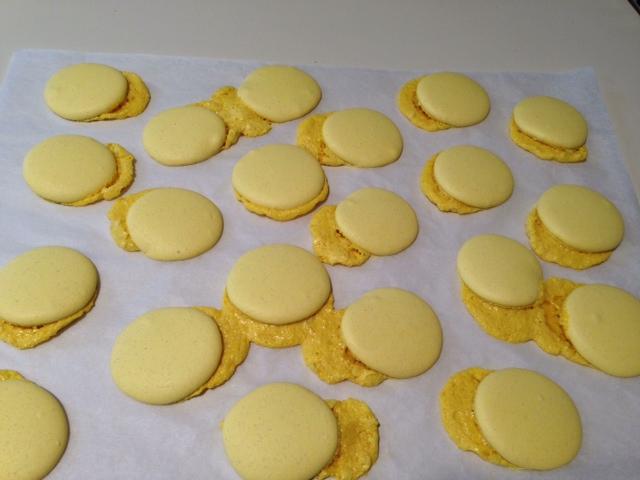
Same sugar. The only new thing that I can think of is that I changed supplier of parchment paper, but I don't see how that could cause this effect. I checked all of my sheet pans and the oven last night to see if they were level and they are. But then it's not a new oven or new sheet pans. The only thing that I have changed in the way I do things is some modifications of the way that I do the mixing after taking a Macaron class last fall. I'm wondering if I'm over mixing, although in that case I would expect to not get feet at all. It's like the feet melt out after forming. Next batch I'll go back to my old mixing method and see what happens. I can't think of anything else to try. Meanwhile I cut off all of the melted out feet on this batch of shells and filled the macarons and they taste fine! Just not very pretty.
-
Weird, no? It's a regular electric oven, not convection. Until these last 2 batches they have baked fine in the same oven and had good feet. I haven't had problems baking anything else in the oven lately. I don't know if you can tell from the photo, but the many of the shells have also taken on more of an oval shape, although they were round when they went into the oven. It kind of looks like the tops of the shells have slid off the feet.
-
I have made macarons for years with little problem, but the last two batches of shells have looked like the attached photo. I don't know what I'm doing differently. Looks to me like the meringue has collapsed. Any ideas? I'm using the recipe from Pierre Herme's Macaron book.
-
Do you need to boil or steam vac packed chestnuts before beginning the sugar syrup process? Just not clear to me if vac packed chestnuts are cooked at all.
-
I've had an ICE-100 for a couple of months now and can't say enough good things about it. Previously I was using one of the Cuisinart bowl-in-the-freezer models. The ICE-100 is much quieter. Most importantly I think that the texture of the ice cream that I get out of the ICE-100 is much better.
-
Ganache issues with "Couture Chocolate" by William Curley
cmflick replied to a topic in Pastry & Baking
I'll have to try to make one of these ganaches again. I did weigh the cream, so it sounds like I may have had too much. Could explain my problems with too soft ganache. The too soft ganaches do make great fillings for molded chocolates, though! -
The Comprehensive Home-Made Fondant Discussion: Making, Using, Storing
cmflick replied to a topic in Pastry & Baking
Thanks for the tip! I figured out yesterday that my new candy thermometer is woefully defective. It responds very slowly to temperature changes and hence what I thought was 236F was more like 246F! I checked the thermometer vs. the an old thermometer and found that the new thermometer lags the old one as temperature rises by anywhere from 8 to 12 degrees. Once it reaches a constant temperature, e.g., boiling water, it's fine. I'm blaming the weird fondant on overcooking the sugar. -
The Comprehensive Home-Made Fondant Discussion: Making, Using, Storing
cmflick replied to a topic in Pastry & Baking
I've made fondant using the recipe in Greweling at Home countless times with no problems. I cooked the sugar to 236F as per the recipe, but while mixing the fondant, it turned very dry and crumbly. I let it mature overnight before trying to make thin patties. When I tried to melt the fondant for thin patties it was very difficult to melt. It didn't start to melt until about 140F and at 170F was still way too thick to use. I couldn't push the temperature any higher since I wanted to add invertase. Any ideas as to what happened to my fondant? -
I modified the King Arthur recipe above to substitute honey for the sugar and include a preferment (also converted recipe to metric weight amounts). I usually brush the buns with milk after they bake. I think that this version has a little better flavor and keeps better. You can also use this recipe to make pretzel rolls: After 2nd rise, boil rolls for 30 seconds on each side in 8 quarts of water with 1/4 c baking soda and 2 tbsp sugar. Brush with egg white before baking and sprinkle with pretzel salt. Bake the same as for the burger buns. Ingredients Preferment 154 gram Water 154 gram All-purpose flour pinch Yeast, Active Dry Dough 310 gram All-purpose Flour 50 gram Water 2 tbsp Butter 1 ea Egg 79 gram Honey 1 tsp Salt ½ tbsp Yeast, Active Dry Instructions Combine ingredients for preferment and ferment overnight. DOUGH: Combine remaining ingredients with preferment and knead until gluten is fully developed (about 6-8 minutes with a Kitchen Aid on speed 2). Let rise about 1 hour at room temperature. Divide into 8 pieces. Shape into balls and let rest for about 20 minutes. Flatten balls and let rise for 50-60 minutes. Bake at 375F for about 20 minutes or until golden brown.
-
Ganache issues with "Couture Chocolate" by William Curley
cmflick replied to a topic in Pastry & Baking
My cream is about 36% butterfat. Do you think that could effect the firmness of the ganache? -
Ganache issues with "Couture Chocolate" by William Curley
cmflick replied to a topic in Pastry & Baking
I tried using tempered chocolate with another one of the Curley ganaches (passionfruit/mango) and the ganache was much too soft to slab as was the star anise ganache that I made previously. It did make a great molded chocolate though. Excellent flavor. I also made the orange/balsmic caramel. The flavor is great, but I was somewhat surprised at how liquid the caramel is. If you bite into the molded chocolate you will definitely have a handful of caramel filling! -
Ganache issues with "Couture Chocolate" by William Curley
cmflick replied to a topic in Pastry & Baking
I'll have to try some more recipes from the book, but make the ganaches more like I usually do, i.e., with tempered chocolate and use for molded chocolates. I remelted the slabbed ganache and used it for molded chocolates. The texture is a little "coarser", i.e., not very creamy, than I would like, but the star anise flavor is excellent. I was especially interested in some of the caramel recipes, since there are some interesting flavor combinations. Good to hear that the caramels work well. -
Has anyone tried any of the ganache recipes in William Curley's book Couture Chocolates? I tried to make the star anise ganache (p. 66) and it didn't solidify. The recipe says to slab the ganache and cut the next day. The problem was that the next day it was still much too soft to cut. It was more the consistency of a very (emphasis on very) soft ganache for a molded chocolate. The recipe uses a mix of bittersweet chocolate and gianduja for the chocolate component. I was suspicious of the recipe before I began because the ratio of the chocolate mix to cream is only about 1.25:1 which seemed too low to me for a slabbed ganache. Also the recipe calls for heating the chocolate to about 45C (113F) before emulsifying with the cream. Could this have contributed to the ganache not setting, at least in the 24 hour timeframe called for in the recipe? I usually use tempered chocolate to make ganaches. The instructions also have you use a chocolate/cocoa butter mix for the foot. As this mixture crystallized on the slab it cracked a lot and was very brittle. Meanwhile I scooped the ganache up and it's sitting in the refrigerator until I have time to make some molded chocolates. Should be a good filling for that! On the bright side, the flavor is quite nice.
-
Cooking with "Chocolates and Confections" by Peter Greweling (Part 2)
cmflick replied to a topic in Pastry & Baking
I use coconut oil that is labeled that it melts at 76F and it works fine. I've made both mint and peanut butter meltaways with it. -
Cooking with "Chocolates and Confections" by Peter Greweling (Part 2)
cmflick replied to a topic in Pastry & Baking
I have made both the mint and peanut butter meltaways and dipped in chocolate. At Kerry Beal's suggestion I added about 5% milk chocolate to the dark chocolate that I used to dip and had no problem with bloom. I don't really understand the reasons why, but the milk chocolate is supposed to inhibit bloom. -
I made the green tea meltaways from Greweling's at Home book. They're made with white chocolate. The texture is amazing, i.e., very creamy. I have made the mint meltaways before and what surprised me with these is how long that it took for them to crystalize to a point where they could be cut. Whereas the mint meltaways (dark chocolate) could be cut an hour after pouring the slab, it took about 6 hours before the green tea meltaways could be cut. I much prefer the texture of the green tea meltaways, though. The mint meltaways made with all dark chocolate were a little bit on the hard side for me.
-
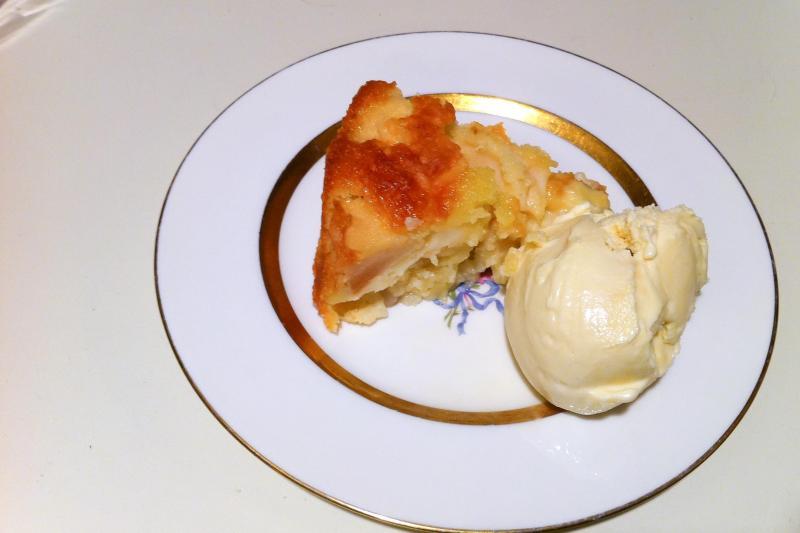
Marie Helene apple cake from Dorie Greenspan's book "Around My French Table". Cinnamon ice cream from David Lebovitz's book "The Perfect Scoop".
-
I have made them several times with dark chocolate (70%). Also enrobed them in dark chocolate.
-
I did enrobe mint meltaways in dark chocolate spiked with about 5% milk chocolate as Kerry suggested. There was no fat seepage at all.


