Brent
-
Posts
5 -
Joined
-
Last visited
Content Type
Profiles
Forums
Store
Help Articles
Everything posted by Brent
-
A Day in the Life of a Freeze Dryer After buying our freeze dryer I was naturally curious as to how it "knew" when something was done, since batch times varied so much depending on what was being processed. Watching the cycle times didn't seem to tell me anything at first -- especially without a thermometer to tell me what was happening inside -- until I finally caught on that applying heat to the frozen food affected the vacuum, which provided the measure of how dry the food had become. I thought an easier way to see what was happening would be to make a time lapse video of an entire freeze drying cycle. As I was about to prepare some apples for freeze drying yesterday, I thought it would be a good time to do that -- so out came the GoPro. It's hardly the most exciting GoPro video for sure, and some may think it's about as interesting as watching a tree grow, but if you really want to see the Harvest Right "in action" in order to understand what's happening (not that there's much to see), this provides a "speeded-up" way to do that! In any case, maybe it will help some newbie HR Freeze Dryer owners to answer some of the questions I once had. Here's the link to the video:
-
Tony: Very interesting! Makes me glad I live in a dry climate. Question for you: I'm impressed by the shortening of cycle times. Obviously some of that is from the improvement in insulation on the lines, etc., but I'm wondering how much of it might be from "drying out" of the insulation and outer walls of the freeze drying chamber. Perhaps the ice buildup reduced the efficiency of the insulation(?) It would be interesting to know. Have you noticed any differences in your internal temperatures since your changes? (By the way, I liked your idea for monitoring the temperature, so bought the thermometer from Walmart you previously suggested.) I, too, have noticed a significant difference when I defrost mid-cycle. I do that routinely now. I carefully use a heat gun to "shock" the surface of the ice, moving back and forth across it fairly swiftly, which causes it to crack and separate somewhat from the cylinder. I can then usually remove it while still in the ice stage, producing very little actual water. Doing that I can remove the ice, reload the system, and be back up and running again in about 5 minutes.
-
Gypsyman: Proof again that "great minds think alike". In my initial pondering, I thought using an oil filter base would be a logical approach -- but I didn't have one handy and figured my car might miss it. Besides, one of my goals was to keep this affordable, and they tend to be a little pricey. I did wonder though, since this is gravity flow and not pressure driven as on a car, if having the filter mounted horizontally might result in using only "half" the filter, as the oil would tend to travel through the low side of the filter -- although in practice, I suppose, as the filter material gets plugged it would force the fluid level higher. If you make one, let us know how it works out!
-
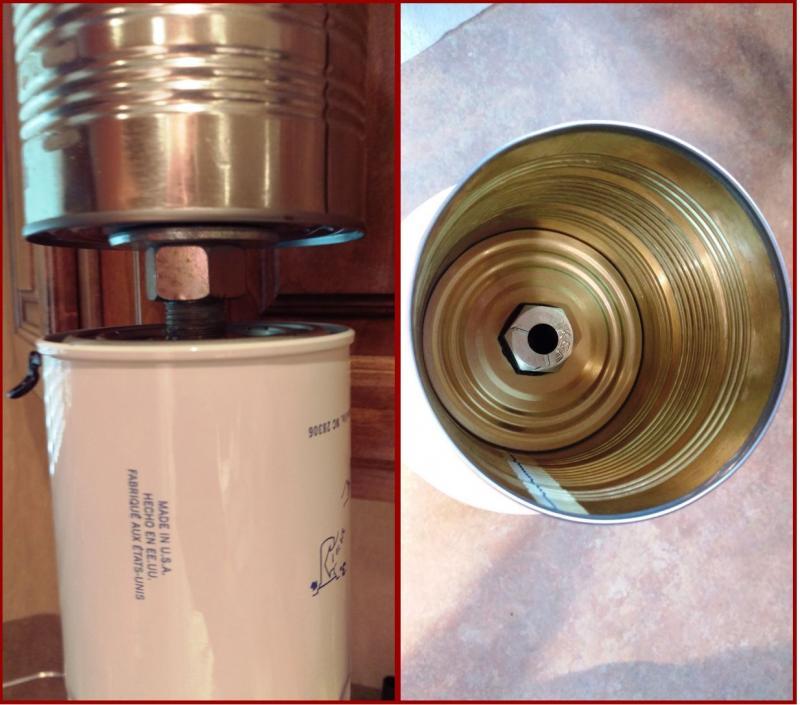
Thanks dsheidt. I was afraid that the AN8 fittings I could find might not be long enough to provide the space needed so that the oil could flow over the top of the filter, especially given my "disk" method of holding up the can. Of course, if someone used a larger can, say a #10, that is bigger than the top of the container that surrounds the filter and captures the oil, then the "disk" wouldn't be needed at all. In that case, an AN8 fitting might work -- or maybe there are longer ones out there somewhere. I found out the hard way about the anti-drainback seal when I first tried the filter and got... nothing. I did do some research afterward and learned, as you point out, that there are some filters than don't use the seal but by then I was committed. Fortunately, it wasn't all that hard to remove it, but definitely better not to have to.
-
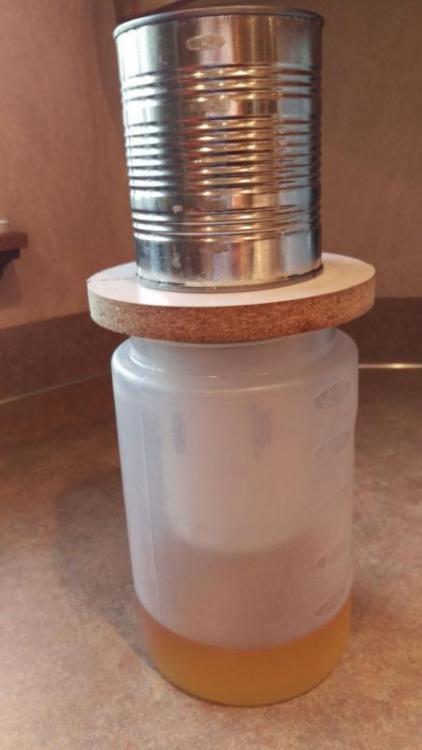
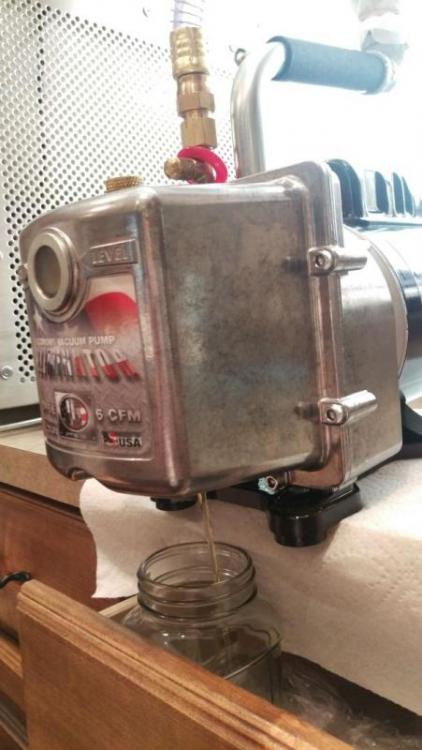
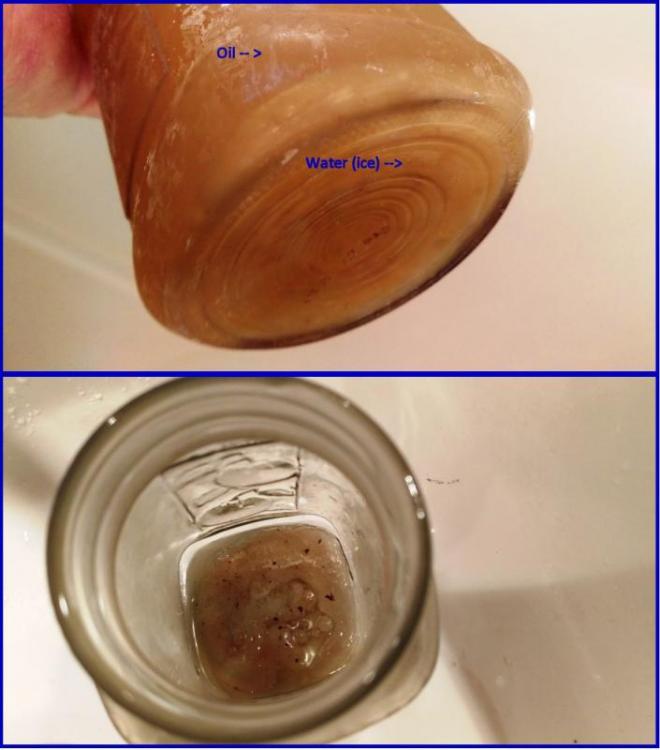
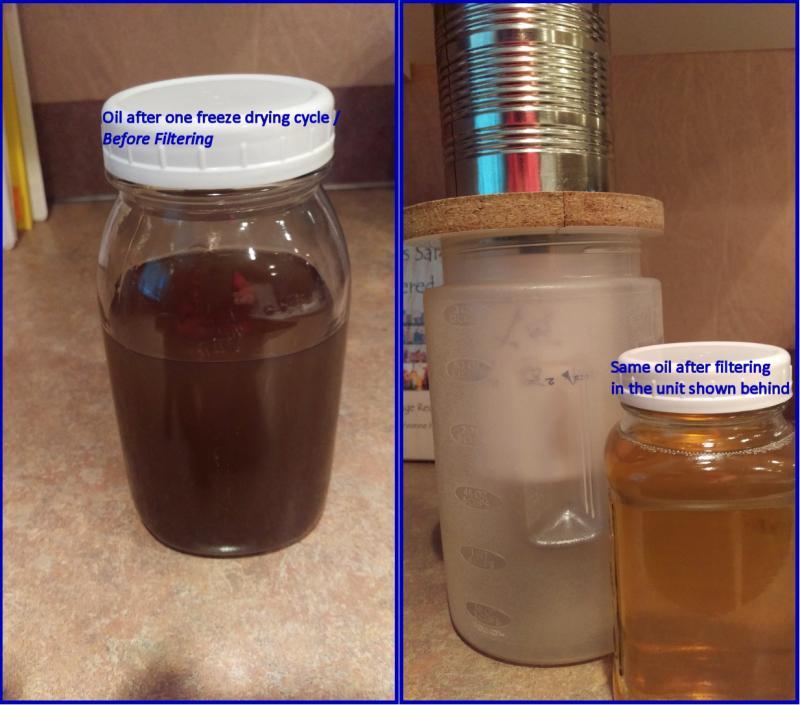
Hi all, Discovered this site this weekend, and spent much time reading the 747 previous Freeze Drying posts. Thanks to all for sharing -- I've learned much. We have been HR owners for about a year -- love it, btw -- but only into "24/7 mode" for about the last three months. As was inevitable (though unanticipated), I've scaled the learning curve about vacuum pump maintenance, (aka water drain-offs, oil changes, power flushes, and pump cover disassembly and cleaning.) We've followed the instructions given by HR. Like many, I was surprised to see the buildup of gunk (I believe that's their official term ) in the pump, and the effects of the accumulated water. Having recently completed my third anti-gunk teardown, I thought there has to be a better way. It seemed like filtering the oil might help, so at first I tried the obvious: coffee filters and filtering through dense cloth. Short story: Not worth the effort and the mess. It occurred to me that the solution might be to use an automotive oil filter. (There is a reason they call them "oil filters", after all.) The problem is, a car's oil filter operates under pressure, and has the intake and outlet on the same side of the filter. There is no flow "through" in the sense of what goes in the top comes out the bottom. Hmmm... I finally came up with a solution that would work around that, and here it is: (--don’t laugh, first impressions are often misleading). The oil goes in the can at the top, passing into the filter below, filling it. The overflow then goes out of the filter and is caught in the container beneath. The can and the filter are linked by a threaded pipe, as shown here: The one "gotcha" I encountered in making this is that a typical car oil filter attaches with a 3/4x16tpi threaded pipe. I could find no such pipe anywhere. My solution was to use instead a 3/4x16tpi bolt, and then drill a hole through it. Fortunately, I have the equipment to do that, but most probably wouldn't. Even then, bolts are hard material, and I dulled two drill bits getting it done. The "disk" that the can and filter rests on is just a board with a 2" hole in its center, cut in half. So now I change (or perhaps I should say, “recycle”) the oil after every batch. I immediately drain the oil while it's still hot and when the water and sediment particles are mostly still suspended. Someone's bound to ask about the water, which of course the filter wouldn't exclude, although it would probably accumulate in the bottom of the filter and not pass into the container. I solve that problem by letting the drained oil sit a while, so that the water and sediment will settle, then I put it in the freezer until the water freezes. The water & heavier gunk stay behind, while the oil still flows nicely. Here are pictures showing the oil with the water frozen at the bottom, and the ice and sediment that remain after the oil is poured off into the filter. Here's a before/after comparison of oil after one batch (previously new oil used for one batch of mushrooms -- yummy, btw) and the same oil after being run through the filter: A couple of other points: There are obvious and easy improvements that could be made, such as using a container with a dispensing faucet (think of a lemonade jar, for example). Also, for the technically savvy, auto-mechanic-type person who may be wondering about it, there is an anti-backflow seal that has to be removed from the oil filter, but that can be removed by cutting through it and pulling it out with needle nose pliers, which is easily done. So far there has been a noticeable difference in the cleanliness of the oil, and hopefully that will be true for the buildup of "gunk" as well. I imagine pump disassembly and cleaning will still be needed, but hopefully not nearly as often, and with a little luck, it won't be nearly as "gunky". Sorry for such a long post (especially my first one!) Hope this is helpful to someone! Brent