Search the Community
Showing results for tags 'Recipe'.
-
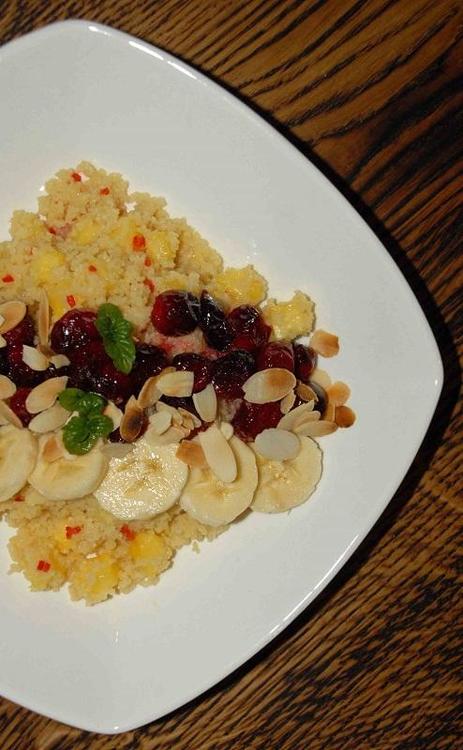
ALMOND CUSCUS WITH CRANBERRIES AND PINEAPPLE I hate getting up in the morning. My household knows that before 8 o'clock I'm unbearable, and because almost every day I wake up much earlier, I tend to be unbearable more frequently than I want. Every extra five minutes of sleep is priceless, so I appreciate a good breakfast that is not too complicated and is quick to prepare. Recently, I have been preparing breakfast with groats and flakes. This time I chose cuscus. This product is a cross between pasta and groats, and it doesn't need long to prepare. It is enough to add hot water or milk and leave for a few minutes. I added some fresh pineapple, cranberries and banana. I spiced it up with some hot chili pepper . Ingredients (for 2 people) 125g of cuscus 400ml of almond milk 1 tablespoon of honey 1 teaspoon of vanilla essence 2 slices of fresh pineapple 1 teaspoon of minced chili pepper 150g of fresh cranberries 2 tablespoons of brown sugar 1 banana 4 tablespoons of flaked almonds Wash the cranberries and put them into a pot. Add two tablespoons of water and the brown sugar. Boil, stirring gently until the cranberries burst and the sauce has thickened. Boil the almond milk with the vanilla essence. Pour the milk onto the cuscus and leave for 5-7 minutes. Slice the banana and roast the almond flakes. Peel the pineapple and dice it. Mix the pineapple, chili pepper and honey. Add the pineapple to the cuscus and mix it in. Put the mixture into two bowls. Put the cranberries and banana on the top and sprinkle with the almond flakes. Enjoy your meal!
-
SWIFT HOMEMADE NAPOLEON Sometimes we have days – may there be as few as possible – when nothing works out. I can even burn the water for tea. I have two ways of dealing with such days. The first is to sit in a corner and wait it out – maybe it will sort itself out. I can only do this when I'm alone. When I have a hungry family I have to look for another way. My second way is to use only well-known recipes and stick to them irregardless of how well I know them. Any experiments in this situation will end in failure. Last weekend was just difficult. My husband helped me prepare dinner, but the dessert was my problem alone. Following the rules, I used a recipe for napoleon that is so simple there is no way you could fail. I recommend it to anyone struggling with creative impotence or who likes glamourous results after not too much effort in the kitchen. Ingredients (for 9 napoleons) 1 pack of chilled French pastry 500ml of milk 6 tablespoons of sugar 1 packet of powdered blancmange 50g of butter 2 egg yolks 1 teaspoon of vanilla essence 1 tablespoons of potato flour 2 tablespoons of flour caster sugar Heat the oven up to 180C. Cover a baking tray with some baking paper. Cut the French pastry in half. Bake one half for 20 minutes. Remove it from the tray. Cut the second part into 9 squares. A cake prepared in this way is easier to divide into portions. Put them on the paper and bake for 20 minutes. Now prepare the crème. Boil 400ml of the milk with the sugar, vanilla essence and butter. Mix the rest of the milk with the powdered blancmange, flour and potato flour and egg yolks. When the milk has boiled, take it off the heat and add it to the mixture, stirring constantly. Put it on the heat and boil, stirring until the mixture is coagulated. Take the pot off the heat. Put the warm mixture on the whole part of the French pasty and then cover it with the sliced part of the pastry. Cover the dessert with aluminium foil and leave in the fridge for a few hours. Cut and sprinkle with the caster sugar before serving.

-
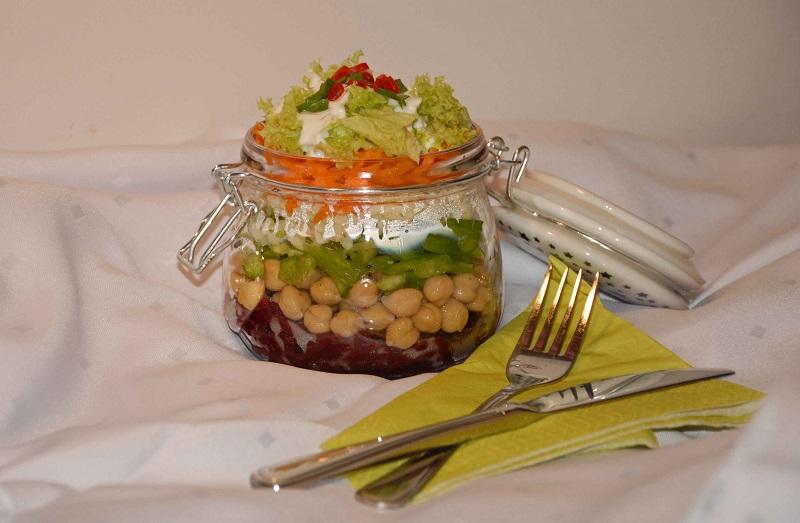
LUNCH FROM THE JAR, I.E. LAYERED SALAD IN THE OFFICE Most of us take lunch boxes to the office. Some lucky people can warm their food up at work The rest have to eat sandwiches. Sandwiches are great, but even if we absolutely love them we could get fed up with them in the end. Regardless of where we work we can save the situation with salads. Every day we can prepare a different one and we have an entirely new lunch. If we also take an attractive dish, we have something that is not only tasty but also glamorous. I would like to share with you the recipe for a salad which looks equally as beautiful as it is yummy. The chickpeas and groats make it a satisfying and balanced meal, after which we won't be hungry. I think that if you prepare your lunch in the morning and plan to eat it at lunchtime, we should keep the salad and the dip separately. Otherwise, after a few hours in the jar, we have an unappetising dish with squishy lettuce, which isn't what we want, is it? Ingredients (for 2 people) 1 beetroot 200g of tinned chickpeas 100g of bulgur 1 carrot 1 fresh green pepper 4 lettuce leaves 200g of natural yoghurt handful of minced chives 1 small chili pepper salt and pepper Clean the beetroot and bake or boil it. Grate the beetroot and carrot. Cut the pepper into thin strips. Boil the bulgur in salty water. Arrange in layers in a jar the beetroot, chickpeas, pepper, bulgur, carrot and lettuce. Dice the chili pepper. Mix the natural yoghurt with the chives and chili pepper. Spice it up with salt and pepper. Add the dip to the salad just before serving.
-
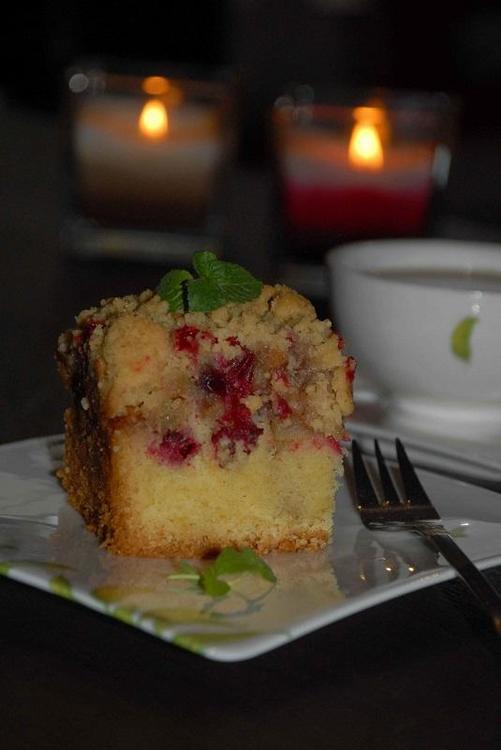
CRANBERRY-APPLE CAKE The worst thing about my cranberry-apple cake is the way it looks. It didn't look impressive, but it was so yummy it disappeared from the baking pan before it had completely cooled down. My children said that it was a colourful apple pie, and it really was something like that. Apples with cinnamon are the basis of apple pie – one of my favourite cakes. However, the sour cranberries make it more fresh and interesting. The crumble topping was, for my son, the most important part of the cake. I had to drive him away, because otherwise the cake would have been deprived of its crunchy top. Ingredients (18×26cm cake tin ):dough 200g of flour 150g of butter 3 eggs 1 packet of powdered vanilla blancmange 1 teaspoon of vanilla essence 200g of sugar 1 teaspoon of baking powder pinch of saltfruit 250g of fresh cranberries 1 apple 3 tablespoons of brown sugar 1 teaspoon of cinnamoncrumble topping 5 tablespoons of brown sugar 100g of butter 150g of flour First make the crumble topping. Put the cool butter, flour and sugar in a bowl. Knead them until you have small lumps. Leave it in the fridge. Heat the oven up to 180C. Cover a cake tin with some baking paper. Mix the flour with the baking powder and salt. Cream the butter with the sugar. Add egg after egg to the butter, stirring constantly. Add the flour, vanilla essence and powdered vanilla blancmange. Mix it together until you have a smooth dough. Put the dough into the cake tin. Wash the apple, remove the apple core and cube it. Mix the cranberries, apple, sugar and cinnamon in a bowl. Put the fruit on top of the dough. Cover the fruit with the crumble topping. Bake for 50 minutes. Enjoy your meal!
-
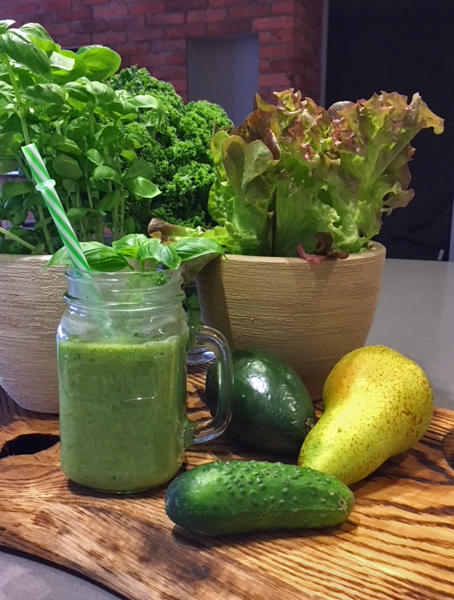
INSTEAD OF COFFEE? - MORNING GREEN COCKTAIL After waking up, most of us head towards the kitchen for the most welcome morning drink. Coffee opens our eyes, gets us up and motivates us to act. Today I would like to offer you a healthy alternative to daily morning coffee. I don't want to turn you off coffee completely. After all, it has an excellent aroma and fantastic flavor. There isn't anything more relaxing during a busy day than a coffee break with friends. In spite of the weather outside, change your kitchen for a while and try something new. My green cocktail is also an excellent way to wake up and restore energy. Add to it a pinch of curcuma powder, which brings comfort and acts as a buffer against autumn depression. Ingredients (for 2 people): 200ml of green tea 4 new kale leaves 1 green cucumber half an avocado 1 pear 1 banana pinch of salt pinch of curcuma Peel the avocado, pear and banana. Remove the core from the pear. Blend every ingredient very thoroughly. If the drink is too thick, add some green tea. Drink at once. Enjoy your drink!
-
BICOLOUR DESERT WITH SEMOLINA Today when we think about breakfast with milk we can choose different kinds of flakes, granolas, muesli and milk which has sometimes never been anywhere near a cow. When I was a child, only semolina rolled oats and rice were on the menu. Semolina with milk – our hated everyday breakfast – means that I don't fancy using it in my kitchen. But, as they say, time is a great healer and semolina was on our table last weekend for dessert. The dessert had two colours: the first layer was vanilla, and the second was with cocoa. On the top I put some mousse with blueberries. The dessert was very grand and really very tasty. Ingredients (for 4 people)vanilla layer 50g of semolina 400ml of milk 3 tablespoons of brown sugar 1 teaspoon of vanilla essencecocoa layer 50g of semolina 400ml of milk 3 tablespoons of brown sugar 2 tablespoons of cocoafruit mousse 200g of blueberries 1 tablespoon of brown sugar pinch of cinnamon 1 tablespoon of lemon juice First prepare the vanilla layer of the dessert. Boil the milk with sugar and vanilla essence. When the milk has boiled, slowly add the semolina, stirring constantly so as not to make lumps. Keep boiling and stirring until the mixture is stiff. Put some small glasses into some small bowls and arrange them in such a way that they are resting at an angle. Put the mixture into the glasses and leave to congeal. Now make the cocoa layer. Boil the milk with sugar. Mix the semolina with the cocoa. When the milk has boiled, slowly add the semolina with cocoa, stirring constantly so as not to make lumps. Keep boiling and stirring until the mixture is stiff. Place the glasses upright and put the cocoa mixture into them. Leave to congeal. Wash the blueberries and blend them with the sugar, cinnamon and lemon juice. Put the fruit mousse on top of the dessert. Enjoy your meal!

-
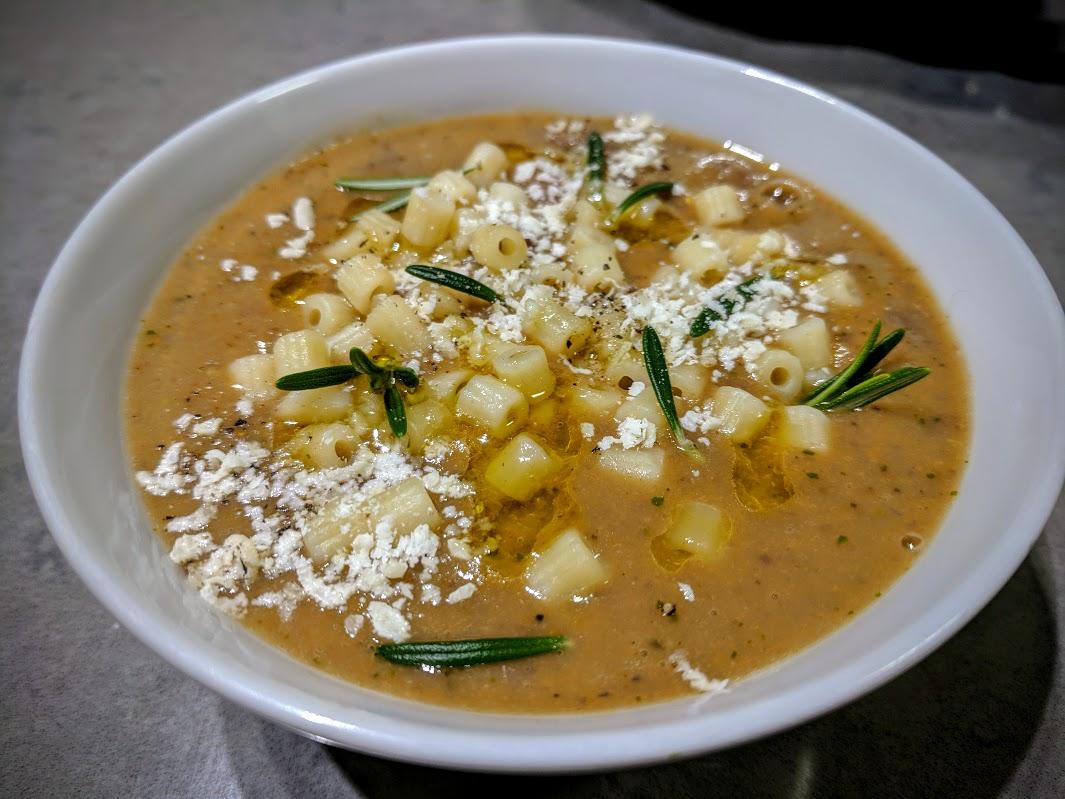
EXQUISITE JERUSALEM ARTICHOKE SOUP Jerusalem artichoke, also called sunchoke or earth apple, has been known in Poland since the first half of the XVIII century. It is a vegetable especially recommended for diabetics because it reduces the amount of blood glucose. Those who would like to lose weight should also reach for it. Jerusalem artichoke contains a lot of potassium so it reduces blood pressure, and inulin which reduces high cholesterol. I have looked suspiciously at the packaging of Jerusalem artichoke a few times. Only the soup I ate in a Warsaw restaurant convinced me to buy it. I prepared my own version of cream of Jerusalem artichoke. I found the recipe at the Polish page zakochanewzupach. However, I used my own spices. I served this soup with mushroom crisps and parsley olive oil. It was really excellent. Ingredients (for 4 people): 500g of Jerusalem artichoke 200g of potatoes 1 big onion 2 tablespoons of oil 500ml of vegetable stock 400ml of coconut milk 2 mushrooms fistful of parsley 2 tablespoons of olive oil salt and white pepper Dice the onion and fry lightly in oil. Peel the Jerusalem artichokes and potatoes and cube them. Add the vegetables to the onion and fry for a while on a low heat. Don't brown them. Put everything into a pot, add the vegetable stock and boil until the vegetables are soft. Add the coconut milk, spice it up with the salt and white pepper and boil for a while. Blend the soup thoroughly. If it is too thick, add more vegetable stock. Cut the mushrooms into thin slices. Fry the slices in oil until they are gold and crunchy. Grind the parsley in a mortar with a pinch of salt. Add the olive oil while grinding constantly. Serve the hot soup with mushrooms crisps and parsley oil. Enjoy your meal!

-
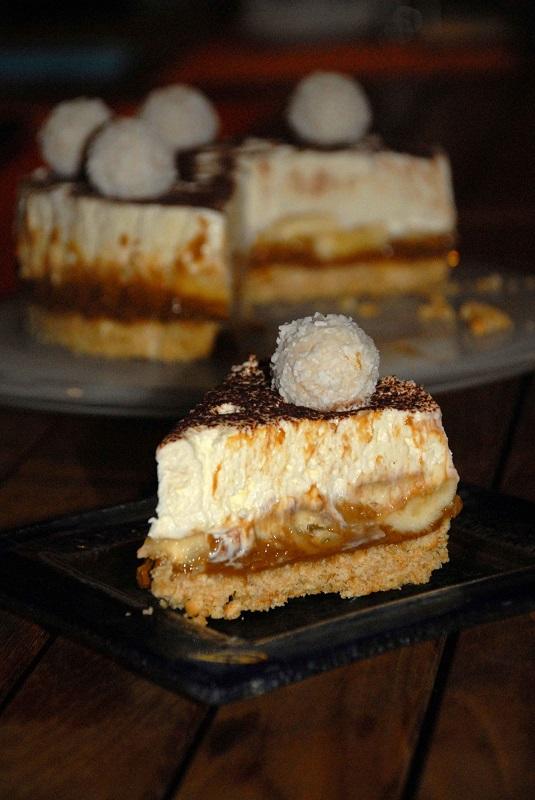
BANOFFE - MY DAUGHTER'S BIRTHDAY CAKE This year, mischievous nature tried to upset my daughter's birthday plans. Spending your birthday in bed with a thermometer isn't an excellent idea ¬– even for an adult. For a teenager it is a drama comparable to cancelled holidays. My daughter told me that you are thirteen only once. And she was right. Literally and figuratively. I wanted to sugar the pill for her on this day and cheer her up for a bit, so I prepared a caramel cake with bananas – banoffee in the form of a small birthday cake. My sweet magic and the dinner from her favourite restaurant worked, and in the end her birthday was quite nice. Ingredients (17cm cake tin): 150g of biscuits 75g of butter 200ml of 30% sweet cream 250g of mascarpone cheese 2 tablespoons of caster sugar 2 bananas 300g of fudge 1 teaspoon of dark cocoa Break the biscuits into very small pieces or blend them. Melt the butter and mix it up with the biscuits until you have dough like wet sand. Put it into a cake tin and form the base. It is worth rolling it flat with a glass. Leave it in the fridge for one hour. Spread the biscuit layer with fudge and arrange the sliced bananas on top. Whisk the chilled sweet cream with the caster sugar. Add the mascarpone cheese and mix it in. Put the mixture onto the bananas and make it even. Sprinkle with the dark cocoa and decorate as you like. Leave it in the fridge for a few hours (best for the whole night). Enjoy your meal!

-
 ON THE CHRISTMAS TABLE - ŁAZANKI - NOODLES WITH CABBAGE AND MUSHROOMS Traditionally, during the Polish Christmas Eve supper we don't eat any meat. Instead we have twelve dishes with fish, mushrooms, vegetables and cabbage. In my home everybody waits for their favourite meal: my husband and daughter for the herring dishes and vegetable salad, my son for the fried fish, while I wait for dumplings and jellied carp. One of the traditional dishes in many Polish homes is łazanki with cabbage and mushrooms. Łazanki are small, square noodles. The best dish is made with noble porcini mushrooms. I sometimes mix these forest mushrooms with sliced champignons, which look beautiful among the noodles. Łazanki are a Christmas Eve dish, but sometimes when my children ask me I prepare it during the rest of the year too. Ingredients: 500g of sauerkraut 1 onion 60g of dried porcini 6-7 champignons 1 tablespoon of caraway seeds 2 bay leaves 2 tablespoons of butter 300g of łazanki salt and pepper Soak the dried porcini in water for 4-5 hours. Cook them until they are soft. Cut them into smaller pieces. Dice the onion, slice the champignons and fry them in butter. Cut up the sauerkraut. If it is too sour, rinse it with water. Put the sauerkraut, onion, caraway seeds, bay leaves and cooked porcini and champignons in a pan with a heavy bottom. Spice it up with salt and pepper. Stew until the sauerkraut is soft (for 2-3 hours). Boil the Łazanki until it is al dente. Mix the noodles with the sauerkraut and mushrooms. Serve hot. Enjoy your meal!
-
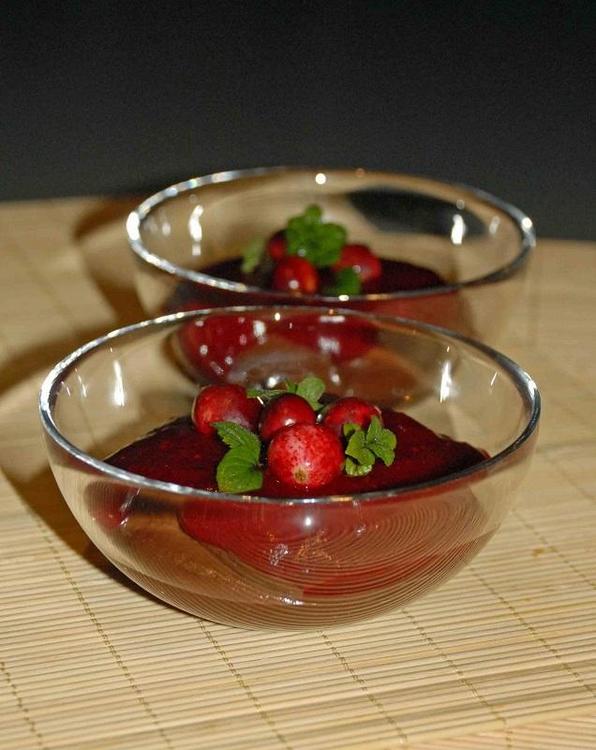
ON THE CHRISTMAS TABLE - CHRISTMAS EVE CRANBERRY KISSEL One of my friends from Ukraine told me about her traditional Christmas dishes. Except for stuffed cabbage with potatoes (which I have made already) I was surprised about cranberry kissel. I searched the Internet and I saw that in many Polish homes Christmas Eve supper ends with cranberry kissel. In my home we always drink compote with dried fruit, but maybe this year we will try a new dish on our Christmas menu. I wonder why cranberries are on the Christmas table. I didn't find any particular information about it (except the fact it is tradition). I think that a few years ago cranberries were treated as a natural cure which aids digestion, and this could be quite useful after a hefty Christmas meal! At my Ukrainian friends' home Christmas kissel is runny like a drink, but you can prepare it like a dessert with a more dense texture. I made the drink version, but you should choose which is better for you. Ingredients: 500g of cranberries a piece of cinnamon and a couple of cloves 6-8 tablespoons of sugar 2-3 tablespoons of potato flour Wash the cranberries and put them with the cinnamon and cloves in a pan. Pour in 500ml of water and boil until the fruit is soft. Remove the cinnamon and cloves and blend the rest. Add the sugar and mix it until it has dissolved. Sieve the cranberry mousse to make a smooth texture. Mix the potato flour with a bit of cold water. Boil the cranberry mousse and add the mixed potato flour, stirring constantly so it is not lumpy. Boil for a while. Pour the kissel into some glasses. Enjoy your meal!

-
COURGETTE MUFFINS WITH LEMON Since I found the recipe for courgette muffins with lemon on the Polish blog gotujzcukiereczkiem I decided to prepare them. My children looked at the ingredients with surprise. Courgette and cakes don't go together well. The argument that they add caster sugar to the courgette pancakes didn't convince them. The muffins reminded my husband of the lemon cake his grandma used to prepare many years ago. I just liked them. They were short lived, because they disappeared in no time, slightly lemony, moist and not too sweet. They were perfect. If I didn't know they had courgette in them, I would never believe it. Try it, because it is worth it. Ingredients (for 12 muffins) muffins 200g of flour a pinch of salt half a teaspoon of baking soda half a teaspoon of baking powder 150g of sugar peel from one lemon a tablespoon of lemon juice 2 eggs 150ml of oil a teaspoon of vanilla essence a teaspoon of lemon essence 210g of grated courgette icing: 3 tablespoons of milk 10 tablespoons of caster sugar 1 teaspoon of lemon essence Heat the oven up to 170C. Put some paper muffin moulds into the "dimples" of a baking pan for muffins. Mix together the dry ingredients of the muffins: flour, salt, baking soda and baking powder. Mix together the sugar and lemon peel in a separate bowl. Add the eggs, oil, lemon juice and both essences. Mix them in. Add the dry ingredients and mix them in. Grate the unpeeled courgette, don't squeeze and don't pour away the liquid. Add the courgette to the dough and mix it in. Put the dough into some paper muffin moulds. Bake for 25-30 minutes. Now prepare the icing. Mix the milk with the caster sugar and lemon essence. Decorate the muffins with the lemon icing. Enjoy your meal!


-
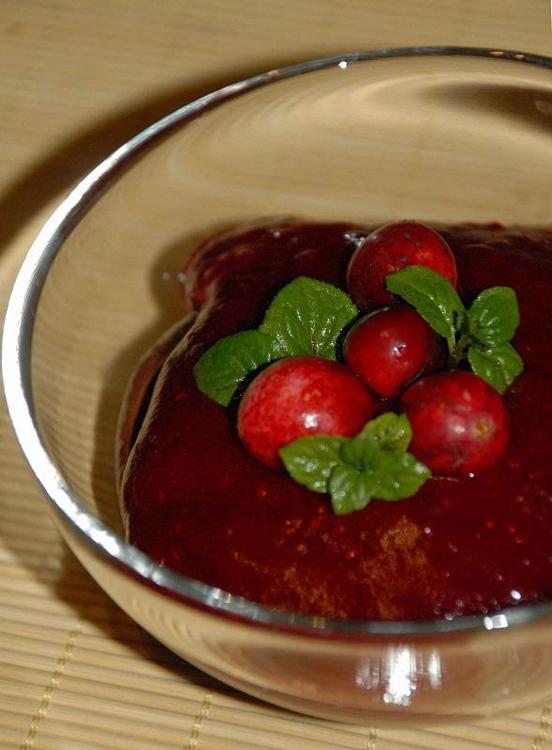
MILLET GROATS CHOCOLATE CREME WITH CRANBERRY MOUSSE Today I would like to share with you the recipe for the best chocolate crème I have ever eaten. It is thick, smooth and very chocolaty in flavour and colour. Despite the chocolate, the dessert isn't too sweet. But if somebody thinks that it is, I recommend serving it with slightly sour fruit mousse. You can use cherries, currants or cranberries. You will make an unusually yummy arrangement and your dessert will look beautiful. My children were delighted with this dessert. I told them about the fact it had been made with millet groats after they had eaten it, and ... they didn't believe me. Next time I will prepare the millet groats crème with a double portion of ingredients. Ingredients (for 4 people)chocolate crème 100g of millet groats 200g of dark chocolate 1 tablespoon of dark cocoa 250ml of almond milkfruit mousse 250g of fresh cranberries juice and peel of one orange half a teaspoon of grated ginger 4 tablespoons of brown sugar Boil the millet groats in salty water and drain them. Melt the chocolate in a bain-marie. Blend the millet groats, chocolate, cocoa and milk very thoroughly until you have very smooth crème. Pour the milk in gradually to make the right consistency of your desert. Prepare the fruit mousse. Put the washed cranberries, ginger, juice orange peel and sugar into a pot. Boil until the fruits are soft. Blend. Put the chocolate crème into some small bowls. Put the fruit mousse on top. Decorate with peppermint leaves. Serve at once or chilled. Enjoy your meal!
-
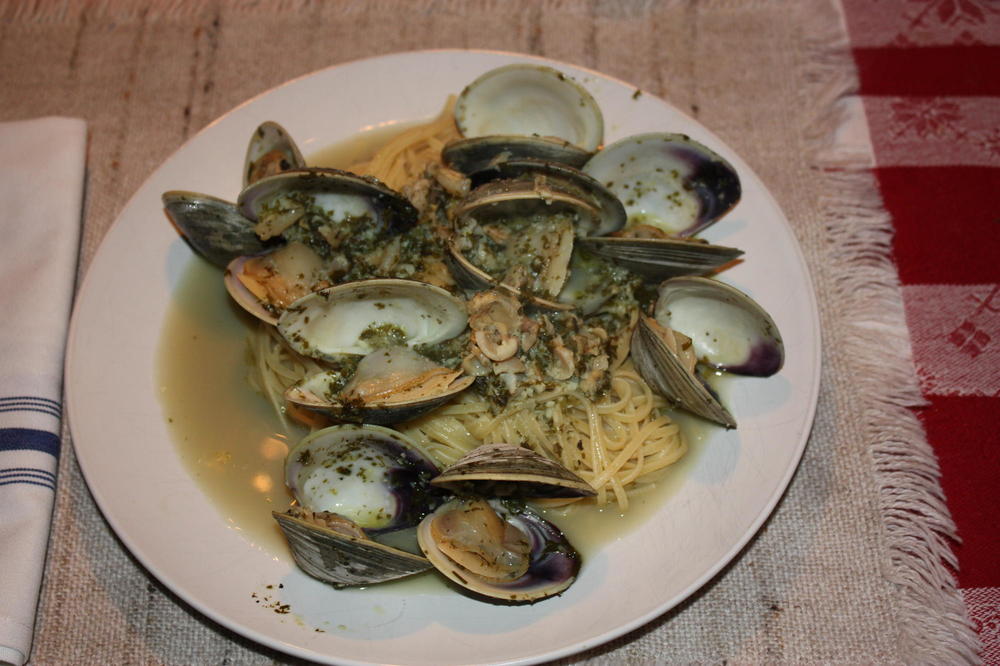
This will easily make enough sauce for 6 to 8 meals. I like to use 10 littleneck clams on each plate, so if this meal is for 2, get 20 fresh littlenecks. I like to go clamming and use the larger ones for the chopped clams. I open them raw and drain the juice and add it to the sauce at the same time I add the wine. In the winter, when it isn't practical to go clamming, I buy raw chopped sea clams and there is little sacrifice to quality of the dish. It is also a whole lot easier than opening the big clams yourself. Ingredients 1 pint of chopped clams 10 washed and scrubbed, live in the shell, littleneck clams for each serving 1 cup dry white wine 6 TBS olive oil 1 large head of garlic, peeled and roughly chopped 1 small bunch each (the bunched stems should cover a nickel) , chopped, of: curly parsley cilantro sweet basil (1 TBS if dried) salt and pepper to taste Directions In a 2 quart sauce pan add the oil, garlic and heat, without browning, to infuse the oil with garlic flavor. After a few minutes add the wine, herbs and bring to a simmer. Once it has simmered for a few minutes, remove from the heat and blend with an immersion blender. I tip the pan and start and stop a few times, trying to avoid splattering. Once the bigger lumps have been smoothed out, return the sauce to the heat and simmer until the wine (and clam juice, if using clams you opened) has been reduced by half. When it's time for dinner, add the chopped clams to the sauce and bring to a simmer. At the same time, put the salted pasta water on the heat. Once the sauce is at a simmer and the pasta water is at a rolling boil, add the littlenecks to the simmering sauce and turn up the heat and add the linguine to the pasta water. At just about the same time the pasta is cooked, the clams should be opening. I drain the pasta and return it to the pan it was cooked in (off the heat) and give it a splash of olive oil and a stir. Give the sauce a taste and adjust salt and pepper. Dish out the pasta servings and count out the open clams onto each. If they have not all opened , leave them at a simmer while picking out the ones that have. If they are fresh, they should all be open by the time your are done. Add some sauce with the chopped clams onto each plate and serve at once. Discard any clams that do not open. I like to serve with warm garlic bread, freshly grated parmesan or Romano cheese. HC

-
The basic formula for these cakes was developed by the wife of a mayonnaise salesman in an effort to help him out. I did a bit of research, and have found many variations. Early variants generally involve using less cocoa, which I cannot recommend. Later variants involve using cold water instead of boiling, adding salt, and additional leaveners. I personally do not feel that any additional salt is needed, as mayonnaise and that famous, tangy brand of salad dressing (sometimes the label just says 'Dressing') both contain a fair amount of salt. If you are using homemade mayonnaise or a low sodium product, an eighth teaspoon of salt may boost the flavor a bit. And, of course, somewhere along the way fans who prefer a certain salad dressing over mayonnaise started using it to make this cake. Nowadays, the Hellman's website has a different formula -one with added eggs and baking powder. I have not tried this newer formulation. Some versions of this recipe specify sifted cake flour. This will result in a very light cake with virtually no structural integrity, due to the paucity of eggs in this recipe compared to a regular cake. Cupcakes made this way give beautifully light results. However, every time I try to make a traditional 8" double layer cake with cake flour, I experience collapse. I recommend AP flour or at least a mix of cake and pastry flour. I have never made this with a gluten-free flour replacer. This recipe does not have very much structural integrity and as such does not make a good candidate for a gluten-free cake. I have made this cake many times, the type of sandwich spread you choose will affect the outcome. Made with mayonnaise, the cake has a good chocolate flavor and moistness. Made with that famous, tangy, off-white salad dressing that gets used as a sandwich spread, the cake has a subtle bit of extra brightness to the flavor. If one chooses to use a vegan mayonnaise, the result is tasty but lacking a little in structure; I would bake this in a square pan and frost and serve from the pan. The cocoa you use will also affect the flavor. For a classic, homey flavor use a supermarket brand of cocoa. To add a little sophistication, use better, artisan type cocoa and use chocolate extract instead of the vanilla extract. Supposedly, the traditional frosting for this cake should have a caramel flavor. Look for one where you actually caramelize some sugar first. Modern recipes for the icing seem like weak imitations to me; using brown sugar as the main flavor instead of true caramel. Chocolate Mayonnaise or Salad Dressing Cake makes enough for two 8" round pans, or a 9" square (about 7 cups of batter) 2 ounces/56g unsweetened, non-alkalized cocoa 1 cup/236g boiling water 1 teaspoon/4g regular strength vanilla extract 3/4 cup/162g mayonnaise, vegan mayonnaise, or salad dressing (the tangy, off-white, sandwich spread type dressing) 10.5ounces/300g all-purpose flour 7 ounces/200g sugar 0.35ounce/10g baking soda Preheat your oven to 350°. Grease or spray two 8" round pans or an equivalent volume square or rectangle. Place the cocoa in a medium (4-5 cup) bowl. Add the hot water and stir with a fork to break up any clumps. Allow to cool down a little, then add the vanilla extract and the mayonnaise or salad dressing spread. Beat well to eliminate lumps. In the bowl of an electric mixer or larger regular bowl if making by hand, sift in the flour and add the sugar and baking soda. Mix the dry ingredients to distribute evenly. Slowly beat in the cocoa mixture. Mix until the batter has an even color. Pour immediately into the pans. If making two 8" rounds, weigh them to ensure they contain equal amounts. Bake for approximately 20 minutes, or until the center of the top springs back when touched lightly. (The toothpick test does NOT work well on this moist cake!) Allow the cake to cool a little and shrink from the sides of the pan before removing. Removal is easier while still a little warm. Good with or without frosting. Good beginner cake for kids to make.
-
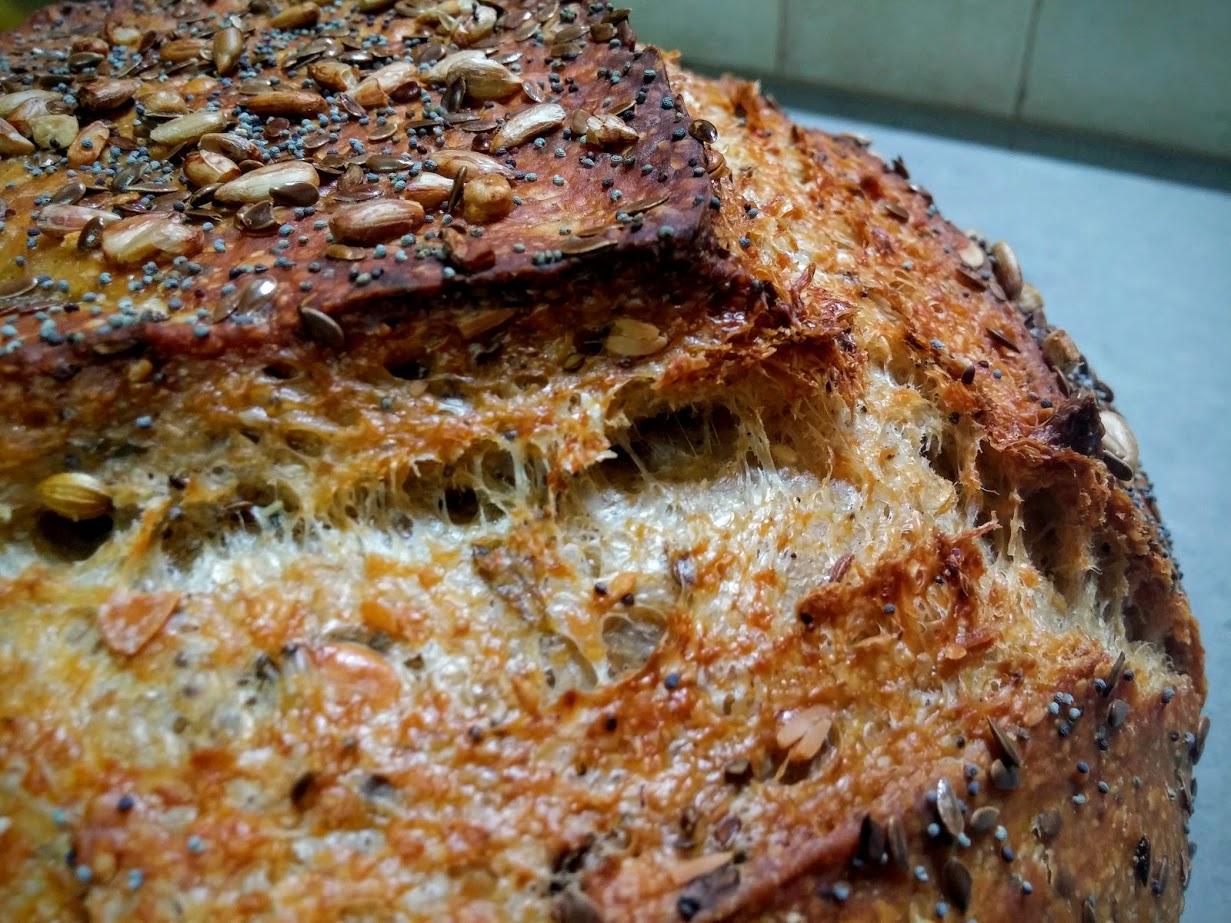
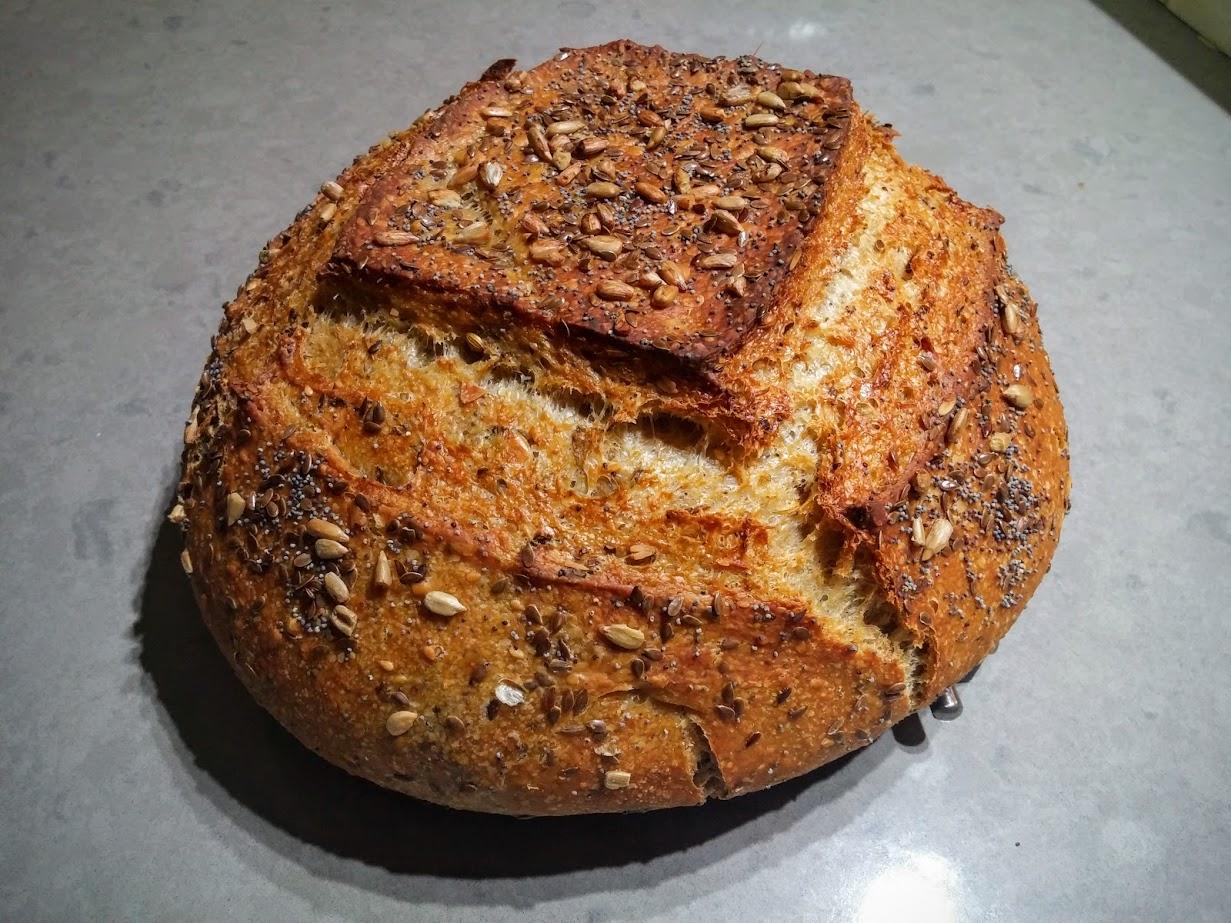
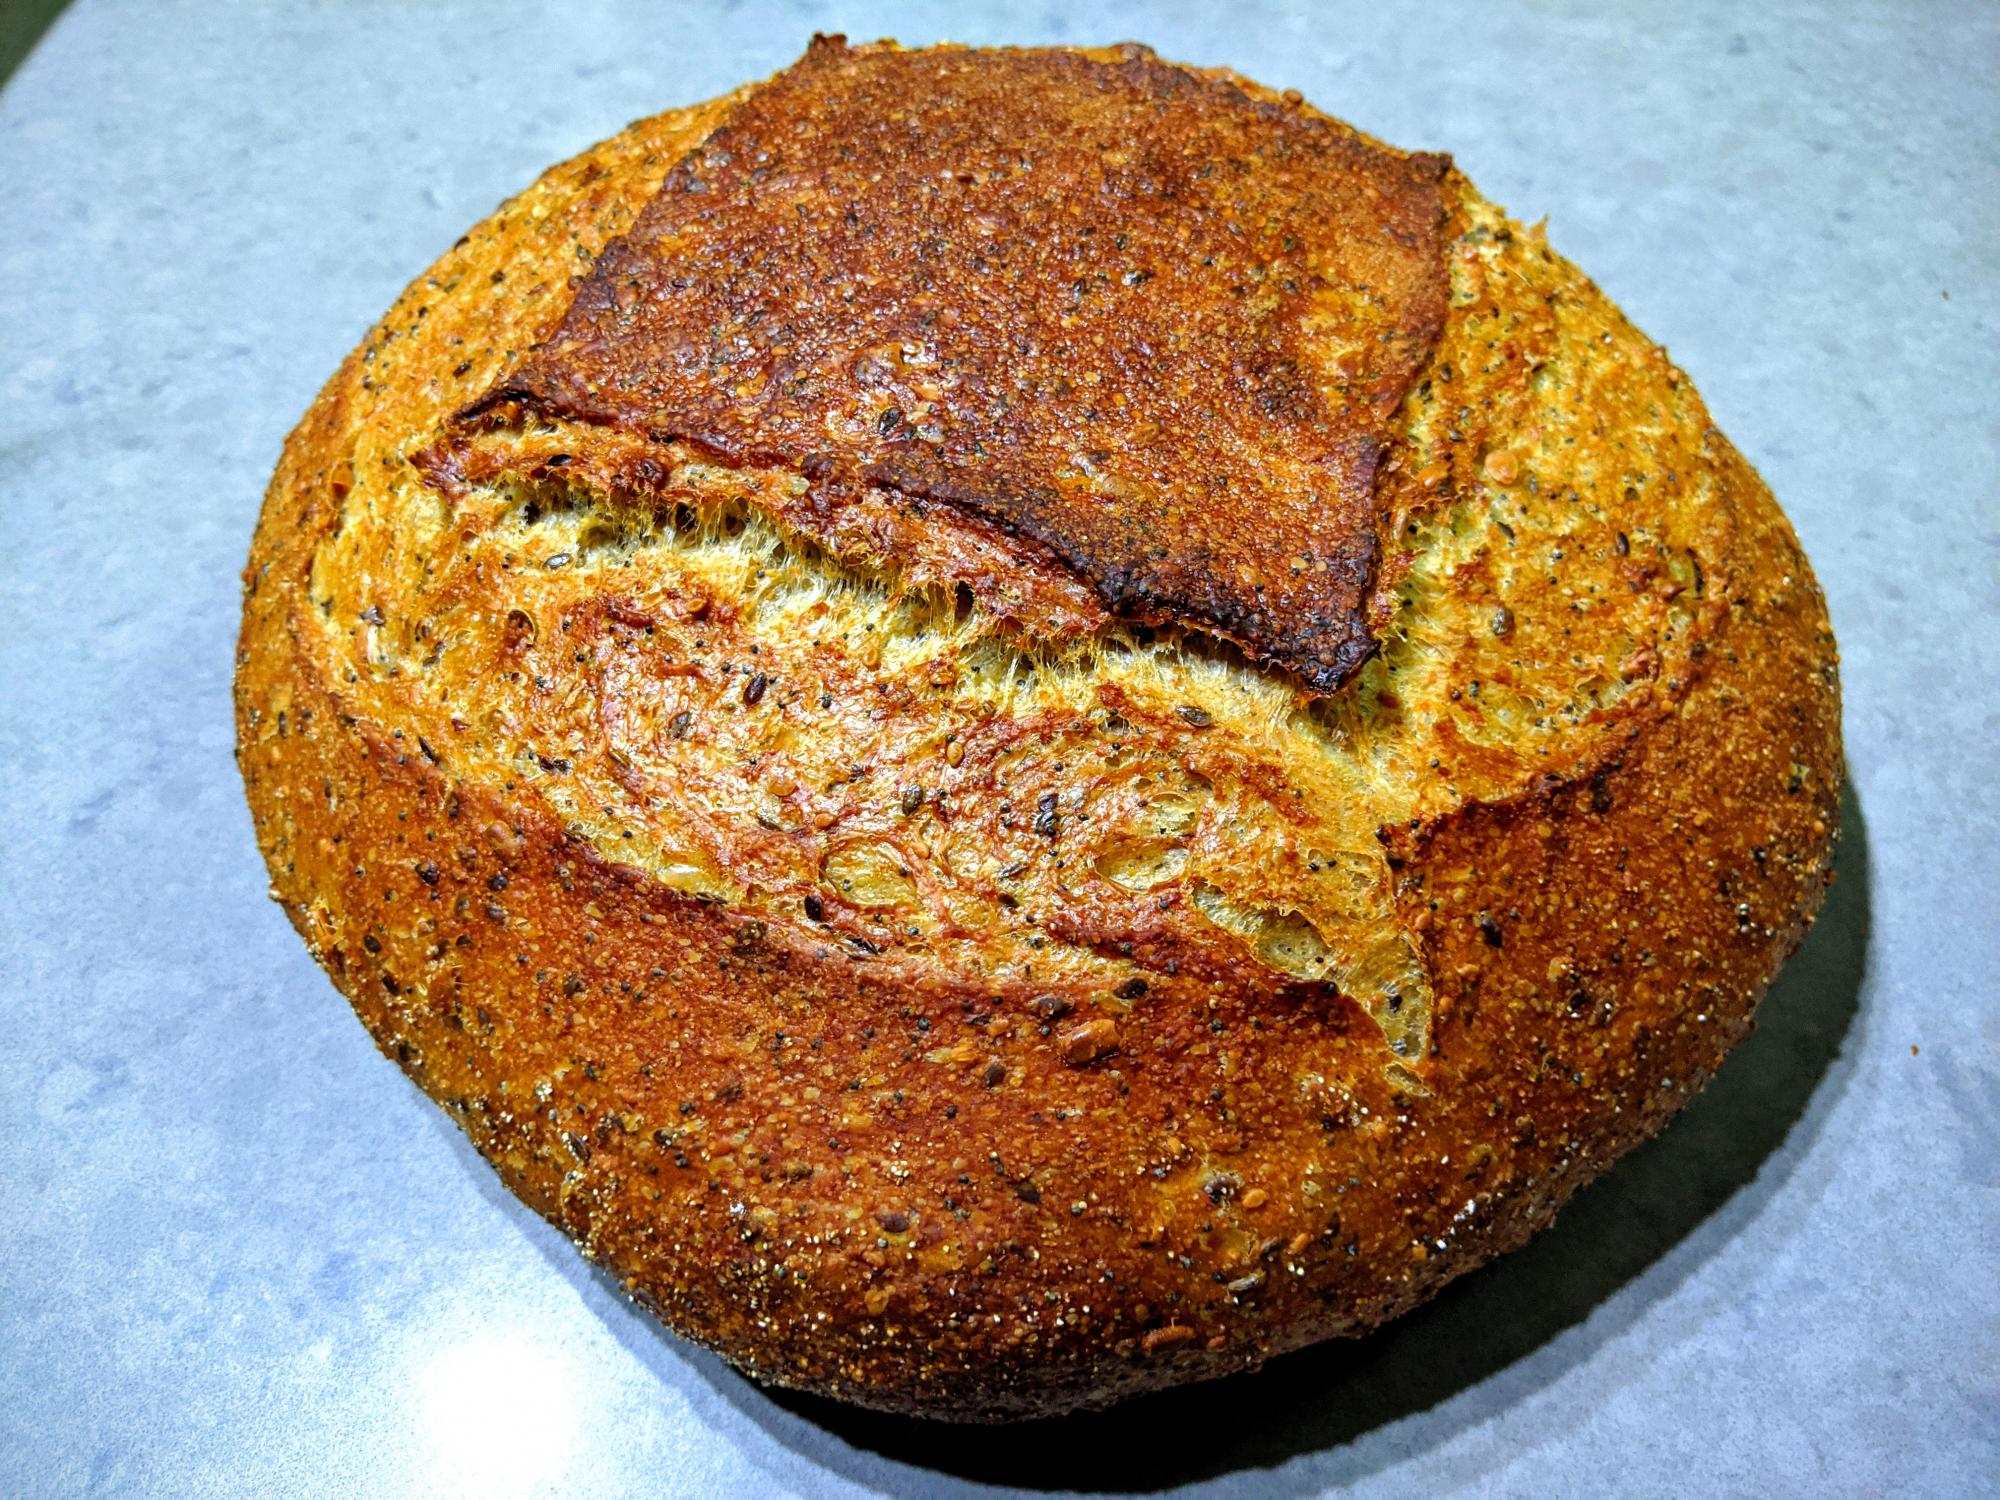
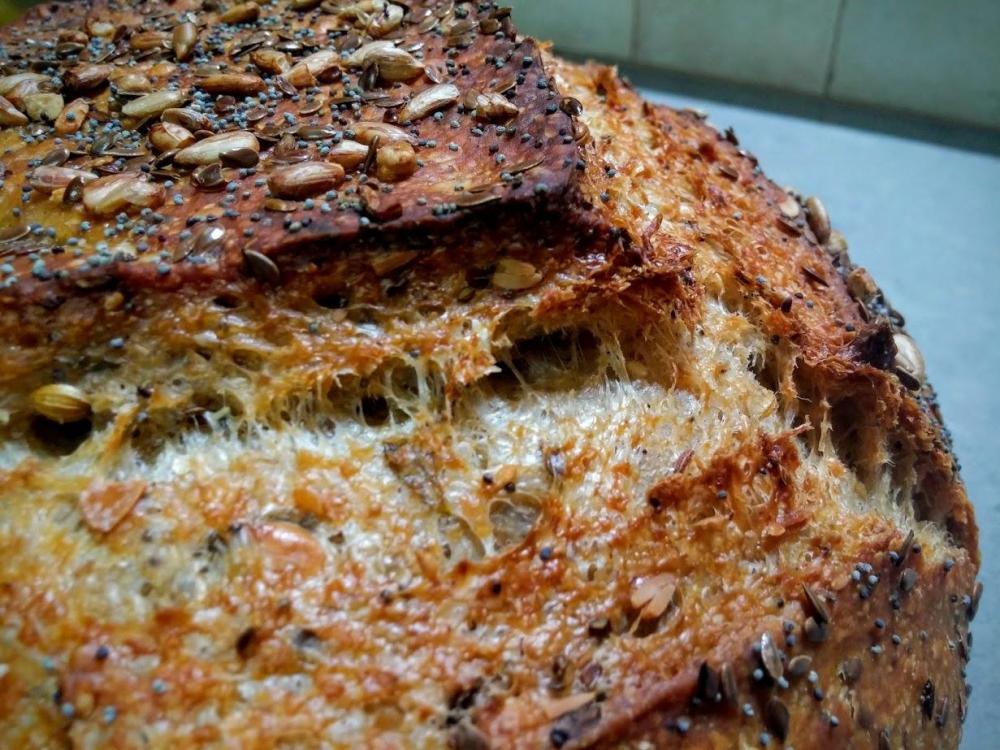
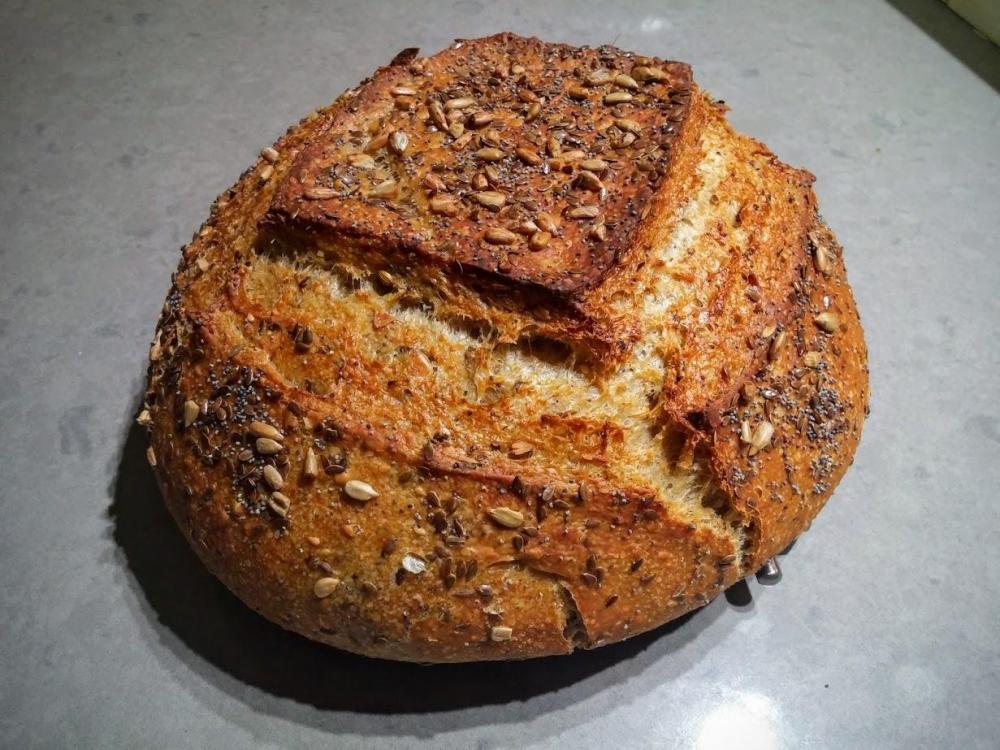
Updated June 2020 to match my current formula. Ingrdients Seeds: 20g sesame seeds 1 teaspoon coriander seeds (5g) 15g poppy seeds 30g flax seeds 1 teaspoon caraway seeds (5g) 30g sunflower seeds Porridge: 130g oat bran (or wheat bran) and/or corn meal 1 teaspoon of cinnamon 540g water Dough: 130 g cold water 3g fresh yeast / 1.5 g dry yeast 670g strong bread flour 17g Salt 30g dark malt syrup 5g apple cider vinegar or wine vinegar (1 tsp) Preparation One to three days before baking: Dry roast the seeds sesame, poppy and coriander. Add flax and caraway. Lightly mince in a morter and pestle to release flavors. Toast the sunflower seeds and add to the rest. ~ Cook the bran (and cornmeal) with the water, covered over low flame, until cooked into a porridge. Cool completely. ~ Add cold water, yeast, cinnamon, flour, salt, malt and vinegar. In a mixer, knead/mix for 5-7 minutes. Let rest for 5-10 minutes. Repeat kneading and resting about 4 times, until the dough is strong well developed. Cover and refrigerate overnight (and up to 3 nights). Prepare for baking: Grease the bottom of a 24 cm wide pot with a thin layer of oil. If the pot does not have an anti-stick coating, sprinkle with a thin layer of semolina or cornmeal. ~ Remove the dough from the refrigerator between 60 minutes (on a warm day) and two hours (on a cool day) before the baking. (It is better to err in the direction of a shorter proof). Gently separate the dough from the sides of the bowl and give it a roughly round shape. Pour the dough into the oiled pot and gently press it to fill the pot evenly. Cover the pot and allow the dough to rise until it almost doubles its volume and looks soft and airy (the time approximation is as mentioned above). ~ At least 45 minutes before baking, place an iron plate or baking stone on a shelf in the bottom third of the oven and heat it to 230 degrees C. ~ After the dough has risen and the oven is hot: Optionally, sprinkle the dough with sunflower seeds, poppy and flax for decoration. Score the dough if desired. Spray some water on the dough, sides of pot and lid. Bake covered for about 40 minutes. Remove the lid and bake for another 20-25 minutes until the bread is very brown and the internal temperature is at least 97 degrees C. Remove the pot from the oven and remove the bread from it (wait a little for it to cool). Allow to cool on a cooling rack for one hour before slicing. ~ For serving, return the bread to the oven for about 10 minutes (this is not mandatory, but will yield a crisper, less chewy crust, and a warm loaf). 2020's bake:


-
Home Style Corned Beef We still cannot buy corned beef here and I try to make this at least once a year and have it for St. Patrick’s Day. Then I invite all of our corned beef starved friends for dinner. Corned beef must be an acquired taste because all of the Latinos that come here think that we are crazy. Even if you buy your corned beef, the preparations given here are some of the best ways to cook it. Corned Beef Brine: 4 cups water 1 teaspoon saltpetre 4 whole cloves 8 whole allspice berries 1/4 cup white vinegar 1/2 cup salt 4 bay leaves 1 teaspoon whole black peppercorns 1/2 teaspoon mustard seed 1/4 cup granulated sugar Combine all ingredients, and bring to a boil. Cool thoroughly and add 4 garlic cloves, mashed. Meat: 5 pounds of beef brisket Pierce meat well with a sharp fork or a Jacquard tool and place in a large bag with a zip type closure. Add brine ingredients. Place in another plastic bag and refrigerate. (if you have a plastic container that the meat fits well inside, you can use that. See photo) if using a plastic container, place a plate on the top of the meat to submerge it in the brine. Be sure to turn it every 2 days. Turn the meat at least every two days. Let meat cure for 2 to 3 weeks (a small cut of meat can be used in as little as 8 to 10 days). If you don’t plan to use the meat at this time, wrap it well and freeze it. Preparation: Rinse meat well, and place in a large pot. Cover with water and add: 1 teaspoon whole peppercorns 3 bay leaves 2 cloves of garlic Simmer gently for 3 hours. At the end of 2 hours add; 4 large potatoes cut in quarters 10 to 12 small peeled onions, whole 2 carrots, cut in large chunks At the end of 2 1/2 hours, add 1 small cabbage, cut in quarters, with the core left on to hold it together. (I always please toothpicks in the wedges to hold them together) Serve with horseradish sauce and mustard. Instant Pot Preparation: Since I got my instant pot, this is my new favorite way to cook corned beef. Rinse the meat well, and place it in the instant pot. Cover with water and add the aromatics as in the previous method. Cover the pot and close, checking to see that the pressure gauge is in place. Select manual setting for 50 minutes and start. when the time is up let the pressure release naturally for 15 minutes. Release the remaining pressure, open the pot and remove the meat to a platter. cover and keep warm. Add the carrots, potatoes and onion to the broth inside. Close the pot and cook for 4 minutes. Using natural pressure release as before, add the cabbage wedges and cook for a further 5 minutes. Let the pressure release as before.
-
There are two ways in which I make this dish, in first one, listed here, I use one pot to cook the vegetables and beans together. In the other I dice the vegetables and lightly saute them separately in butter. In both the vegetables are blended. The first version has a cleaner flavor, the second a slightly browned, heartier one. I'm not sure which I like better. Ingredients: 450 g dried brown Borlotti beans, soaked overnight 2 onions cut into quarters (250-300 g) 1 large carrot or two small, peeled and halved (150-200 g) 3 medium-sized celery branches, with leaves, halved 2 rosemary branches + a few leaves to serve A small sage branch 1 teaspoon fennel seeds or anise seeds 2.5 teaspoons of salt 6 garlic cloves 2-3 teaspoons "nutritional yeast" (if not using stock) Black pepper, generously One or two tablespoons of lemon juice About 400 g small hollow pasta, such as: Ditalini (rings) or Gnocchini (small shells) 1 teaspoon salt To serve: Olive oil, use an aromatic one Plenty of black pepper Grated parmesan/pecorino cheese (optional, prefer a nutty cheese over a sharp one) A few rosemary leaves preparation In pressure cooker, place the beans, onions, carrots, celery, rosemary, sage, fennel seeds, garlic yeast and salt. Cover with stock or water. Cook until the beans are tender (about 25 minutes under high pressure). Remove the rosemary and sage branches and discard them. Remove a third of the beans, along with any vegetable, and blend smooth. Mix back with the whole beans. Add a little water if the dish is too thick. Add black pepper generously and a spoon or two of lemon juice. Add more salt if needed. To serve: Heat well. Add pasta to each dish. Drizzle with aromatic olive oil, sprinkle with some ground black pepper, a few rosemary leaves, and parmesan cheese.

-
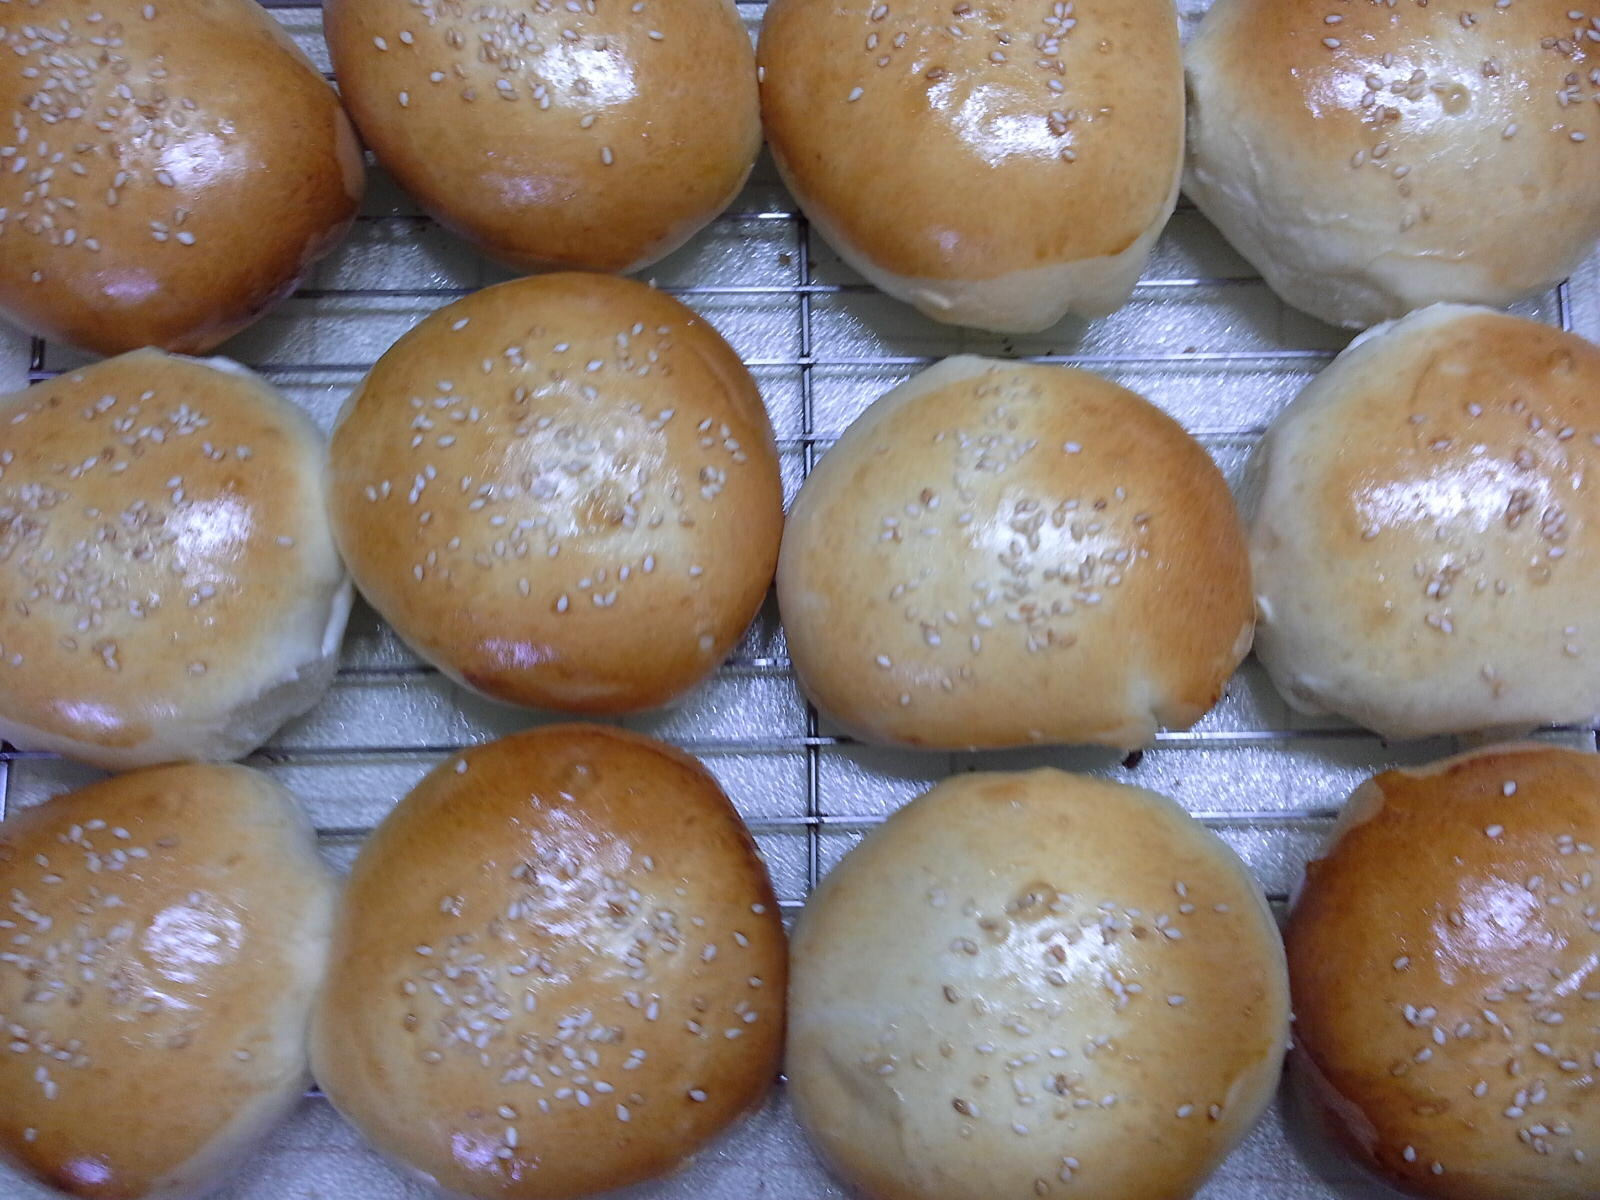
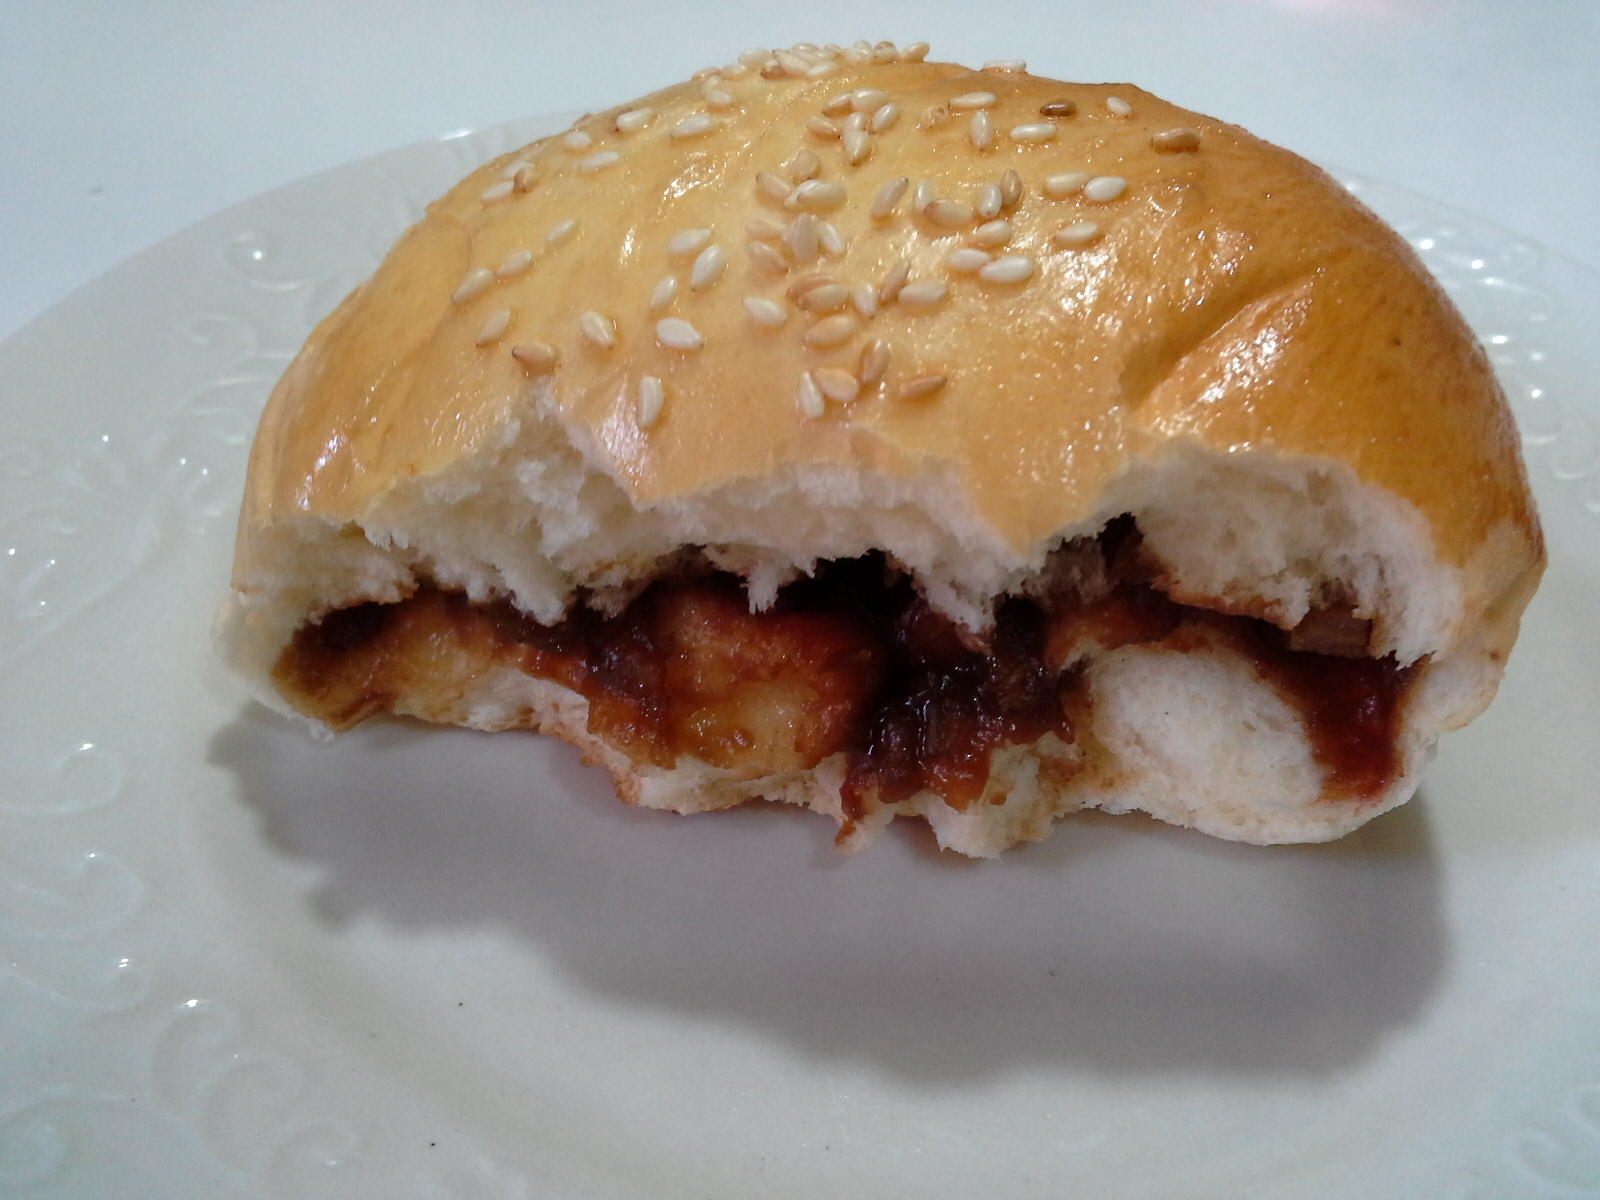
I have made Char siu bao many, many times and I had always considered it a chore until I found this recipe. It is not only easy, it is delicious. It is the closest one that I have found to the Char siu bao that I used to buy in the International District in Seattle in a little bakery called ‘Piece of Cake’. You had to get there early because they were usually sold out by 10. If you would like to go to the original site, this is IT. The pictures are mine. David Soo Hoo’s Bread Machine Bao Makes 6 buns (Bao) Dough 2/3 cup water 4 T. (1/2 stick) unsalted butter, melted 1 large egg 3 1/2 cup bread flour 5 tablespoons sugar 1 tablespoon nonfat dry milk 3 teaspoons bread machine yeast Pork Bao Gravy 1/4 C. water 1 tablespoon rice wine or dry sherry 2 tablespoons oyster sauce 1 tablespoon hoisin sauce 2 tablespoons soy sauce 1 teaspoon sesame oil 1 tablespoon sugar 3 tablespoons all-purpose flour Bao BBQ Pork Filling 3 tablespoons diced yellow onion or stalk of green onions 4 oz. prepared char siu (Chinese barbecued pork) Bao Egg Glaze 1 large egg beaten with 1 tablespoon sugar 1 1/2 tablespoons white sesame seeds Rising the dough in the bread machine Place all the dough ingredients in the bread pan according to manufacturer’s instructions, reserving 1 1/2 cups of the flour. Program for the Dough cycle; press Start. (This recipe is not suitable for the Delay cycle.) About 5 minutes into the Knead 2 cycle, slowly add the remaining flour. Dough will be stiff, but by the end of the kneading cycle be pliable and smooth. This is important; if the batter is too moist, the bows will flatten as they bake. While the dough is rising, prepare the gravy. Combine the water, rice wine, oyster sauce, hoisin, soy sauce, sesame oil, and sugar in the top of a double boiler. Whisk in the flour. Place over simmering water and, stirring constantly, cook until thick and smooth. It will be the consistency of mayonnaise. Remove from the water bath and cool in the refrigerator. For the filling, chop the pork into a large dice and place in a large bowl with the onions. Add the gravy and mix with the pork. Cover and refrigerate until needed. Line a large baking sheet with parchment paper. At the beep, remove the dough from the machine and place on a clean wooden work surface. Roll into a fat 3 inch wide log. Cut the log into 6 equal portions. Place a disc of dough on a wooden work surface (don’t shape on cool marble or ceramic because it will stiffen the dough). With the palm of your hand, press down on the center and rotate your palm, spiraling out from the center. The dough will grow into a 3-inch diameter circle (not lopsided, please) with a pretty spiral-pattern radiating from the center like a flower. Don’t use any flour. Using a 1 1/2-ounce ice cream scoop (size 40), place a scoop of filling in the center of the round of dough. Bring up the dough over the filling, and holding the two sides between your thumb and third finger, and pinching with your pointer finger, pleat the edges to encase the filling. Place, seam side down and at least 4 inches apart, on the prepared baking sheet. Cover loosely with plastic wrap and let rise at room temperature until double in bulk, 45 minutes to 1 hour. If the filling is cold, it will take 1 1/2 hours to rise. Twenty minutes before baking, preheat the oven to 350º. Brush each bao with the egg glaze and sprinkle with sesame seeds. Bake in the center of the preheated oven 30 to 40 minutes, until big, puffy, and golden brown. If you have a convection oven, they will bake about 20 minutes. Eat the day they are baked, or freeze in plastic freezer bags up to 2 months. Reheat in a microwave (no need to defrost) for 2 to 3 minutes for a quick dinner My Notes: I followed the recipe faithfully with only the following exceptions. My bread machine does not have a double knead cycle so I put all of the ingredients in at once, adjusting at the beginning to ensure that I had a fairly stiff dough. I made 12 buns instead of 6 and as a result they cooked perfectly in 20 minutes. I also prepared the gravy very successfully in the microwave. The one advice that I would give in forming the Buns is to have the center much thicker than the edges. Roll the edges very thin so that you don't have all the bulk at the bottom when you pinch the edges together. Do not overfill the Buns! I have made this recipe several times and no matter how small or large I make them the filling always seems to miraculously come out exactly even.

-
Char Siu (Chinese Barbecued Pork) This is the traditional Chinese Barbecued pork that used to be served as an appetizer in every Chinese restaurant. The best cut of meat for this is something with plenty of fat or marbling. Do not use pork loin. It lacks both the moisture and the flavor that a fattier meat will provide. 3 pounds pork shoulder, or butt 2 cloves garlic, mashed 2 tablespoons grated fresh ginger 2 tablespoons Shao Hsing rice wine or dry sherry 2 tablespoons hoisin sauce 2 tablespoons ketchup 2 tablespoons dark soy sauce 1 tablespoon honey or molasses 2 teaspoons sugar 1/2 teaspoon five-spice powder a few drops red food coloring, optional Cut the pork into strips approximately 2 inches wide and 5 inches long. Whisk together the rice wine or sherry, hoisin sauce, ketchup, soy sauce, liquid honey, sugar, mashed garlic, ginger and five-spice powder. If using the red food coloring, add it now. Place the pork and the marinade in a zip-top bag. Marinate the pork in the refrigerator, for at least 6 hours or up to 2 days, the longer the better. Remove the pork from the bag. Reserve the marinade.Preheat the oven to 425 degrees F. Fill a shallow roasting pan with 1/2 inch of water and place the pork on a rack above the water. Roast until brown, turning and brushing 2 or 3 times with the reserved marinade for about 45 minutes. The internal temperature of the pork should be 155 to 160 degrees F. Do not overcook or it will be dry. Note: Do not leave out the alcohol. If you don't have the rice wine or sherry you can use rum or brandy. It seems to make a big difference in the penetration of the marinade. Any extra marinade can be boiled and stored in the refrigerator up to a month or in the freezer to be used the next time I like to serve this in 1/4 inch slices with ketchup, Chinese hot mustard and sesame seeds. To make Chinese hot mustard, just mix dry, ground mustard with water to make a paste. Or use the in following recipe to make Char Siu Bao. if you don't have any Chinese five-spice powder you can easily make it with the following recipe. It is an essential flavor in this recipe. Five-Spice Powder 1 tsp. ground star-anise (3 whole star anise) 1 tsp. ground fennel seeds (3/4 tsp. whole fennel seeds) 1 tsp. ground Szechuan or white pepper (1 tsp. whole Szechwan or white peppercorns) 1/2 tsp. ground cassia or cinnamon 1/2 tsp. ground cloves Grind to a fine power in a spice grinder or mortar

-
CAPE MALAY PICKLED FISH Ingredients: 2 to 2.5kg fish salt & pepper oil for frying 750ml brown vinegar 1 cup water 170g sugar 1 tablespoon turmeric 3 tablespoons curry powder 1½ teaspoons salt 1 tablespoon black peppercorns 4 large onions, finely sliced 6 Bay leaves 170g sultanas (optional) 4 teaspoons flour Method: Fillet the fish and cut into cubes. Season lightly with salt and pepper and fry in hot oil until cooked though. Drain on kitchen paper. In a large saucepan combine the vinegar, water, turmeric, curry powder, salt and peppercorns and bring to the boil. Add onions and Bay leaves and simmer for 10 to 12 minutes until the onion is cooked but still slightly crunchy. Layer the fish, sultanas (if used) and onion in a large non-metallic dish, pour sauce over and refrigerate. Keep refrigerated for at least 3 days. It keeps refrigerated for over a month. I layer the fish in a Tupperware type plastic container with a locking lid. Let it mature for more than 3 days if you can. Also, try and use a firm white fish. Sometimes I have used tuna when doing a yacht deliver.
-
Host's note: this recipe video was posted in response to a request in the Dinner 2018 topic; a description of the recipe, and a photo of the results, is here. Cheesy Chicken Fritters: https://natashaskitchen.com/cheesy-chicken-fritters-video/
-
Here's my recipe for the infamous "jail slaw," which I learned to make while a rookie reporter covering courts and cops in Crittenden County, Arknsas, and often being invited to eat lunch at the jail. It's a great, crisp accompaniment to burgers or pulled pork barbecue or fried fish, It goes well in place of lettuce on a bacon and tomato sandwich, and keeps in hte fridge approximately forever. 1 large head cabbage, shredded 4-6 carrots, shredded one large onion, shredded one large bell pepper, shredded (the latter two are optional) Dressing: 1 cup vinegar 1/2 to 3/4 cup sugar 1/2 tsp dry mustard 1/4 tsp white pepper 1/4 tsp turmeric 1 tsp celery seed Heat dressing ingredients until almost boiling. Pour over vegetables. Let sit on counter for three or four hours to marinate, stirring and tossing occasionally. Refrigerate at least overnight before serving. 4-
- 11 replies
-
- 12
-

-

-

-
These biscuits feature flaky layers made by lightly laminating the dough. Cold ingredients, a cool room & work table, using cold tools and a light touch are key to great results. Ingredients 1200g cake flour (AP flour may be substituted, but the result will not be as tender) 24g salt 60g sugar 72g baking powder 420g cold butter (frozen may also be used if you have a sturdy, large-holed grater) 800g cold buttermilk (regular, whole milk may be substituted, but the result will be less flavorful) 34g melted butter, to brush on tops (for those in the US, just use what's left from the pound you've almost used up) Preheat the oven to 350° Line a plain half sheet pan with parchment paper or use a non-stick sheet pan. On a clean work surface, sift together the dry ingredients in a mound. Cut in the cold butter until the chunks are about the size of peas. Random large chunks are good. If using frozen butter, grate it with a large-holed grater and toss with the flour to coat. Quickly create a well in the center of the flour mound with a bench scraper or fork. Pour the cold buttermilk into the cavity and start folding the flour/butter mixture into it with the bench scraper or fork. Once everything (except the melted butter) is barely incorporated into an ugly shaggy mass, use the bench scraper or fork to form a rough rectangle that is at least twice as wide as it is high, and about 2cm high. You should see random streaks of butter in the dough. Use a little flour on the board if needed. If too dry add a little bit of milk but be careful, this should start out as a fairly dry dough, the butter, as it cooks, will moisten it. Make a book fold by taking up each of the shorter-length ends of the rectangle and placing them touching each other on the center. Gently pat with tools, or roll quickly/lightly once or twice with a pin, to make an even rectangle about 2-3cm in height. Using a bench scraper or the back side of a long knife (carefully!) cut into grid of 16-24 biscuits. To make round biscuits, use a juice glass or round cutter and cut with one strong downward motion -do not twist or you will inhibit the rise. Scraps from making round biscuits can be lightly formed into shapes, generally 1-2 crazy biscuits result from cutting rounds. Use a spatula to place the biscuits on the baking sheet. Brush the tops with the melted butter. Bake for about ten minutes, depending upon size. The tops should be golden, the bottoms light brown. They will continue to cook for a few minutes out of the oven. Enjoy! These are best eaten immediately, I would not hold them for more than 6 hours.
-
Let's Cream Biscuits (recipe by James Beard's family cook)
Lisa Shock posted a topic in RecipeGullet
This is an easy drop biscuit recipe originally developed by the Beard family cook over 100 years ago. The trick here is to use fresh ingredients in a cold room and a light hand. AP flour may be substituted for the cake flour, but the resulting biscuits will not be as tender. Do not use a cream substitute or any lower-fat alternatives. Converted to weight-based measurement by me, directions by me. Makes 10 sandwich sized biscuits or 20 regular sized biscuits. Ingredients: 284g sifted cake flour 10.5g baking powder 5g salt 14g sugar 360g heavy cream, cold 28-30g melted butter, optional, for brushing on tops Preheat the oven to 350° Place parchment paper on a plain half sheet pan, or use a non-stick sheet pan. In a medium bowl, sift together the dry ingredients. Add the cold cream and stir gently until barely mixed. This 'shaggy mass' will look very rough. Using the two-spoon method, drop in large spoonfuls onto the cookie sheet. Lightly tap into shape, if need be. Brush the tops with butter, if desired. Bake for about 10 minutes, time varies by size, until the tops are barely colored and the bottoms slightly brown. They will continue to cook for a few minutes after leaving the oven. These can also be carefully dropped into flan rings on a parchment covered sheet pan to make consistent rounds for sandwiches or eggs benedict. Or, try dropping into non-stick molds like muffin pans -keeping the height 2-3cm. Enjoy! -
Corned Beef and Cabbage Casserole 4 c. chopped cabbage 1 c. sliced celery 1/2 c. chopped onion 1/4 c. butter 8 oz. mostaccioli noodles cooked and drained 1 can (12 oz.) canned corned beef 1 c. (4 oz.) Swiss cheese shredded 1/2 c. milk 1/2 t. dry mustard, but prepared mustard works very fine and I like a lot of it in there, about 1/4 cup 1/2 t. caraway seed 1/8 t. black pepper Preheat oven to 350 degrees F/ 177 C. Saute cabbage, celery, onion in butter until tender. Add remaining ingredients. Mix well and spoon into 2 qt. casserole. Original recipe says to cover and bake 45 to 50 minutes until heated. 8 servings. I always cooked the past first, drained it in a colander and let that sit there while I sauteed the veggies and mixed them in the same pasta pot to keep the dish washing down. Some adaptations I've made over the years have been to increase cabbage to 6 c., celery to 2 c. and onion to 1 c., but I like a lots of veggies. I also find it imperative to remove the cover to let the pasta and cabbage caramelize a bit. I think I also increased the milk a bit and the cheese to compensate for the extra veggies. I like it and find it tastes a bit like a Reuben. I was scared of the caraway seed at first, but that is what makes it IMO. There is no salt added because there is plenty in the corned beef. If you try this, I hope you enjoy it as much as I have over the years.