Search the Community
Showing results for tags 'Recipe'.
-
Spicy Mango Relish Ingredients 150g soft brown sugar 150 ml white wine vinegar 1 star anise 1/2 a red onion, chopped 2 cloves garlic, chopped 1 thumb of ginger, chopped 1 or 2 red chillies, chopped 3-4 mangoes, chopped 1 tsp black mustard seeds salt and pepper Dissolve sugar in vinegar and add everything. Simmer for 25-30 minutes, stirring regularly. Cool and keep in fridge. It keeps for months. Eat with chicken, cheese, curries, scotch eggs - pretty much anything.
-
Stromboli 8 servings I usually make one of these every weekend. It's great to have on hand for snacking and it never needs to get boring because you can change the filling to anything you want or anything that you have on hand. Dough Approximately 1 cup warm water 1 tablespoon granulated sugar 2 1/2 teaspoons active dry yeast 2 1/2 cups all-purpose flour 3/4 teaspoon salt Filling 1/2 cup pizza sauce 1/2 pound sliced Italian cold cuts or pepperoni 1 to 1 1/2 cup shredded mozzarella cheese Topping 1 egg beaten In bowl of stand mixer whisk together flour, salt, sugar and yeast . Add the warm water and with dough hook mix on medium speed just until dough comes together. Add only enough water to have a soft but not sticky dough. If the dough is too soft the filling will break through as it bakes. Turn the mixer down to kneading speed and knead for 5 minutes. Let rest, in the bowl, for 10 minutes and then knead again for five minutes longer. Shape into a ball on the counter and cover with a bowl. (Do not place in an oiled bowl) Let rise for 45 minutes. Turn dough out onto lightly floured cutting board or counter and roll out into a large rectangle. Approximately 14 in by 11 in. Spread pizza sauce lightly and evenly over dough until about 2" away from edges. Top with sliced cold cuts or pepperoni and then sprinkle with cheese. Brush the edges of each of the short ends and fold over the filling. Brush one long side with beaten egg and starting on the opposite side roll up cinnamon roll style being careful to seal bottom edge. Transfer to a baking sheet lined with greased parchment paper or foil with the sealed edge at the bottom. Cut small slits at even intervals on the top being careful to cut almost to the bottom but not through. Cover with a thin moist towel and let rise for about 30 minutes. Preheat oven to 350o. Brush with beaten egg. Bake in oven for 20 to 25 minutes until golden. Serve hot with extra pizza sauce if desired Note: the amounts on the filling ingredients are optional. I usually have two layers of thin sliced meat. I then cover it with shredded cheese. My favorites are mozzarella and Parmesan but I also use asiago, gorgonzola, and provolone if I have them on hand. For the pizza sauce, I spread it very thinly on the dough and then drizzle a little on top of the cheese. Sometimes I sprinkle Italian seasoning over the cheese. It helps to press everything down before you start to roll it up.
-
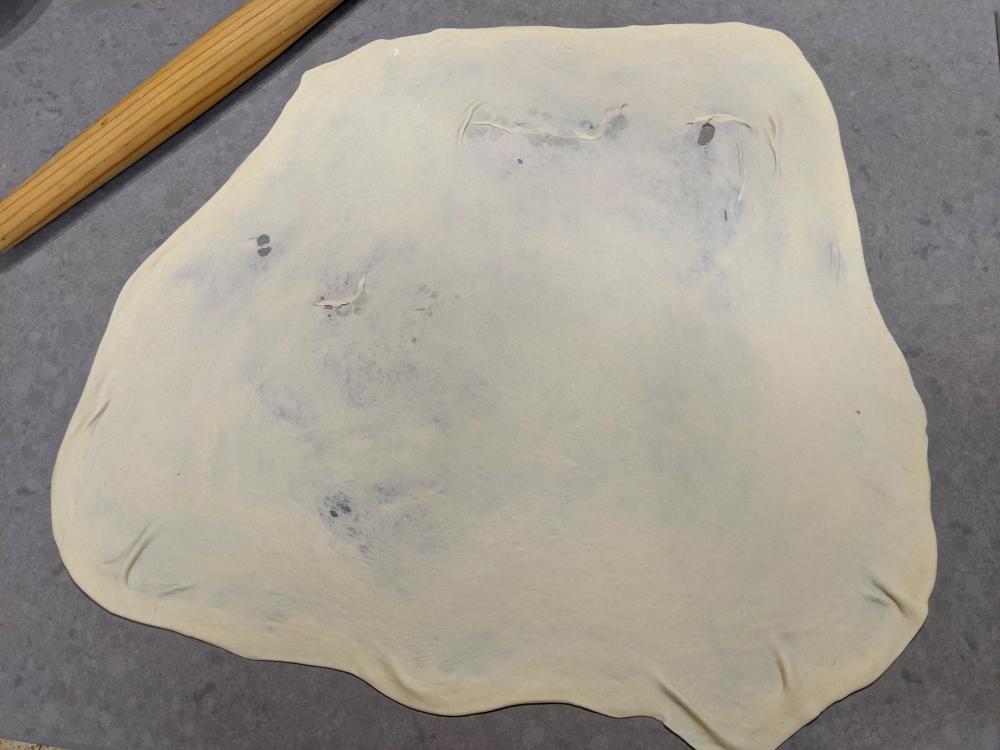
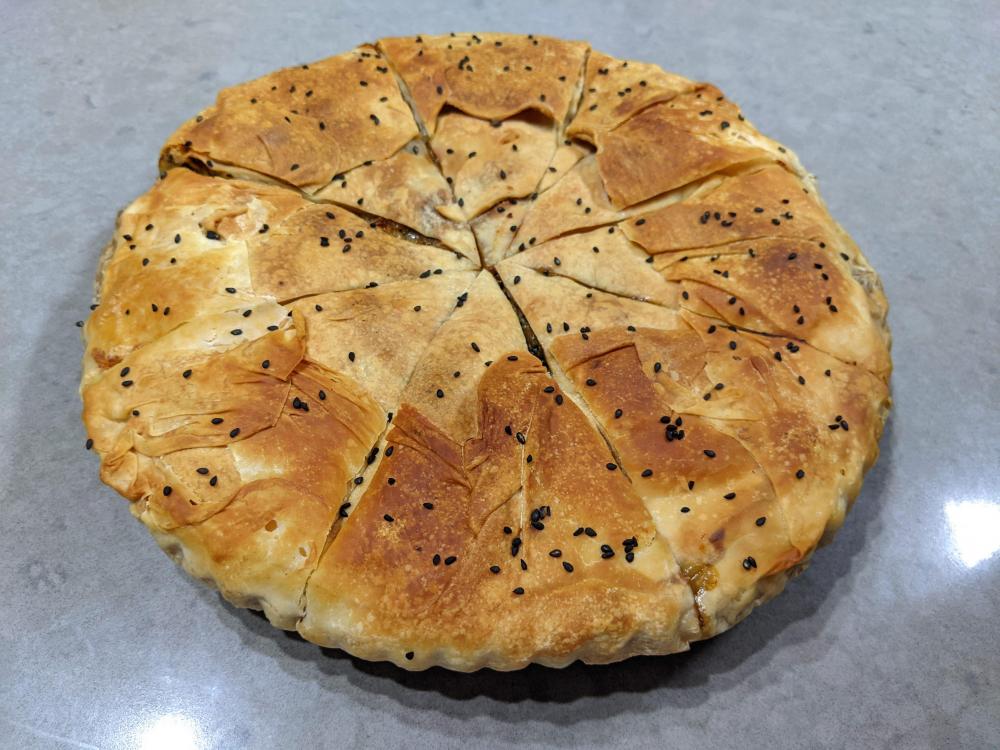
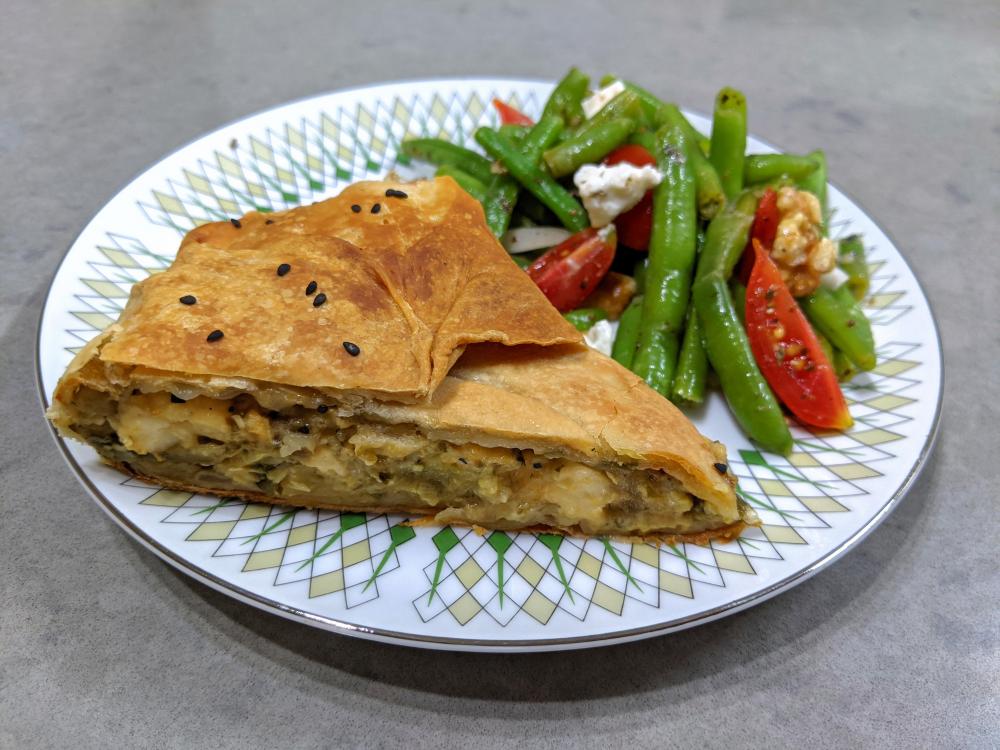
For a 25cm (10") round pan. 300g AP flour 145g water 5g salt 6g vinegar 2 tsp (8g) oil Apx 20-30g butter or apx 25g olive oil (or more as needed) - mixed with apx 20g water Knead the dough until smooth. Let it rest for an hour or so (covered). Prepare a 25cm (10") round pan and grease it. Divide the dough into two. Roll each piece as thin as possible. If it is sticky, brush it with some fat. It's ok if it's thicker on the edges. Place a sheet over the pan, and push it towards the edges. Cut the edges of, leaving enough overhang to cover the pie back up (i.e. it should go over 12-13 cm in every direction). Brush with fat, including the overhang. Repeat with the second sheet. With the cut-off dough, form two balls and roll again into two sheets, as thin as possible. Place one sheet in the pan. Put in the filling. Place the second small sheet on top. Brush with fat. Fold over the overhang to close up the pie. Brush with remaining fat, or more if needed. - Bake at 200dC for 10 minutes. Cut the pie into slices or squares. Once fully baked, the dough is hard to cut. Bake for 30 minutes until deep golden. You can now leave the pie until ready to serve, you can also freeze it or chill overnight. For serving bake another 20-30 minutes, until deep golden-brown and crisp.
-
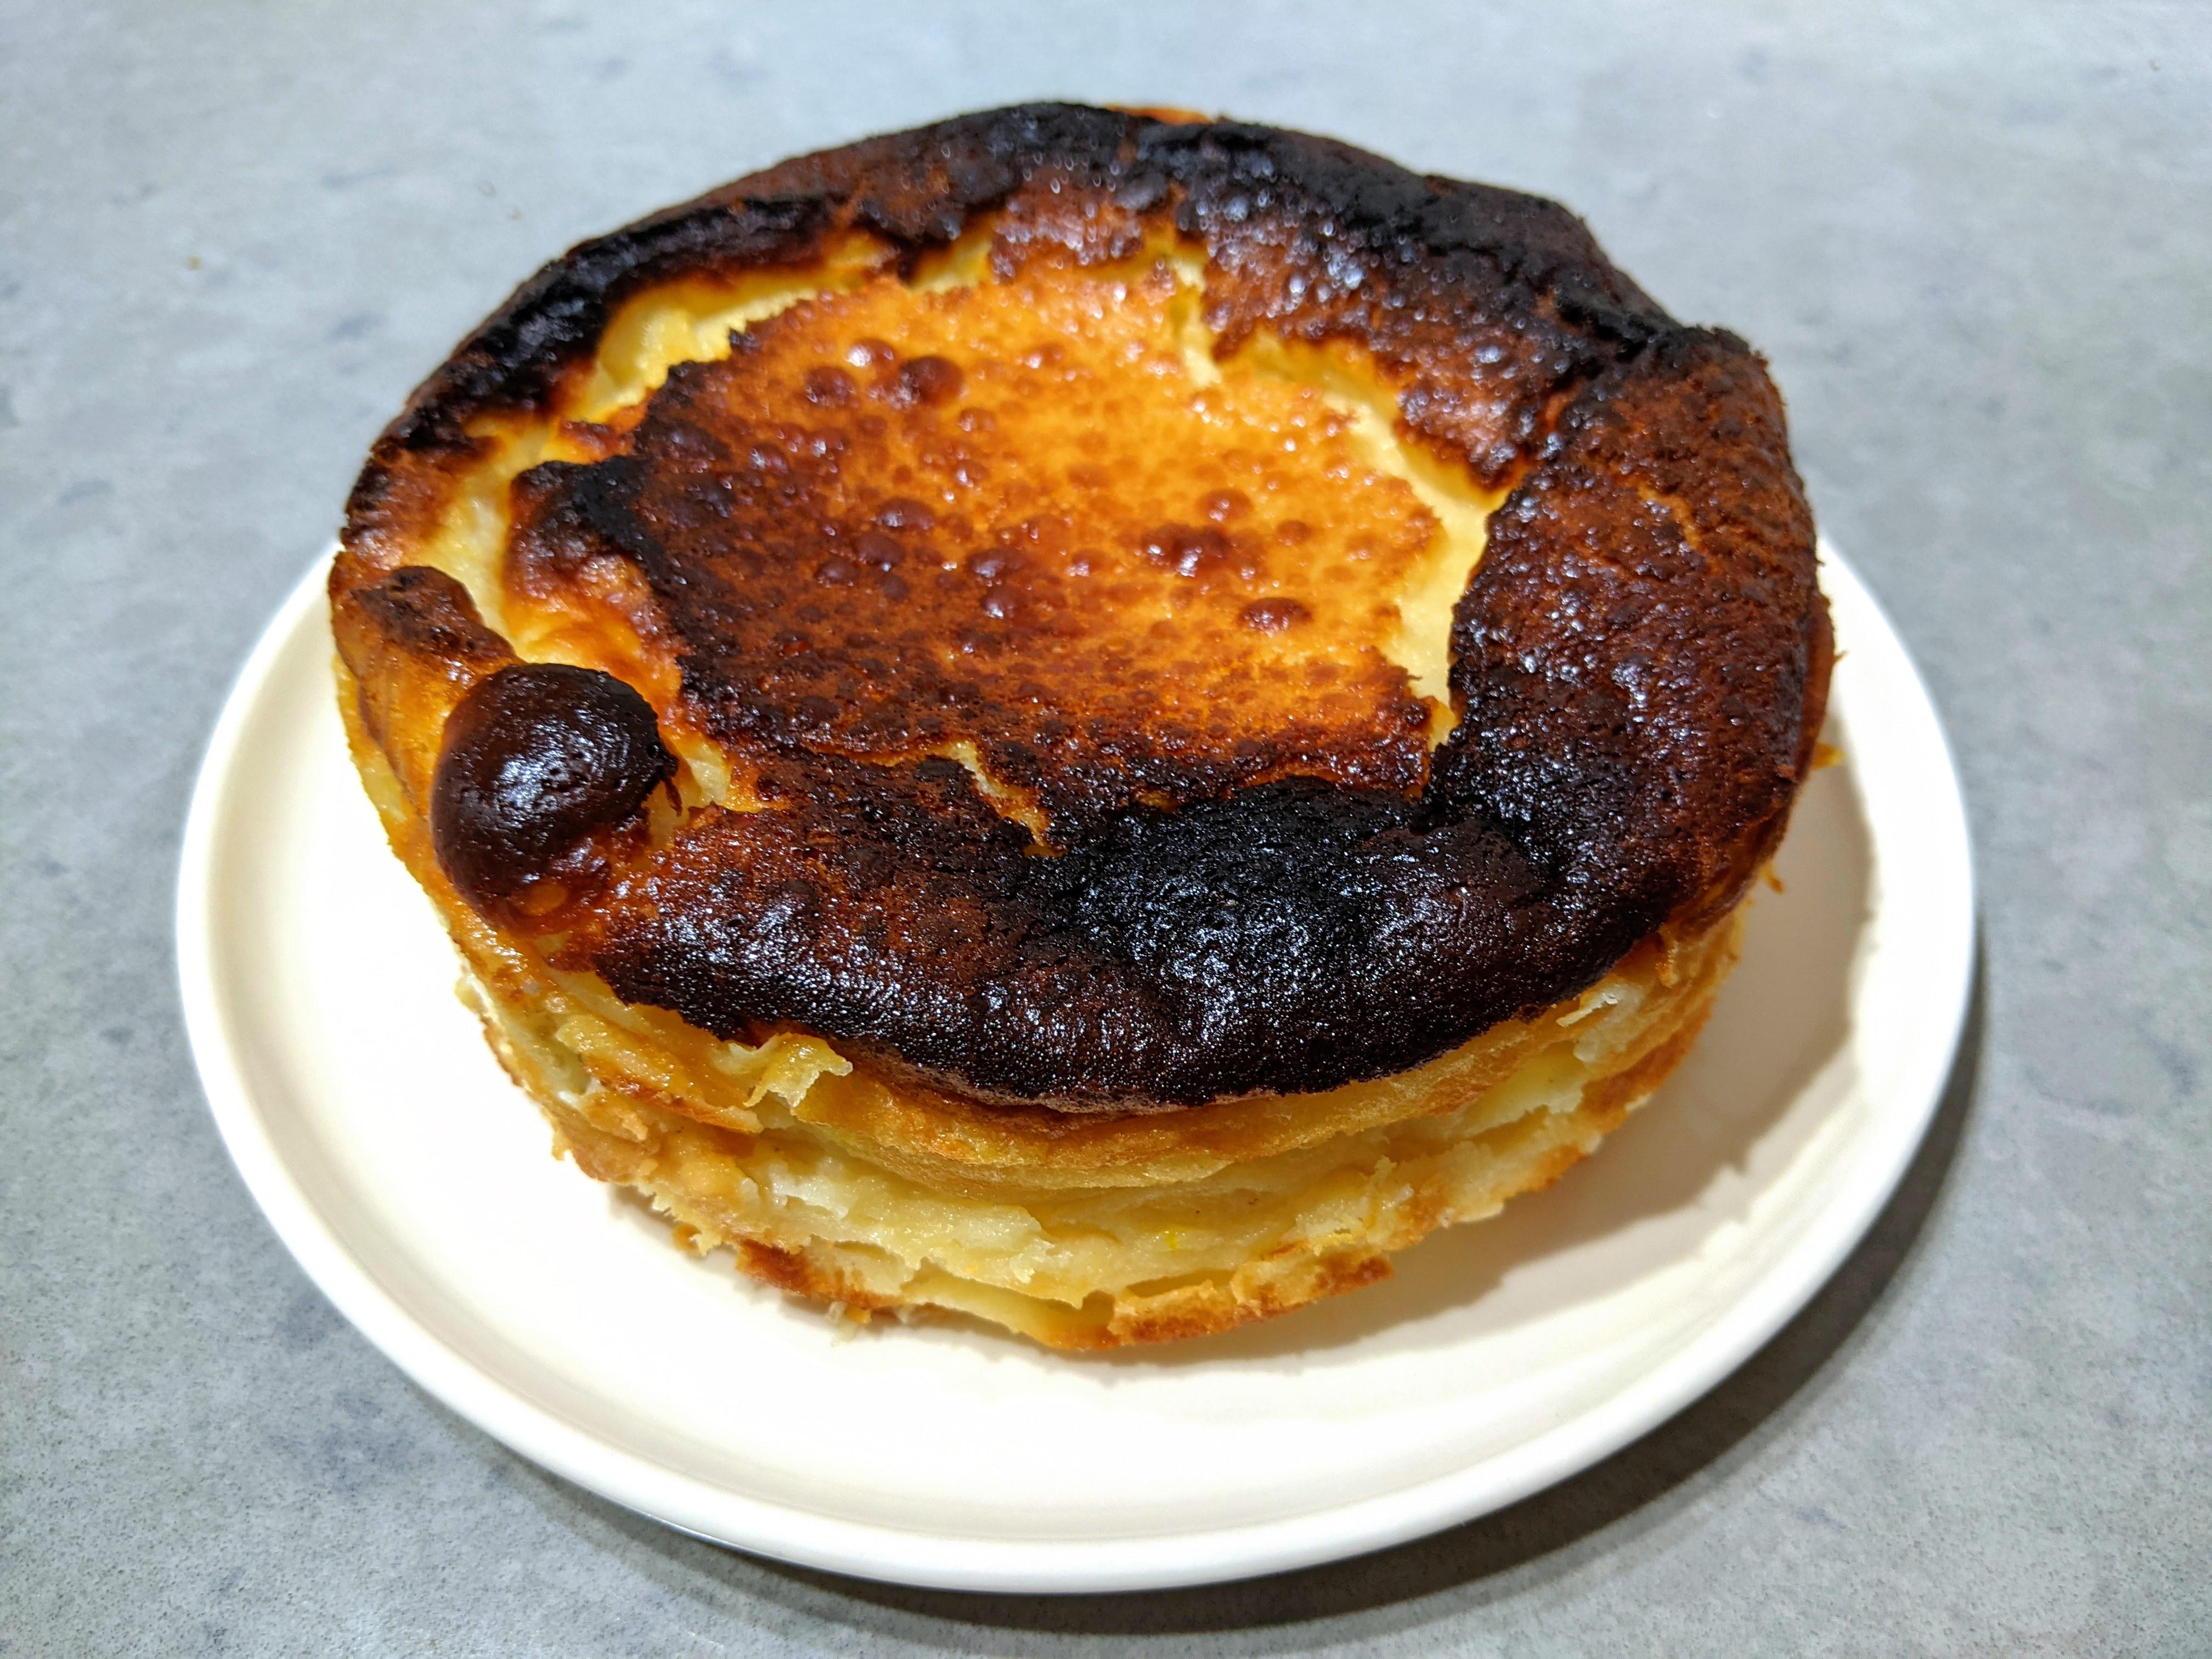
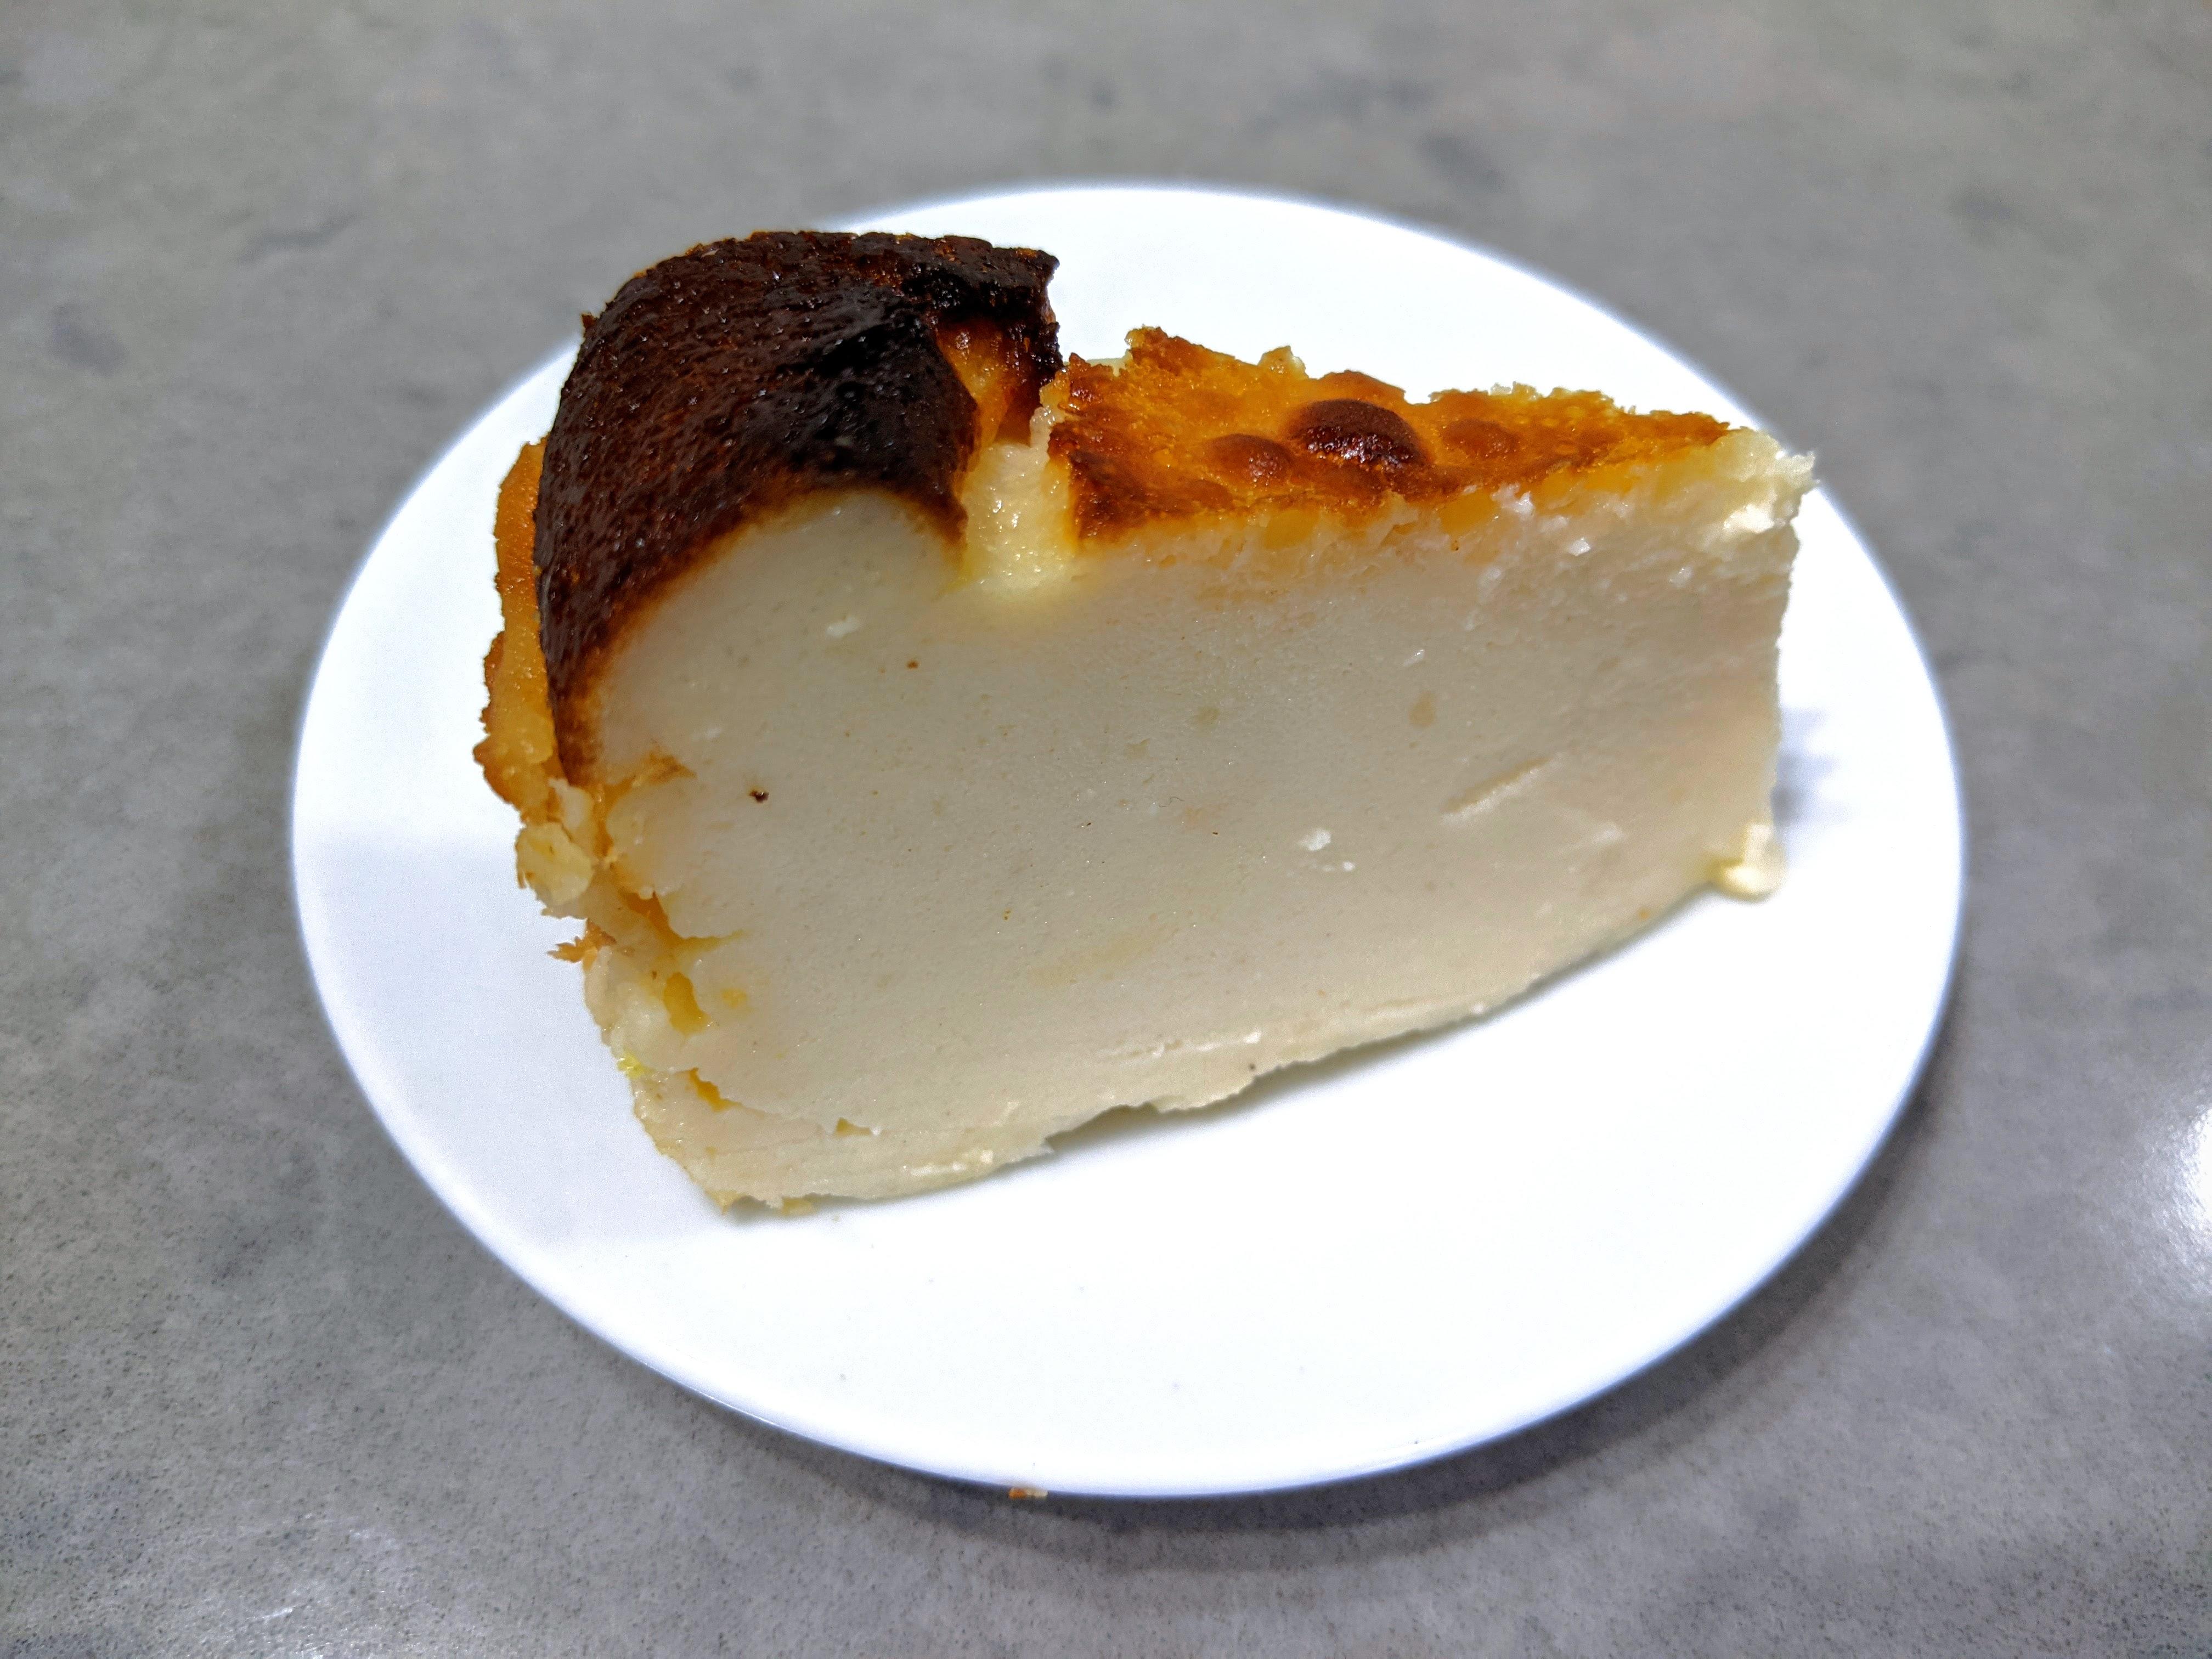
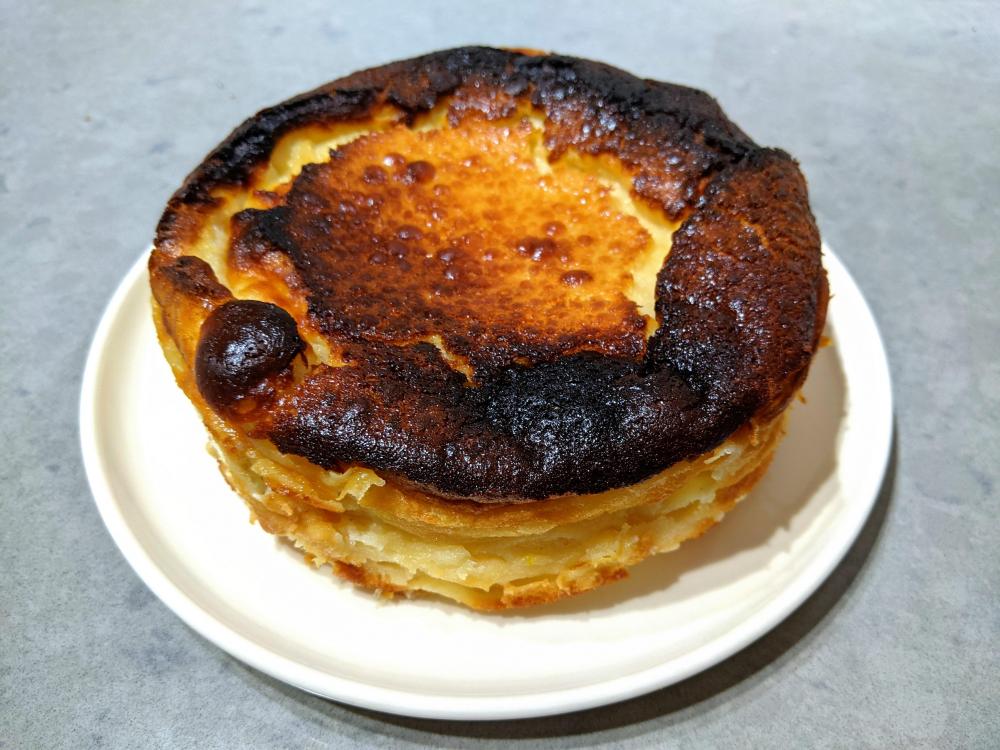
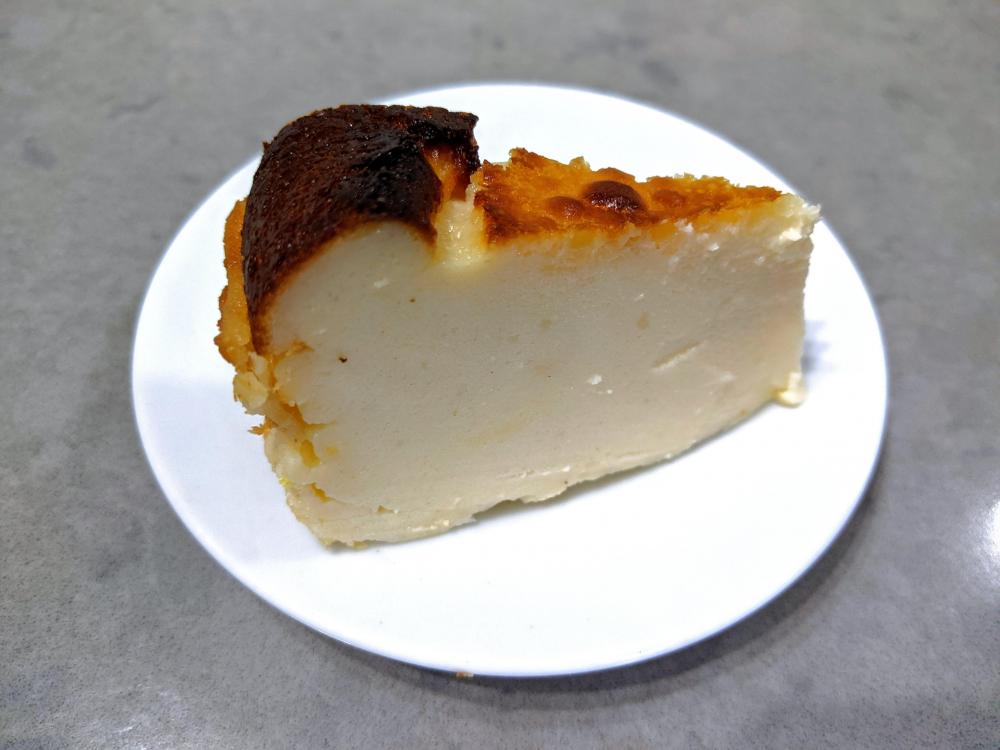
Not very much like a regular cheesecake in texture - this one is more custardy and creamy. It's the easiest cheesecake I ever made. Amount for a 6" wide cake pan. For an 8" pan, double the ingredients. 300g cream cheese 110g sugar 2 large eggs 150g full fat cream (I think it could also work with sour cream or mascarpone if you'd like a tart cheesecake) 2 tsp vanilla extract 1/4 tsp salt some grated nutmeg apx 1/3 tsp fine orange zest 30g flour Most recipes suggest that you line the cake with a parchment paper, so that it covers the sides as well and ends above the pan, this allowes for easy removal of the cake. I opted to use a spring-form pan, brushed with butter, but this requires that your pan is stick and leak proof! Heat oven to 220C, no water bath needed. In a wide bowl, beat sugar and cream cheese. Add eggs and mix well. Mix in the cream, vanilla, salt, nutmeg and orange zest. Sift in the flower while gently folding, until evenly distributed. Pour into the pan. Bake for 35-45 minutes, the cake needs to rise and become very dark (some say black, but I find it to be too much). Avoid over baking, so that the center stays custardy. If you'd like, you can under bake so that it turns out creamy. Remove from the oven and let chill completely before removing from the pan.. Refrigerate to cool. It's best serve slightly below room temperature, so l suggest you let it warm up if refrigerated overnight. Serve with brandy!

-
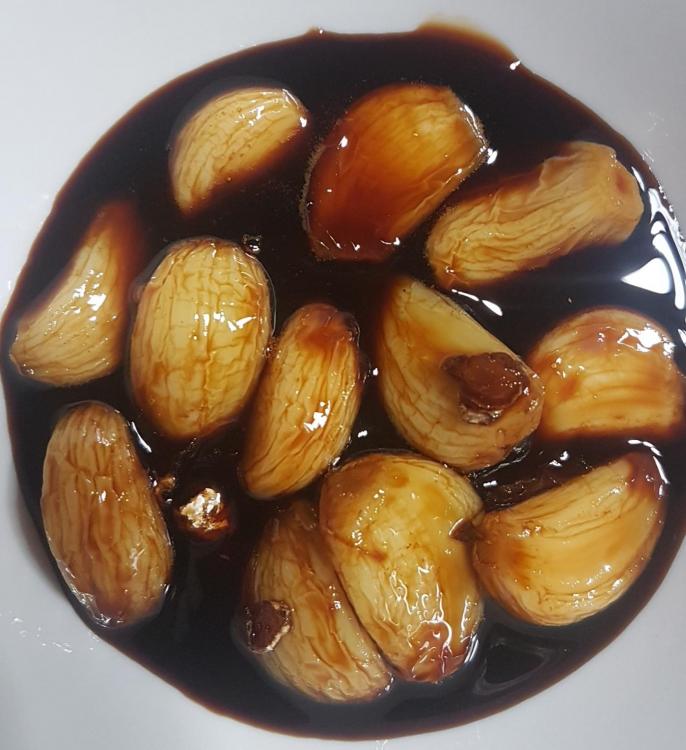
I live in a garlic deprived household because one of my housemates is deathly allergic to all garlic and onions. Sometimes I just want some garlic to munch on and raw garlic is just too much. So I set out to make a garlic snack and this is what I came up with. It is sweet with a little bit of sour, soft without being mushy and very, very garlicky. I can see the remaining syrup as a dip for potstickers or a great inclusion in a stir fry sauce. Candied Garlic 2 heads of garlic, peeled 1 cup water 1/2 cup sugar 2 tablespoons dark soy sauce 1 tablespoon Chinese black rice vinegar 15 G ginger, sliced thinly 1 star anise Peel the garlic and place in the freezer overnight. Remove the next day and thaw completely. Combine the ingredients for the syrup in a small saucepan and bring to a boil stirring until the sugar dissolves. Reduce the Heat and simmer very slowly for 30 minutes. Add the thawed garlic and continue to simmer for 15 minutes. Let the garlic cool in the syrup and it is ready to eat. Note: I suppose that this could be made with regular rice vinegar but the black vinegar gives it in rich, smoky flavor. I suppose that if I just had the rice vinegar that I would add a drop of smoke flavoring. This is the vinegar that I used.
-
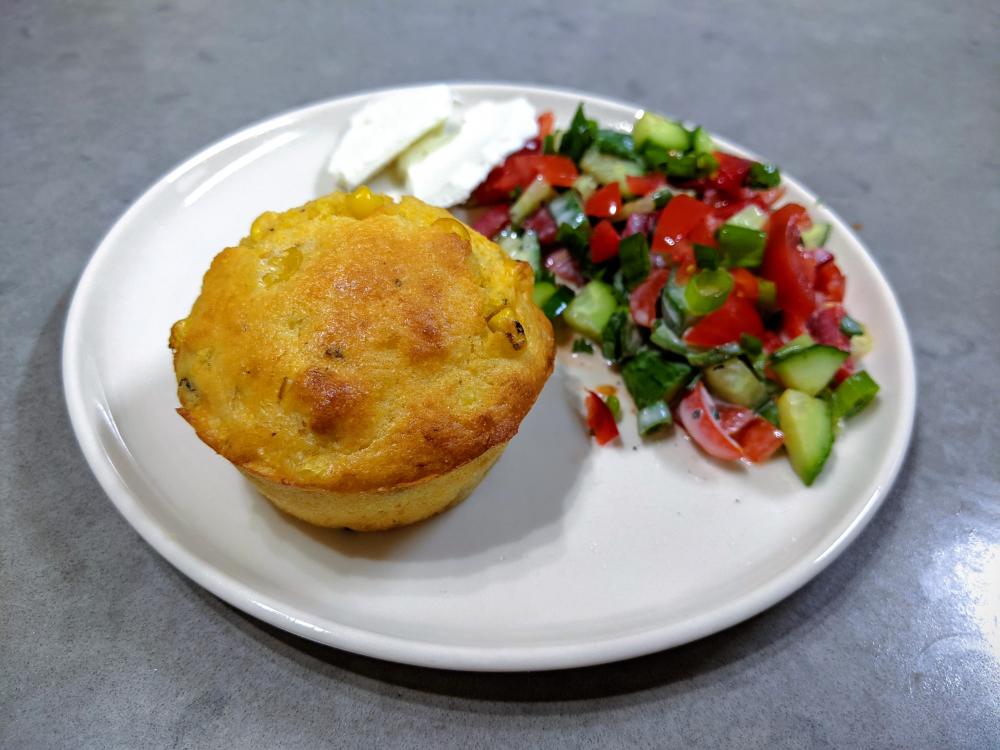
Makes 12 muffins that can be served either savory or sweet. See also cornmeal biscuits recipe. 175g cornmeal 20g butter 135g AP flour 2.5 tsp baking powder 1/4 tsp baking soda 2 tsp salt 200ml sour cream 35g sugar 1 large egg 90ml whole fat milk apx 250g corn kernels - fresh is best, I sometimes used kernels from grilled corn. Frozen and even canned corn also works great. Optional addition: - Up to 1/2 tsp black pepper (I never skip the pepper) - Chopped chilies of any kind - Chopped scallions - Chopped cheddar cheese - Chopped feta (reduce salt from the muffins) - I guess chopped bacon will be really good - Brush a muffin tin tray with butter, or if you have one, use a silicon muffin tray. - Preheat an oven to 220dC. - Mix flours, baking powder, soda, salt. - Melt the butter, I suggest doing so in a large bowl or pot to which the remaining ingredients can be later added. - Mix in the sour cream, egg, sugar, milk, corn kernels and any other optional addition. - Mix dry ingredients into wet ones just until uniform. Avoid over mixing. - Divide batter among 12 muffin cups. - Bake for 15 minutes until set and golden. - Let cool for at least 5 minutes and release from tray. - For serving: bake again, preferably with convection fan, until deep gold and crisp. Apx 5-10 minutes. - Can be served savory with sour cream, cheese or butter; or sweet with butter or sour cream and honey. - Leftovers / planned-overs can be frozen, preferably after the first bake.

-
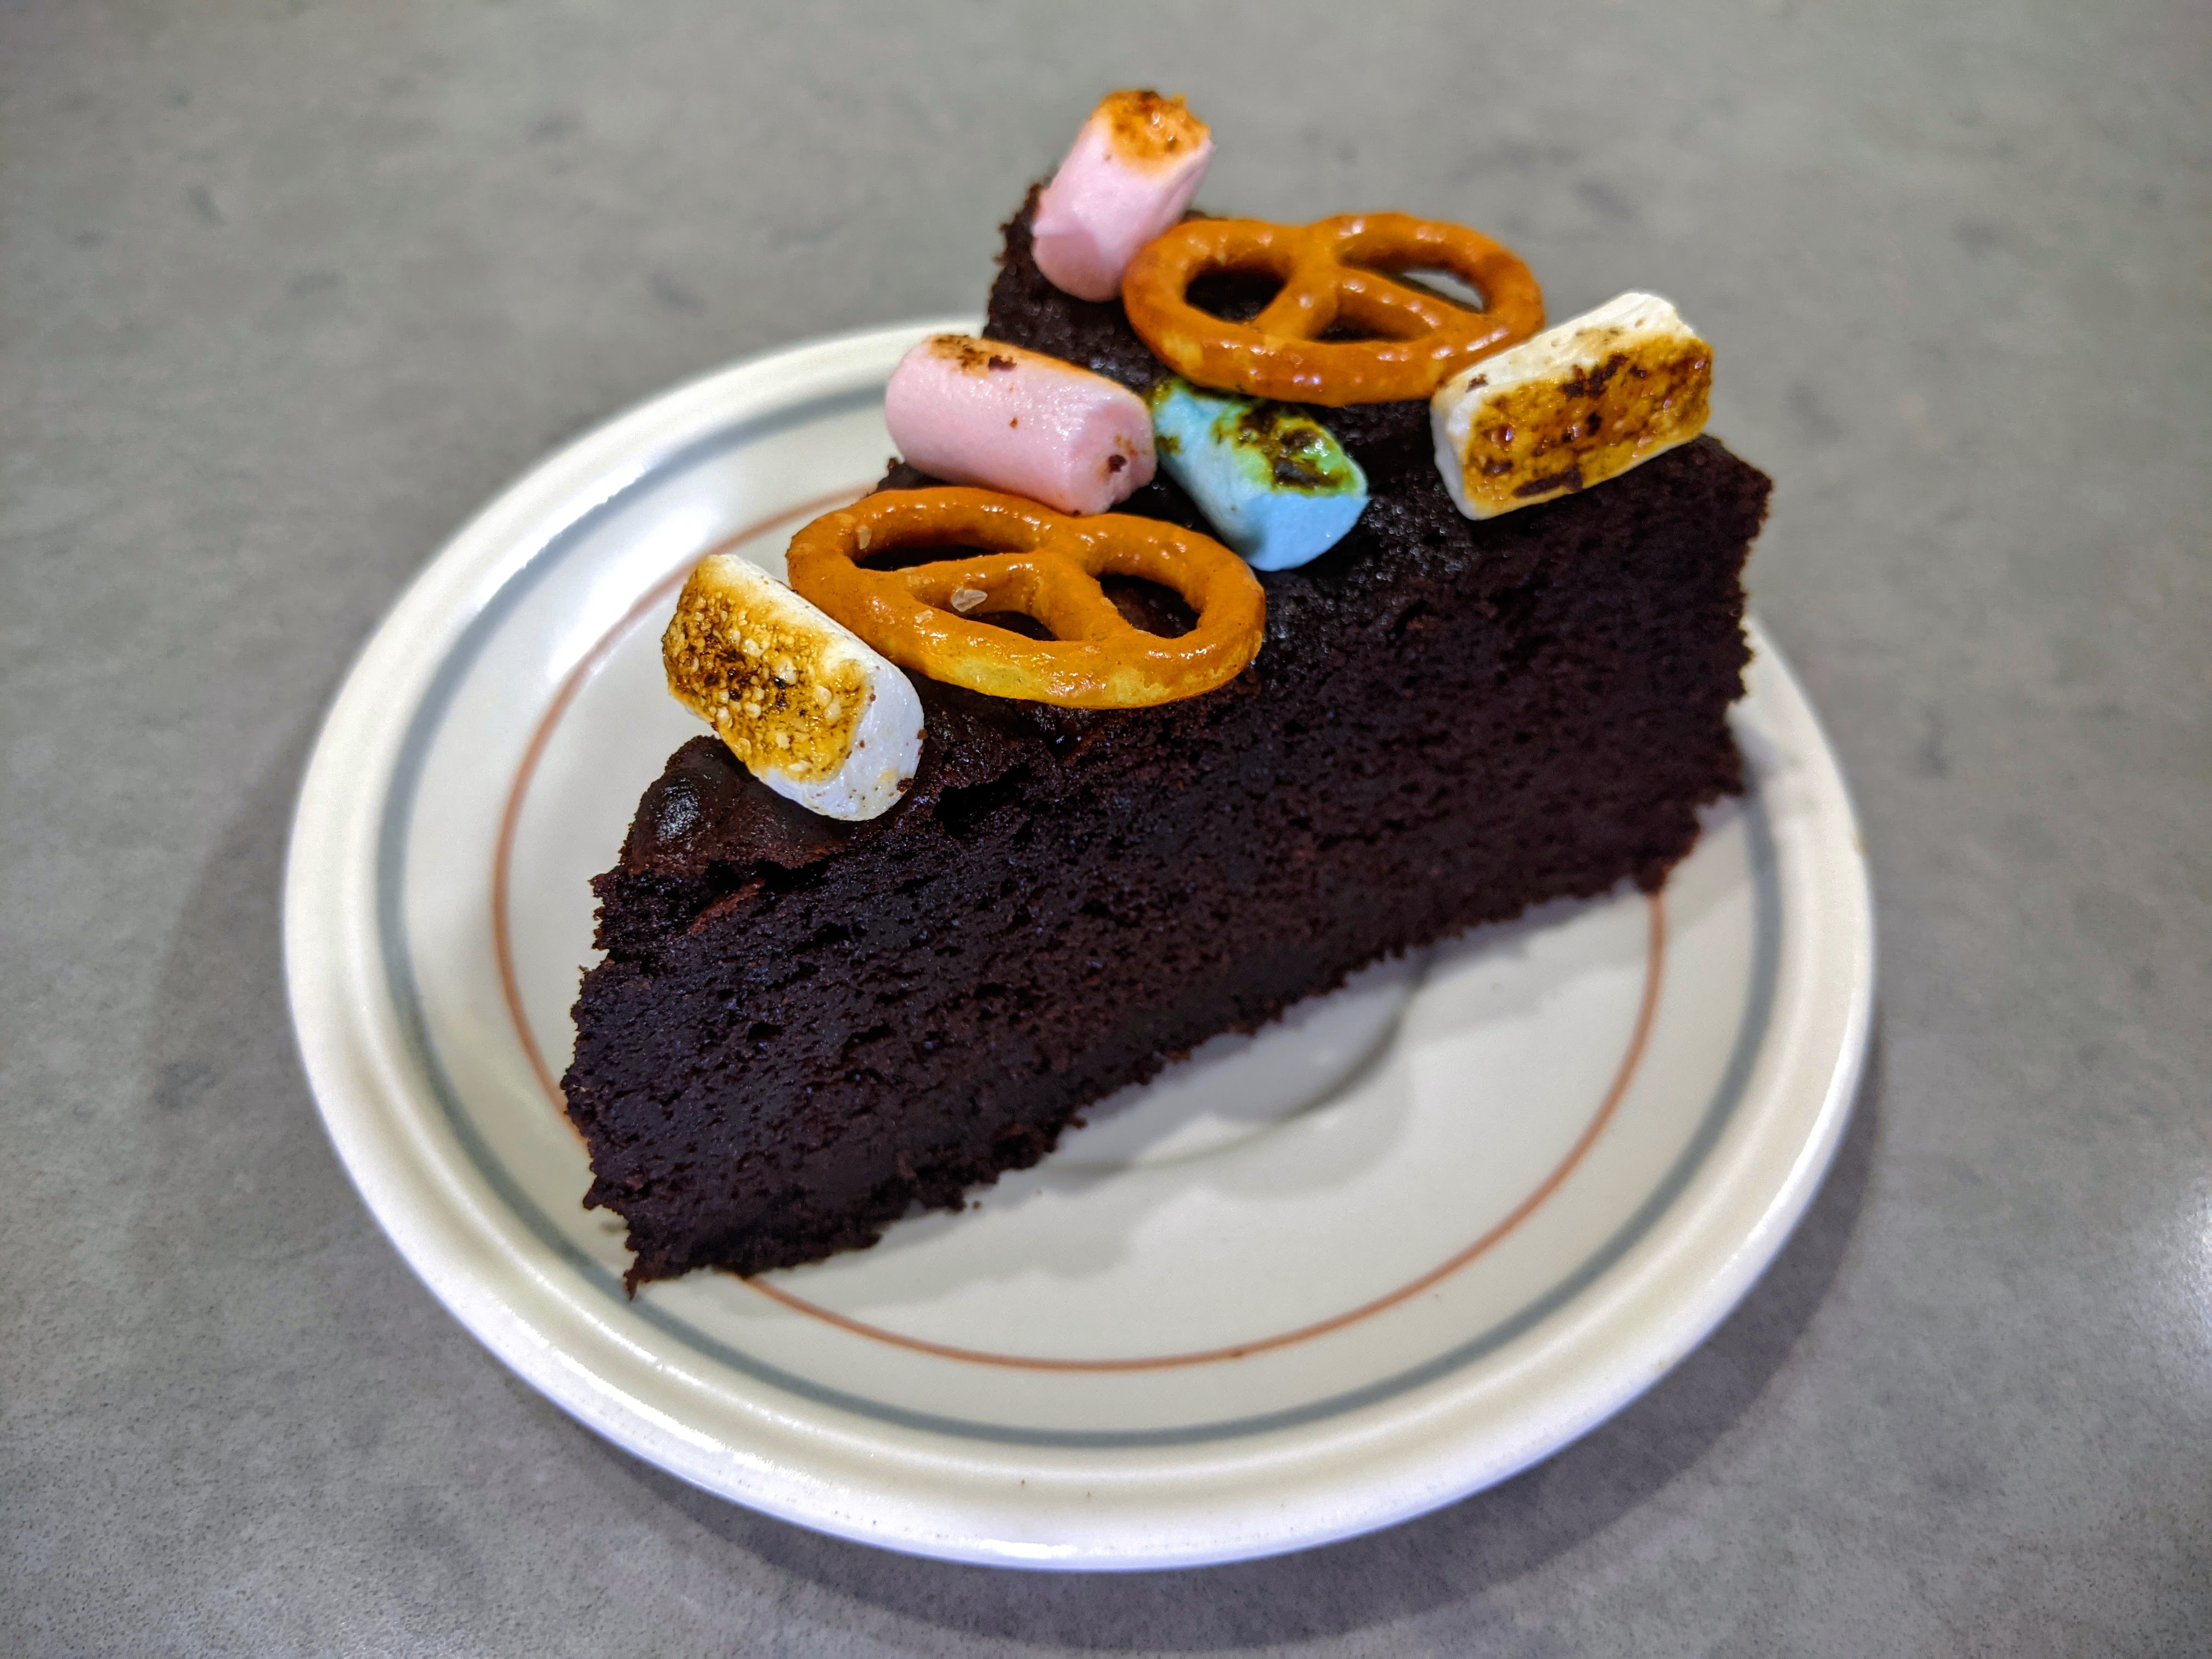
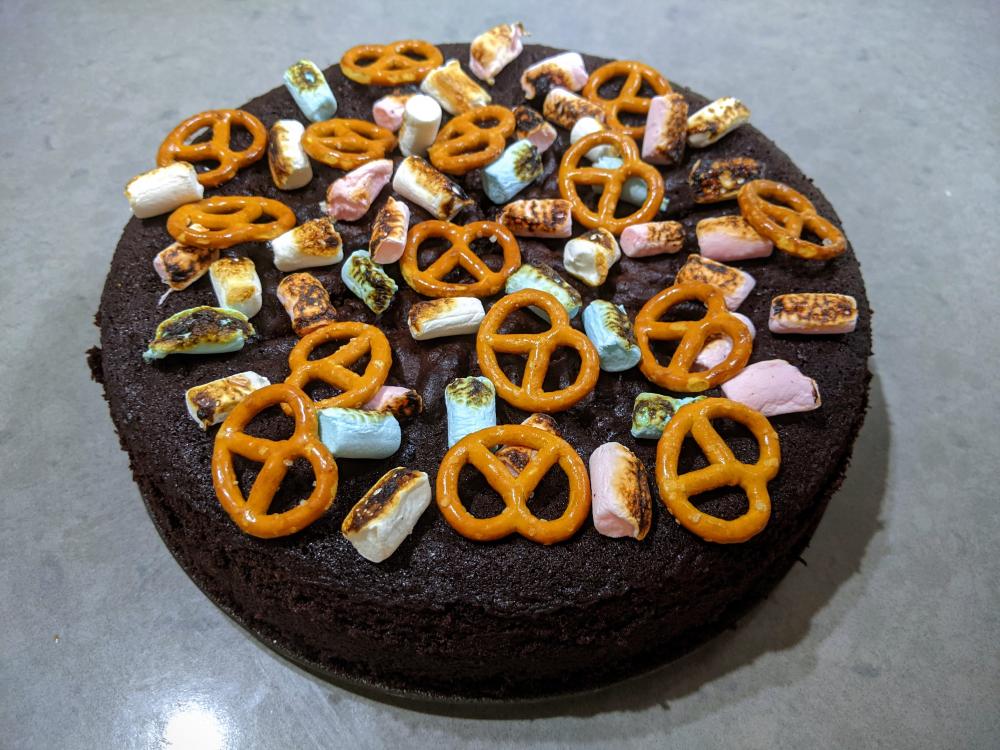
Wet mix: 100g soft butter 280g sugar 2 eggs 250ml cream, full fat 200ml sour cream 60ml milk or coffee or a mixture of the two 1/4 tsp salt Dry mix: 75g good quality cocoa powder 170g flour 1 tsp baking powder 1/2 tsp baking soda Prep: Mix together flour, cocoa, baking soda and baking powder. In a large bowl, whip butter and sugar until fluffy. Add in eggs and whip until smooth. Add in the two creams, milk or coffee, salt. Mix well. Sieve in the flour mixture while gently folding. Pour into a pan, 22-24 cm in diameter. Bake in a preheated oven at 170dC for apx 45-60 minutes. The cake is ready when a skewer leaves with a few moist crumbs. Do not over bake! This cake is very good served warm with ice cream, at room temp, or cold where it becomes fudgey. You can top it with a ganache or whatever you fancy.

-
My family loves lasagna but I get tired of making it and sometimes I just don't have any lasagna noodles in the pantry. I make a killer pastitsio and I tried spaghetti pie. But to be truthful, we'd rather just have the spaghetti. So when I came across this recipe the other day, I thought it would be worth trying and it was good. Good enough to share. Beef Vermicelli Cake serves: 4 to 6 3 1/4 oz salted butter 1 onion, chopped 1 lb 2 oz ground beef 28 fl oz bottled pasta sauce 2 tablespoons tomato paste 9 oz vermicelli 1/4 cup all-purpose flour 1 1/4 cups milk 1 1/4 cups grated cheddar cheese Preheat the oven to 350°. Lightly grease a 9 inch round deep spring-form cake pan. Melt a tablespoon of the butter in a large deep frying pan and cook the onion over medium heat for 2 to 3 minutes, or until soft. Add the beef, breaking up any lumps with the back of a spoon, and cook for 4 to 5 minutes, or until browned. Stir in the pasta sauce and tomato paste, reduce the heat and simmer for 20 to 25 minutes. Season well. Cook the pasta in a large saucepan of rapidly boiling salted water until al dente. Drain well. Meanwhile, melt the remaining butter in a saucepan over low heat. Stir in the flour and cook for 1 minute, or until pale and foaming. Remove from the heat and gradually stir in the milk. Return to the heat and stir constantly until the sauce boils and thickens. Reduce the heat and simmer for 2 minutes. Season with salt and pepper. Spread half the pasta over the base of the pan , then cover with half the meat sauce. Cover with the remaining pasta, pressing down with the palm of your hand. Spoon on the remaining meat sauce and then pour on the white sauce. Sprinkle the cheese on the top and cook for 20 minutes. Leave to stand for 15 minutes before removing from the pan. Cut into wedges to serve. Quick Pasta Sauce (double the recipe) 8 oz ground beef 1/2 small onion, diced 1 garlic clove, minced 14 oz canned diced tomatoes 1/2 teaspoon ground oregano 1/2 teaspoon dried basil 1 1/2 tablespoons dry vermouth or red wine Salt and pepper to taste Combine ground beef, onion, and garlic in a skillet and saute until no longer pink. Add the remaining ingredients and simmer on low heat until most of the moisture has evaporated. At this point, season with salt and pepper to taste. Since my family loves cheddar cheese I made it just as is and it was a big hit, however I think that I will try it the next time with mozzarella and Parmesan. If you don't have a springform pan, I don't see any reason at all that this can't be made in a casserole dish and served like lasagna.
-
Ingredients 4 Strawberry 1 Whole Kiwi 4 tsp Sugar 1 Cup of MilK 3 Mint leaves (Optional) Equipment Blender Measuring Cup Instruction Peel the Kiwi skins of exposing the green part Combine the strawberry, kiwi, sugar and milk in the measuring cup Blend it together in the blender Ontop put 3 Mint leaves as garnishing Enjoy
-
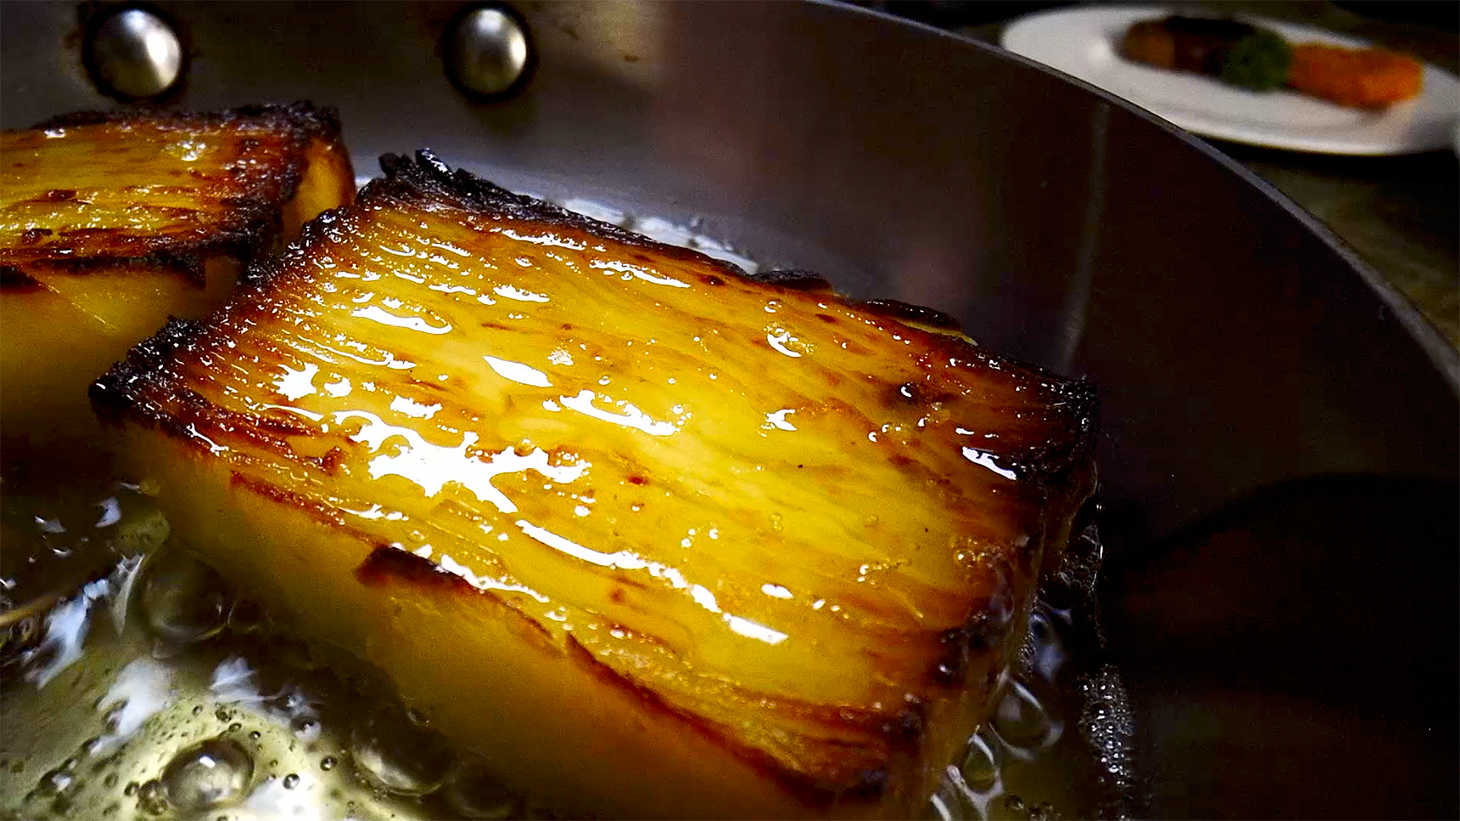
 I've been making these for a decade, my preferred alternative to french fries. They're sliced potatoes layered either with an infused cream or flavorful stock. You can cook them in a flat dish and then fry them, but I've always liked the way the layers look when I bake it in a deep bread pan. I posted a photo last week and people seemed to like it, so I made a video of it (link at the bottom). Either way, here's the cream/milk version of the recipe -- and if this has a proper name, let me know. https://www.youtube.com/watch?v=muBHw8SZXwI Fried Gratinated Potatoes / Fried Scalloped Potatoes Milk/Cream version Garlic, 1 or 2 cloves (optional) Herbs: Bay leaf, Thyme, Rosemary, one or all to taste Cream and/or milk, enough to make 2 cups Potatoes, enough to fill whatever sized dish you are using Cheese, optional. Parmesan and Gruyere are good choices Salt, to taste 1. Prepare the garlic and herbs. 2. Add the milk/cream to a sauce pot with the garlic and whatever herbs you will be using. 3. Heat the milk/cream on a low heat to bring to the simmer. Cover and turn off the heat. Leave until it is room temperature then remove the garlic and herb. 4. Peel and slice enough potatoes to fit whatever pan you will. be cooking them in. (You do not need to use all of the sauce. You can keep any leftover in the refrigerator for another version later.) 5. Dip the potato slices in the milk/cream mixture and layer the potato slices in the pan, then add a layer of the sauce and cheese (if using). You can also brush butter or fat onto the each potato layer to deepen the flavor. 6. Cover and bake in a 350F or 180C oven for 1 hour or until the potatoes are done. 7. While the dish is still hot, put a sheet of wax paper over it and set upon it something heavy to weigh it down. Doing this will remove all gaps to make clean layers. This step is optional -- unless you are frying. 8. When the dish reaches room temperature, you can invert and serve or slice and fry. 9. In a pan add whatever fat you will be using and fry slices of the gratin until golden brown. Alternatively, you can broil slices with a lot less oil, be sure to base the slice to avoid burning. Here's the video if you'd like to see.
-
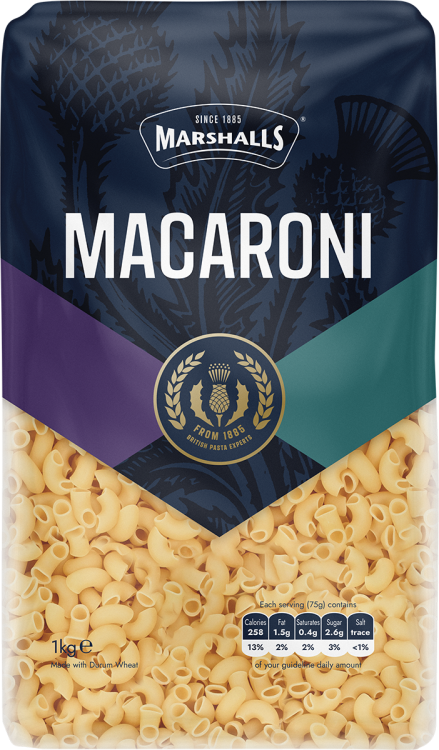
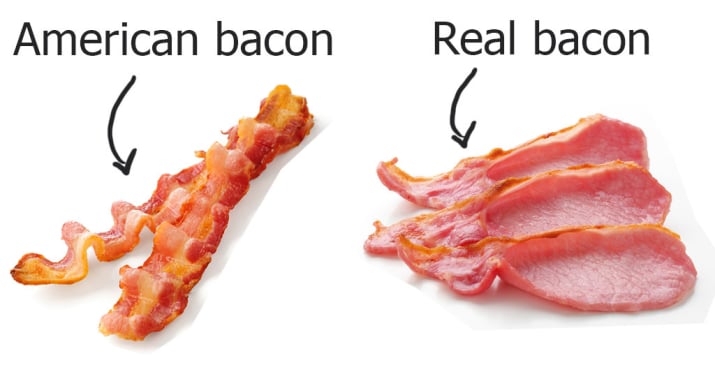
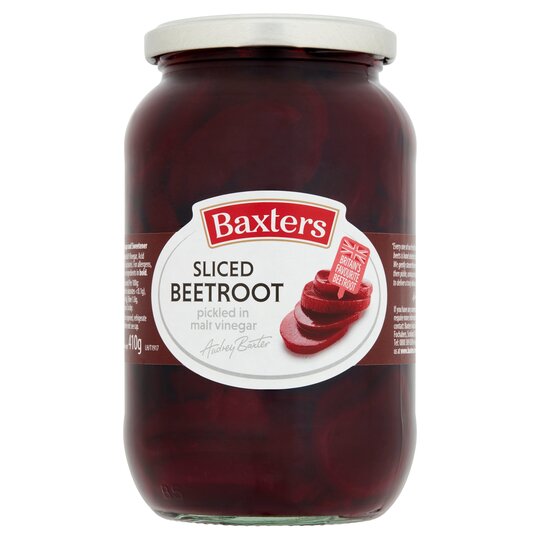
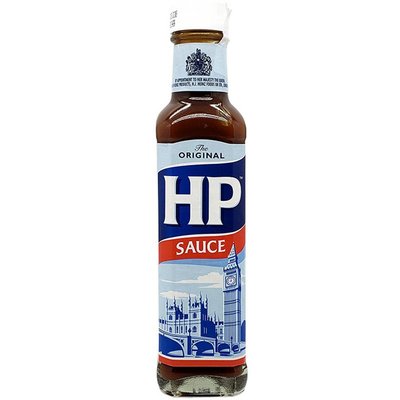
When my mother recently passed away, because we are a scattered family, one of my younger brothers had the great idea of setting up a private Facebook page for the immediate family to talk in – mainly about funeral arrangements but also just in general. One topic, which I inadvertently started, was about her cooking. It’s fair to say, and she would agree, that cooking was not her forte. She was able to feed us but it was never exciting. That’s me being respectful. So we were joking amongst ourselves about that when the subject of her two most ‘original’ recipes came up and we each tried to remember exactly what was in them. Here, to the best of our ability, is what we agreed on. Pasta Mish-Mash Ingredients: Pasta. This had to be Marshall’s macaroni, a Scottish speciality and the only pasta I ever ate until I was about 18 years-old, apart from tinned spaghetti, usually in the form of spaghetti hoops. Bacon. This would normally be unsmoked Ayrshire back bacon. Not American bacon! Onions. White onions. We didn’t know they came in other colours. Tomatoes. Scottish tomatoes are surprisingly good. Salt. Common iodised table salt. You know. Natural salt. None of your fancy sea flavoured salt nonsense! Pepper. Black pre-ground and stale. Method: Boil pasta according to pack instructions. Or a bit longer if you get distracted. Drain. Cut bacon into pieces. Chop onion approximately finely. Chop tomatoes into eighths. Fry bacon and vegetables. When ready add drained pasta and mix. Apply seasoning if you remember. Even if you remember, under season. Serve. Polish Salad During WWII, around 17,000 Polish soldiers were stationed in Scotland, first temporarily in the border areas but later in east Scotland where my mother lived. (Her elder sister married one of them). Family lore has it (from my mother) that she learned this recipe from one or more of those soldiers. I’m fairly certain that there was little if anything Polish about it, but suppose its possible it was those soldiers’ attempt to recreate something from home without really knowing the recipe and having to use whatever they could find in the way of ingredients. If anyone here is Polish, of Polish descent or just knows more about Polish food than I do knows of any Polish dish that this could even vaguely resemble, I’d love to know. It was memorably distinctive - bright purple. I'm sure it glowed in the dark. Ingredients: Tomatoes Onions Apples Hard boiled eggs Pickled beetroot (store bought and pickled in malt vinegar) Heinz Tomato Ketchup Brown Sauce, preferably HP Sauce. Method: Chop all the ingredients except the ketchup and brown sauce into small pieces and mix together. Mix ketchup and brown sauce in a 50:50 ratio, and fold into the other ingredients. If too dry, add a little of the beetroot pickling liquid. Serve Father's 'recipe' coming up next.


-
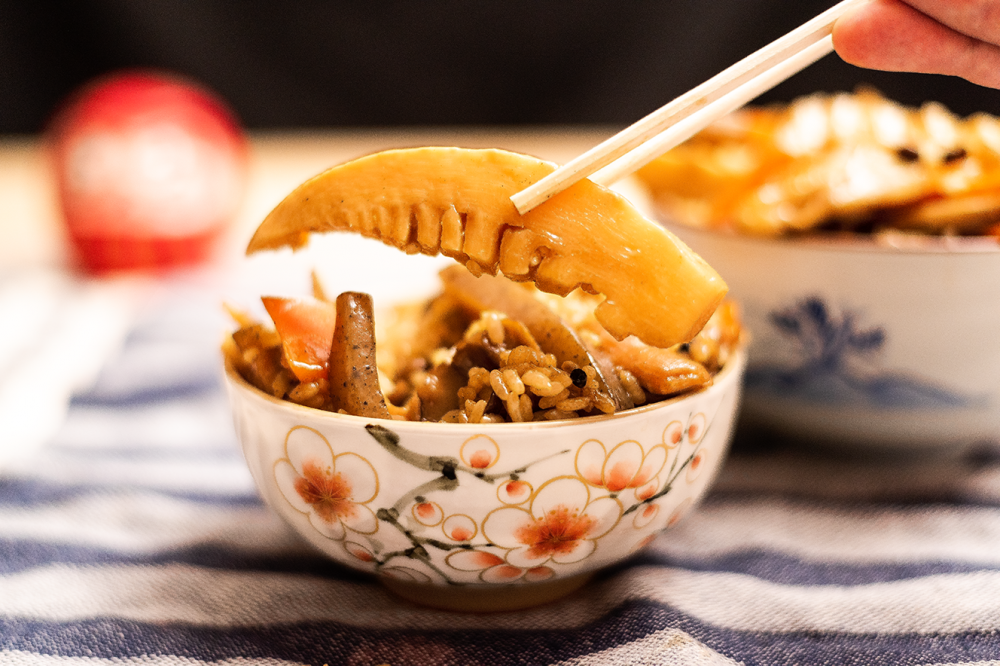
This was a staple in university because I had no time to cook and no stomach for junk food. I would put everything in the rice cooker and have something warm to eat ready all day long. Here is a video so that you can easily understand: https://www.youtube.com/watch?v=p9UCXQcRQdU One recipe done in a slightly different order gives you two of Japan's easiest rice dishes, this one is called TAKIKOMI the other is MAZE GOHAN 3 cups Rice Shiitake Mushrooms (4 or 5) Seasonal Mushrooms (1/2 - 1 cup) 1 Carrot 1/2 cup sliced Burdock Root (Gobo -- any seasonal vegetable) 1 pack Konkyaku (has no flavor, adds texture, can omit) 2 fried tofu (abura age) (adds texture and protein, can omit) 200 grams Chicken (preferably leg meat) 2 tablespoons Soy Sauce 2 tablespoons Mirin (or 1 teaspoon sugar, 2 tablespoons sake)2 tablespoons Sake (this is said to negate any odor) Salt to taste 3 cups Dashi (note: the amount of vegetables and chicken is not precisely measured but ratio of rice to dashi is always 1 cup rice to 1 cup dashi. And, myself, I'm a bit carb-phobic, so I only use one cup rice.) 1. Wash the rice and set aside. Doing this will partly hydrate the rice which is said to improve the texture and flavor. 2. Slice the vegetables and set aside. (note: some people put the sliced burdock in water to remove bitterness and/or prevent oxidation) 3. Boil the konyaku and 'fried tofu' separately. Drain, slice, and set aside. 4. Slice the chicken, with skin, into bite sized pieces and add the soy sauce, mirin, and sake. 5. Prepare your dashi. 6. Now that all of your ingredients are ready, combine them either in a rice cooker or a deep sauce pan. 7. The rice MUST go into the pan first. Make sure it is evenly spread along the bottom. 8. Place the rest of the ingredients into the pot in any order but do not mix. 9. Add the dashi. 10. Set into your rice cooker. (Japanese rice cookers will have a special setting labeled 炊き込み.) 11. If you are using a stovetop, without stirring the pot, bring it to a boil then cover and reduce the heat to low. Cook for 13 minutes, then turn off the heat. Do not open the pot. Let it steam for an additional 15 minutes. 12. Stir the takikomi rice and serve.
-
Hi all!! I work at an amazing little New Zealand Style ice cream shop in the beautiful Denver Colorado. I was hoping to get a little help on the subject of adding fruit into ice cream after extracting it and ensuring that, when the ice cream is frozen, the fruity bits don't turn into rock hard shards. I am planning on doing a cherry chocolate ice cream and I was going to soak some dried cherries that we're no longer using for something else. I was planning on using some brandy and a ton of sugar, but I was really hoping someone had a tried and true method they could send my way so that I KNOW that the fruit will be luscious as it's frozen. If you have a certain sugar ratio. I know there is the brix test, but to be honest it's been many years since pastry school and I am very rusty. Would love to hear from some of my fellow sugar-heads. Thank you! Amy
-
Honey Butter Japanese Sweet Potato I always serve this dish with Tonkatsu. It is not too sweet and the flavors blend perfectly with the Tonkatsu sauce that is served with the pork. 1 sweet potato 2 tablespoons butter 2 tablespoons honey 2 teaspoons soy sauce 2 tablespoons water 1 teaspoon black sesame seeds Wrap the sweet potato in cling wrap and microwave for 3 to 4 minutes.* Cut into 1 1/2 inch thick strips. Melt butter in a skillet and cook the sweet potato over medium heat. When the potatoes are soft, add the honey, water and soy sauce to the pan. Mix well together and stir just until the liquid starts to turn to a syrup. Top it off with sesame seeds. * Note: Instead of putting this in the microwave, I cut the potato into wedges and cook it in the instant pot for 2 minutes. This can be done a day ahead of when you need it.
-
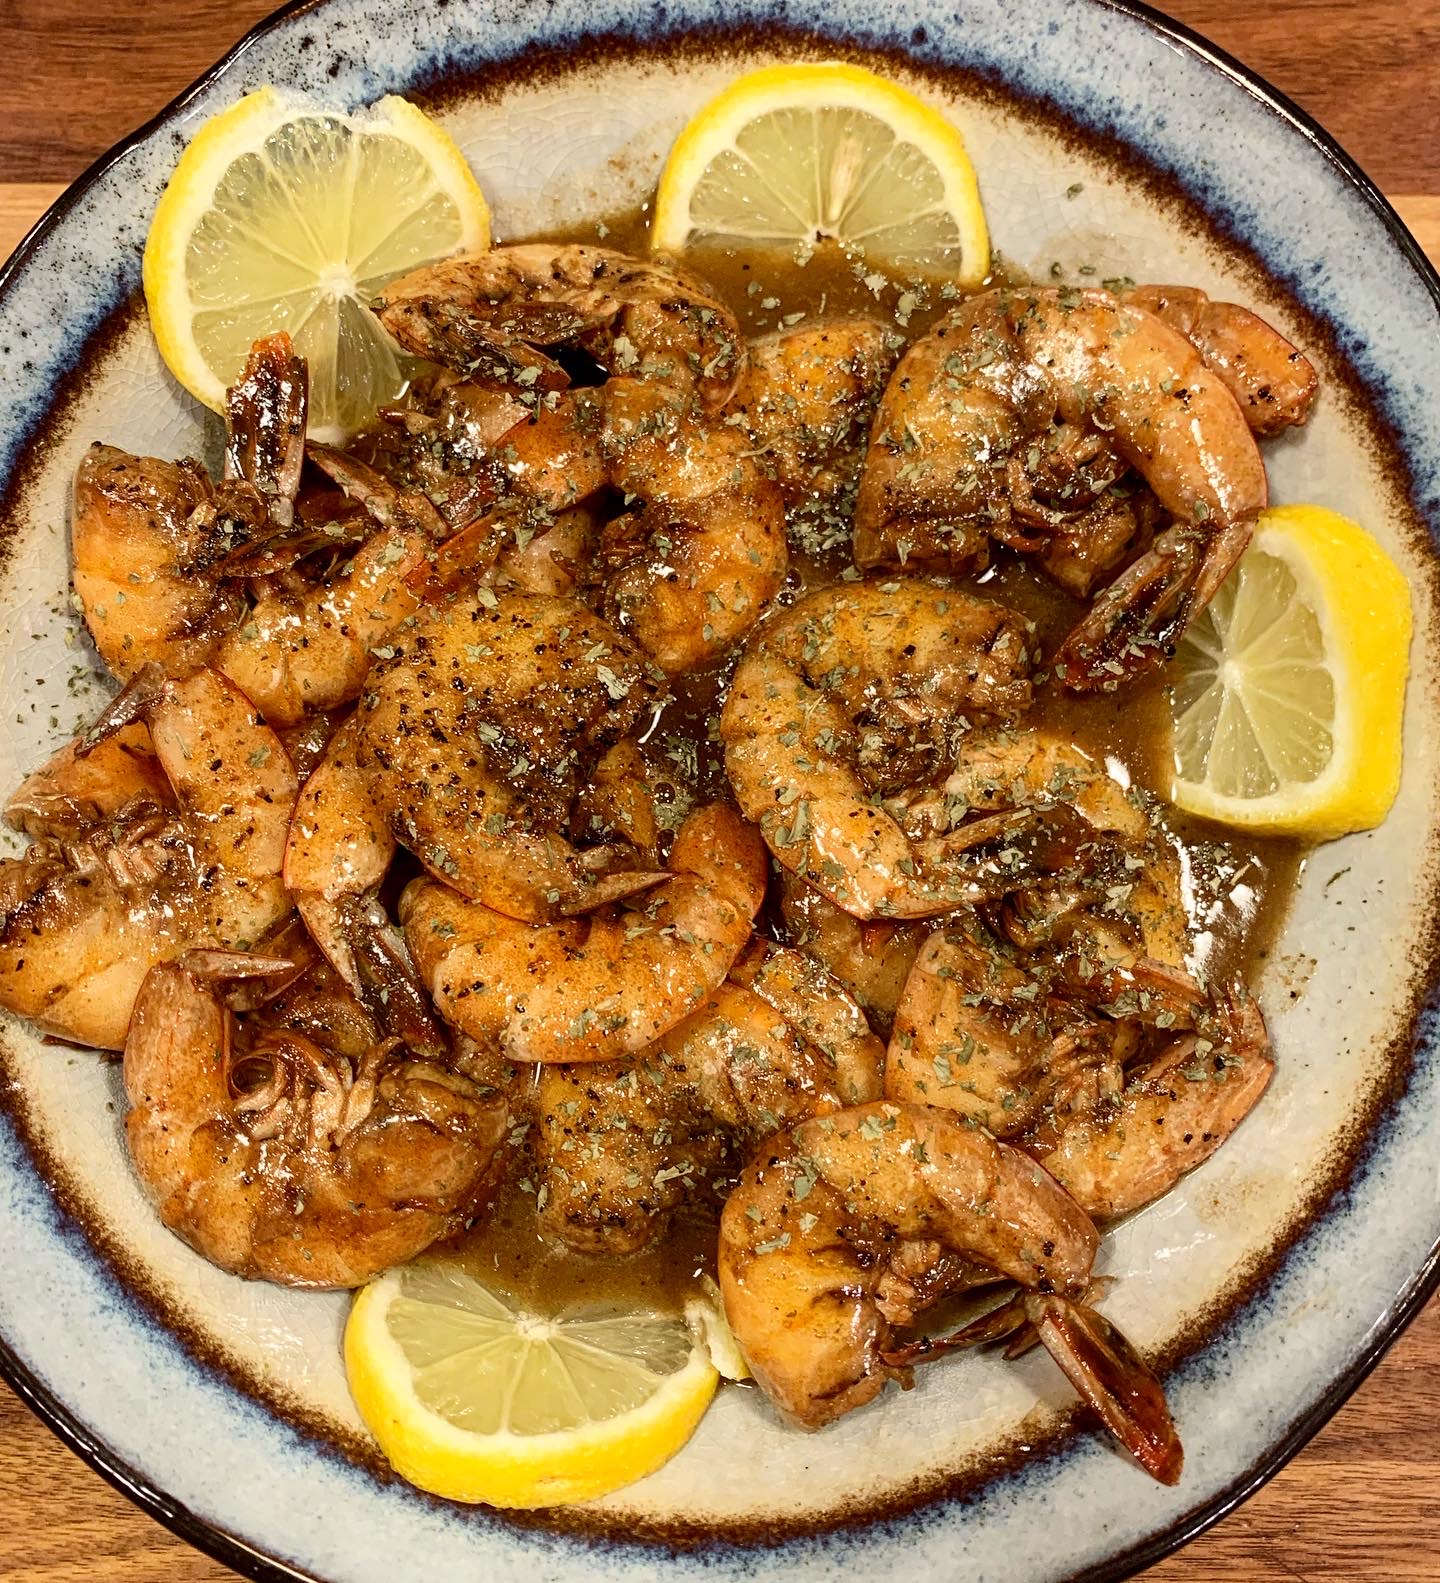
For non-Louisianans, this dish has nothing to do with actual barbecue. 16 jumbo shrimp (12 per pound, about 1 1/2 pounds), with heads and shells. 1/2 cup Worcestershire sauce 2 tablespoons fresh lemon juice (about 2 lemons) 2 teaspoons ground black pepper 2 teaspoons cracked black pepper 2 teaspoons Creole seasoning (Tony’s or other) 1 teaspoon minced garlic 1 1/2 cups (3 sticks) cold unsalted butter, cubed French bread as accompaniment In a large skillet combine shrimp, Worcestershire, lemon juice, black peppers, Creole seasoning, and garlic and cook over moderately high heat until shrimp turn pink, about 1 minute on each side. Reduce heat to moderate and stir in butter, a few cubes at a time, stirring constantly and adding more only when butter is melted. Remove skillet from heat. Place shrimp in a bowl and pour sauce over top. Serve with French bread for dipping. Yield: 4 appetizers or 2 entrees Head on shrimp are preferred, as there is so much flavor from the heads. However, de-headed, as pictured, is also good!

-
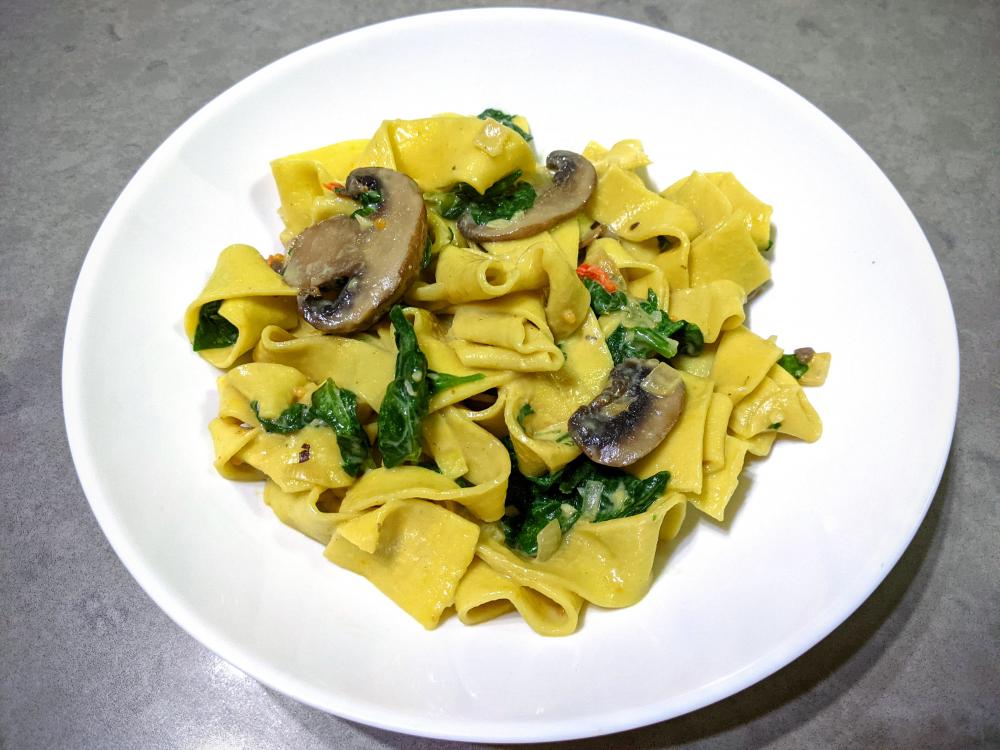
Creamy pasta with a spicy pungent flavor. Best served with a bold red wine or a dark ale. Serves four. Mustard must be added to taste, I find the acidity to be the limiting factor, rather than its pungency, but if your mustard is very strong, you may need to use less and add a touch of vinegar. 400 g dried fettuccine or other wide pasta, or better, an equivalent amount of fresh egg pasta 250-300 champignon or other mushrooms, sliced thinly 3 tsp butter 1 medium onion, diced 4 garlic cloves, minced A small amount of chili 400g spinach leaves, stems removed, cut into ribbons Apx 1/4 cup half and half, or a bit less full fat cream 4-8 tsp Dijon mustard (add to taste), you can include some grainy mustard if you have it at hand Optional: 1 tsp nutritional yeast or a touch of MSG, if you like using it Optional: 1/2 to 1.5 tsp honey or dark brown sugar Salt to taste A generous grating of nutmeg Plenty of black pepper Cook mushrooms with some of the butter over high heat until lightly browned. Set aside. Add more of the butter and fry the onion until golden. Add remaining butter, garlic and chili. Fry briefly until aromatic. Cook the pasta very al dente. Drain well. Add it along with the mushroom, spinach and cream. Heat over low flame, until the spinach is wilting. Add mustard to taste, optional nutritional yeast or msg, optional honey or sugar, salt. All to taste. Add vinegar only if needed, add nutmeg. Plate and grind pepper on top.
-
180 g dry small white beans, soaked in water overnight 1 teaspoon salt 3 bay leaves stock (chicken or veg) 1 large red pepper 1 medium onion 3 large celery branches (keep the leaves) 1 parsley root (you can use a parsnip or more carrots instead) 2 small carrots 4 garlic cloves, finely chopped 1 tablespoon butter 1.5 tablespoons flour 1 tablespoon tomato paste 1.5 teaspoon salt To finish: 3 teaspoons Hungarian paprika (you can replace some with smoked paprika) 3 small garlic cloves, crushed 3 teaspoons wine vinegar A little chili powder, to taste 10 tarragon leaves, chopped 3 tablespoons chopped parsley 2 tablespoons chopped dill To serve: Red onion, finely chopped, mixed with a little wine vinegar and salt Sour cream (important) Light country/seeded bread, not sliced - before serving, put it (or a portion) in a low oven and bake until it's crips on the outside preparation In a pressure cooker, cook the beans in the stock with a teaspoon of salt and bay leaves. Cut all the vegetables into small cubes. Keep aside the celery leaves (check that they are not bitter, if they are, discard them). In a large pot, heat the butter. Add the chopped vegetables (pepper, carrot, parsley root, onion, celery) and saute while stirring over medium heat until the vegetables soften, but not browned. Add the garlic and flour and mix well until it is absorbed. Add the tomato paste, salt and celery leaves. Add the beans with their cooking liquid. Add more water/stock as needed Mix well, cover, and cook until the vegetables soften. Add vinegar, paprika, crushed garlic, tarragon, parsley and dill. Serve very hot, accompanied by vinegered onion, sour cream and bread.

-
Prawn Balchao is a very famous Goan pickle that has a sweet, spicy and tangy flavor to it. For the balchao paste you will need: > 8-10 kashmiri red chillies > 4-5 Byadagi red chillies > 1/2 tsp cumin seeds > 1/2 tsk turmeric powder > 1 tsp peppercorn > 6 garlic cloves > 1/2 tsp cloves > 1 inch cinnamon stick > Vinegar First you will need to marinate about 250 grams of prawns in some turmeric powder and salt. After 15 minutes deep fry them in oil till them become golden n crisp. Set them aside and add tsp vinegar to them and let it sit for 1 hour. Now, make a paste of all the ingredients mentioned under the balchao paste and make sure not to add any water. In the same pan used for fryin the prawns, add in some chopped garlic and ginger. Lightly fry them and immediately add one whole chopped onion. Next, add the balchao paste amd let it cook for 2-3 minutes. Add in the prawns and cook until the gravy thickens. Finally add 1 tsp sugar and salt according to your taste. Allow it to cool. This can be stored in a glass jar. Let this mature for 1-3 weeks before its use. Make sure never to use water at any stage. This can be enjoyed with a simple lentil curry and rice.
-
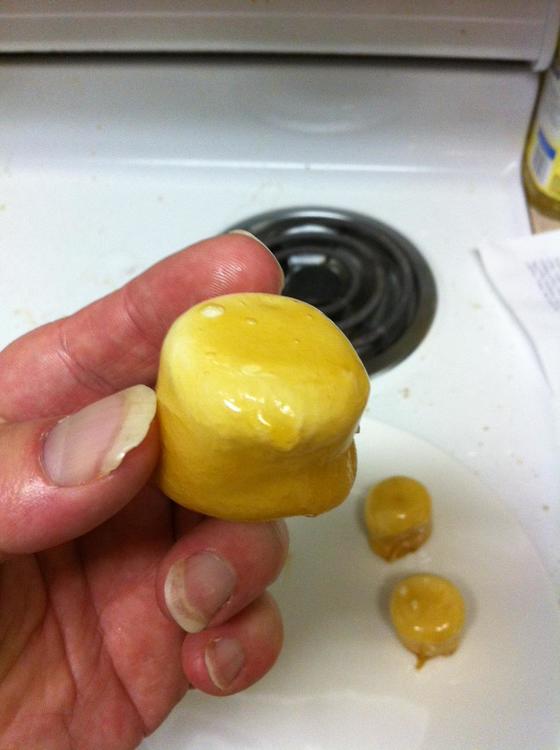
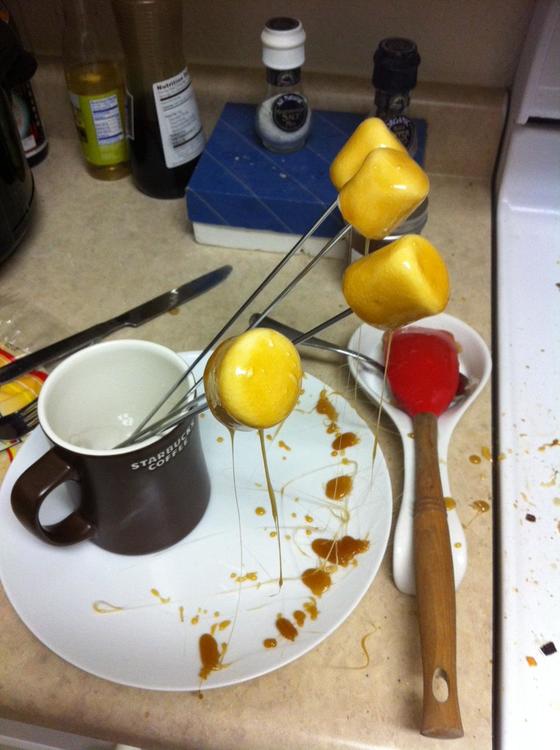
Here's a fun little recipe I put together - it's a bit casual and unrefined, so I won't be at all offended if any experts jump in with improvements, but it's pretty easy to make, and makes a really tasty treat Toffee covered Marshmallows: 1 lb. bag large marshmallows (large homemade marshmallows should also work - feel free to give it a try) 1 1/2 cups sugar 1/4 cup light corn syrup 1/2 stick butter (or 1/8 lb., for non-US people who wonder what the heck a stick of butter is) A splash of water (yay for exact measurements! ) Also needed: 4 or 5 skewers (preferably metal), and a reasonably heavy coffee mug 1. Remove the marshmallows from the bag, separate them, and put them in a plastic bag or other suitable container in the freezer. It's OK if they are touching in the bag, but make sure they're not squished together. 2. After a few hours, add the rest of the ingredients to a saucepan (use just enough water to wet the sugar so it doesn't burn as easily) and cook on medium heat, stirring occasionally. 3. Cook the mixture until it just starts to turn brown - if you have a candy thermometer, this will be around 290F/143.333C. If you don't have a candy thermometer, just occasionally put a drop of the mixture on a white plate to check the color (then put "candy thermometer" on your shopping list, because candy thermometers are awesome) 4. Once it starts to just barely (but definitely) start to turn brown, take the pan off the heat, turn the stove burner down to very low heat, and put the pan back on (you want just enough heat to keep the mixture from cooling too much, but not so much heat that it continues cooking) - this is the toffee that you will dip the marshmallows into 5. Take the bag of marshmallows out of the freezer, stick a marshmallow on the end of a skewer, and dip it into the toffee. You must dip it quickly, so that the marshmallow doesn't melt, and also try to avoid dipping it in far enough that the toffee gets on the skewer (toffee on the skewer makes it really hard to remove the marshmallow cleanly) 6. Find someplace to stick the skewer while the toffee cools (this only takes a minute or so, but the toffee will stick to anything it touches until then, and it will probably drip until it cools). My recommendation is to put the aforementioned coffee mug on a plate (to catch drips), and place the end of the skewer in the coffee mug (see photo below) to hold it. 7. Once you've dipped the fourth or fifth marshmallow, the toffee on the first one you've dipped should be hard, and you can use a fork to ease it off the skewer so you can dip another marshmallow 8. Continue dipping marshmallows until you run out of marshmallows or toffee, or get tired of trying to keep them from sticking to each other in the coffee mug. Notes: -The heat from the toffee mixture slightly cooks the marshmallow, so you'll end up with a slight campfire-marshmallow flavor once you get through the thin candy shell - it's really quite tasty! -The toffee should drip off in long thin drips like in the photo (these easily snap off once the toffee cools. If you are instead getting thick oozing drips that make it look like the marshmallow is trying out for the part of "elephant" in the school play, you are dipping the marshmallows in the toffee for too long and they're melting - dip quicker -keep the marshmallows at least one inch apart in the coffee mug - if they make the slightest contact with each other, they'll stick permanently (and they make this really cool marshmallow-toffee bridge when you try to pull them apart). This will happen at least once in the process - just consider them samples for quality-control purposes -For those who are afraid of boiled sugar recipes, try this one out - just take your time and be very careful not to drip any toffee on yourself, and you should do fine. Feel free to message me if you have any concerns - I'm happy to help people get into candymaking -The toffee shell is quite happy to suck up any humidity in the air, so once they're made, they need to be eaten within a few hours or they start getting sticky on the outside - this is either a good point or a bad point Enjoy!
-
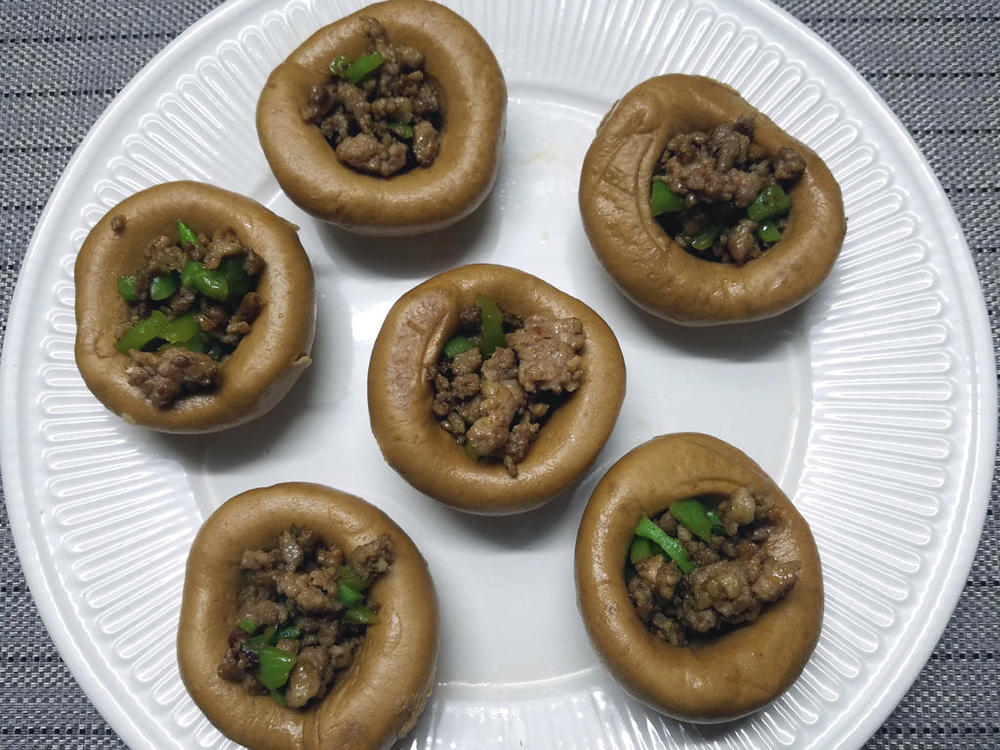
Wowotou buns ( 窝窝头 wō wō tóu), also known more simply as wō tóu are originally from northern China. The name means "nest" and they come in many forms. These are the ones I use. As you can see, they are usually stuffed with whatever the cook decides. These are stuffed with spicy pork and pickled greens, but I've also served them with a seafood stuffing. This is the recipe I usually use. 窝窝头 350 grams all-purpose/plain flour 150 grams black soya bean flour 3 grams instant yeast 260 grams milk Mix the flours well, dissolve the yeast in the milk and stir into the flour until a dough forms. Knead the dough until smooth. Cover with plastic wrap and leave in a warm place until double in size. Sprinkle flour on the chopping board, knead the dough, adding more flour if too wet. until all air is expelled and the dough has a smooth surface. Form the dough into six even-sized balls and rub between the palms until smooth and round. Flatten slightly, then use your thumb to press the dough into a nest shape. Steam covered for 30-35 minutes. Note: The flours used vary a lot. Corn or sorghum flours are very popular, but I don't like corn and sorghum isn't the easiest to find here in southern China. Use what you like, but the overall quantity for this recipe should be 500 grams. It has been suggested that pure corn flour is too sticky, so probably best to mix it with regular wheat flour. They freeze well. Recipe adapted from 念念不忘的面食 by 刘哲菲 (Unforgettable Wheat Foods by Liu Zhefei). This isn't a direct translation, but retelling of the gist. Any errors are mine. Not Ms. Liu's.
-
1 free-range chicken or fryer, 3 1/2 to 4 pounds, cut into 8 pieces, rinsed and patted dry 2 teaspoons salt 3/4 teaspoon freshly ground black pepper 8 tablespoons unsalted butter, cut into small pieces 1 tablespoon vegetable oil 6 cloves garlic, unpeeled 1 cup good-quality white wine vinegar 2 tomatoes, peeled, seeded and chopped, about 1 cup 2 cups chicken stock 2 tablespoons creme fraiche or heavy cream Chopped parsley, garnish Season the chicken evenly on both sides with the salt and pepper. In a large Dutch oven, melt 2 tablespoons of the butter with the oil over medium-high heat. Add the chicken and garlic cloves and cook until the chicken is well browned, turning once, about 8 to 10 minutes per side. Add the vinegar and stir to loosen any browned bits on the bottom of the pan. Add the tomatoes, cover the pot and reduce the heat to medium. Cook until the chicken is tender, about 25 minutes. Transfer the chicken pieces to a warmed platter and cover to keep warm. Add the chicken stock to the pot and bring to a boil, scraping any browned bits that cling to the sides or bottom of the pan. Cook until the sauce is reduced by 1/3 in volume, about 10 minutes. Strain the sauce through a fine sieve and return to the pan, discarding the solids. Reduce the heat to low. Add the remaining butter, a piece at a time, whisking constantly until all the butter has been added and the sauce is smooth and thick. Do not allow the sauce to boil and remove from the heat as necessary to prevent from breaking. Add the creme fraiche and whisk to combine. Adjust the seasoning to taste. Ladle the sauce over the chicken and garnish with the parsley. **** Note--I don't strain the sauce, I like it chunky!
-
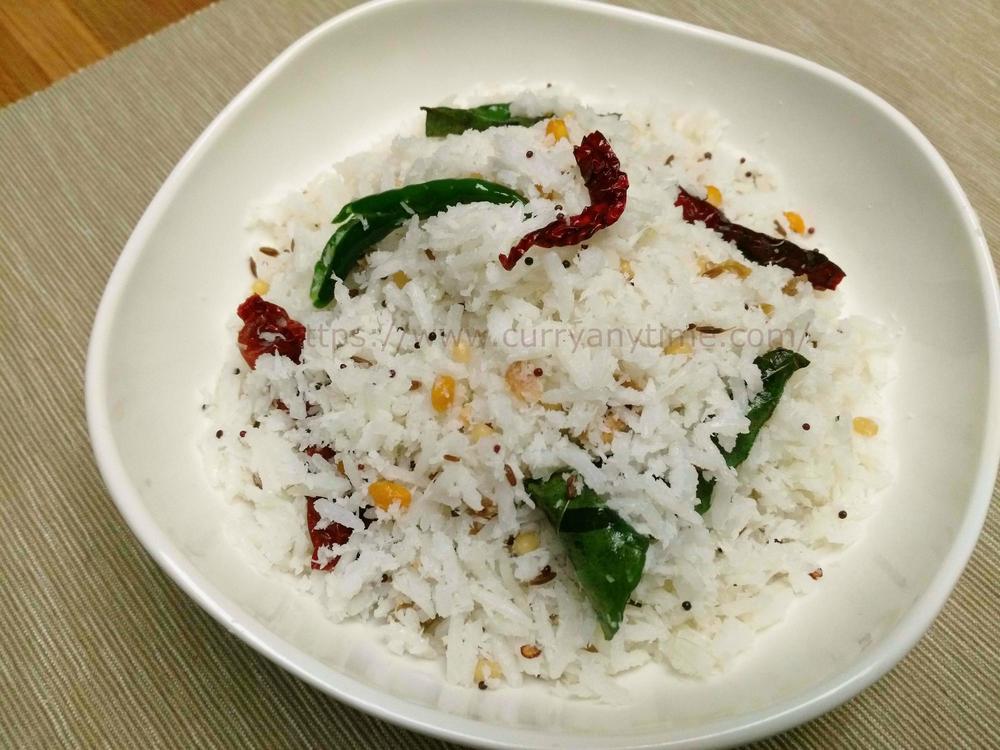
This is one of my daughter favorite dishes, being mild and less spicy she loves this rice dish. Its super easy to make and goes well with most Indian curries. Do try this out and I am sure you will be happy with the results. Prep Time : 5 mins Cook Time: 5 mins Serves: 2 Ingredients: 1 cup rice(basmati), cooked 1/2 cup coconut, shredded or grated 1 green chili, slit 1 dried red chili 1 1/2 tablespoon oil/ghee(clarified butter) 1/2 teaspoon mustard seeds 1/2 teaspoon cumin seeds 1/2 tablespoon chana dal(split chickpeas) 1/2 tablespoon urad dal(split black gram) 1 teaspoon ginger, finely chopped A pinch of hing (asafoetida) Few curry leaves Salt to taste Directions 1) Heat oil/ghee(clarified butter) in a pan in medium flame. I used coconut oil here because it tastes best for this dish. 2) Add mustard seeds, cumin seeds, chana dal(split chickpeas), urad dal(split black gram), green chili, dried red chili, ginger and curry leaves. Fry this for 30 seconds in medium flame. The trick is to ensure that these are fried but not burned. 3) Add a pinch of hing(asafoetida) and mix well. 4) Now add the cooked rice and coconut. Stir well for about 15 to 20 seconds and switch off the flame. 5) Finally add salt into this and mix well. You could add peanuts or cashew nuts if you prefer. Goes well with most curries.
-
- 4
-

-
- Indian
- Vegetarian
- (and 1 more)
-
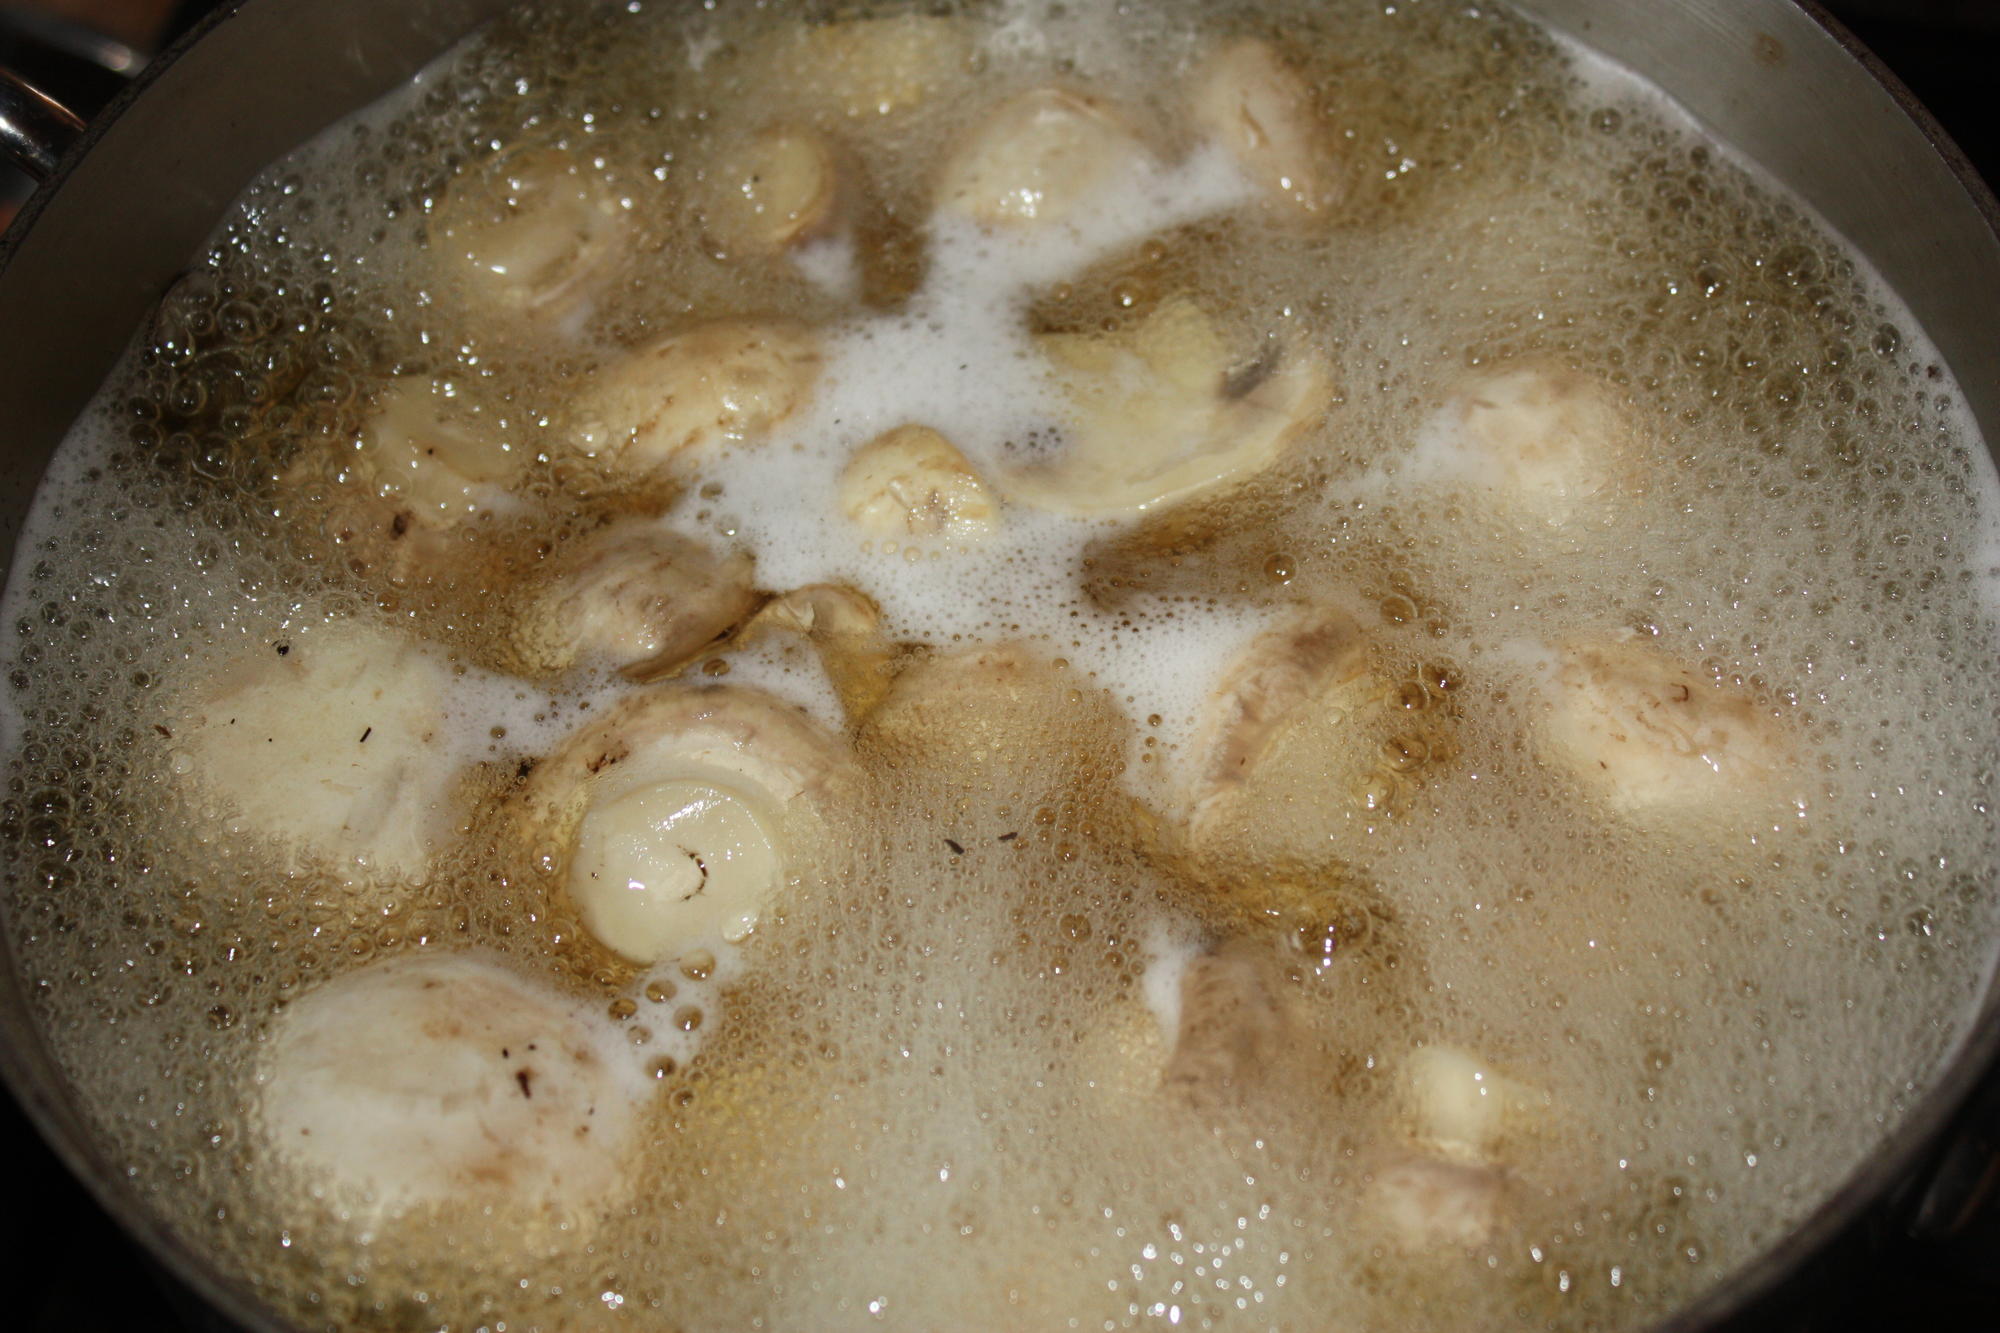
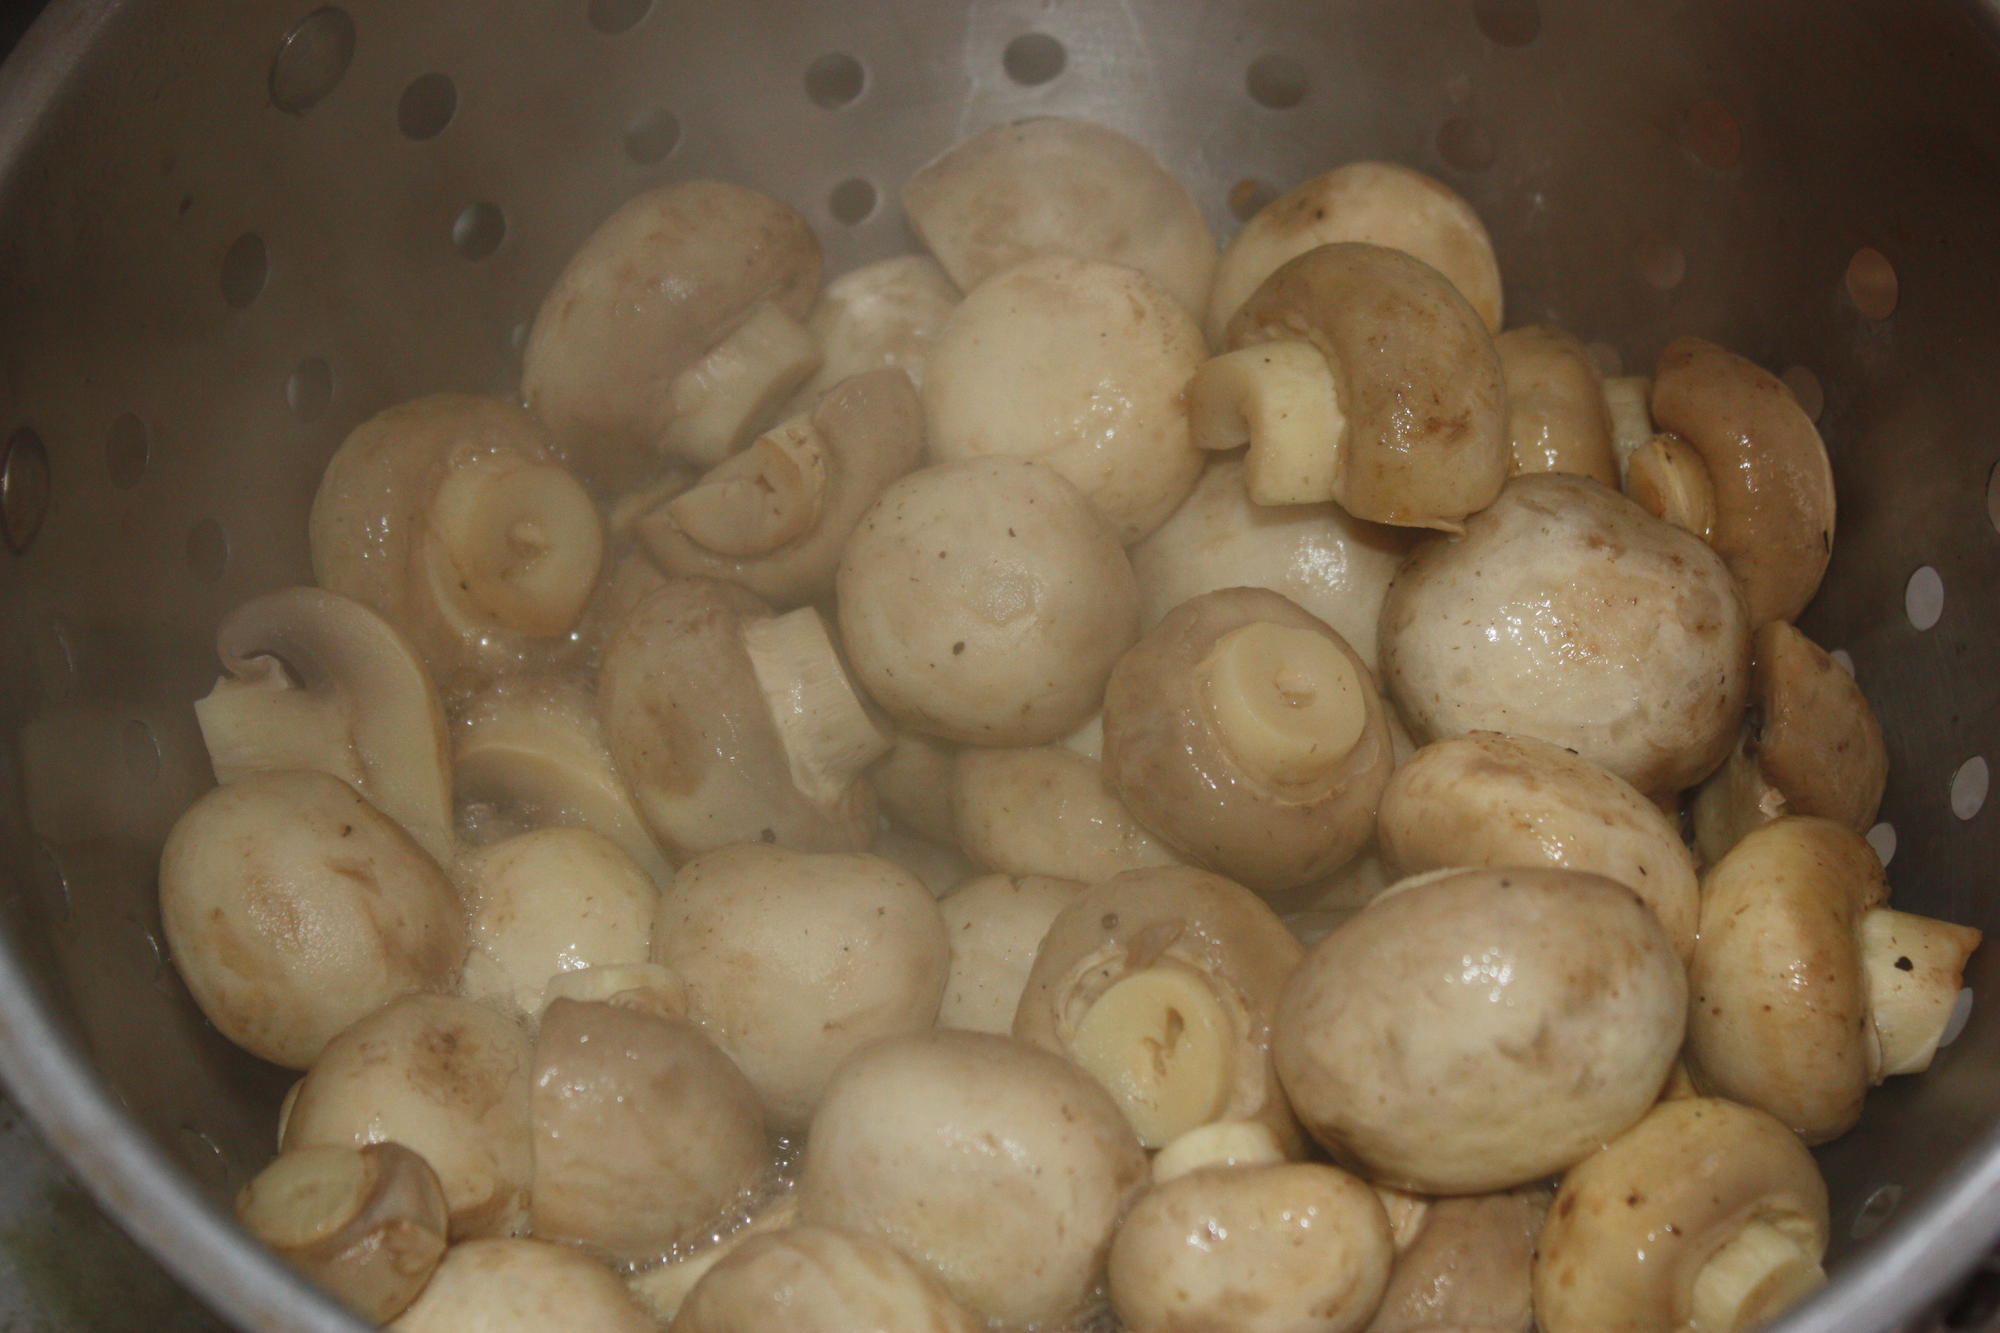
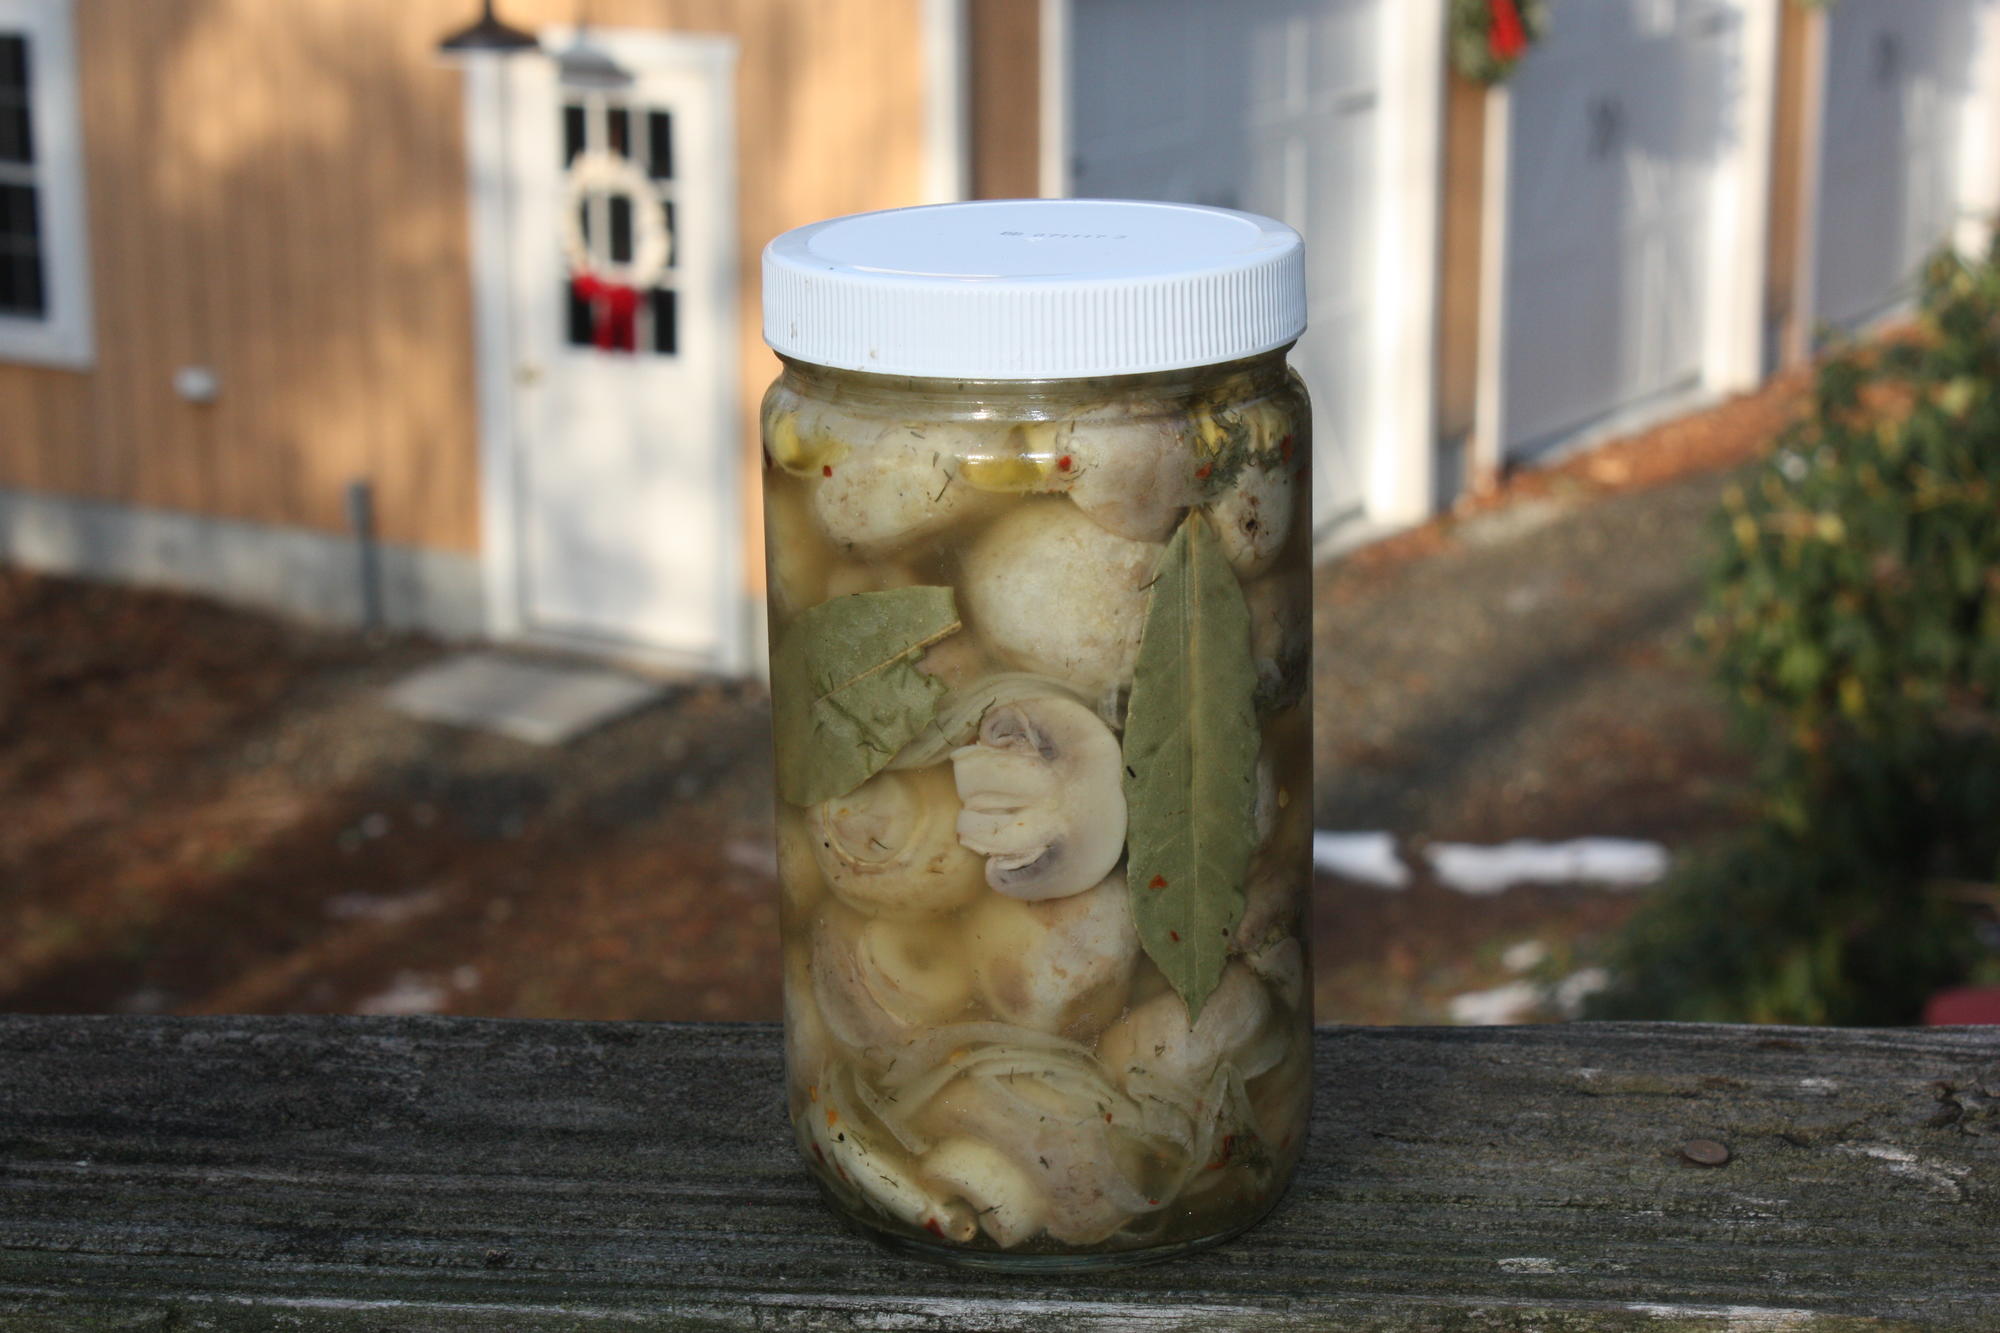
This is a quick refrigerator marinade that will last for months in the fridge. They are great as a snack or a side or on a tray with similar items. 2 pounds will make roughly a quart. Start by brushing off or rinsing off any dirt and trim longer stems so the mushroom is pleasing to the eye. Keep in mind that they will shrink, so only cut up the ones larger than a golf ball (unless you want them sliced). Put 1 TBS kosher salt and 1/2 cup white vinegar in a sauce pan, add the mushrooms and enough water to float them. Put on high heat to boil. In a clean quart jar, add 3 or 4 cloves of peeled garlic that have been slightly crushed (I use the flat side of a knife under the heel of my hand to do this), 1 TBS kosher salt, 1 TBS dried dill weed and a few shakes of crushed red pepper flakes to taste. Once the mushrooms have come to a boil, give the pot a stir and examine the surface of the boiling liquid for any dirt that may have escaped your attention and skim the foam it is floating on if you see any. Boil for about 5 minutes until you notice the color change from white to beige then pour the contents of the pot into a colander to drain. Allow them to cool until they can be handled and add them to the jar you have prepared along with a few bay leaves. I like to add a few layers of thinly sliced onions, but that is optional. When the mushrooms are all in the jar, pour in enough white vinegar to fill the jar half way to the top, then add tap water to 3/4 from the top and top off with a well shaken Italian dressing ( I use Ken's Italian Dressing and Marinade). Secure the lid and shake until you see that all the salt has dissolved. Refrigerate and give the jar a shake every day or so. The mushrooms will be ready in about 3 days. HC


-
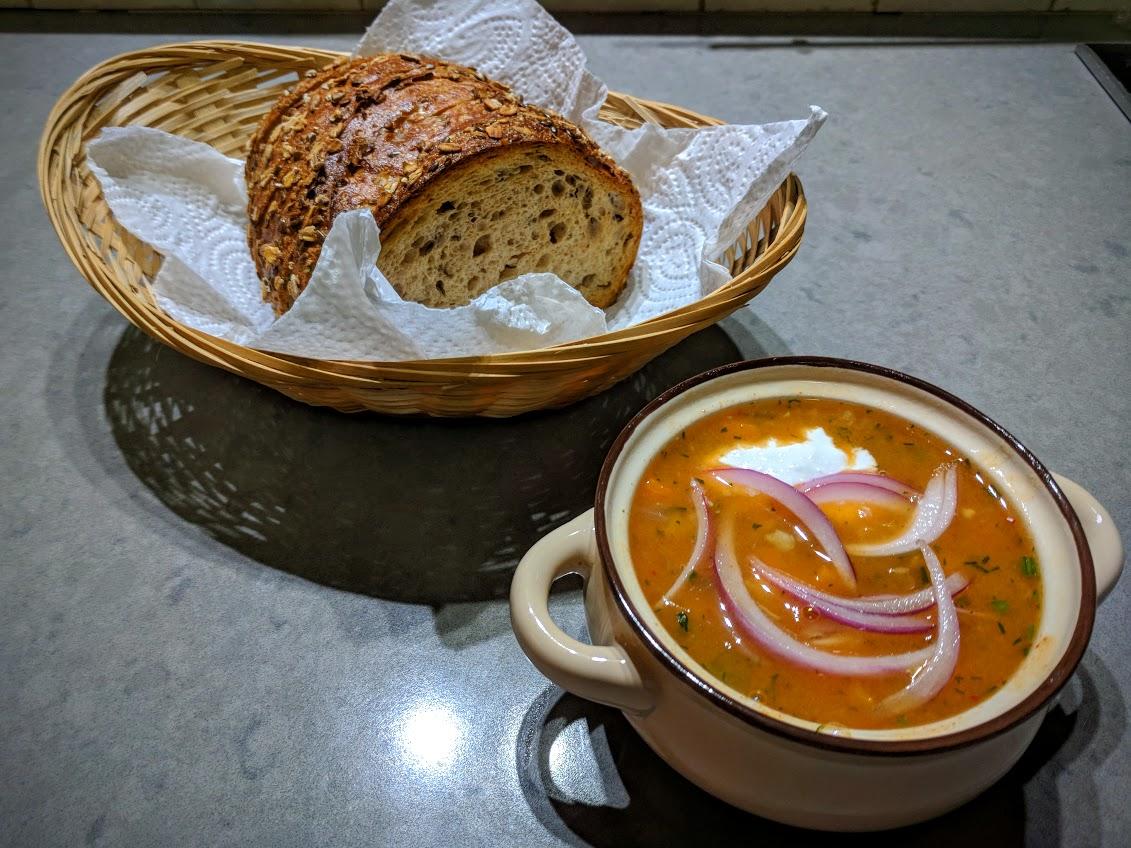
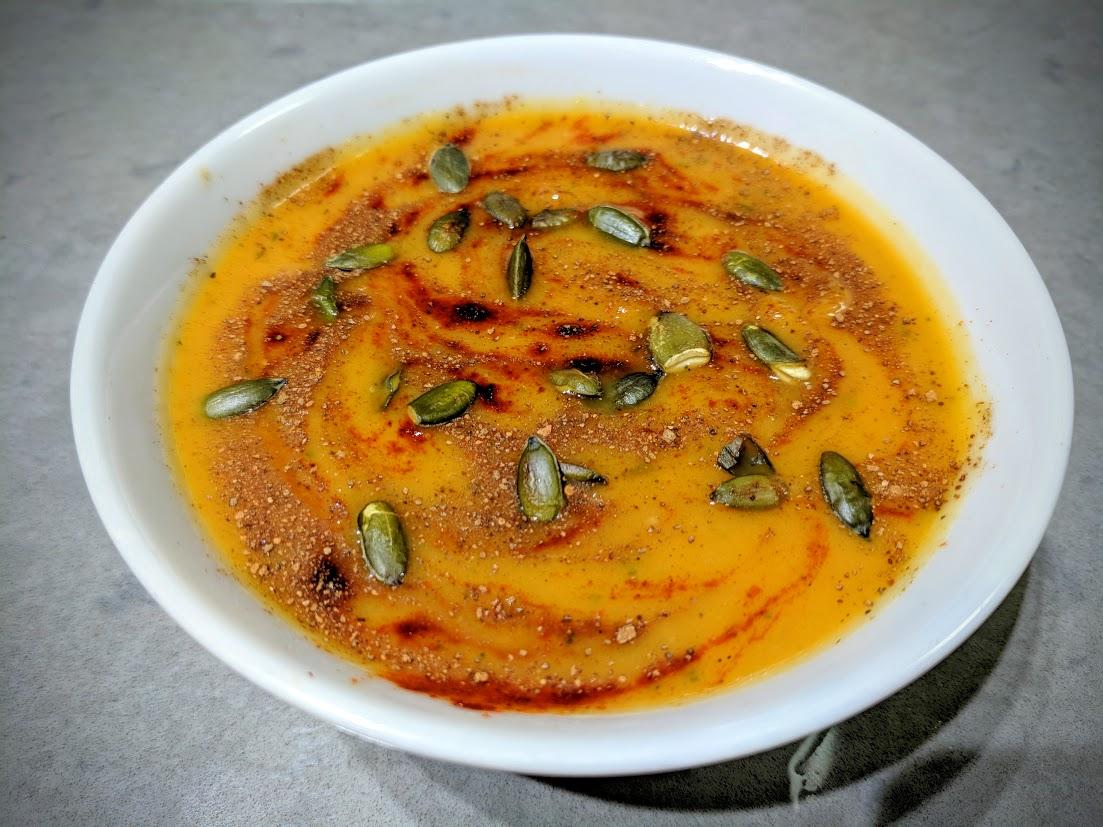
Ingredients 4 medium carrots, peeled and cut into lateral halves (450 g) 3 medium-sized sweet potatoes, peeled and cut into quarters (950 g) 700 g pumpkin, peeled into quarters About 20 grams of butter 1 onion, peeled and chopped (130 g) 2 parsley roots peeled and chopped (2, 100 g) A quarter teaspoon of hot pepper Spoon of thyme 2 bay leaves 1/2 teaspoon fennel seed or anise (optional) 1 Tbsp ginger root, finely chopped (15 g) 5 garlic cloves, coarsely chopped 8.5 cups hot water 3 tablespoons chopped parsley 1.5 teaspoon cinnamon 3 teaspoons beer yeast 2-2.5 teaspoons of salt 2 tablespoons wine vinegar To serve (you can choose what you want from the following): Roasted pumpkin seeds Small croutons cinnamon paprika Sour cream Egg noodles Preparation Cut the pumpkin, carrot and potato into very large cubes. Place them on a baking pan without baking paper. Set the oven to 200 degrees. Place the vegetables in the cold oven. When the oven reaches the temperature, remove the pan and mix the vegetables with 2/3 to 1/2 of the butter to cover. Bake the vegetables until soft and lightly brown - about an hour and a half. In the meantime, fry the onion and the parsley roots with the remaining butter, until soft, but not brown. About 4-5 minutes. Add the thyme, the bay leaves, the hot pepper, the seeds of the guard, the ginger and the garlic. Fry in a medium to low heat for about a minute or two, until aromatic. Add the baked vegetables, including all their liquids and the pieces stuck to the pan. (Use hot water to help the pieces break free from the pan) Add the water and bring to a boil over medium heat. Cook in a very simmer for about 10-15 minutes. Add the cinnamon, beer yeast, 2 teaspoons of salt and parsley. Grind in a food processor or blender until smooth. If the soup is too thick, add more hot water. Add the vinegar. Taste and adjust seasoning. Add salt, chili and vinegar to taste. Mix well and serve. (Always mix before taking a portion of the pot.) Serve with roasted pumpkin seeds or croutons; Paprika, chili powder or cinnamon and also sour cream. The soup tastes better when it is not boiling hot.

-
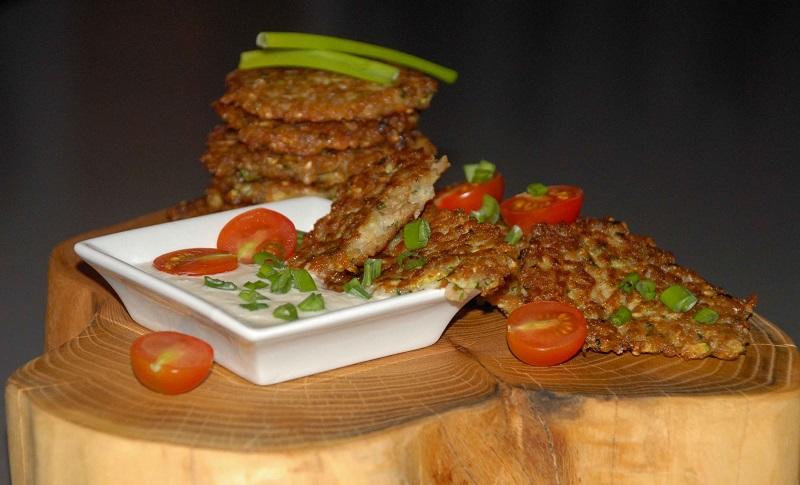
COURGETTE_BUCKWHEAT PANCAKES When I ask my son what I should prepare for dinner, you can be sure as hell he wants pancakes or crepes. He isn't a typical guy. He doesn't like meat. He likes groats, rice, potatoes, vegetables and salads, and he leaves the meat to the end. When I was a child I was the opposite. First, I ate what I liked the least so that I could relish my favourite dish. Today I would like to share with you a recipe inspired by my son's taste. I recommend courgette-buckwheat pancakes, which I served with horseradish dip on a natural yoghurt base. The recipe comes from Lidl cookery book. Ingredients: 100g of buckwheat groats 1 onion 300g of courgette 2 cloves of garlic 3 tablespoons of minced parsley 150g of 18% cream 1 teaspoon of baking powder 4 tablespoons of flour 2 eggs salt and pepper Wash the courgette, grate it, add salt, stir, leave for 15 minutes and then drain it. Boil the buckwheat groats until they are soft (not al dente). Dice the onion and crush the garlic. Mix the groats, eggs, parsley and onion. Add the drained courgette, cream, garlic and spice up the mixture with salt and pepper. Mix everything together. Fry the small pancakes in heated oil. Serve the hot pancakes with cold horseradish dip. Enjoy your meal!