Search the Community
Showing results for tags 'Recipe'.
-
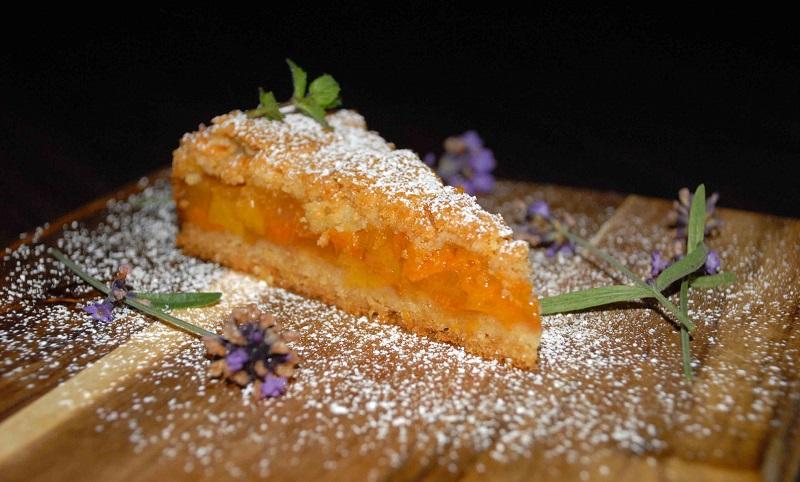
Smile of the summer – apricot-peach shortcake Fortunately, the summer is not only about the weather. There is also fresh, sweet-smelling fruit. Today I would like to share with you the recipe for an easy to make weekend cake. It is excellent for afternoon tea or coffee. A little work and a little baking and after that you may serve and eat, and serve and eat again and again ... I remind you that it should be a weekend cake, so if you eat everything at once, you will need to bake another one Ingredients:dough 200g of flour 150g of butter 75g of sugar 1 egg 1 egg yolk 1 teaspoon of baking powder fruit: 1kg of apricot 4 peaches 2 packets of powdered vanilla blancmange 4 tablespoons of brown sugar Put the flour, sugar, baking powder and butter onto a baking board. Chop it all up with a knife. When you have the consistency of crumble topping, add the egg and egg yolk and then knead the dough quickly. Divide the dough into two parts – 2/3 and 1/3. Cover the pieces of dough with plastic wrap and put them into the freezer. Wash the apricots, remove the stones and cube them. Put them into a saucepan, add a bit of water and boil until they are soft. Stir the blancmange powder in 150ml of cold water and add it to the apricots. Boil for 2 minutes stirring constantly. Turn off the heat. Wash the peaches, remove the stones and cube them. Add them to the apricots and mix them in. Heat the oven up to 180C. Smooth a 23-cm cake tin with some butter and sprinkle with breadcrumbs. Grate the bigger part of the dough onto the cake tin, even it out and bake for 15-17 minutes. Take out the cake, but don't turn off the oven. Put the fruit mixture onto it and grate the rest of the dough onto the top. Bake for 50 minutes. Sprinkle with caster sugar before serving. Enjoy your meal!
-
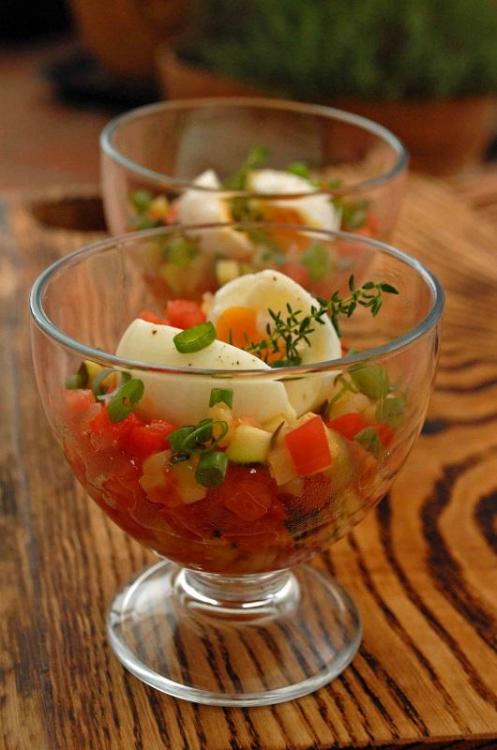
Holiday brunch. During the holiday, eating is a waste of time for my children. Although breakfast should be a balanced and calm meal, at this time it is eaten quickly and carelessly. Sometimes I need to wrest my children away from their play and nourish their young bodies with brunch. Today I would like to share with you the recipe for a very simple egg and vegetable brunch. Though my children like all vegetables, the look of the food made them anxious. Only the soft boiled eggs settled them down and got them eating. After a while there were two empty glasses in the dishwasher and my children could go back to playing. It was good, because the holiday is almost over. Ingredients (for 3 people) half an onion 2 cloves of garlic 1 tablespoon of butter 300g of courgette 1 red pepper 2 tomatoes 2 sprigs of rosemary 2 sprigs of thyme 3 tablespoons of minced chives 3 eggs Dice the onion and garlic and fry them in butter. Remove the core from the tomatoes. Cube the courgette, tomatoes and red pepper. Put one of the cubed tomatoes to one side. Add the second tomato and the rest of the vegetables to the onion and stew on a low heat for 10 minutes. Boil some water and carefully put the eggs into the water. Boil for 5 minutes. Cool them down and carefully remove the shell. Mix the stewed vegetables in with the rest of the tomato. Spice it up with salt and pepper. Put the vegetables into a cup. Arrange the eggs on top and cut them up with a sharp knife. Spice up the egg with salt and pepper and sprinkle with the chives. Serve at once. Enjoy your meal!
-
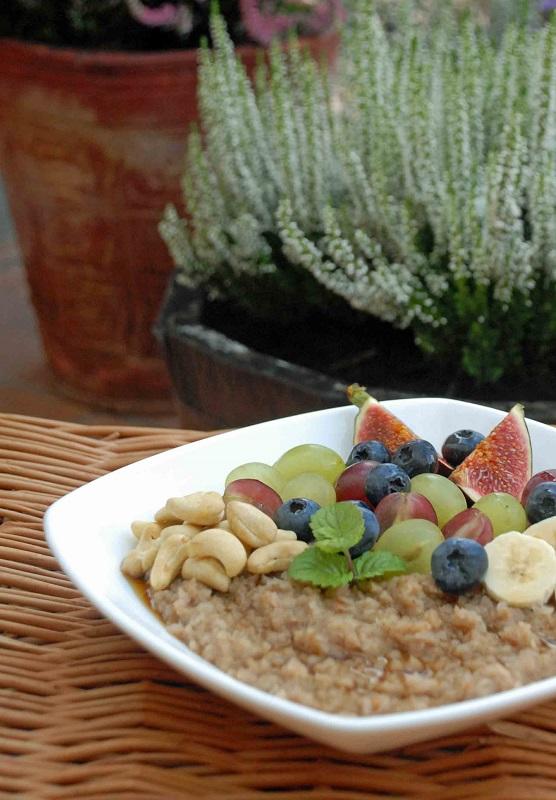
My yummy breakfast - reward for morning wake-up call I hate getting up in the morning. Every day, the morning alarm at 6 o'clock is difficult for me. My first thought after awakening every day is the same: "I'll go to bed earlier this evening". Usually, everything finishes with these wishes, because "early" in the evening doesn't exist. When I don't have to get up early, I wake up at 8 o'clock. Then, regardless of the weather outside, my day looks different. Today I decided to prepare a reward for myself. For these awful mornings. I prepared a breakfast which was so yummy only common sense stopped me from eating a second helping. Buckwheat flakes with almond milk, fruit and some drops of maple syrup. Ok, there were more than several drops of maple syrup, but it was a reward, wasn't it? Ingredients: 250ml of almond milk 5 tablespoons of buckwheat flakes a pinch of salt fruit (figs, grapes, banana, blueberries) nuts (cashews, almonds) 3 tablespoons of maple syrup Boil the milk. Add the buckwheat flakes, add a pinch of salt, mix it in and boil for 3-4 minutes, stirring from time to time. Put the boiled buckwheat flakes onto a plate. Decorate with fruit, nuts and sprinkle with maple syrup. Serve at once. Enjoy your meal!

-
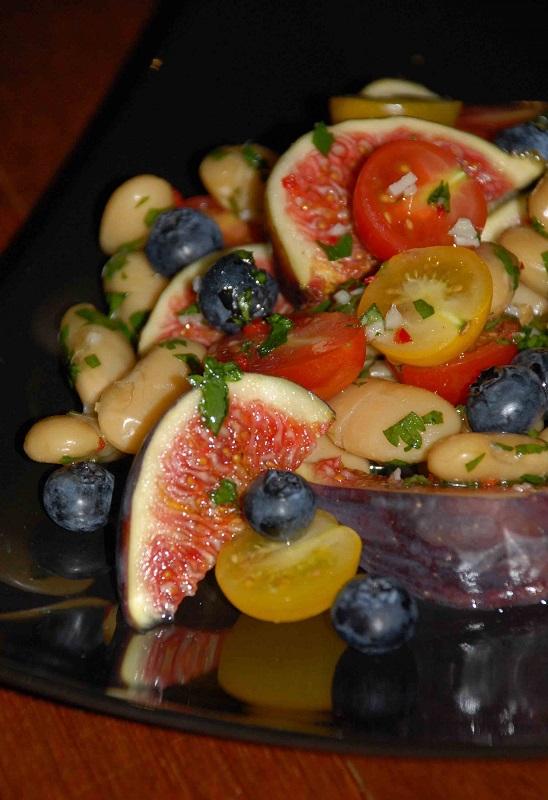
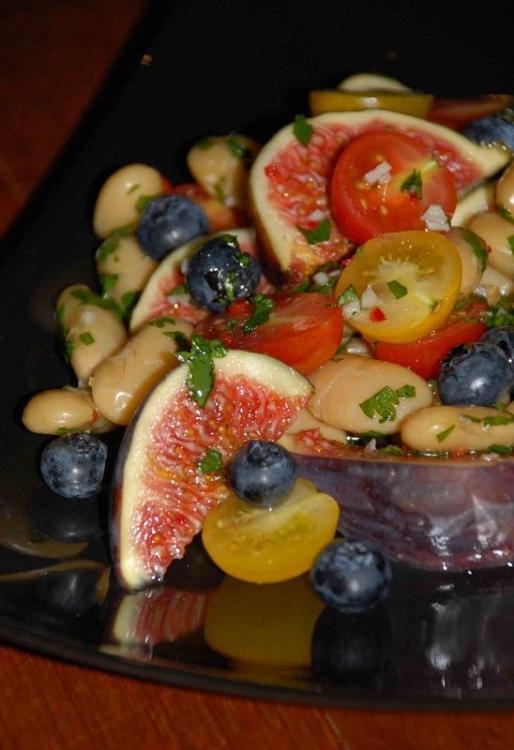
Salad with figs and white beans. Today I would like to share with you my proposal for an unusual combination: salad with figs and white beans in a spicy parsley sauce. I recommend adding colourful cherry tomatoes to balance the floury taste of the beans and the gently sweet taste of the figs. They will be equally beautiful as a decoration on the dish. Ingredients (for 2 people): 200g of white beans 2 fresh figs 12 cherry tomatoes a fistful of blueberries dip: 3 tablespoons of olive oil 1 tablespoon of water half a chili pepper 2 tablespoons of minced parsley 1 clove of garlic salt and pepper Dice the onion and chili pepper. Add the olive oil, water, chili pepper, parsley and garlic and stir. Spice it up with salt and pepper and leave for a while. Soak the beans and leave them for a night. Boil until they are soft. Cut the cherry tomatoes in half and the figs into quarters. Mix the beans with half of the dip and leave for half an hour. Arrange the beans, tomatoes, blueberries and figs on a plate. Sprinkle with the rest of the dip. Enjoy your meal!
-
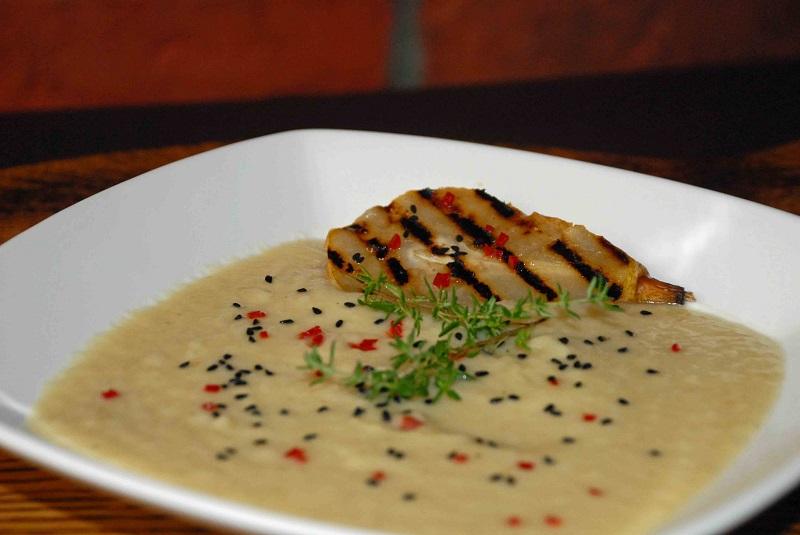
Pear soup with ginger and chili pepper Everyone can see what the weather is like outside. I think the summer has forgotten that it should go on until 21st September. For two weeks - almost without pause - it has been raining and windy, and the temperature doesn't really enthuse. Maybe it should be this way to help pupils at the beginning of the school year. It is difficult to learn when it is sunny outside and the bike and ball are more appealing than books. Today I would like to propose an almost-autumn fiery soup with white vegetables and pears. The chili pepper and ginger give the soup an interesting flavour and warm us up on rainy afternoons. Ingredients (for 3 people) ¼ small celery root 10 cm piece of leek (white part) 2 parsley roots 2 cm piece of ginger 2 big pears 2 tablespoons of butter 1 onion 2 cloves of garlic vegetable stock salt and pepper half a chili pepper 1 tablespoon of nigella Dice the onion, Garlic and ginger and fry in the butter. Add the cubed celery, leek and parsley root and fry for a while. Don't brown the vegetables. Peel the pears and cube them. Add to the vegetables. Add the vegetable stock and boil until the vegetables are soft. Blend the soup. If necessary, add more vegetable stock to make the right consistency. Sprinkle with the nigella and finely chopped chili pepper. Enjoy your meal!
-
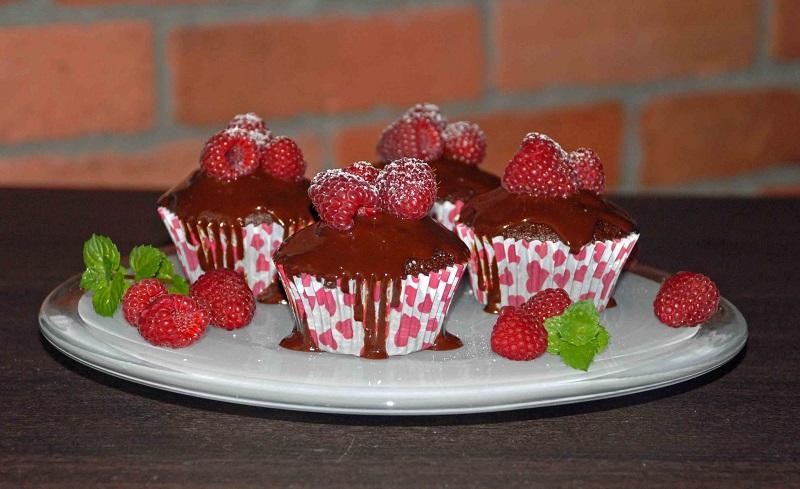
Wholemeal chocolate muffins with raspberries The first week of the school year is over. After two months in which the children did nothing, it was the most difficult time of the year. In a while, when the children get used to schoolwork, it should be easier. In order to sweeten this difficult time, today I prepared some very chocolaty wholemeal muffins. They were dark, with a thick, glossy frosting, and the juicy raspberries looked fabulous, smelled irresistible and tasted even better. They were the best fresh – still hot with melted chocolate inside. In any case, you should try them for yourselves. Ingredients (10 muffins)dough 150g of wholemeal flour 3 tablespoons of cocoa 3 tablespoons of oil 130g of brown sugar 140ml of milk 1 egg 1 teaspoon of baking powder 10 pieces of dark chocolatefrosting 50ml of milk 50g of butter 100g of dark chocolate raspberries Heat the oven up to 180C. Put some paper muffin moulds into the "dimples" of a baking pan for muffins. Mix together the dry ingredients of the muffins: flour, sugar, baking powder and cocoa. Mix together the milk, oil and egg in a separate bowl. Add the egg mixture to the dry ingredients and mix them in. Put the dough into some paper muffin moulds up to 1/2 of their height, and put one piece of dark chocolate onto each one. Add some dough on top. Bake for 20-25 minutes. Now for the chocolate frosting. Heat the milk and butter. Add the crushed dark chocolate. Stir until the chocolate is melted. Decorate the muffins with the frosting and the raspberries. Enjoy your meal!
-
Chanterelle soup with millet groats. In my family home mushroom soups were always served with noodles or potatoes. One day I forgot about proper shopping and experimentally I made mushroom soup with barley groats. My children looked at it slightly suspiciously, but the soup was surprisingly tasty. This time with premeditation I added millet groats to excellent seasonal chanterelle soup . If I have to choose which is better for me: with potatoes, noodles or groats I couldn't decide. They are all great. Ingredients (4 people): 500g of chanterelles 3 carrots 2 parsley roots ¼ of a small celery root 1 onion 2 cloves of garlic 2 tablespoons of butter 100g of millet groats 3 sprigs of thyme 2 bay leaves 1l vegetable stock 2 tablespoons of cream salt and pepper Boil the millet groats in salty water. Clean the chanterelles and cut the bigger ones in half. Dice the onion and garlic. Melt 1 tablespoon of butter in a pan and fry the onion and garlic. Add the chanterelles and fry for a while, stirring from time to time. Peel the carrots and parsley roots and slice them. Peel the celery root and cube it. Put the vegetables into a saucepan, add the bay leaves, pour in the vegetable stock and boil for 15 minutes. Add the onion, garlic, chanterelles and thyme. Boil for 15 minutes. Add the boiled milled groats and spice it up with salt and pepper. Add cream to the soup before serving. Enjoy your meal!

-
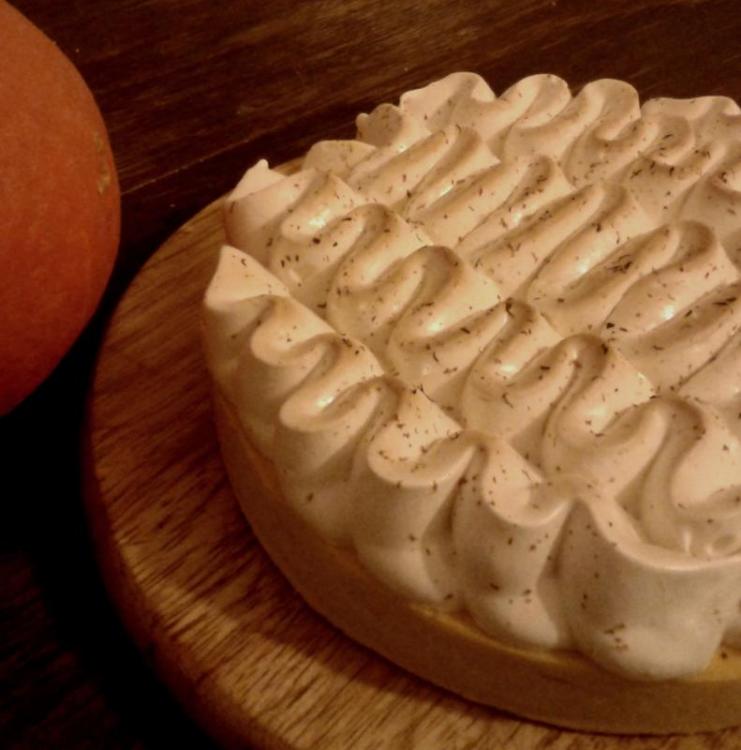
Sweet beginning of the autumn – pumpkin tart There are some products which are housewives' allies. In my opinion, courgette, French pastry, beetroots and cheese belong to this group. I always have them in my fridge, because they allow me to prepare any dish in a crisis situation. Today they were joined by the pumpkin. Usually, I use pumpkin to make crumpets, salads or soups. Today I would like to share with you the recipe for a sweet version of a dish with pumpkin. I made it by following Jamie Oliver's recipe. So, I invite you to a good, because it is sweet, beginning of the autumn, with the pumpkin – the queen of the autumn vegetables – in the lead role. This shortbread tart with a creamy pumpkin stuffing has a beautiful autumnal colour and a slight taste of caramel. It should really be a decoration for the Sunday table and is an interesting proposal for a Halloween party. Ingredients (25cm cake tin)dough 200g of flour 35g of caster sugar 100g of butter 1 egg 1 tablespoon of milkpumpkin stuffing 400g of peeled pumpkin 400ml of milk 150g of brown sugar 1 teaspoon of vanilla essence 2 eggs Mix together the flour and sugar. Cut up the butter add it to the mixture and mash it with a fork until you have the consistency of wet sand. Add the egg and milk and quickly knead into a smooth dough. Cover with a plastic wrap and leave in the fridge for half an hour. Smooth the cake tin with butter and sprinkle with breadcrumbs. Cover a cake tin with the dough, and leave in the fridge for half an hour. Cut up the pumpkin. Put the milk, sugar, vanilla essence and pumpkin into a pan. Boil until the pumpkin is soft. Blend it and leave to cool down. Heat the oven up to 180C. Cover the dough with some baking paper, weigh it down with ceramic balls and bake for 12 minutes. Remove the paper and balls and bake for another 12-15 minutes. Take out the cake from the oven. Turn down the heat to 160C. Add the eggs to the pumpkin and stir. Put the stuffing onto the cake. Bake for 40-45 minutes. Enjoy your meal!
-
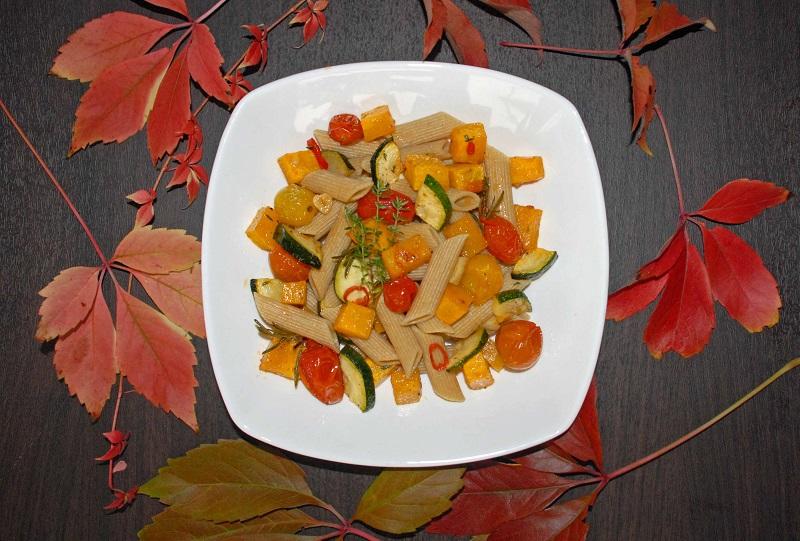
Autumn penne with pumpkin Well, it's autumn. But for the fact that after the autumn comes winter, which I don't like, it could be quite pleasant. Chestnuts, acorns, colourful crackling leaves underfoot and fresh vegetables – that's what I like about autumn. No other season is as rich and colourful. Today I would like to share with you the recipe for a dish which suits the autumn atmosphere perfectly. It is colourful like an autumn landscape and one of the ingredients is the most autumnal vegetable - i.e. pumpkin. Ingredients (for 4 people) 250g of wholemeal penne 500g of pumpkin 200g of cherry tomatoes 200g of courgette 1 onion 3 cloves of garlic 4 sprigs of thyme 3 sprigs of rosemary 100ml of olive oil 4 tablespoons of Parmesan salt and pepper Heat the oven up to 180C. Peel the pumpkin and cube it. Slice the onion, garlic and courgette. Put all the vegetables with the thyme and rosemary into a casserole dish. Spice it up with pepper, sprinkle with olive oil and stir. Bake for 20 minutes until the pumpkin is soft. Spice it up with salt. Boil the pasta so it is al dente. Arrange the penne and vegetables on a plate. Sprinkle the dish with the Parmesan before serving. Enjoy your meal!
-
 White chocolate whip with aquafaba with crumble topping and fruit. Today I would like to share with you a dessert fit for a king. It needs a bit of work, but it is easy, and so tasty that you won't regret the time you spent on it. I have already made chocolate whip with aquafaba. Today I added a bit of whisked sweet cream, due to which it is more creamy but it isn't suitable for vegetarians. You may use any fruit. In my opinion, bilberries, blueberries or raspberries are best. Cherries would also be excellent, but you may use your favourite fruit. Ingredients:crumble topping: 50g of butter 50g of flour 50g of sugar 1 tablespoon of sesame seeds whip: 200ml of aquafaba (from one tin of chickpeas) 150g of white chocolate 150ml of 30% sweet cream 30g of caster sugarother ingredients fruit caster sugar Heat the oven up to 180C. Cover a baking sheet with baking paper. Make the crumble topping. Make a smooth dough with the ingredients. Make a ball with it, roll it out flat and put it on the baking paper. Bake for 10-15 minutes until it is golden. Cool it down and crumble it. Melt the chocolate in a bain-marie and leave it to cool down a little. Whip the aquafaba and sweet cream with caster sugar in a separate bowl. Mix them together. Add the white chocolate and stir thoroughly but gently. Put the chocolate whip into some small bowls and leave in the fridge for 2 hours. Put the crumble topping onto the chocolate whip. Decorate with the fruit and peppermint leaves. Enjoy your meal!
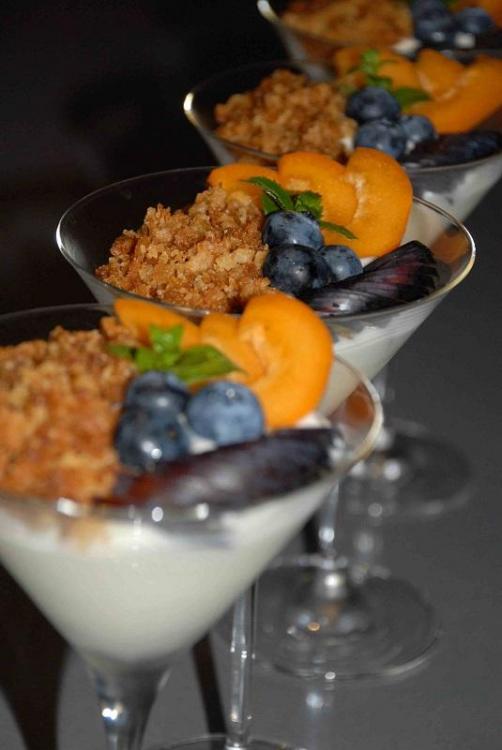
-
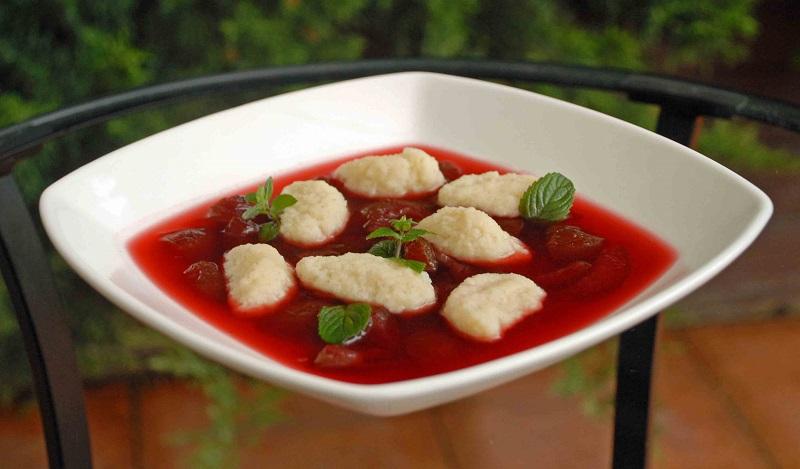
Plum soup with semolina dumplings This soup - with a leaf of peppermint it is an excellent alternative to an early summer dinner. Due to the blackcurrant juice, this soup is a bit sour and has a deeper colour. Ingredients:soup 1kg of plums 100 ml of blackcurrant juice 300ml of apple juice 120g of brown sugar half a teaspoon of vanilla sugar Clean the plums, remove the stones and cut them into smaller pieces. Put them in a saucepan with the rest of the ingredients of the soup and boil for 25 minutes. Sweeten with the sugar if necessary. dumplings 125ml of milk 2 teaspoons of butter 2 tablespoons of vanilla sugar 2 tablespoons of brown sugar a hint of salt 50g of ready semolina 1 egg Boil the milk with the butter, sugar, vanilla sugar and a hint of salt. Remove from the heat, add the semolina and stir thoroughly. Put the mixture into a bowl, add the egg and stir again. Boil some salty water in a big saucepan. With a spoon put a portion of the dough into the boiling water. Boil for 5 minutes. Drain the dumplings. Put the soup with the pieces of plum into a bowl. Decorate with the dumplings and peppermint leaves.
-
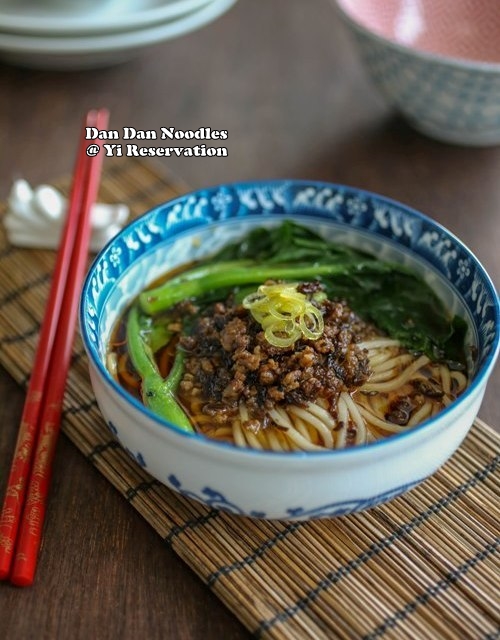
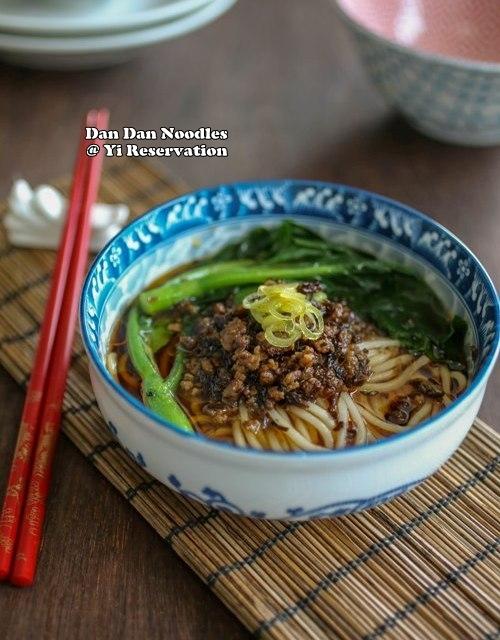
For those of you frequent Sichuan (Szechuan) eateries, you probably know that Dan Dan Noodles is arguably one of the must-try dishes at any Sichuan restaurants. In fact it’s so popular that this spicy, sweet, and tangy noodle dish has often used to measure how authentic a restaurant is! This is a recipe I learned from growing up in Sichuan and imho it's so much better than the restaurant version. If you like to learn with pictures please check out my blog for step-by-step pictorial recipe! Ingredients: 6oz fresh Chinese noodles (can substitute with dry noodles) Handful of fresh leafy vegetables such as spinach Dan Dan Meat Topping: 4oz ground pork 4oz [ya cai (preserved mustard green from Sichuan), chopped 2tbsp soy sauce 1tbsp Chinese cooking wine 1tsp five spice powder Dan Dan Sauce: 2tsp garlic, grated 2tsp Chinese sesame paste 4tbsp soy sauce 1tsp Sichuan peppercorn powder 1tsp sugar 4tbsp chili oil (more if you can handle the heat) 1tsp sesame oil 2tbsp Chinese black vinegar 1cup hot chicken or pork stock, unsalted (can substitute with boiled water) Chopped scallions for garnish Instructions: To make the meat topping: sauté ground pork and ya cai in 1 tbsp of cooking oil over high heat. When the meat turns color, add soy sauce, cooking wine, and five spice powder. Cook for another 3 minutes. Set aside To build the Dan Dan Noodle sauce: combine the garlic and sesame paste in a bowl. Mix using a spoon until smooth Add the rest of the sauce ingredients except the scallions. Stir until well incorporated While building the sauce, cook the noodles in a pot of boiling water until al dente. If using fresh noodles, it should take about 3 – 4 minutes Cook the vegetable in the same pot. To get the best noodle texture, shock the noodles in ice water right after cooking to stop the noodles from cooking Drain the excess water and drop the noodles into the sauce. Add the meat topping and garnish with scallions. Feel free to add additional chili oil according to your own taste

-
Makes 8-12 shells 1/3 # ground veal 1/3 # ground beef 1/3# ground pork Brown the above, with 1 clove chopped garlic, t of oil Mix 2-3 T. Grated cheese--parm air Romano 2 T. Chopped cooked spinach And bind with 1 egg beaten. Use the same shell method in http://forums.egullet.org/topic/146623-stuffed-shellsricotta-cheese/
-
8oz---best ricotta you can get 4 oz-- fresh mozzarella, chopped fine 2 oz -- Parmesan, fresh grated-- I use Romano at times 1 oz--- Fontenella cheese..grated, this adds a bit of pungent sharpness T. Of Parsley Mix all above, now I add pinch of nutmeg and a pinch of sugar and 1 egg to bind. Allow 1 hr set of the mix, you can cover with plastic wrap. Some may want to add a touch of white pepper. This is enough to make 8-12 jumbo shells For the shells: I buy Barilla Jumbo shells, and cook in salted water 8 mins, for the shells..you have to stir often or shells will stick to bottom of pan. Then I rinse these shells in cold water..to remove starch and stop cooking..make handle able. Fill and place in a ceramic cooking vessel with a 2" deep lip, Cover in foil cook 325. 40 mins..rise to 350 - 375 uncover ...20 or until shells for a crust so the edges. Cool and serve Sauce...make your own sugo To finish. : Add. Extra topped grated cheese and sauce. I always make sure my sauce comes 1/2 way up the shell in the dish and add enough top sauce to help keep moisture.
-
I threw this together yesterday for lunch and surprised myself at how nice it was, so I thought I would share: 1 onion (finely chopped) 1 tbsp of olive oil 75g lardons 75g seedless baby peppers 100g sugar drop tomatoes 1/2 tsp cracked black pepper 1 heaped teaspoon of dried basil Handful of fresh basil leaves (leave until close to the end of cooking) 400g chopped tomatoes 1 large clove of garlic I just threw it all together into the slow cooker added about 200ml of water and left it for about 2 hours. About 10 minutes before I served it up, I poured the contents of the slow cooker into the food processer and gave it a quick wizz. I didn't puree it completely as I still wanted chunky bits in the soup. I poured in back in the slow cooker, stirred in some fresh basil leaves left it for another 10 mins of so and then served it up with some nice bread. Easy peasy but delicious! x
-
White chocolate gingerbread blondies are very similar to brownies; they are pretty moist and also chewy. However, along with very spicy gingerbread (holiday flavor), it’s an amazing treat for your friends and also for family members, at the time of winter seasons. Ingredients: 2 3/4 medium size cup of flour (all-purpose)1 medium size table-spoons of flour (all-purpose)1 1/4 medium size tea-spoon of baking soda1 1/4 medium size tea-spoon of salt1 1/4 medium size tea-spoon of cinnamon (grounded)1 medium size tea-spoon of ginger (ground)1/4 medium size tea-spoon of cloves (grounded)20 medium size table-spoon of butter (unsalted, at room temperature)1 1/4 medium size cup of sugar (packed, light-brown)1/2 medium size cup of sugar (granulated)2 medium size tablespoon of sugar (granulated)1 1/4 medium size teaspoon of vanilla (pure extract)1/3 medium size cup of molasses (unsulfured)10 ounces of chocolate (white, coarsely chopped)1 spray (Vegetable-oil, for cooking)2 eggsAnd 1 eggs yolk alone Directions: First heat the oven to 350 degrees F. With the help of cooking spray you have to give a coat to the baking sheet (17/12 – inches, with rim). Inside, at the bottom spread it with parchment sheet which is cut, to fit in, and also give a coat to the parchment. Whisk the ingredients 1. Flour, 2. Baking soda, 3. Salt, 4. Spices. Beat together 2 ingredients, 1. Butter, 2. Sugars (Brown and granulated) with a mixer at medium speed until it turns pale and also fluffy. Now add 1. Eggs, 2. Yolk, 1 after the other, and beat well while adding. Scrap the sides inside the bowl. Then add in vanilla extract and molasses and again beat it. Minimize the speed. Gradually start adding flour mixture to it and beat nicely, until all the ingredients combined well. Then add white chocolate and stir it. In the prepared pan spread batter to the inside portion. Bake till the edges turned golden in color. Allow it to cool fully in the pan itself over the wire rack. At last cut in to small square shape and serve to your dear ones.
-
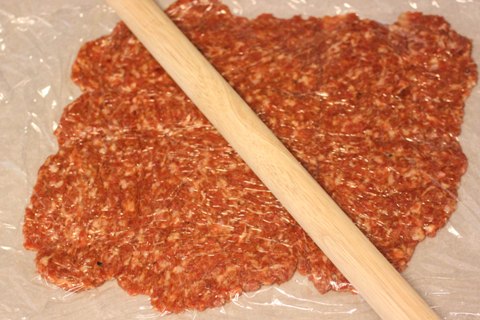
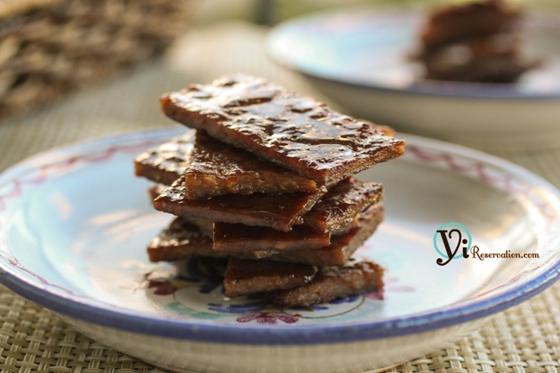
Since I don't see a pork jerky recipe on this forum I figure it'd be nice to share my Honey Glazed Pork Jerky recipe. This is one of my favorite snacks to serve in a party. Perhaps you can try to surprise your guests during this holiday season:) Ingredients: 2lb ground porkPork Marina 2tbsp soy sauce2tbsp fish sauce2tbsp dark soy sauce½ tsp salt2tbsp sugar1tbsp cooking wine2tbsp honey1tsp five-spice powder½ tsp freshly ground pepperCayenne pepper powder to your own taste (optional)For Basting2 tbsp honey1 tbsp cooking wineInstructions: In a mixing bowl, combine the ground pork and marinade ingredients Mix with a spoon or by hand until the pork turns into a paste. Cover with plastic wrap and chill in the fridge for at least 1 hour Preheat the oven at 375 F. Place a piece of parchment paper on a baking sheet. Put a few spoons of pork on a sheet of parchment paper then cover the put plastic wrap Gently run a rolling pin over the wrap to flatten the pork and form a thin layer of pork. Prepare the basting glaze by mixing the honey with cooking wine Bake the pork for about 12 minutes on each side. Carefully flip it once in between Coat the pork with the honey glaze on both sides. Bake at 400 F for 5 minutes each side. Repeat this step one more time Cool down the pork jerky on cooling rack. Cut into bite sizeThe pork jerky can be enjoyed both warm and cold


-
 Materials: Pork 300g Wide vermicelli 200g Scallion right amount The right amount of garlic Ginger appropriate Aniseed 2 2 bay leaves 1 tablespoon soy sauce ½ teaspoon salt A little oil 2 tablespoons soy sauce 1 tablespoon sugar 1 tablespoon mirin Steps: 1.vermicelli in warm water bubble, pork cut into squares. 2.Boiled with water to remove the blood 3.After the big oil pan saute onion, garlic, ginger. 4.Then add pork and stir-fry for a moment, and then transferred to soy sauce, soy sauce, sugar, star anise, bay leaves and the amount of hot water, water over the meat better. 5.Fire boiling, skim foam and turn a small fire stew for 15 minutes. 6.Then into the vermicelli, add salt, and then stew 25 minutes, in the middle of water is not enough, remember add boiling water. 7.Delicious food on the well, then you can enjoy the food.
 -
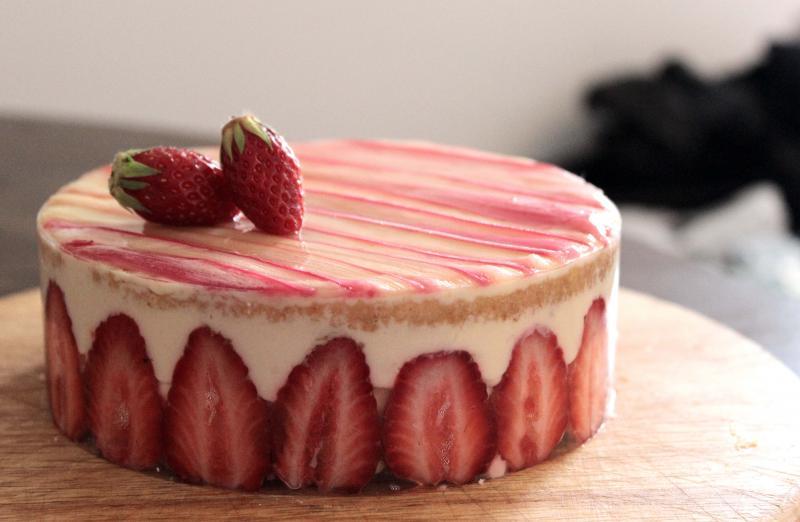
Rhubarb Fraisier Serves 6 This is a good summer cake. It's powerfully flavored and fragrant, but not heavy. If you don't have access to Muscat wine, you can use any other dessert wine, or kirsch. It won't keep very well, so assemble it the day you want to eat it. Génoise 100g eggs (2)70g sugar70g self-rising flour Combine the eggs and sugar in a bowl, and place over a hot water bath. Heat until it reaches 50°C. Remove from the heat and whip until cool, until it reaches the “ribbon” stage. Gently fold in the sieved flour. Ensure there are no lumps of flour. Grease and line a 16cm cake ring and pour in the batter. Bake at 180°C for around 15 minutes. Once cool, cut 2 horizontal slices around 5mm thick using a long serrated knife. Trim one to 14cm diameter, the other to 12cm. Muscat syrup 80g sugar80g waterMuscat wine, to taste Place the sugar and water into a bowl. Microwave until the sugar is completely dissolved. Leave to cool. Add wine to taste- you want a powerful wine flavor. Reserve. Rhubarb cream § Fresh rhubarb, 300g § Caster sugar, 30 + 30 + 30g § Cornflour, 15g § Milk, 20g § Egg yolks, 60g § Gelatin, bloomed, 2g (dry weight) § Butter, 100g Wash and chop the rhubarb, combine with the sugar and leave to macerate for half an hour. Cook in a pan until very tender. Purée until smooth, then weigh out 250g of puree. Heat the purée in the same saucepan with the second lot of sugar. Mix the remaining sugar with the cornstarch, and add the milk. Mix well. Incorporate the egg yolks. Temper the purée into the egg mixture, pour back into the pan and bring to the boil. Don't stop stirring or it will catch and burn. Keep at the boil for around thirty seconds. Take it off the heat, let it cool for a minute or two, and while still warm incorporate the gelatin. Cool to around 40-50°C (it shouldn't burn your finger, but it should feel warm). Using a stick blender/food processor, incorporate the cold butter, cut into cubes. Leave to cool completely in the fridge, preferably overnight. Before using, whip to aerate it. It will turn pale and fairly fluffy. Strawberries Around 300g very fresh, very ripe strawberries, preferably Gariguette. Wash and remove the stalks and leaves from the strawberries. Reserve 9 or 10 attractive, large, similarly sized strawberries. Cut them in half, lengthwise. Reserve two small, attractive strawberries for decoration. Roasted rhubarb strips (adapted from Philippe Conticini’s “Sensations”) One long, unblemished rhubarb stalk, around 40cm longSugar Wash the rhubarb, and cut in half. Make sure the halves are at least 16cm long. Slice into long, thin strips, around 2mm thick. Arrange on greased parchment paper so they each overlap the strip next to them. You’ll end up with a rectangle of rhubarb. Sprinkle with sugar. Bake at 200°C for around 15-20 minutes. The rhubarb should be soft and slightly caramelized. Cut out a 14cm circle, and place in the freezer. Neutral glaze (optional, smooth, slightly diluted apricot jam may be used as a replacement) Ingredients: 50g sugar50g water4g pectin NH Combine the pectin with the sugar. Bring the water to a boil, pour in the sugar-pectin mix while whisking, and whisk well. Boil for 20 seconds, whisking continuously. Remove from the heat, transfer to a container and leave to cool. Assembly Using a 16cm diameter x 4.5cm high cake ring, place it on a sheet of acetate or parchment paper. Place this on a chopping board or other flat surface. I strongly recommend lining the ring with acetate, it will make unmolding a lot easier. Arrange the halved strawberries around the edge of the ring, with the cut sides pressed up against the acetate. Place the 12cm génoise disk inside the strawberry circle. Push it in to fit. Soak the génoise generously with syrup. Pipe a layer of rhubarb cream onto the génoise, around 1cm, making sure to pipe in between the strawberries. Pack in as many strawberries as you can in a single layer on the cream, working in a circular fashion. Cover with cream. You don’t want the cream to be much higher than the strawberries. Place the second génoise disk on the cream and soak liberally. Cover with more cream up to the top of the cake ring and even out the top with a spatula. Place the circle of rhubarb on the cream. Work the glaze to loosen it up, then glaze the rhubarb. Decorate with the reserved strawberries and place in the fridge to set for an hour or so. Leave for half an hour out of the fridge to come to room temperature. Serve with muscat wine.
-
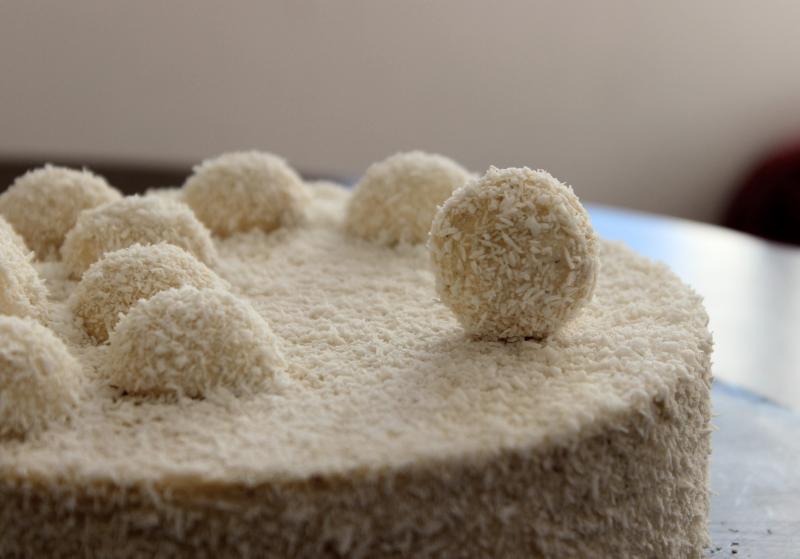
Coconut Cake This was originally posted about here. It's a fairly challenging cake to make, and you'll make your life easier if you make it over the course of a few days. Serves 8 Coconut financier (adapted from Philippe Conticini’s “Sensations”) 140g icing sugar95g desiccated coconut95g butter135g egg whites (around 4½) at room temperature45g flour1 teaspoon vanilla extract In a saucepan, cook the butter until it turns toasted, brown and nutty. Sieve the sugar and the flour and combine with the coconut in a bowl or stand mixer. Gradually whisk in the egg whites, then the vanilla, then the hot butter. Mix well. Grease and line a 16cm cake ring and pour in half the batter. Freeze the rest for another use. Bake at 180°C for around 15 minutes. It should be fully cooked but still moist. It will not rise much. Once cool, even out the top using a long serrated knife. You’re aiming for around 1cm of financier. Coconut croustillant 30g white chocolate20g neutral oil30g desiccated coconut20g pailleté feuilletine (or crushed wafer biscuits)Fleur de sel Combine the chocolate and oil in a bowl and microwave until melted. Mix to blend them. Add the coconut and feuilletine. Stir well to completely coat the dry ingredients, then add a pinch of salt. Mix again. While still warm, spread evenly onto the financier, aiming for a fairly thin layer. You may not need all the croustillant. Roasted pineapple confit (adapted from Philippe Conticini’s “Sensations”) One small pineapple40g caster sugar40g lemon juice1 vanilla bean, split and scraped2g pectin NH mixed with a tablespoon of sugar Remove the skin, leaves and eyes from the pineapple. Cut in half and remove the core. Dust with half the sugar and roast for about an hour at 200°C, until at least a little caramelized. Leave to cool slightly, then dice the pineapple flesh. You’ll need 160g of it. Mix this with the remaining sugar, lemon juice and vanilla, cover and leave for an hour to macerate. Transfer to a saucepan, bring to a simmer and stir in the pectin mixture. Simmer for around 30 seconds, then transfer to a bowl. Leave to cool and set. Génoise 100g eggs (2)70g sugar70g self-raising flour Combine the eggs and sugar in a bowl, and place over a hot water bath. Heat until it reaches 50°C. Remove from the heat and whip until cool, until it reaches the “ribbon” stage. Gently fold in the sieved flour. Ensure there are no lumps of flour. Grease and line a 16cm cake ring and pour in the batter. Bake at 180°C for around 15 minutes. Once cool, cut a horizontal slice around 5mm thick using a long serrated knife. Reserve. Rum syrup 40g sugar40g waterDark rum, to taste Place the sugar and water into a bowl. Microwave until the sugar is completely dissolved. Leave to cool. Add rum to taste- you want a powerful rum flavor. Reserve. Coconut crémeux This will make about twice as much as you need, but it’s not practical to make a smaller quantity. However, it freezes well. § Coconut milk, 250g + 20g § Caster sugar, 30 + 30g § Cornflour, 15g § Egg yolks, 60g § Gelatin, bloomed, 2g (dry weight) § Butter, 100g Heat the coconut milk with 30g of sugar in a fairly large saucepan. Mix the remaining sugar with the cornstarch, and add the remaining coconut milk. Mix well. Incorporate the egg yolks. Temper the purée into the egg mixture, pour back into the pan and bring to the boil. Don't stop stirring or it will catch and burn. Keep at the boil for around thirty seconds. Take it off the heat, let it cool for a minute or two, and while still warm incorporate the gelatin. Cool to around 40-50°C (it shouldn't burn your finger, but it should feel warm). Using a stick blender/food processor, incorporate the cold butter, cut into cubes. Leave to cool completely in the fridge, preferably overnight. Before using, whip to aerate it. It will turn pale and fairly fluffy. Vanilla mousse (adapted from Francisco Migoya’s “The Modern Café”) 180g whole milk180g double cream150g sugar2 vanilla beans, split and scraped120g egg yolks (6)240g double cream, whipped to soft peaks7g gelatin, bloomed (dry weight) Combine the milk, first cream, half the sugar and vanilla in a saucepan. Bring to a simmer. Remove from the heat and leave to infuse for at least one hour, preferably overnight. When you are ready for the final assembly of the cake, bring it back to a simmer. Whisk the egg yolks with the remaining sugar, then temper in the hot milk mixture, return to the pan and cook to 84°C. Remove from the heat and incorporate the gelatin. Strain into a bowl and leave to cool to 35-40°C. Fold in the whipped cream in two additions. Mix until homogenous. Use immediately. Neutral glaze (optional, smooth, slightly diluted apricot jam may be used as a replacement) Ingredients: 50g sugar50g water4g pectin NH Combine the pectin with the sugar. Bring the water to a boil, pour in the sugar-pectin mix while whisking, and whisk well. Boil for 20 seconds, whisking continuously. Remove from the heat, transfer to a container and leave to cool. Assembly Using a 16cm diameter x 4.5cm high cake ring, place it on a sheet of acetate or parchment paper. Place this on a chopping board or other flat surface that will fit in your freezer. I strongly recommend lining the ring with acetate, it will make unmolding a lot easier. Place the financier with the croustillant facing up in the circle. Remove the vanilla pod from the pineapple confit, the stir it to loosen it up. Spread a 1cm layer onto the croustillant. Place the génoise disc on top of the pineapple. Soak liberally with the syrup. Spread a layer of whipped coconut crémeux on top of the génoise. You’re aiming to leave a 5-10mm gap between the top of the crémeux and the top of the circle. Freeze for at least 3 or 4 hours, preferably overnight. Prepare an 18cm diameter by 4.5cm high cake ring as in step 1. Finish making the vanilla mousse. Fill it around 1/3 with vanilla mousse. Unmold the frozen cake, remove the acetate, invert it and push it into the mousse so the naked biscuit is facing upwards. Keep it centered. Push down all the way, until the biscuit is flush with the top of the ring. The mousse will come up the sides. If there is too much, scrape it off with a spatula, keeping the biscuit clean of any mousse. If there is not enough, pipe some into the gaps and even out with a spatula. Place another sheet of acetate or parchment paper over the top and press down. Aim for as few air bubbles as possible. Place another chopping board or flat object on top, and weigh it down with something heavy. Pipe any remaining mousse into demi-sphere silicon moulds. Freeze the cake and the demi-spheres overnight. Finishing Desiccated coconut Unmold the demi-spheres and remove the cake from the ring, keeping the liner on the sides of the cake. Arrange some demi-spheres on top of the cake, using neutral glaze to stick them on. Stick two small demi-spheres together and keep frozen. Brush neutral glaze all over the top of the cake and the domes. Sprinkle liberally with coconut. Holding the cake by the liner on the sides, turn the cake upside down to remove the excess coconut. Put the cake back down, the right way up. Remove the liner and brush glaze over the sides. Tilting the cake upwards, liberally sprinkle the sides with coconut. The whole cake should now be evenly covered. Transfer to the serving plate/board. Remove the small mousse sphere from the freezer. Spike it with a cocktail stick and brush with glaze. Roll it in coconut and place on the cake. Leave the cake to defrost completely before serving. Serve with a Sauternes dessert wine.

-
Adapted from Il Casale in Belmont, Mass. Servings: 8 When simmering the meatballs in the tomato sauce, do not let them boil hard or they will shrivel and toughen. Check the internal temperature with a meat thermometer - the final temperature should be 160 F (not higher). Use the best ingredients possible. SAUCE 1 can (16 ounces) whole San Marzano tomatoes, peeled if possible1/4 cup olive oil2 cloves garlic, halved6 fresh basil leaves2 teaspoons salt, or to taste1 teaspoon crushed red pepper, or to taste 1. Put the tomatoes through a food mill. Discard pith, peel, seeds. 2. Warm olive oil over medium heat in the largest skillet or sauté pan you have (or a long, flameproof casserole that can sit over two burners). Add garlic cloves and fresh basil leaves, and cook for 2 minutes, stirring - do not let the garlic brown. 3. Turn heat up to medium-high, add tomatoes, salt and red pepper, stir, bring to boil, reduce to a simmer, and cook for 30 minutes. 4. Remove garlic cloves & taste for seasoning. Meanwhile, prepare the meatballs: MEATBALLS 1 pound ground beef1 pound ground pork1 1/4 cups unseasoned bread crumbs1 cup grated pecorino Romano1 cup whole milk4 eggs1/2 cup olive oilHandful fresh basil leaves, torn (not chopped)2 cloves garlic, finely chopped1/2 teaspoon dried oregano1 teaspoon crushed red pepper1 1/2 teaspoons salt Extra pecorino (for serving)Extra fresh basil, torn (for serving) 1. Rinse the ground meats in a colander under cold running water. It's best to do the two separately. Handling the meat as little as possible, press it and stir it gently against the side of the colander to drain thoroughly. Shake colander up and down a bit. Allow the meats to drain and keep discarding the red juices that collect at the bottom of the bowl. You want the meats to dry but they will still be extremely moist. 2. Beat eggs. Mix with breadcrumbs, pecorino and milk in a bowl. Let sit for 10 minutes so that breadcrumbs soak up the liquid. 3. Place olive oil, fresh basil, garlic, dried oregano, red pepper, and salt in a small pan and heat over medium flame, stirring, for 2 minutes. Do not let the garlic brown. Remove to a bowl and allow to cool slightly. 4. Add the garlic mixture the bread crumb mixture and mix together thoroughly with your hands. The aim is to have this as mixed as possible so that when you add the meat you do not have to handle it too much to combine the ingredients. 5. Now add the drained ground meats to the mixture and combine gently with your hands - the aim is to thoroughly combine the ingredients while handling the meat as gently and as little as possible. Some sites recommend doing this with a long two-pronged fork but I found that my fingers worked fine. 6. Form the mixture into 24 balls about 2 1/2 inches each. (The mixture is quite moist - this is normal.) 7. Bring the tomato sauce to a boil. Gently drop in the balls, one at a time. The meatballs should be close together but not touching - if you run out of space, reserve your extra meatballs for another time, or make a second batch of sauce. You may end up with 6-12 extra meatballs. 8. Let the sauce return to a boil. Lower the heat and simmer, turning the meatballs and stirring occasionally, for 15 minutes. 9. Towards the end of 15 minutes, start checking the meatballs' internal temperature with a meat thermometer - when they reach 160, they are done. 10. In 6 shallow bowls, spoon some of the tomato sauce. Add meatballs to each one. Garnish with pecorino and fresh basil. If you have leftover meatballs, or you don't have sufficient sauce, make more sauce and heat the extra meatballs. The meatballs survive very well in the fridge, and you can make an extra batch of sauce and then reheat them in it using steps 7-10 above. If anything, the ratio of sauce to meatballs is very low - this is intentional and how it is served in the restaurant, but you could slightly increase the amount of sauce. It is also a fantastic and very versatile tomato sauce for general application, but of course the flavor is changed and deepened after the meatballs are cooked in it.
-
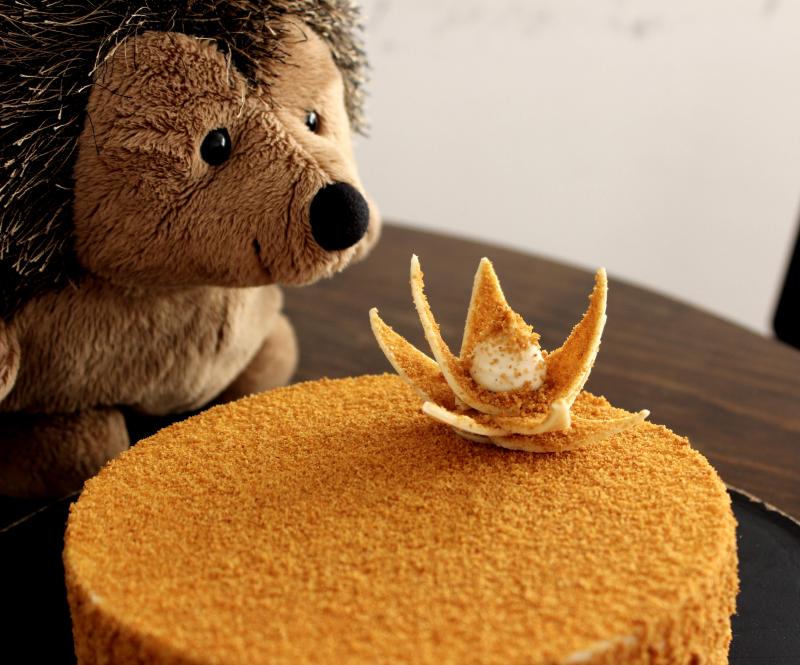
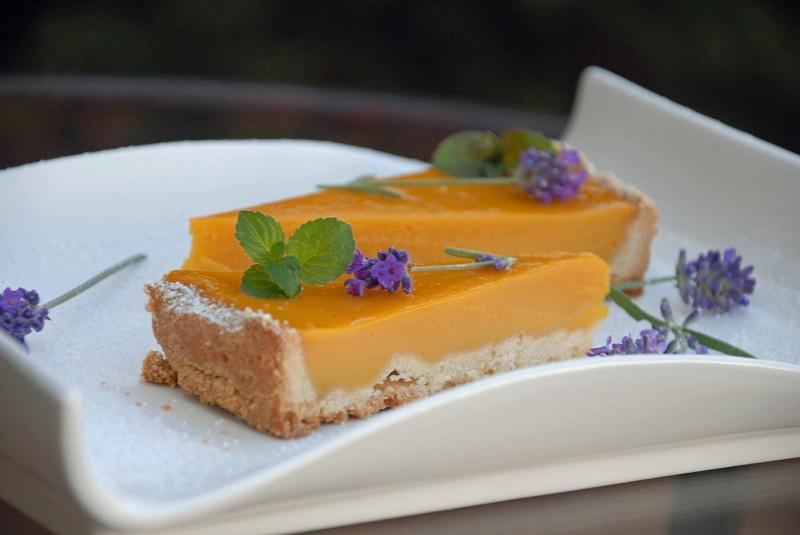
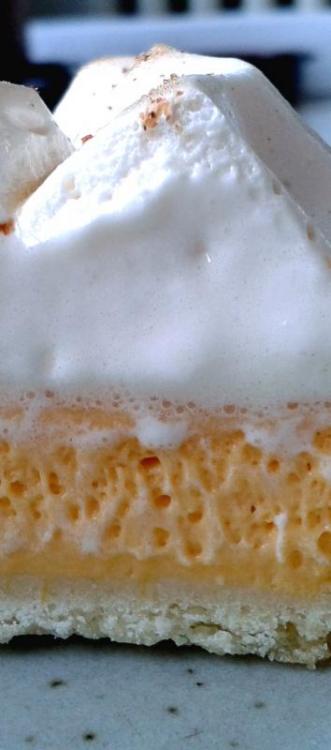
Originally posted here, this is a take on the classic. Sweet pastry, butternut crémeux and golden syrup spiced meringue. You can use any other squash, essentially any other fruit purée for the crémeux, and it freezes well, as does the pastry dough. Makes one 18cm tart. Sweet pastry Flour, 100gButter, 50gEgg yolks, 30gIcing sugar, 17gMilk (lukewarm), 8gSalt, 2g1. Sift flour onto a large piece of greaseproof paper. 2. Warm butter until very soft (almost liquid, but without breaking the emulsion). 3. Whip butter until white. 4. In a separate bowl, combine egg yolks and icing sugar. Whip until pale and creamy. 5. Incorporate milk and salt. 6. Pour the egg mixture into the whipped butter, and whisk to fully combine. Scrape the bottom of the bowl to ensure everything is homogenous. 7. Pour the sifted flour into the butter mixture. 8. Mix with a wooden spoon (or mixer paddle) until fully combined. Scrape the bottom of the bowl again. 9. Scrape onto cling film, wrap, press flat and refrigerate for at least one hour, preferably overnight. 10. Roll out to the thickness of a £1 coin (2mm). 11. Cut a circle around 2cm larger than your tart circle/tin in the pastry. 12. Line the tin, ensuring you've pushed the dough into the bottom edge all the way round (to avoid the sides collapsing in the oven). Refrigerate for 20 minutes. 13. Preheat the oven to 180°C. 14. Remove the dough from the fridge and trim the edges with a paring knife. Prick the base with a fork. 15. Bake for 12-18 minutes, until lightly golden. Leave to cool before unmolding. Butternut crémeux Butternut purée, 250gCaster sugar, 30 + 30gCornflour, 15gEgg yolks, 60gMilk, 20 gGelatin, bloomed, 1.5g (dry weight)Butter, 100gHeat the purée with 30g of sugar in a fairly large saucepan. Mix the remaining sugar with the cornstarch, and add the cold milk. Mix well. Incorporate the egg yolks. Temper the purée into the egg mixture, pour back into the pan and bring to the boil. Don't stop stirring or it will catch and burn. Keep at the boil for around thirty seconds. Take it off the heat, let it cool for a minute or two, and while still warm incorporate the gelatin. Cool to around 40-50°C (it shouldn't burn your finger, but it should feel warm). Using a stick blender/food processor, incorporate the cold butter, cut into cubes. Leave to cool completely in the fridge, preferably overnight. Before using, whip to aerate it. It will turn pale and fairly fluffy. Fill the tart shell, and level the top. Refrigerate while you make the meringue.Spiced meringue Sugar, 100gGolden syrup, 100gWater, 70gEgg whites, 100gTonka bean, cinnamon, nutmegCombine sugar, syrup and water in a small saucepan. Bring to the boil and cook to 118-121°C. (Alternatively, if you don't have a thermometer, make it as a Swiss meringue. Omit the water, combine sugar, syrup and egg whites and heat over a water bath until it's just too hot for your finger, then whip until cool) When the sugar is at around 114°C, start whipping the egg whites. Once the sugar has reached 118-121°C, pour gently into the whipping whites. Whip until cool. Grate some spice into the meringue, and mix more. Pipe or spread onto the tart. Grate on a little more spice. Blast under the grill or with a blowtorch. Cover with a cloche or a bowl to capture the aroma. Serve at room temperature.
-
Medovik (Russian honey cake) This is the result of much trial and error and discussion here. Thanks to everybody who contributed, especially to Gfron and Kerry Beal for the biscuit recipe, which is only slightly modified. It's a long recipe, but not technically very difficult. It's easiest to break it up into two or three days- the first day for the biscuit and filling, the second for the assembly, the third for finishing and decoration. If you don't want to use cake rings and freeze the cake, you don't have to. You could just build it like any other layer cake, but the presentation will suffer (unless you have some extremely good spatula skills). If anybody has any questions, use the discussion linked to above. It's a really nice cake to make, and looks pretty too. Behold, the Medovik. Makes 1 x 16cm cake Biscuit Ingredients: 60g honey (as flavorful as possible)4g bicarbonate of soda100g butter100g sugar1 egg, beaten265g plain flour, sieved In a saucepan, warm the honey and soda. Once the frothing dies down a little, add the butter until fully melted. Add the sugar and stir until dissolved. Transfer to a bowl (not a stand mixer, the quantities are too small) and whisk in the egg in two additions. Make sure the mixture is not too hot, or it will cook the egg. Add the flour in two or three additions. Mix until homogenous. The dough will be fairly stiff, somewhere in consistency between a pâte à choux and a pâte sucrée. Divide the mixture into ten, and heat the oven with two baking trays inside to 180°C. Place one ball of dough between two sheets of baking paper, cut to around 30x30cm. Using a rolling pin, roll it as thinly as possible, keeping a fairly regular shape. You can’t roll it too thin; you want to be able to see daylight through the dough and paper. Make sure it’s big enough to cut a 14cm circle out of. Keeping the dough between the paper, place it on a baking tray and place the second tray directly on top of it. Bake for around six minutes, until deep golden brown. Prepare another piece of dough. Once out of the oven, remove the top layer of paper immediately, replace it, flip it over and remove the second layer. Using a 14cm cake ring/pan, cut out a circle of dough. Work quickly, while the biscuit is still soft. Leave to cool, and reserve the trimmings. Bake and cut the rest of the dough pieces, reusing the paper. If you have a large oven, you can do several at once. You will end up with 10 perfectly flat, circular discs and a bowl of trimmings. Crème fraîche Chantilly Ingredients: 50g double cream25g honey1 vanilla pod4g gelatin, bloomed450g crème fraîche (at least 30% fat)The day before you need it, heat the cream with the honey and vanilla pod (scraped) until simmering. Take off the heat and stir in the gelatin. Add a tablespoon of crème fraîche, whisk to combine, and slowly incorporate the rest to prevent the temperature from dropping too quickly and pre-setting the gelatin. Store overnight in the fridge. The following day, transfer to a bowl large enough to whip it in, and place in an ice bath. Remove the vanilla pod. Whip until it starts to firm up and hold its shape- just past soft peaks. Reserve until you are ready to assemble. Dulce de leche Ingredients: 200g dulce de leche, preferably not too liquid (bought or homemade)Salt, to taste Pour/scoop the dulce de leche into a bowl. Season to taste (just enough to cut the sweetness) and mix well. Reserve until you are ready to assemble. Honey soaking syrup (optional) Ingredients: 100g water100g honey Combine water and honey in a saucepan. Heat until fully dissolved. Do not bring to the boil. Transfer to a container and leave to cool to room temperature. Neutral glaze (optional, smooth, slightly diluted apricot jam may be used as a replacement) Ingredients: 50g sugar50g water4g pectin NH Combine the pectin with the sugar. Bring the water to a boil, pour in the sugar-pectin mix while whisking, and whisk well. Boil for 20 seconds, whisking continuously. Remove from the heat, transfer to a container and leave to cool. Assembly Using a 14cm diameter x 4.5cm high cake ring, place it on a sheet of acetate or parchment paper. Place this on a chopping board or other flat surface that will fit in your freezer. I strongly recommend lining the ring with acetate, it will make unmolding a lot easier. Place a biscuit disc in the ring. Soak with syrup if using, be generous but don’t drown it. Add 1 ½ to 2 tablespoons of Chantilly, and spread evenly. Add another biscuit disc, pressed down onto the cream. Soak (if desired). Add a tablespoon of dulce de leche, and spread gently and evenly. Repeat until you reach the top of the ring. You probably won’t use all of the layers, normally 7 or 8 will fit comfortably. Ensure that the top layer is Chantilly. If you end up with a layer of dulce de leche and one or two millimeters of space, cover with Chantilly rather than another biscuit disc. Place another sheet of acetate or parchment paper over the top and press down. Aim for as few air bubbles as possible. Place another chopping board or flat object on top, and weigh it down with something heavy. Freeze for at least 3 or 4 hours. Prepare a 16cm diameter by 4.5cm high cake ring as in step 1. Whisk the remaining Chantilly until it loosens up, becoming a little more liquid. Fill the ring around 1/3 full with Chantilly. Unmold the frozen cake, remove the acetate, invert it and push it into the Chantilly so the naked biscuit is facing upwards. Keep it centered. Push down all the way, until the biscuit is flush with the top of the ring. The cream will come up the sides. If there is too much, scrape it off with a spatula, keeping the biscuit clean of any cream. If there is not enough, pipe some into the gaps and even out with a spatula. Cover the ring as in step 8 and freeze overnight. Coating and decoration Biscuit trimmingsWhite chocolate Take the biscuit trimmings and blitz them in a food processor until they resemble fine breadcrumbs. Set aside. Temper the white chocolate. Spread finely on a sheet of acetate. Working quickly before the chocolate sets, sieve a spoonful of crumbs over the chocolate. Once it is dry to the touch, cut into triangles around 5cm x 2cm and one small (2cm) circle, and roll up. Leave to set. Using the chocolate circle as a base, build a flower, gluing each “petal” with more tempered white chocolate. Once complete, pipe a small cone of Chantilly (if there is any left) into the center, and dust with more crumbs. Reserve in the fridge until necessary. Finishing Once the cake is frozen solid, unmold and remove the acetate. Brush an even layer of neutral glaze or jam onto the sides of the cake. Work quickly, but ensure you do not miss any patches. If there are uncoated patches, the crumb will not adhere and there will be white patches on the finished cake. Pour the crumb into a wide dish. Roll the edges of the cake in it to coat evenly. Place the cake on a grill or board. Sieve a spoonful or two of crumb evenly over the top. Gently brush off any clumped crumbs on the sides with your fingertips or a brush. There should be no white patches on the cake. If there are, you can patch them up will a pinch of crumb. Transfer to a serving platter. Place the chocolate flower on the cake and leave to defrost- around 3 to 4 hours out of the fridge, double that in the fridge. Serve with Champagne or Russian tea.

-
An easy, lazy, tasty way of using any tomatoes hanging around, especially disappointing winter ones. Ingredients: Tomatoes, around 3 decent sized ones per personGarlic cloves, smashed and peeled, from 0-5 (or more) per personThyme leaves, fresh, frozen or dried, a couple of big pinches per personLots of salt, lots of pepperOil, a couple of big glugs of whatever you fancy. Olive is more traditional.Hot waterQuarter the tomatoes, removing stalks and stickers but leaving everything else. Put everything but the water in a roasting tin and combine with your hands to coat the tomatoes. Bake in the oven at 140°C-200°C, depending on how much time you have. Cook until the garlic is tender and your house smells nice. At 180°C it takes around 45-90 minutes. Pour everything into a blender and blitz completely. Add hot water until it's as thick/thin as you like. Season, add a little more oil if you like. Strain through a sieve or chinois. Eat.
-
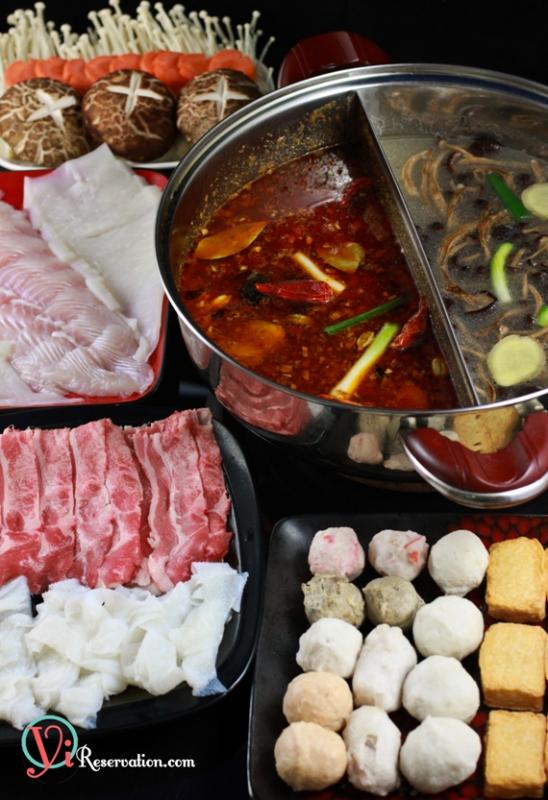
In this cold winter, there is nothing better than sharing a spicy Sichuan hot pot with your friends and family. For the uninitiated, Chinese hot pot, a.k.a. huo guo (火鍋), is a group dining activity where a pot of boiling broth is shared. Friends and families cook the raw ingredients of their liking in this communal pot of broth while chitchatting, laughing, and enjoying each other’s company by the table-side. This recipe is for a popular regional hot pot from Sichuan (Szechuan). The broth is infused with lots of aromatic spices, fiery chili oil and tongue-numbing Sichuan peppercorn so it is very fragrant and spicy! This is a make from scratch recipe that I first posted on my blog. If you like to learn visually, I'd recommend you to visit my blog (link in my profile) for the step by step pictorial recipe. Enjoy! Ingredients: For Master sauce (adjust to your own spiciness) 3 tbsp Sichuan Spicy Bean Paste 5 Dried chili, soaked until soft. 1 tbsp Chinese Black Bean 4 slice Ginger, 4 glove Garlic ½ cup Cooking Wine 1tbsp Rock Sugar Dry Spices: 3 star anise, 1tbsp Sichuan Peppercorn, 1 black cardamom, 4 green cardamom, 2 sand ginger, 1 piece cinnamon stick, and 1 tbsp fennel seeds For the stock: 2 lb Beef or Pork or Chicken bones. 3 slice Ginger 2 Scallion 3 Bay leaf 1 gallon water Instructions: The recipe is for half of a 12 inch special pot. Adjust the amount accordingly. 1. Make the base stock by combining beef or pork bones or chicken skeleton with water, ginger, scallion, bay leaves. Broil and simmer for 3 hours. Can be made in advance. 2. The master sauce is the soul of Sichuan hot pot (and is guarded by restaurant owners as top secret but today you’ll get it for free). I recommend making this in advance. To make the aged-spicy paste: chop the Sichuan Spicy Bean Paste, soaked dry chili, ginger, garlic, and black bean. Combine 4 tbsp of oil and all the chopped ingredients, cook in low heat for 10 minutes. Stir frequently. Add the rest of the dry spices and cooking wine and sugar to the paste. Continue to cook in low heat for another 30 minutes then turn off the heat. This is your aged-spicy taste and can be made in advance. 3. Before serving the hot pot, combine the aged-spicy paste with base stock and bring to boil. Add additional ginger, dried chili, and salt to taste. 4. To make the special peanut butter sesame dipping sauce, combine the peanut butter, sesame paste, and fermented bean curd. Mix into a paste. Add oyster sauce, sugar, chopped chive flower and mix well.