Search the Community
Showing results for tags 'Bread'.
-
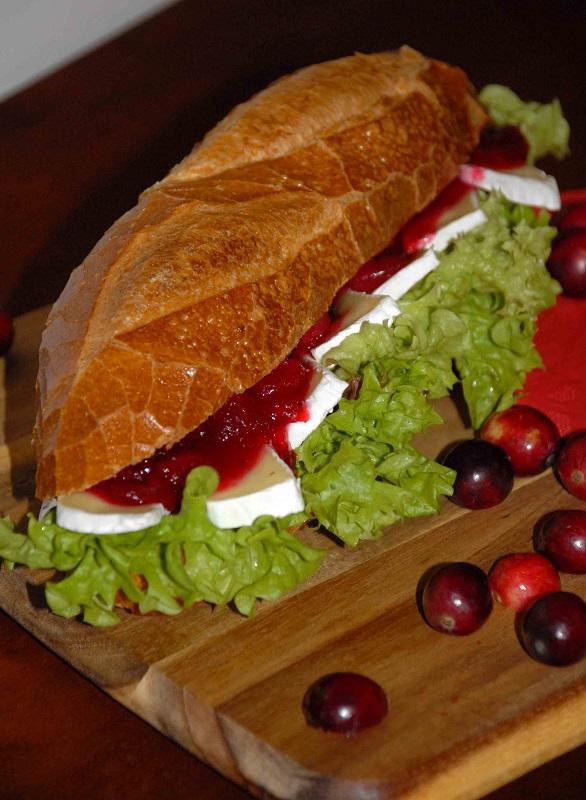
A SANDWICH TO GO Today I would like to share with you the recipe for a snack which you can grab and eat "on the go". I know that it is unhealthy. We should celebrate eating and eat calmly and with deliberation. However, sometimes the day is too short for everything on our schedule and we still have to eat. Admittedly, we can sin and go for some fast food, but it is healthier and tastier to prepare something quickly in our own kitchen. Today, Camembert cheese and cranberries in a fresh, crunchy roll take the lead role. It sounds easy and yummy, doesn't it? Try it and get on with your day . Today I used a homemade cranberry preserve which was left over from dessert, but if you like you can buy your own. Ingredients: 2 fresh rolls (your favourite ones) 150g of camembert cheese 1 handful of lettuce 2 teaspoons of butter 2 teaspoons of pine nuts or sunflower seedspreserve 100g of fresh cranberries 3 tablespoons of brown sugar 100ml of apple juice Wash the cranberries. Put the cranberries, sugar and apple juice into a pan with a heavy bottom and boil with the lid on for 10-12 minutes, stirring from time to time. Try it and if necessary add some sugar. Leave to cool down. Cut the rolls in half and spread with the butter. Put some lettuce on one half of the roll. Slice the camembert cheese and arrange it on the lettuce. Put a fair portion of the cranberry preserve on top of the cheese. Sprinkle with the roast pine nuts or sunflower seeds and cover with the second half of the roll. Enjoy your meal!

-
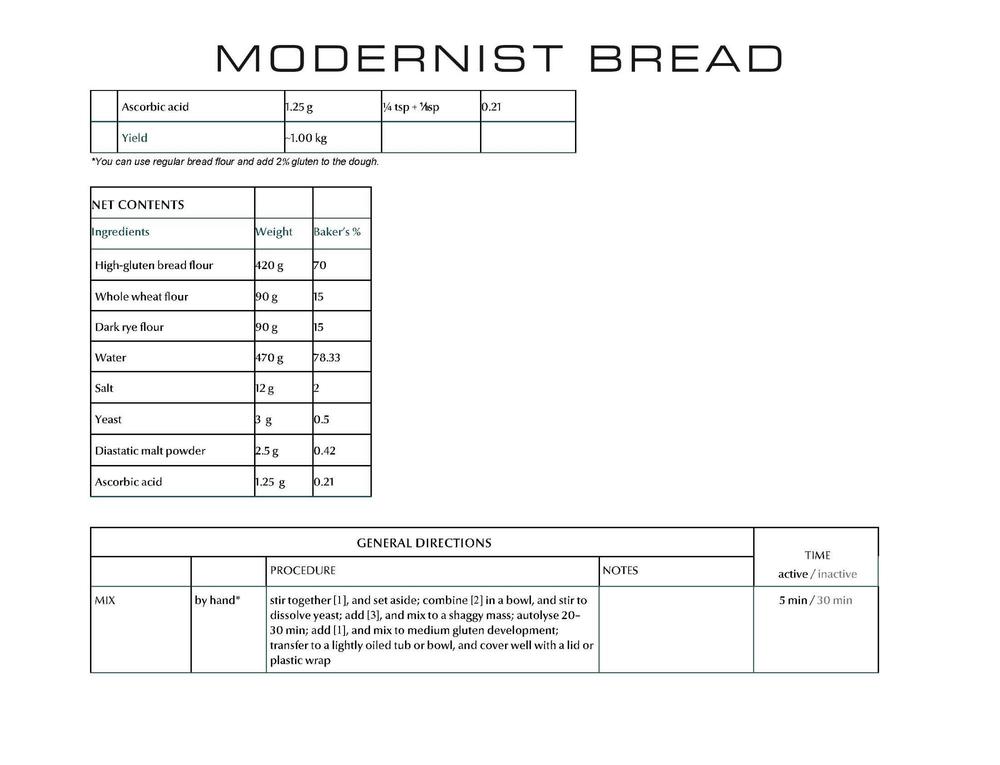
 Is there a discussion in the book about the purpose of adding ascorbic acid? I just saw the contest #2 in which the recipe called for it. I'm curious because a woman I know on the internet used to work in a bakery in Vietnam, and said that to get similar results to the banh mi there, you need to add ascorbic acid. Does it act as a gluten relaxer? Traditional banh mi have a very tender and crisp crust, and a very light and tender, relatively closed crumb.
 -
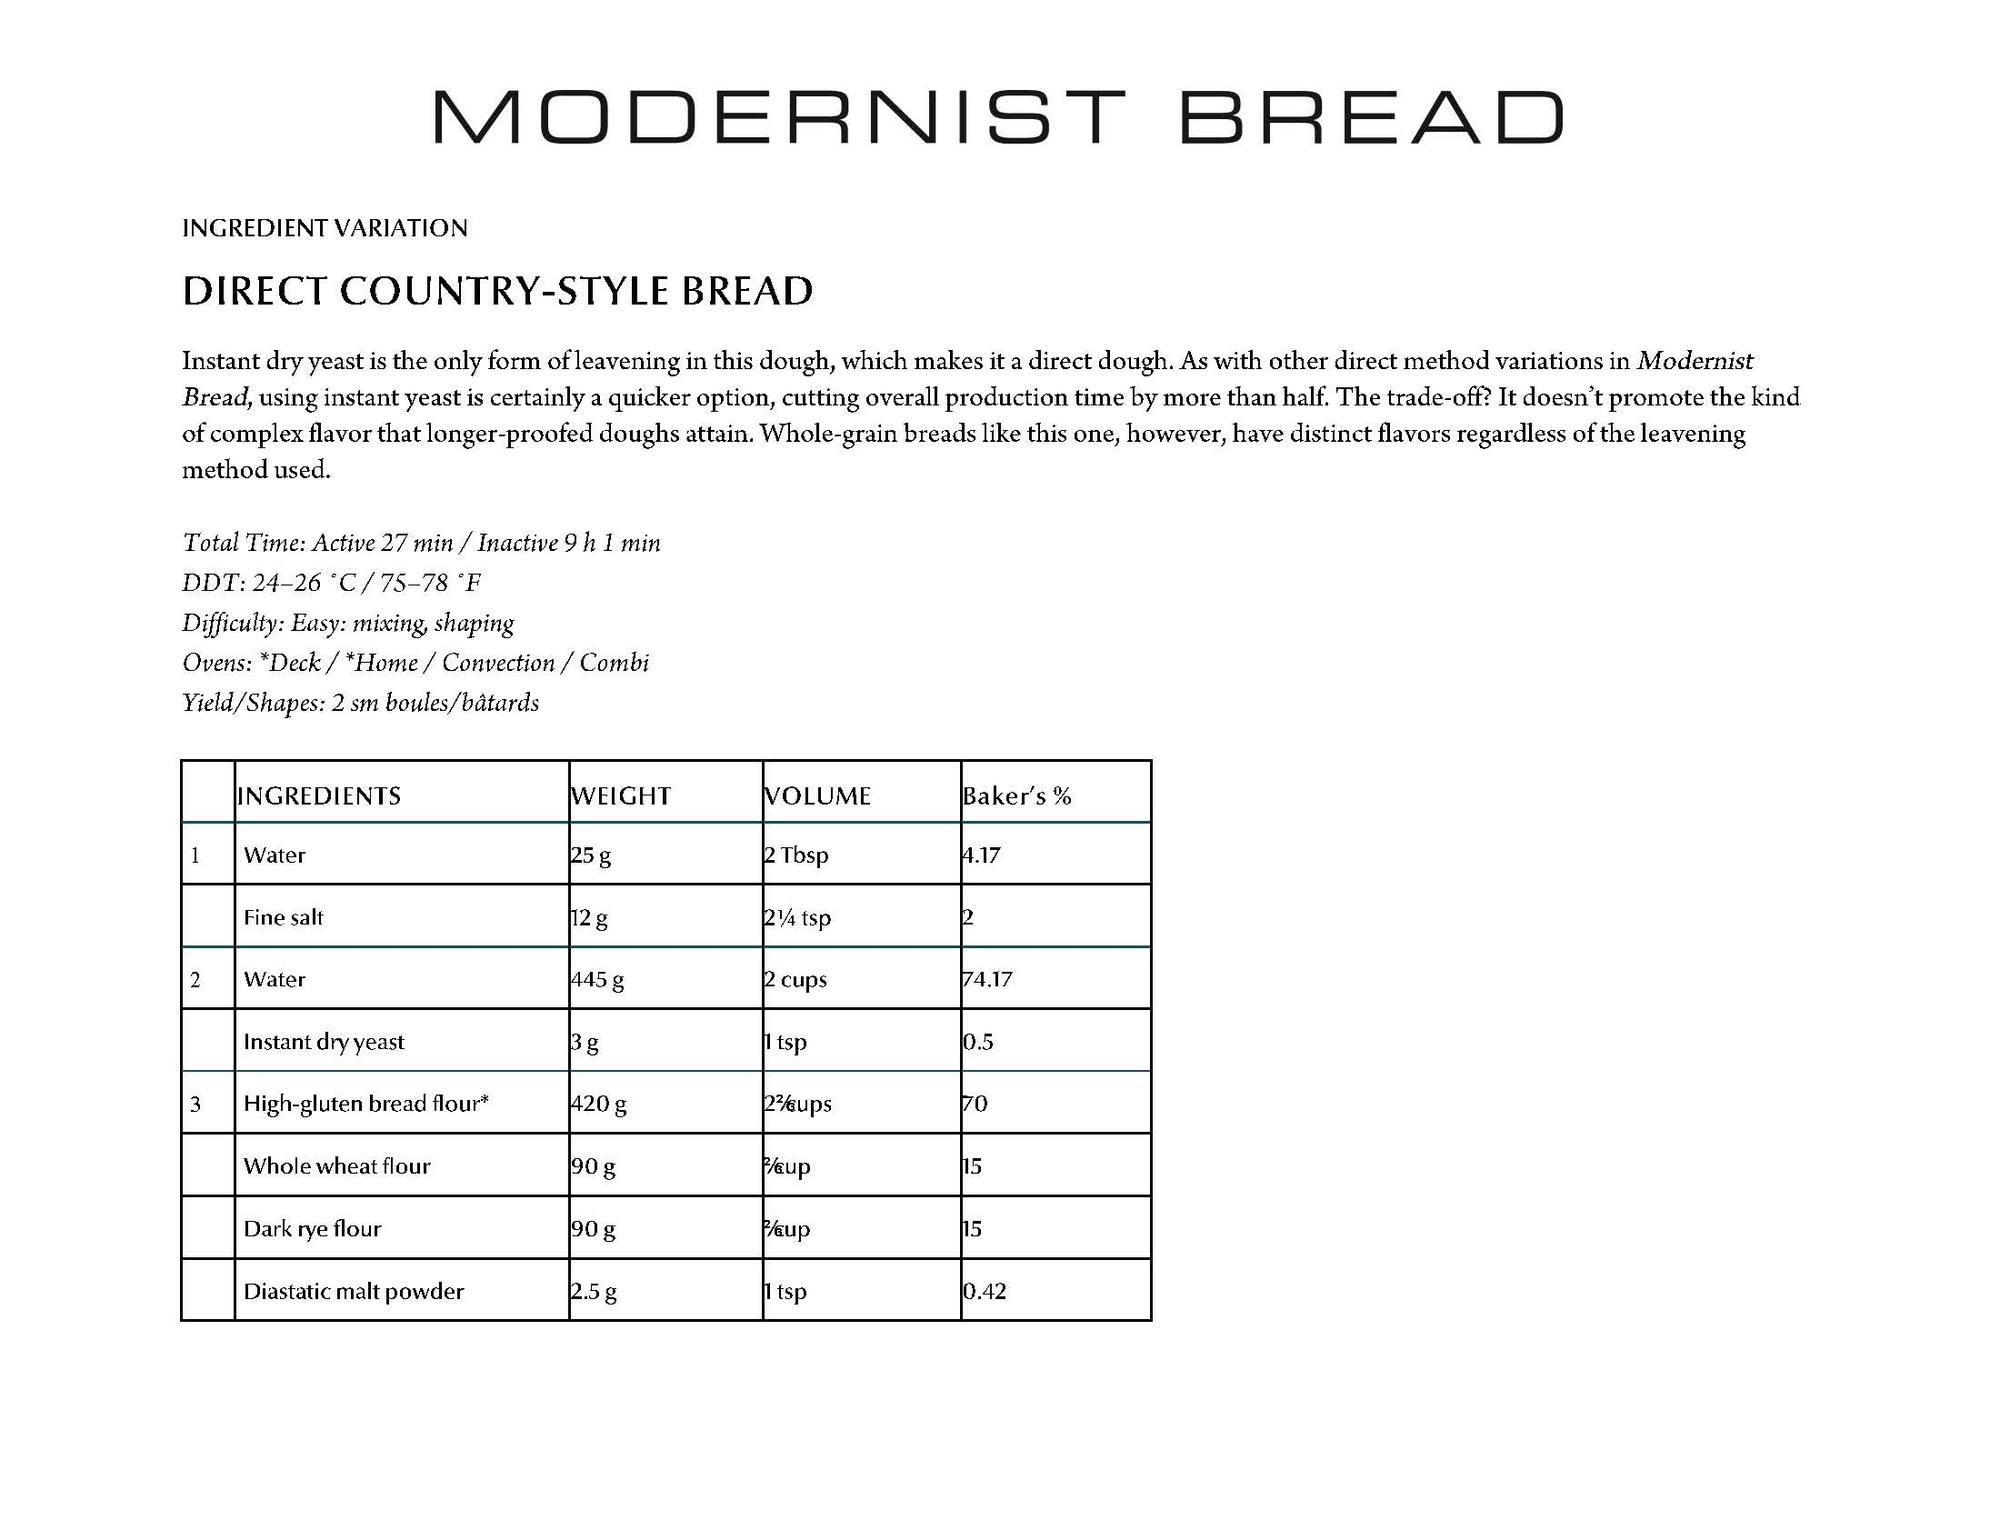
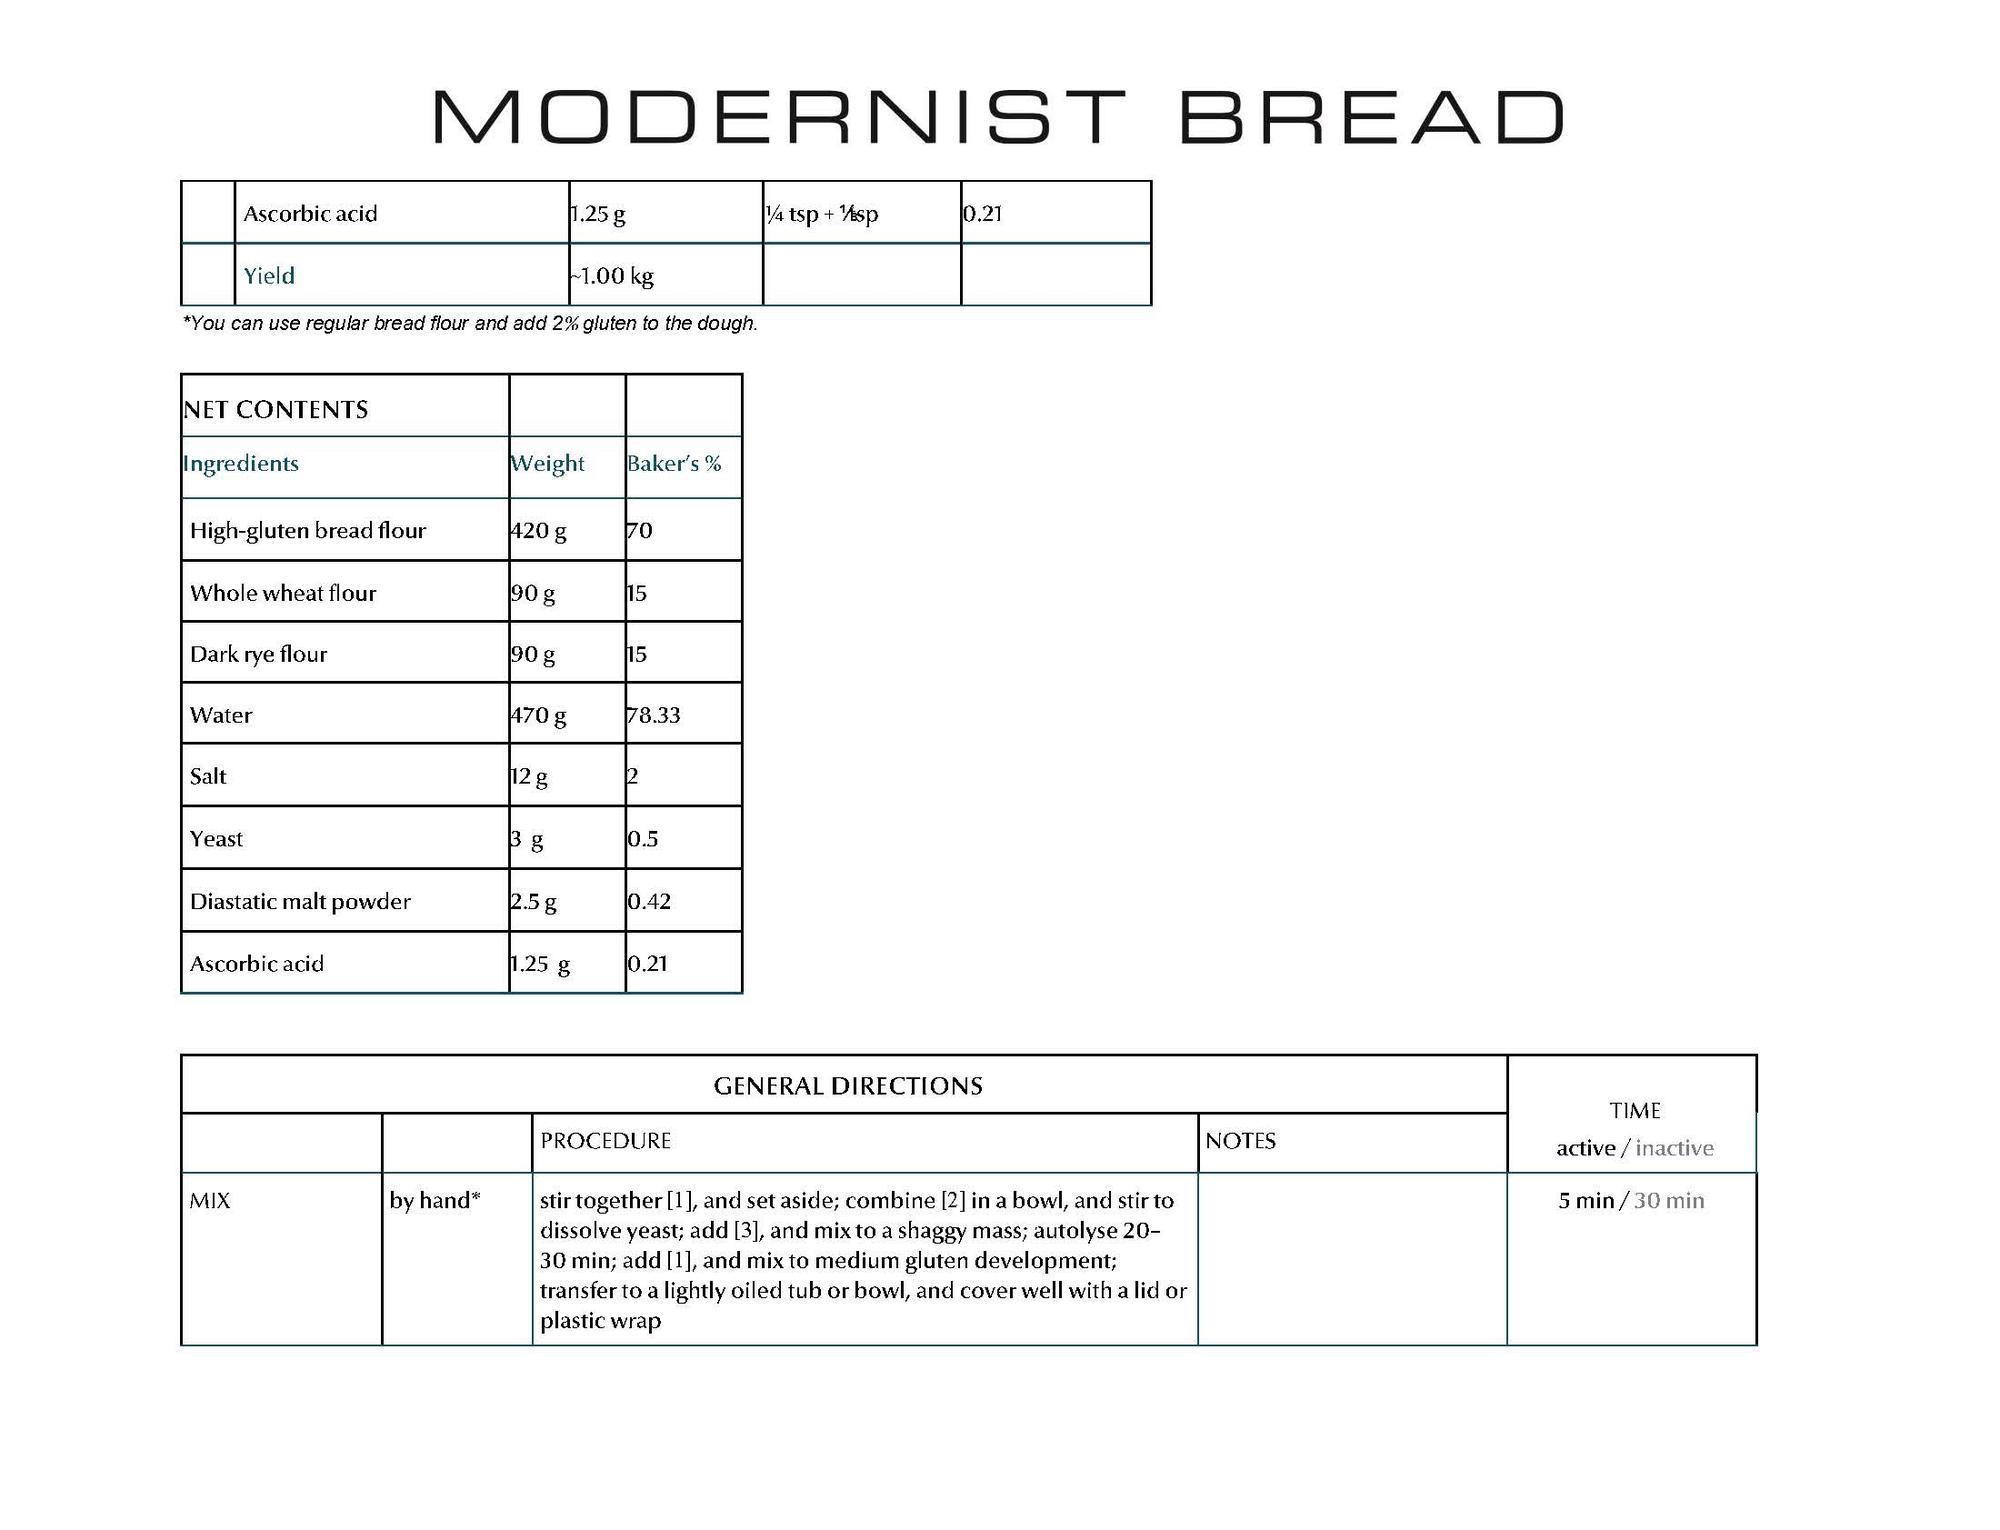
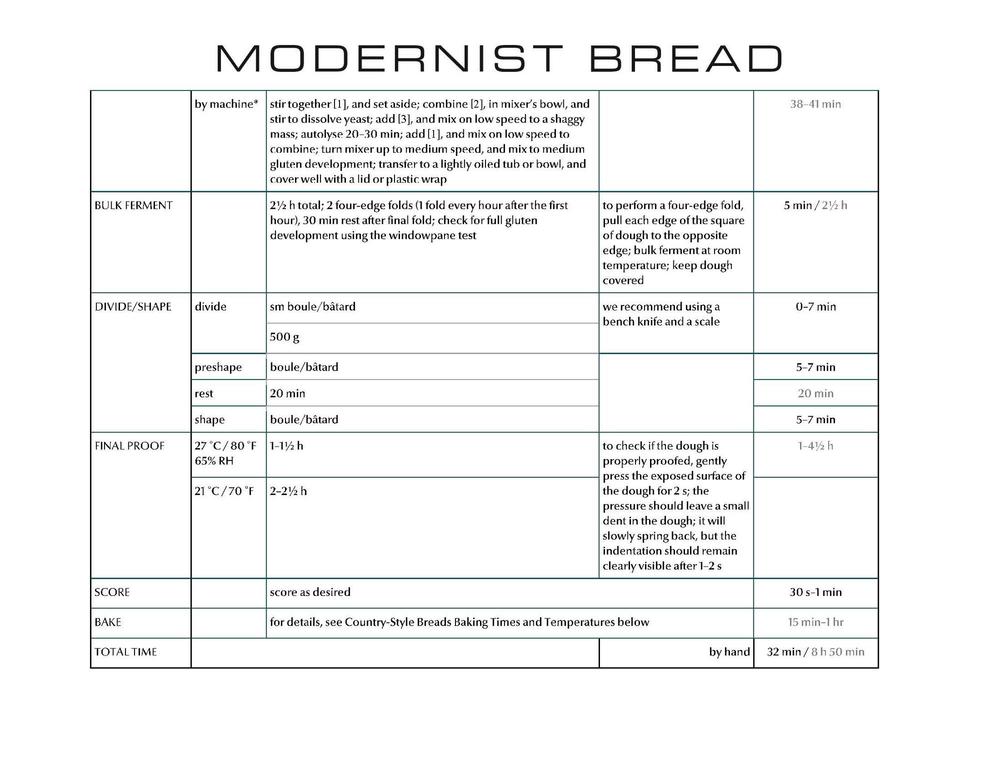
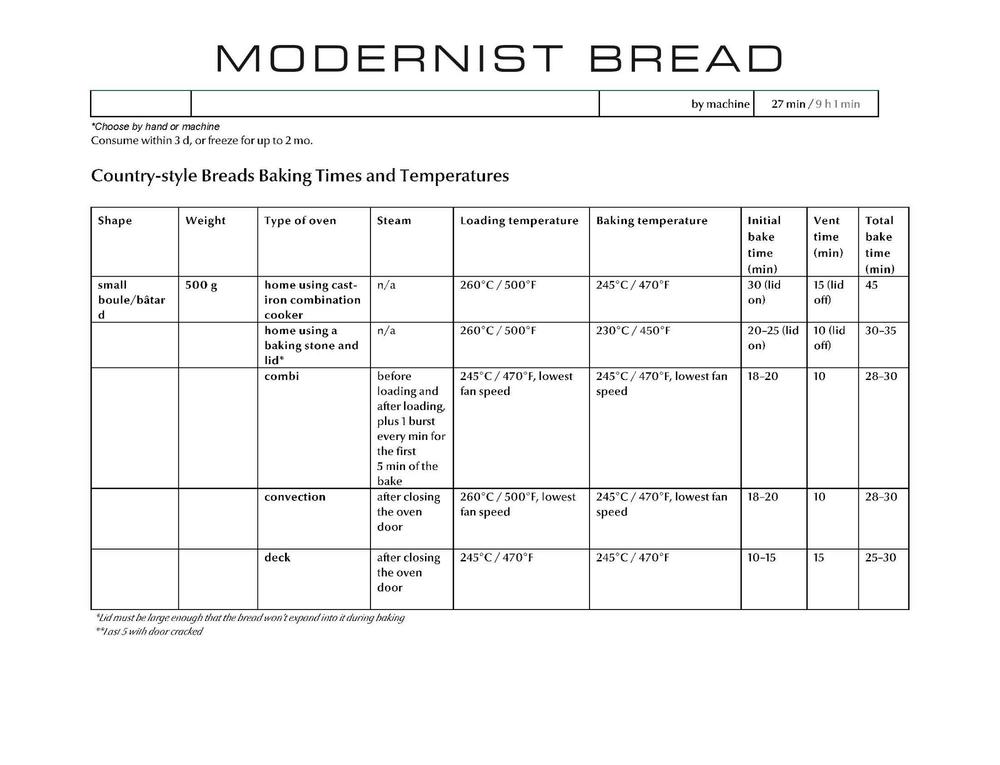
 Modernist Bread is out now, but maybe you haven't taken the plunge. Here's your chance to win your own copy, courtesy of the eGullet Society for Culinary Arts & Letters. The Cooking Lab has provided us with a couple of other prizes that will go to a second and third winner: second place will win an autographed poster and calendar, and third place will receive an autographed poster. They are also providing an autographed bookplate for the first place winner's copy of Modernist Bread. The rules are simple: we are going to post recipes from the book that the team at The Cooking Lab has graciously provided for this purpose. To enter into the contest, you need to bake one or more of these recipes and post about them in the official contest topics by the end of November 2017. Winners will be drawn at random from those posting pictures and descriptions of their completed loaves. Complete rules and other details can be found here. For part two, we're featuring another cornerstone recipe from the book: Direct Country-Style Bread. The only leavener here is instant yeast, so production time is considerably shortened. The relative lack of flavor compared to long-proofed doughs is offset by the use of whole grains. Courtesy of The Cooking Lab, here's that recipe (extracted from the book and reformatted for purposes of this contest):
-
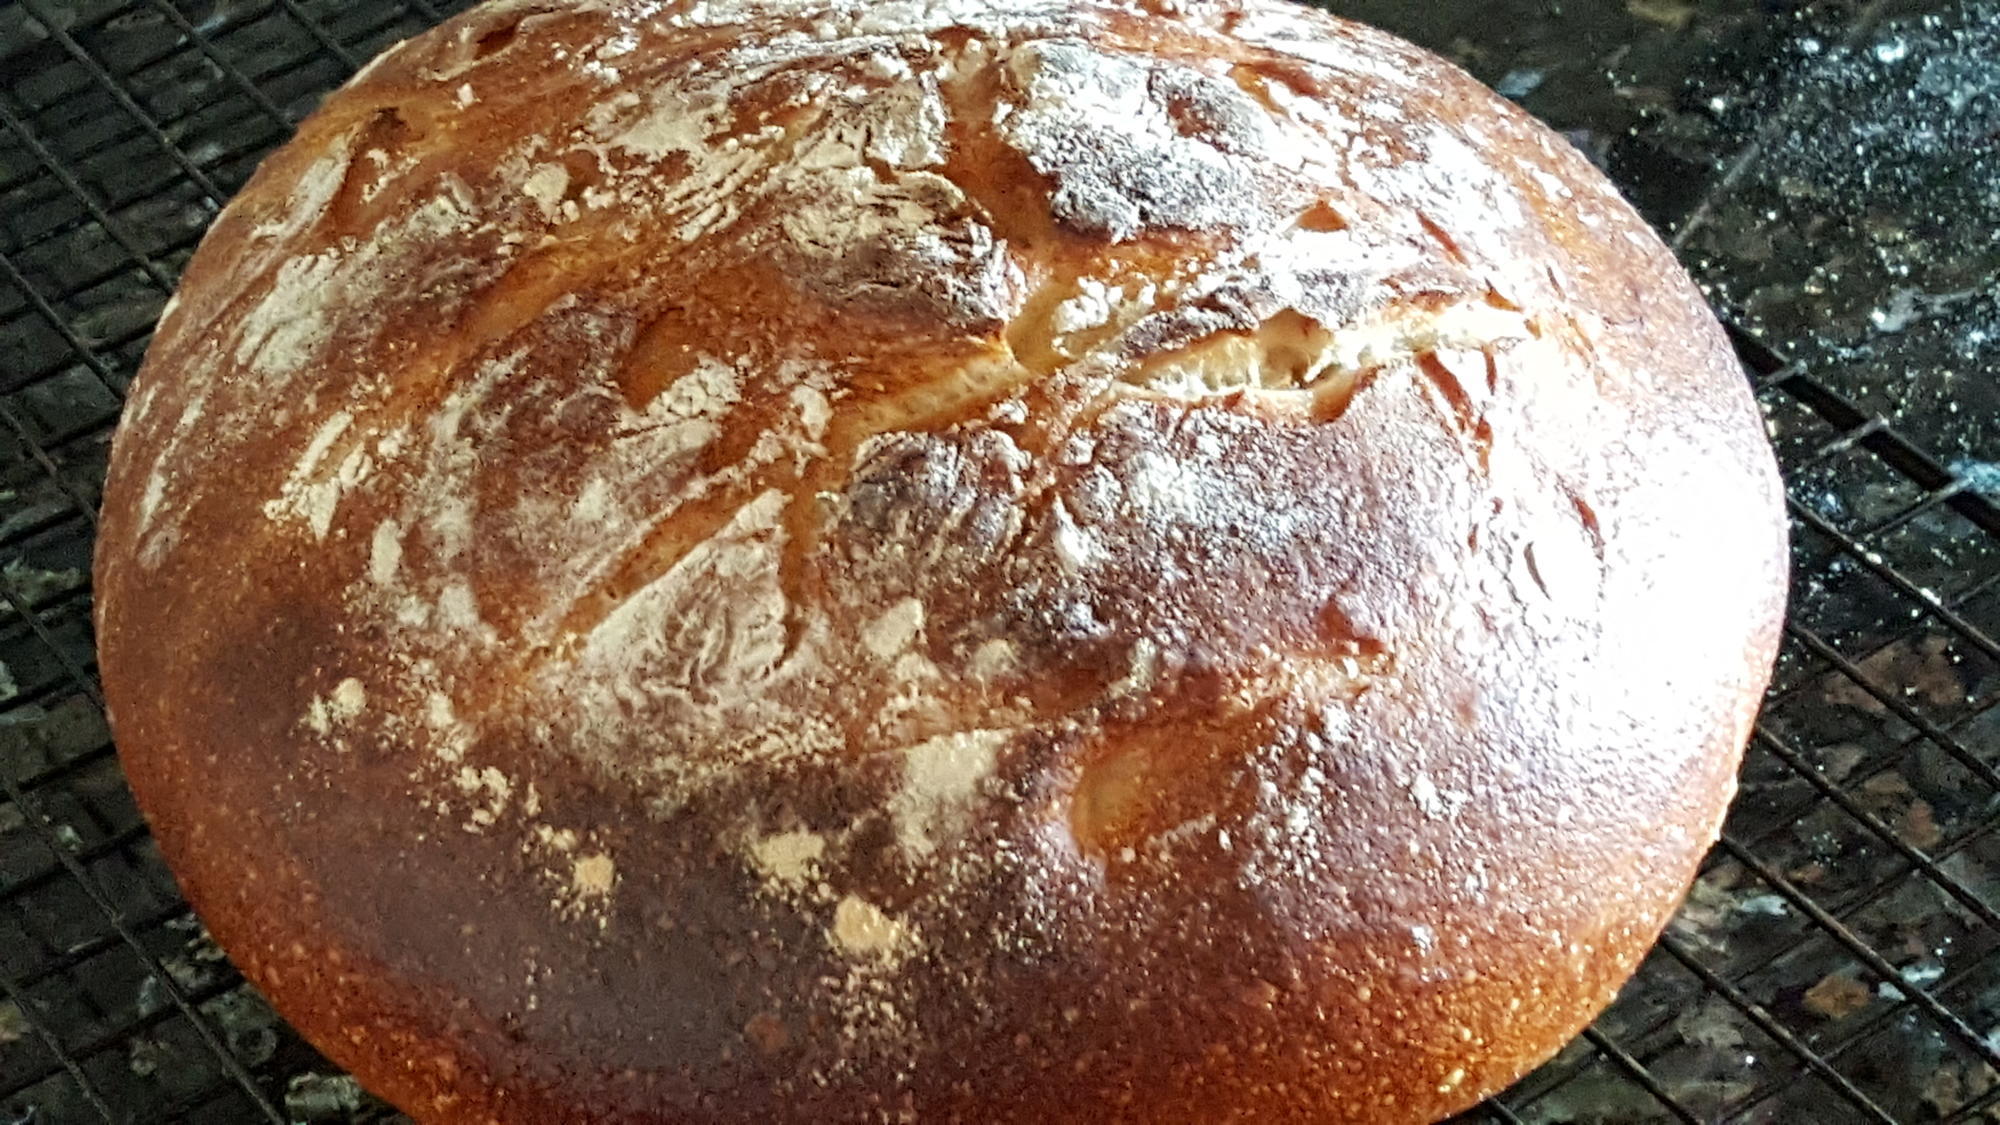
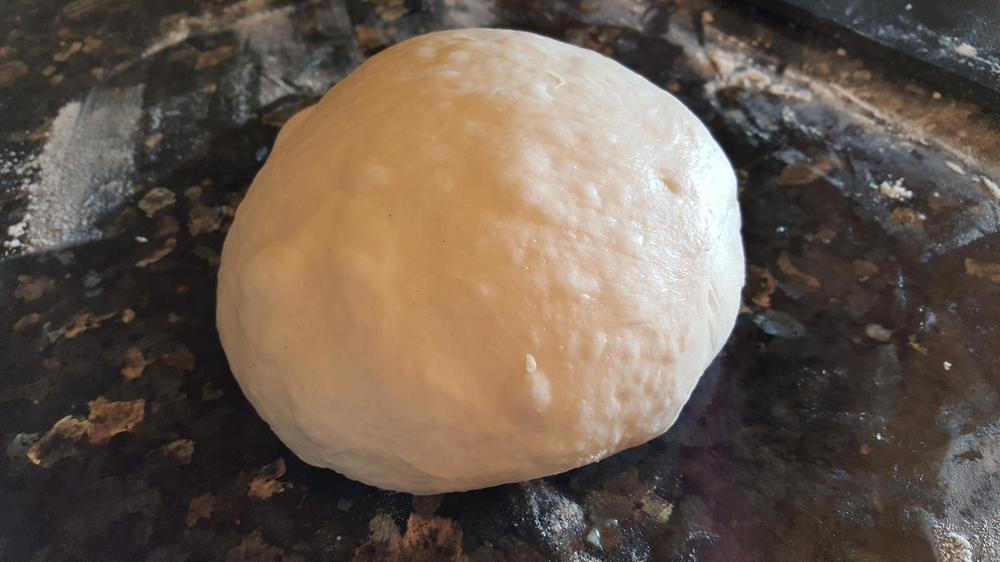
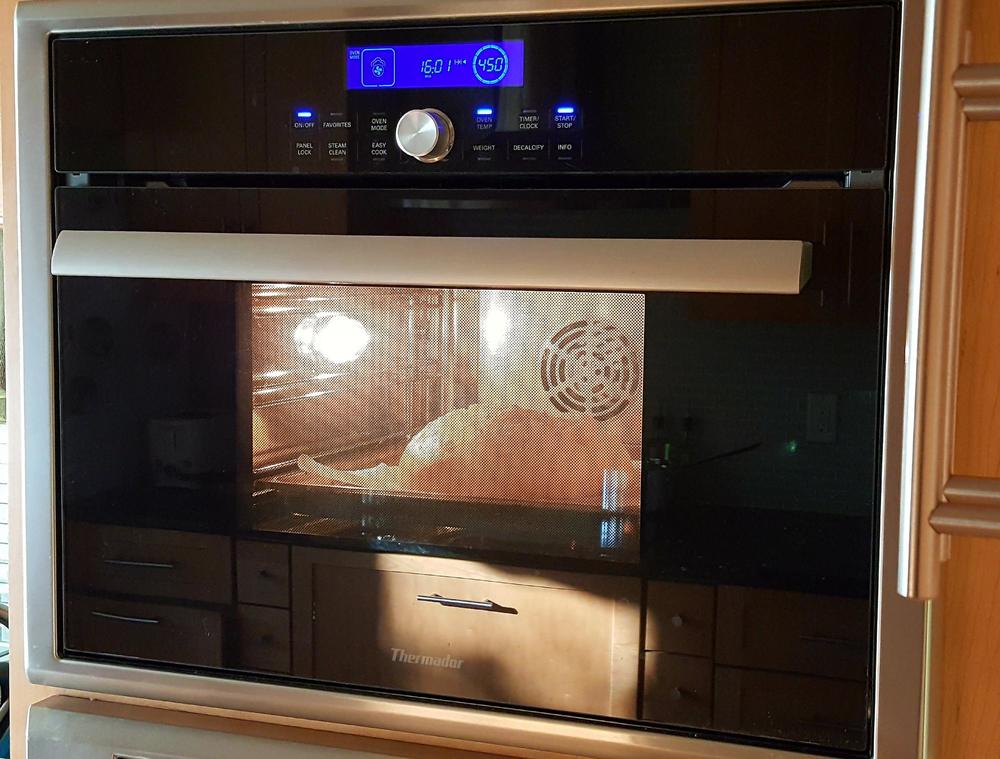
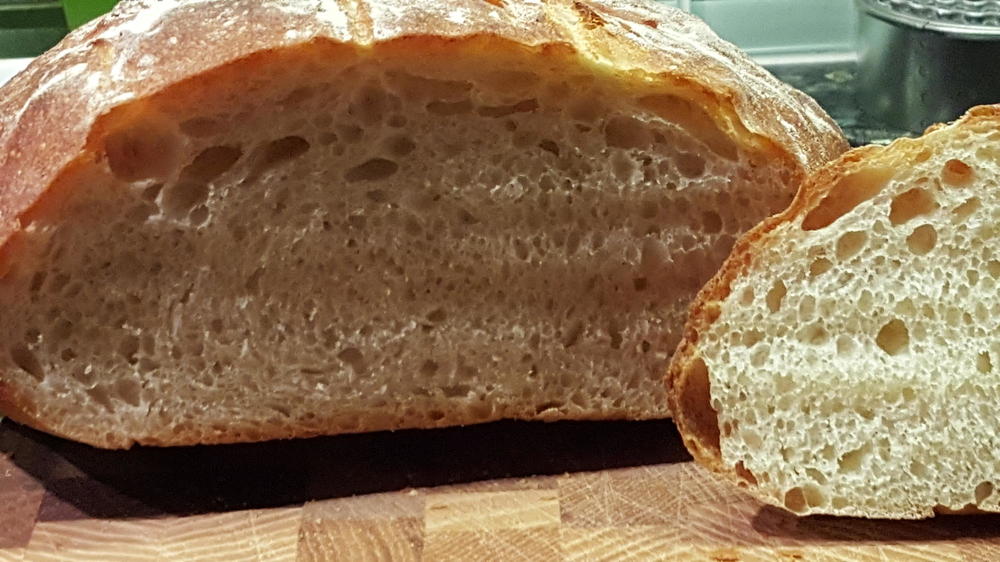
 HOST'S NOTE: This post and those that follow were split off from the pre-release discussion of Modernist Bread. ***** Figured I don't need to dump all this into the contest thread - so I'll post here. My journey to making my first MC loaf. Her's the poolish after >12 hours: Not pictured - water with yeast in it below the bread flour and poolish That went into the mixer and not long later I had a shaggy mass: That rested for a while - then mixed until medium gluten formation - a window pane that was both opaque and translucent (no picture for that slightly messy part) Folded and rested, folded and rested, I think this is 1/2 the mass now ready to rest one final time. Proofed it in the oven - I have a picture of that but it's just foggy window oven Then it went into the oven, here it is at max temp - 450 with steam turned on. Completed loaf: \ And the crumb - this is awesome bread:
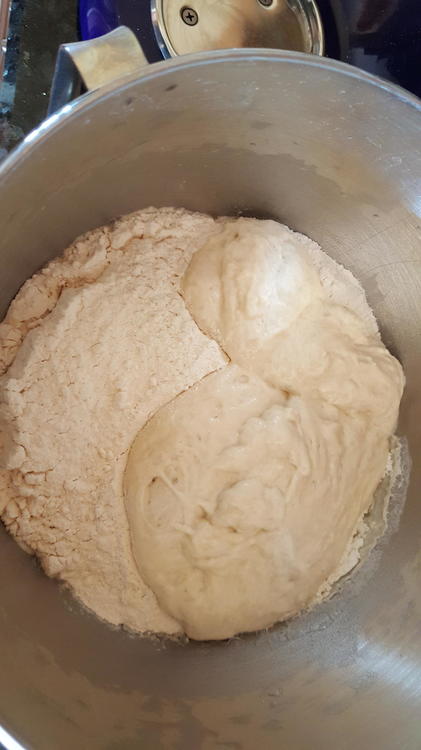

-
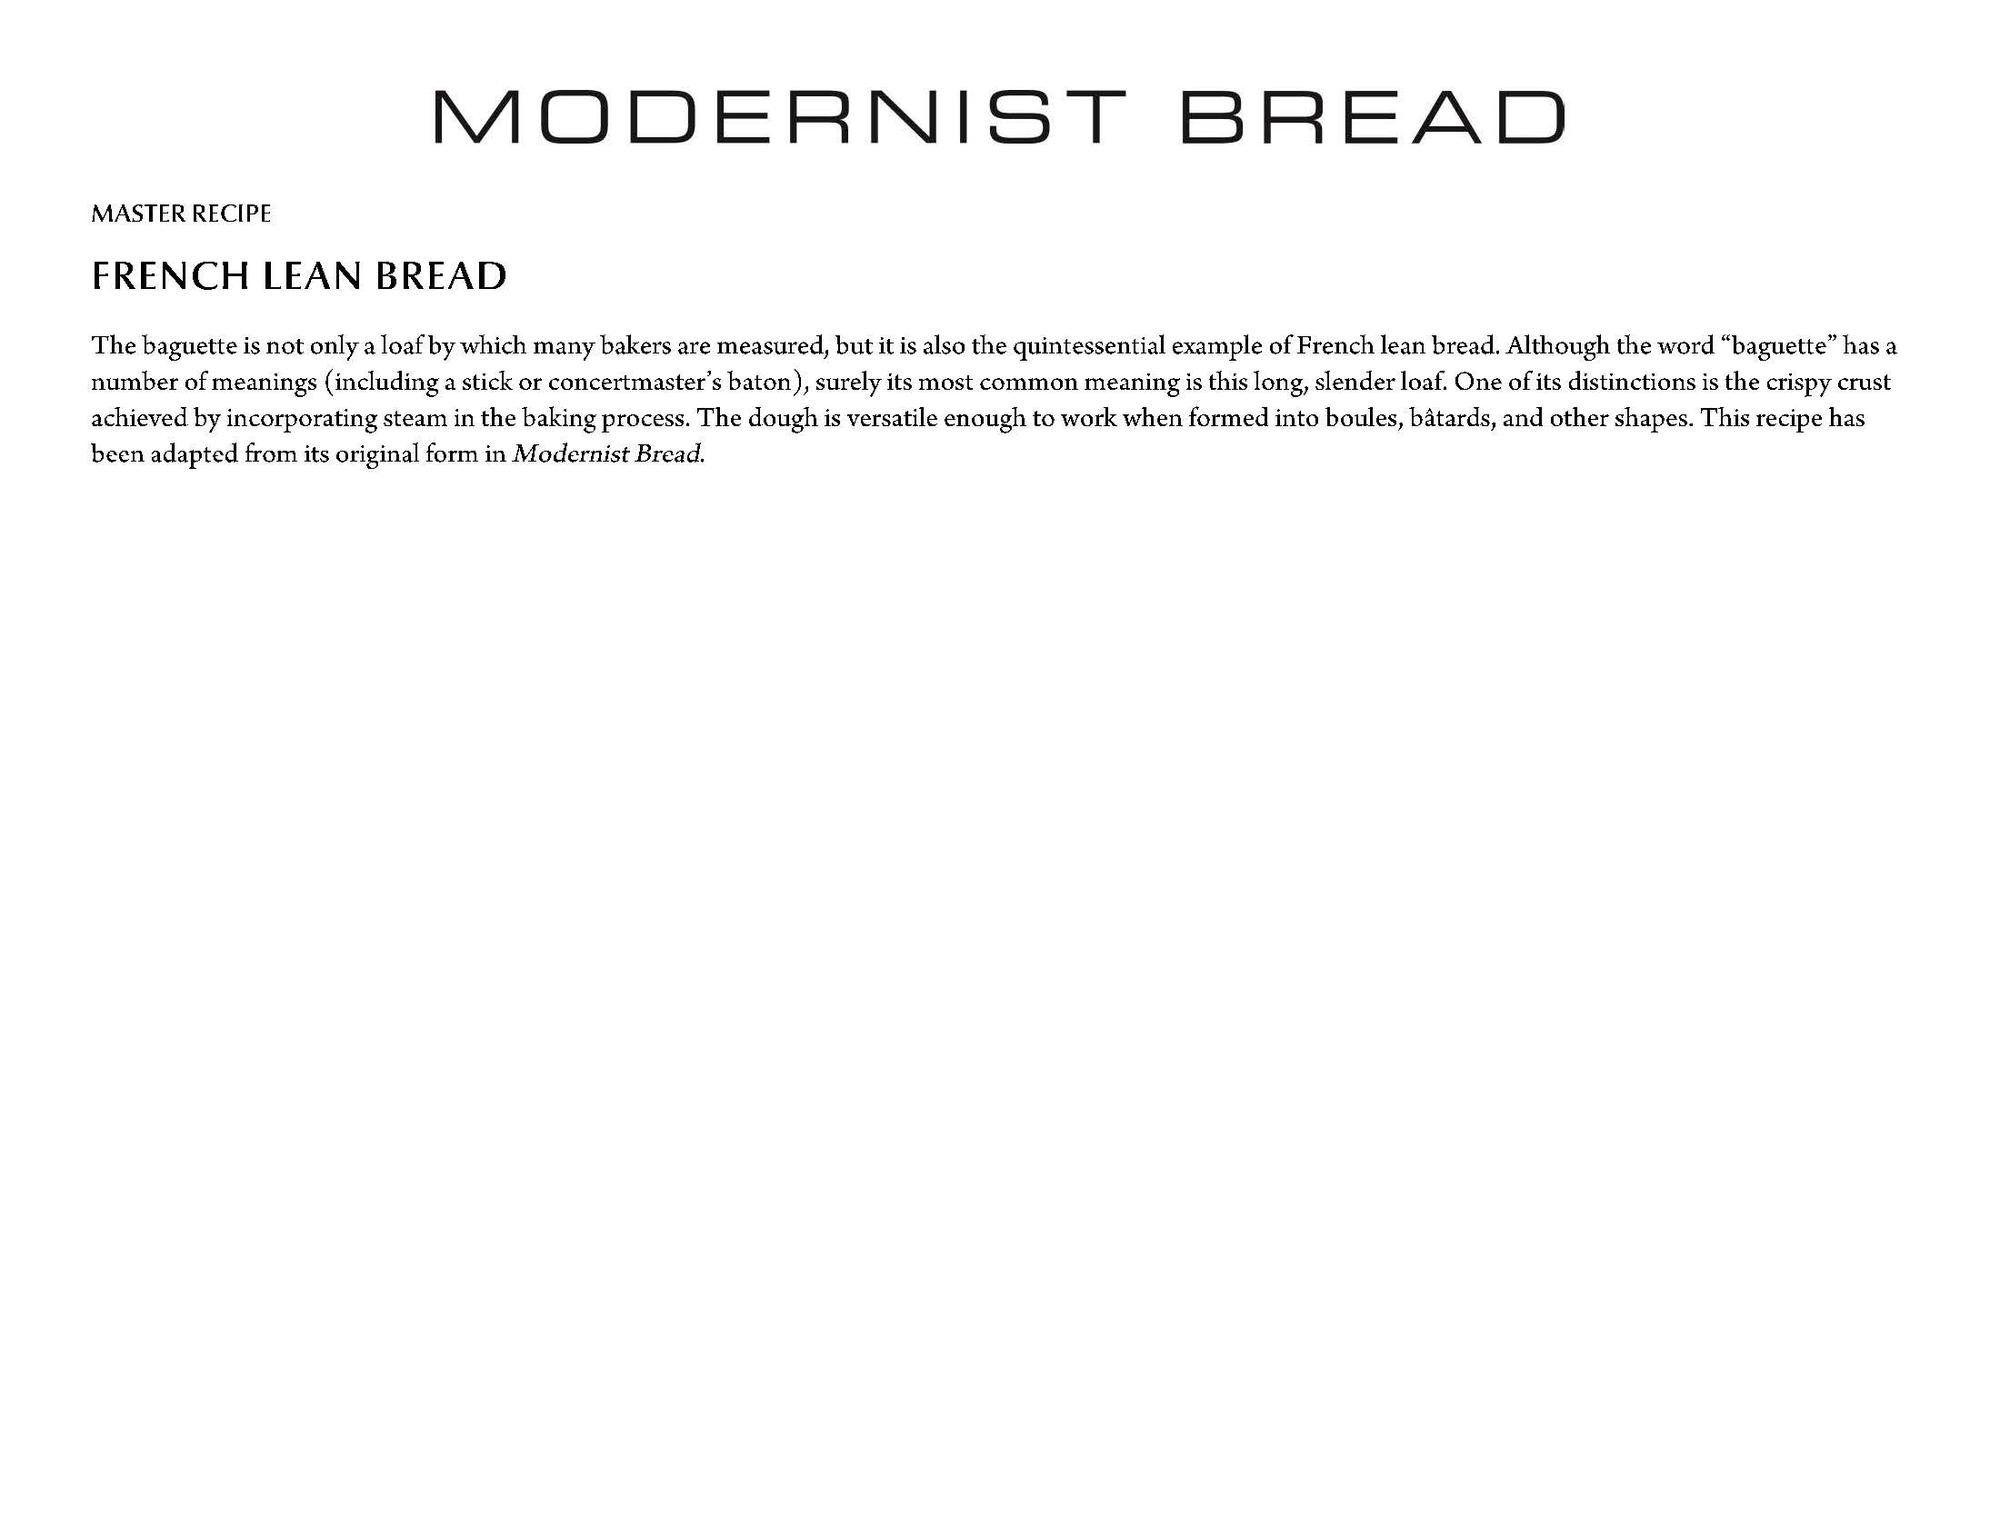
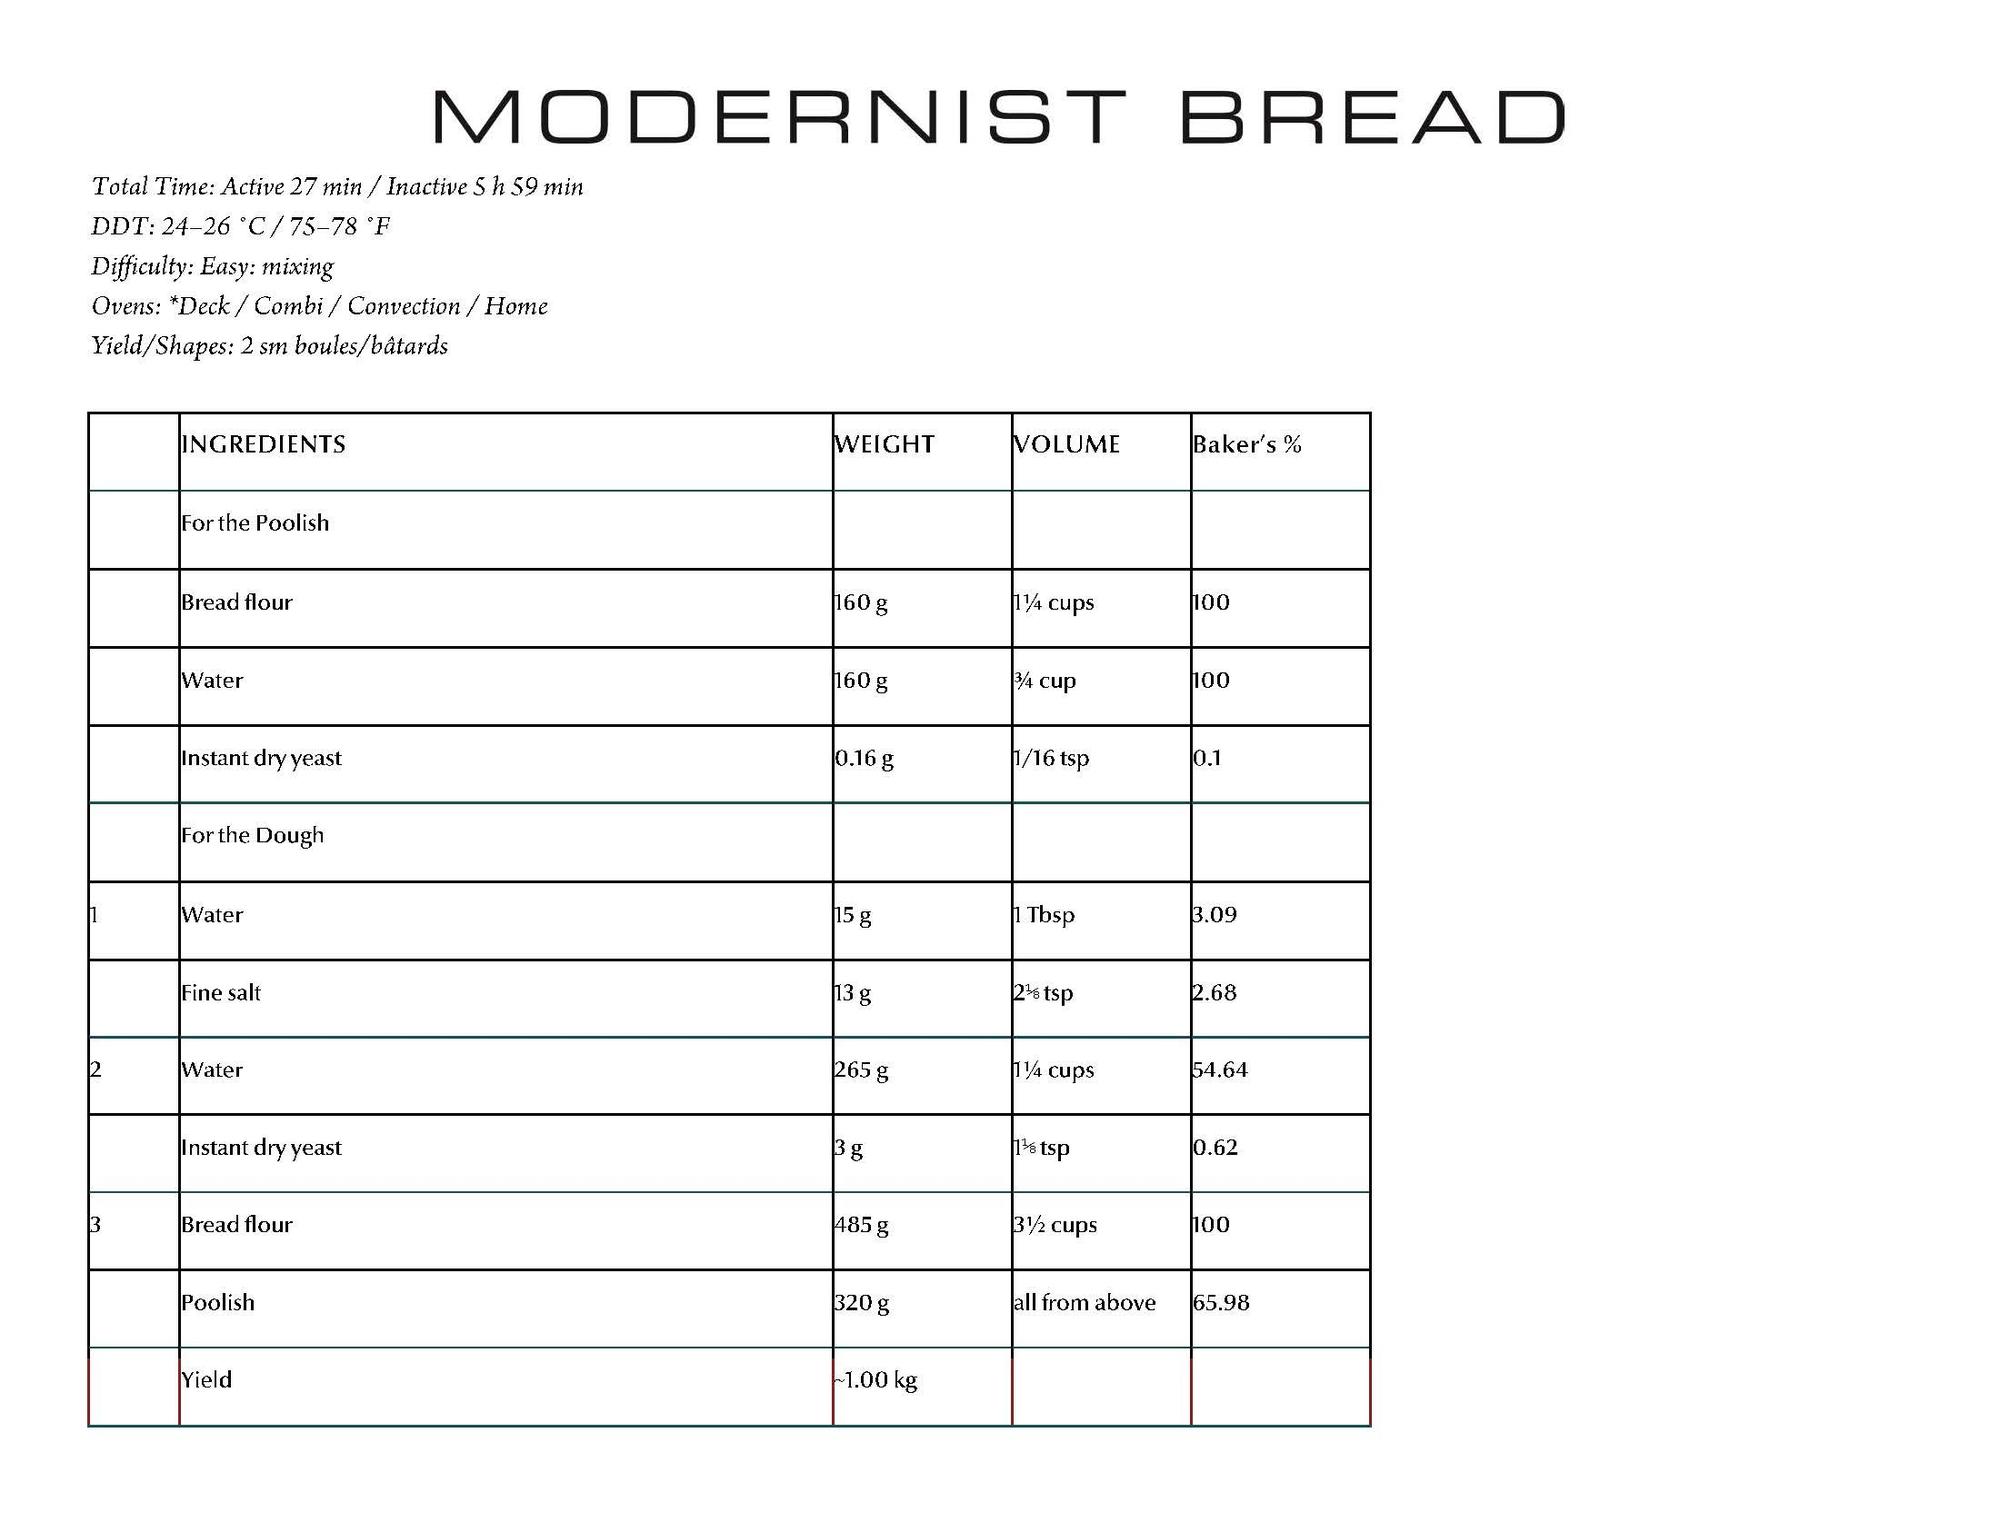
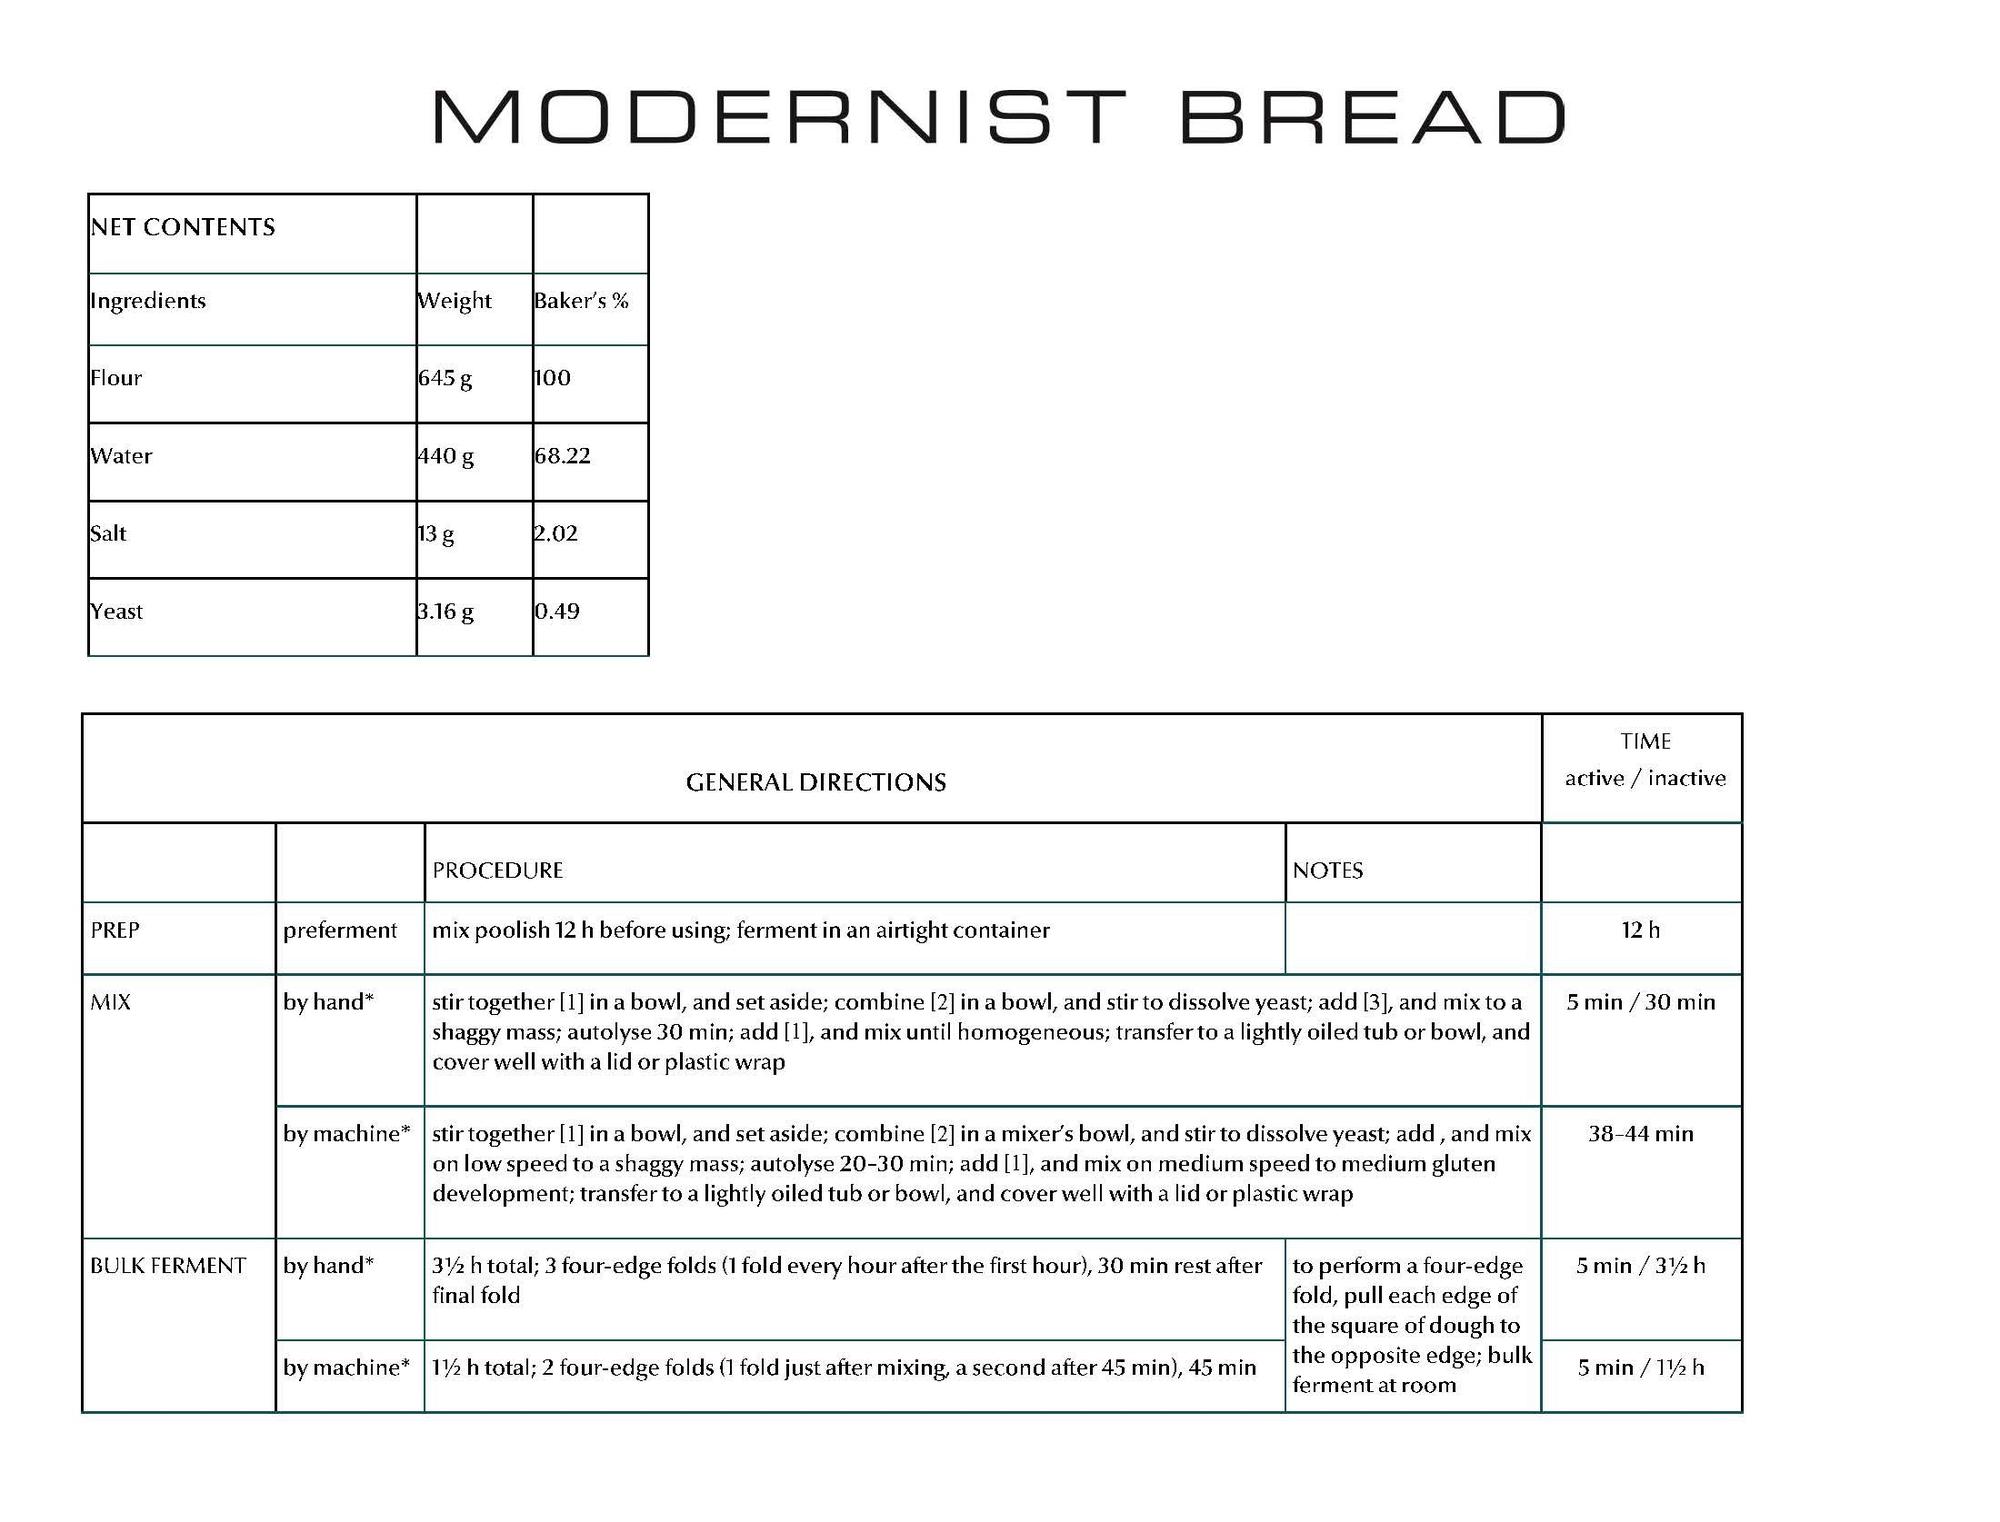
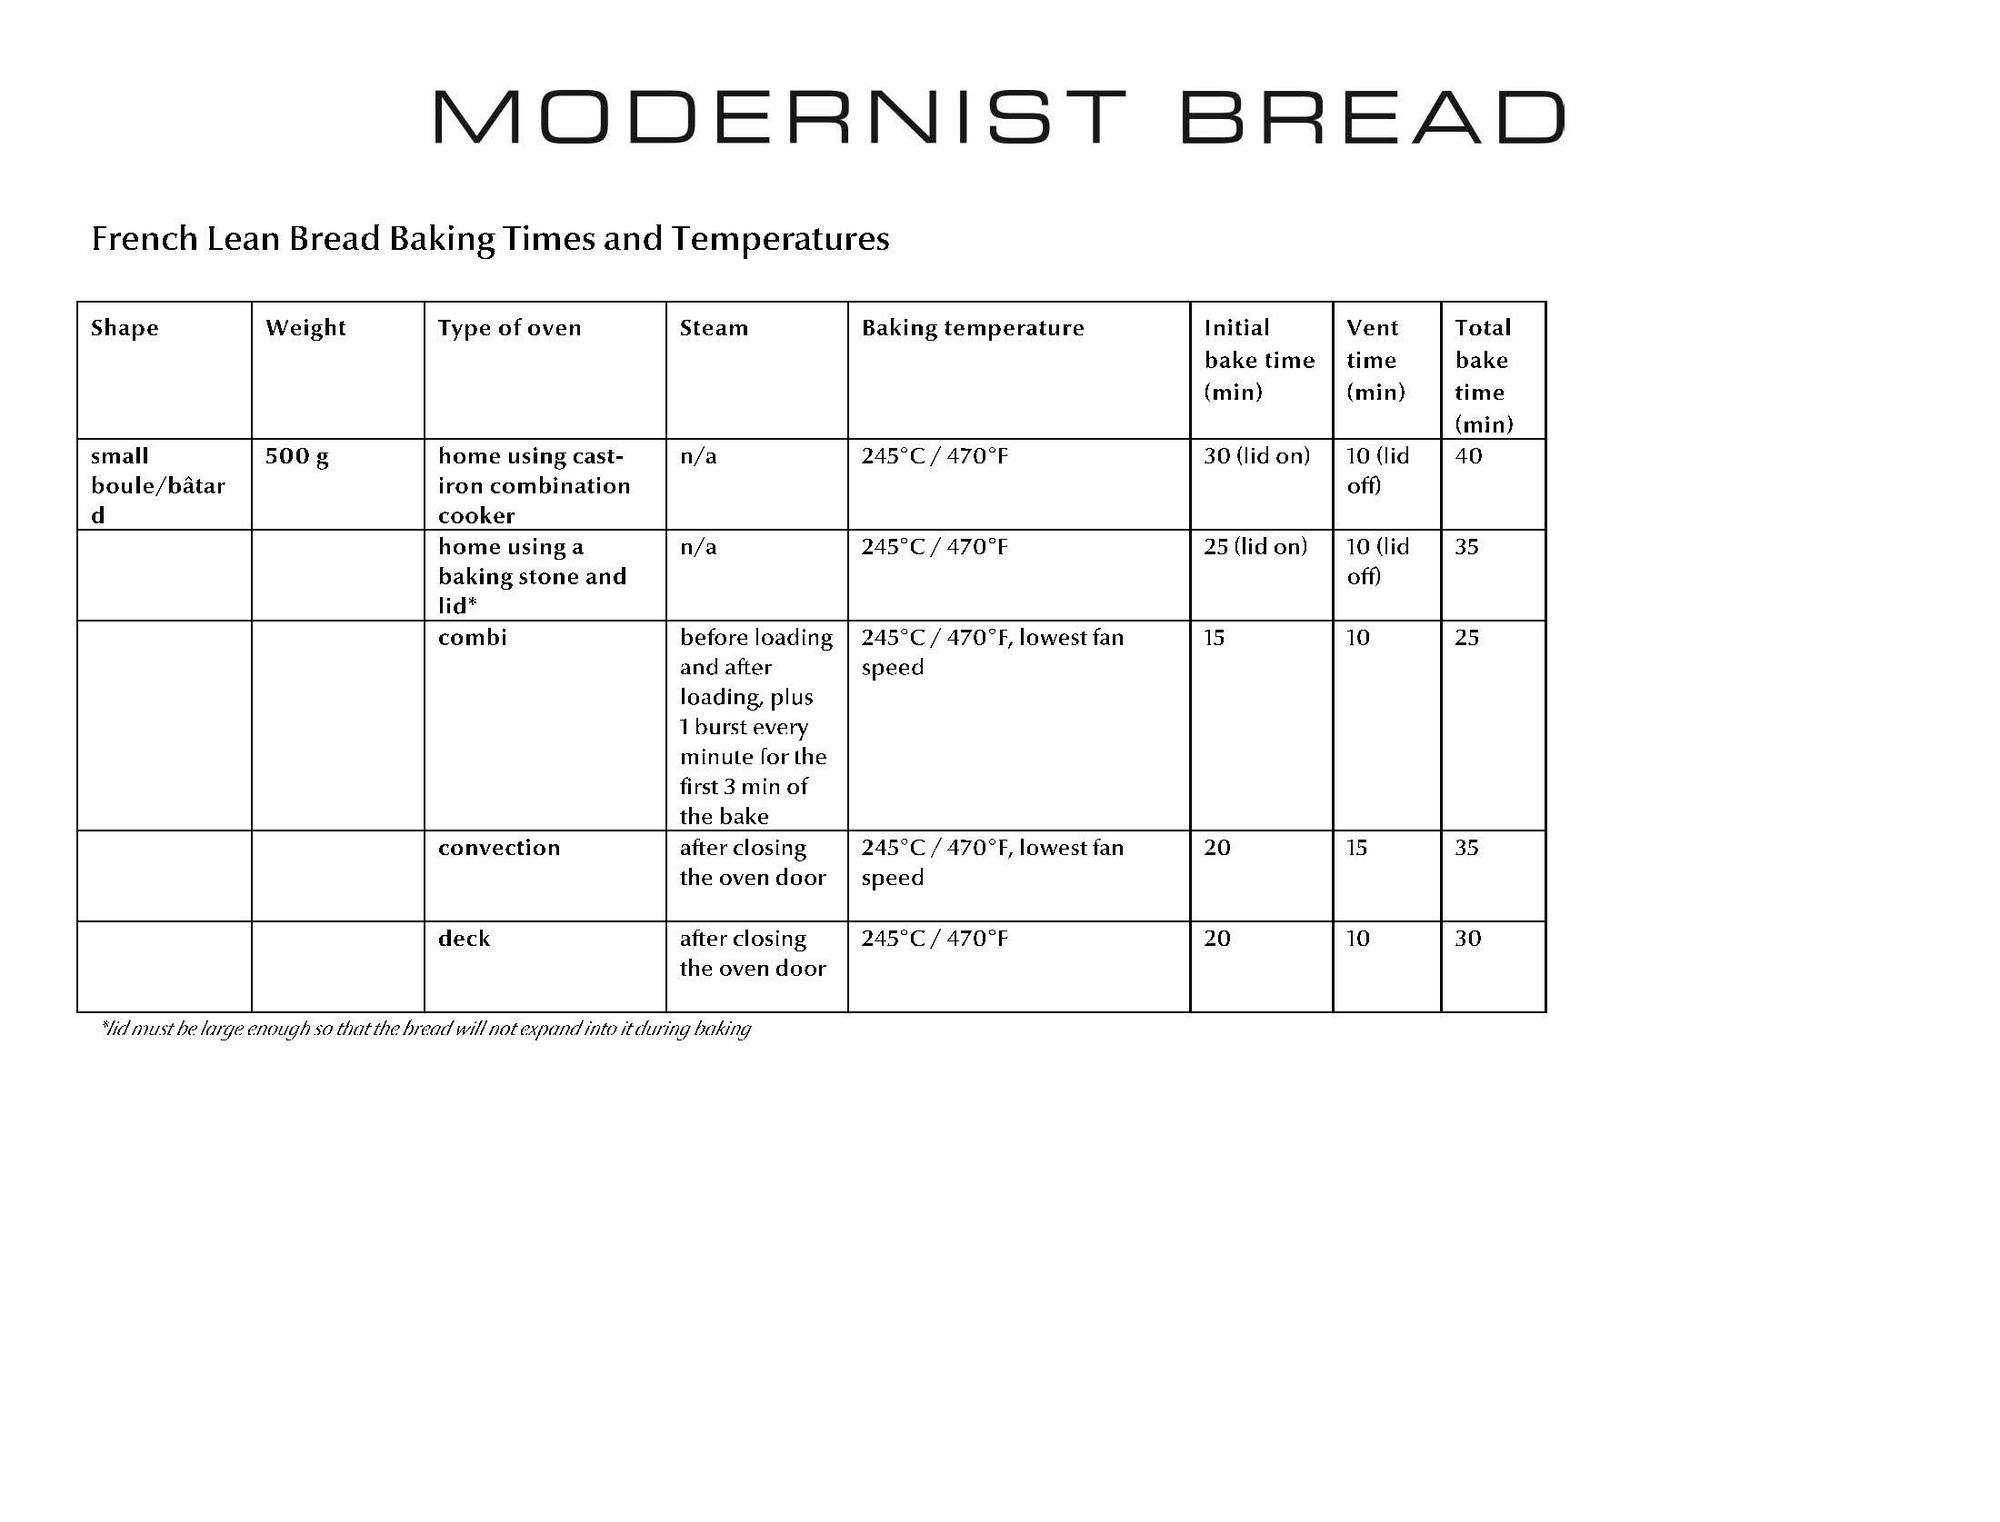
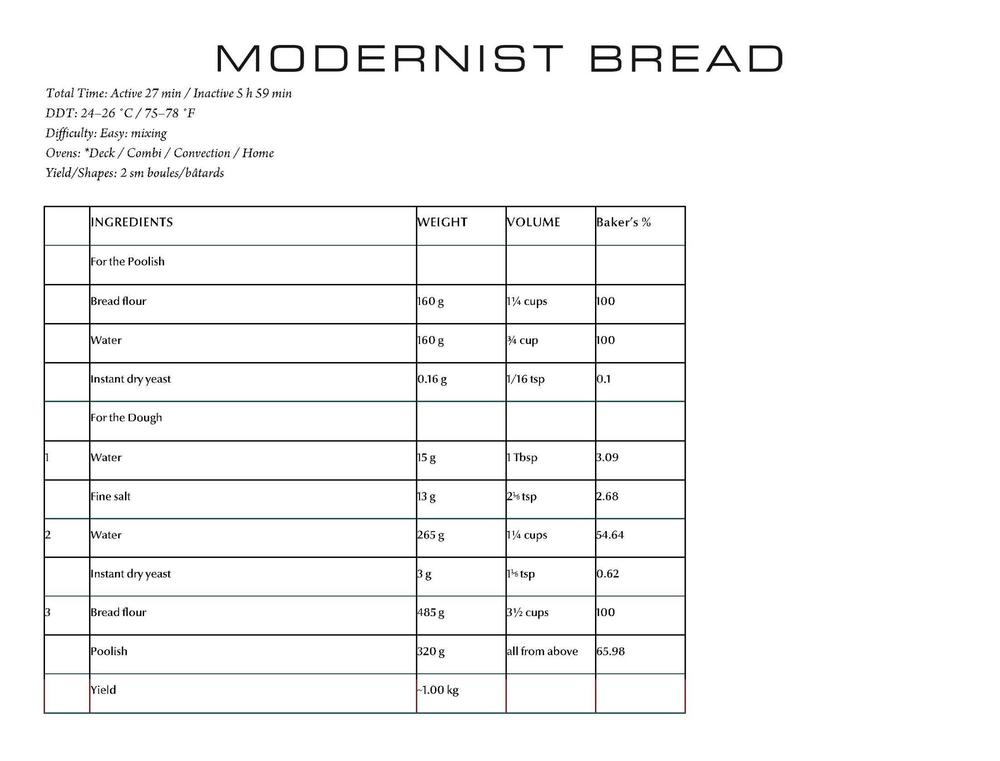
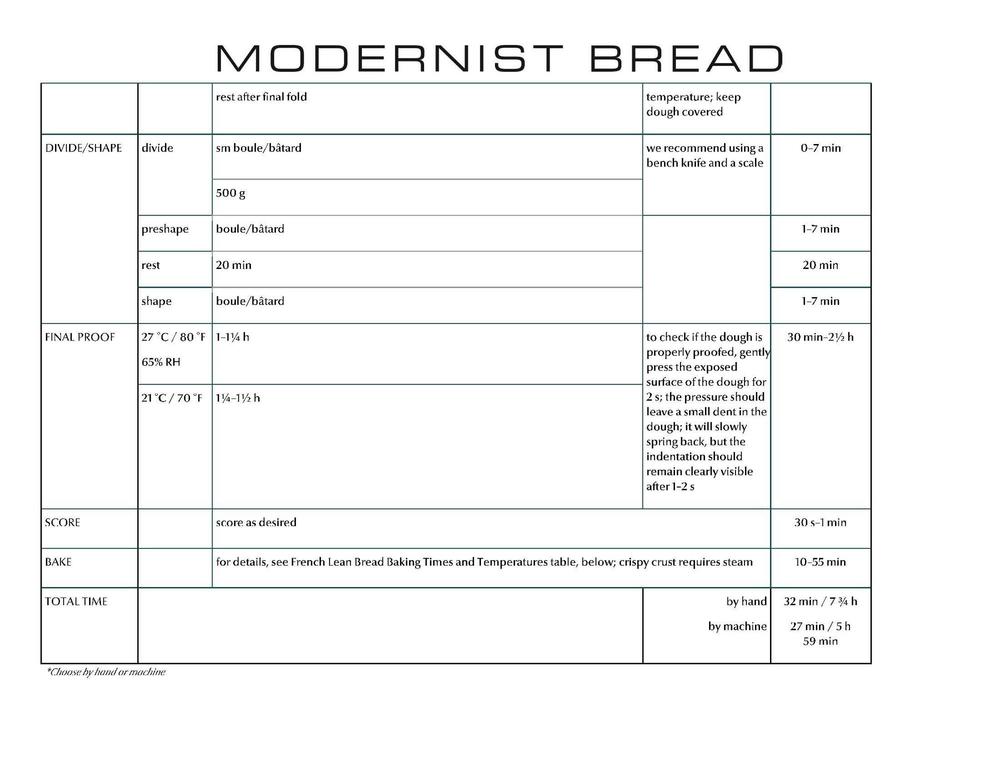
 Next week marks the official release of the highly-anticipated Modernist Bread by Nathan Myhrvold and Francisco Migoya. The eGullet Society for Culinary Arts & Letters is excited to provide you with the opportunity to win a copy of the book. The Cooking Lab has provided us with a couple of other prizes that will go to a second and third winner: second place will win an autographed poster and calendar, and third place will receive an autographed poster. They are also providing an autographed bookplate for the first place winner's copy of Modernist Bread. The rules are simple: we are going to post recipes from the book that the team at The Cooking Lab has graciously provided for this purpose. To enter into the contest, you need to bake one or more of these recipes and post about them in the official contest topics by the end of November 2017. Winners will be drawn at random from those posting pictures and descriptions of their completed loaves. Complete rules and other details can be found here. For our first recipe, we're starting with a cornerstone recipe from the book: French Lean Bread. I've personally made this one and it's both delicious and completely approachable by anyone with an interest in this book. Courtesy of The Cooking Lab, here's that recipe (extracted from the book and reformatted for purposes of this contest): The recipes in this book tend to rely on information presented more extensively earlier in the books, so if anything isn't clear enough here please ask and Dave and I will do our best to answer your questions (we've had early digital access to the books for the last month or so). ETA: Here's what my first go at the recipe sounded like coming out of the oven...
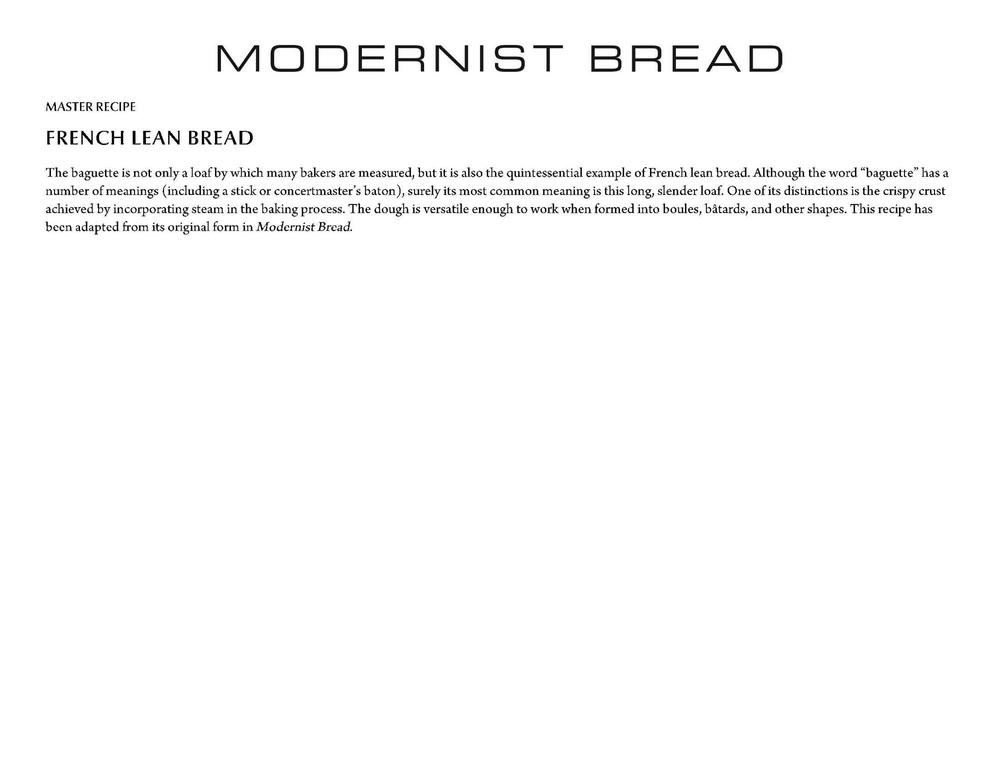


-
I've had my bread machine for about 2 years and love it - I love how quickly I can add the ingredients and a few hours later, I have a nice smelling house and often tasty loaf of bread. I don't remember buying a loaf of bread in these 2 years! Having followed numerous recipes, I feel I'm ready to get creative and try to devise my own combinations. But I'm scared - scared of wasting vast quantities of ingredients on recipes that fail to rise or are too stodgy. So, having seen the expertise available here, I was wondering if anybody can give me some tips on what ratios to absolutely stick to and how to adjust it for different ingredients - e.g. adding cheese = less oil. I know it's not this simple (and adding cheese probably doesn't = less oil) so I'm here to hear your wisdom and guidance! Apologies if this has been asked before - I couldn't find anything other than an extensive conversation about yeast
-
Blueberry Buckle, Banana Bread, Banana Coffee Bread, Boston Brown Bread and Prune Nut Bread. Cornbread, Corn Fritters and Corn Spoon Bread. Ginger Muffins, Hawaiian Muffins and Swedish Timbale Cases. All these recipes come from my cherished 1968 edition of the Better Homes and Gardens "New Cook Book." But the popularity of "quick breads" hasn’t faded over the decades. By definition, quick breads are basically breads that are leavened with baking soda or baking powder rather than yeast. And "quick" breads eliminate the need for waiting hours for the yeast in traditional doughs to rise. The Holidays are the perfect time for quick breads. Quick breads are economical and all the well-known ingredients of the holiday kitchen work quite well in quick breads: dates, raisins, pumpkin, cranberries, candied fruits, nuts, citrus fruits, eggnog and a boozy nog too. The Holidays are fast approaching, so join in the celebration as we launch our newest Bake-Off, eG Bake-Off XX: Holiday Quick Breads. See our complete Bake-Off Index here: https://forums.egullet.org/topic/155586-bake-off-index/
-
On Nov. 7, 2017, Modernist Bread will finally arrive on my doorstep. Having preordered it literally the first day it was available, to say I'm excited about this book is a bit of an understatement. The team at The Cooking Lab have been gracious enough to give @Dave the Cook and me early electronic access to the book and so I've spent the last week pouring over it. I'm just going to start with a few initial comments here (it's 2600 pages long, so a full review is going to take some time, and require a bunch of baking!). Dave and I would also be happy to answer any questions you've got. One of the main things I've noticed about this book is a change in tone from the original Modernist Cuisine. It comes across as less "everything you know is wrong" and more "eighty bazillion other bakers have contributed to this knowledge and here's our synthesis of it." I don't think it's an exaggeration to say that Myhrvold and company are now the most experienced bread-bakers in the world. Not necessarily in terms of the number of identical loaves they've produced, but in the shear number of different recipes and techniques they've tried and the care with which they've analyzed the results. These volumes are a distillation of 100,000 years of human breadmaking experience, topped off with a dose of the Modernist ethos of taking what we know to the next level. The recipes include weight, volume, and baker's percentages, and almost all of them can be made by both a home baker and someone baking in a commercial facility. The home baker might need to compromise on shape (e.g. you can't fit a full-length baguette in most home ovens) but the book provides clear instructions for both the amateur and professional. The recipes are almost entirely concentrated in volumes 4 and 5, with very few in the other volumes (in contrast to Modernist Cuisine, where there were many recipes scattered throughout). I can't wait for the physical volumes to arrive so that I can have multiple volumes open at once, the recipes cross-reference techniques taught earlier quite frequently.
- 171 replies
-
- 11
-

-
I was cooking for a party last night at which a gluten free cake was served for dessert. I had a few bites and aside from the cake being dry and the frosting very sweet, there was that tell-tale grittiness that GF baked goods seem to have. This particular bakery uses a blend of millet, sorghum, tapioca and potato flours. I used some Bob's Red Mill GF flour to satisfy a customer request for GF shortbread and found the same grittiness - they use garbanzo bean flour, potato starch, whole grain white sorghum flour, tapioca flour and fava bean flour. Obviously some sacrifices of flavor and texture are made when trying to replicate the magic of gluten, but why can't these flour blends be softer? Can't they be milled more finely? Or is it just the way the particular starches or proteins in those other flours are felt on the tongue? It's like that chalky cold cooked rice texture, do you know what I mean? Why can't it be better? Almost every time I eat something made with substitute flours, it makes me sad and want to fix it.
-
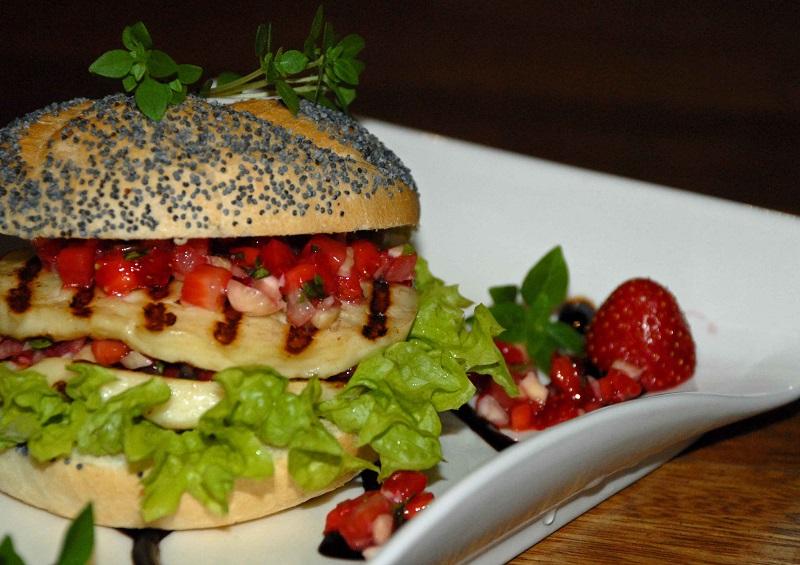
Today I would like to share with you a recipe for a slightly different sandwich. Instead of traditional vegetables, I recommend strawberry salsa, and rather than a slice of ham – a golden grilled slice of Halloumi cheese. Only one thing is missing – a fresh and fragrant bread roll. Halloumi is a Cypriot cheese made with sheep's milk or a mixture of sheep's, goat's and cow's milk. It is semihard and so flexible that it is excellent for frying and barbecuing, and it is great fresh too. Ingredients (for two people) 2 fresh rolls of your choice 2 big lettuce leaves 4 slices of Halloumi cheese 2 teaspoons of butter salsa: 8 strawberries half a chili pepper 2 tablespoons of minced peppermint leaves ¼ a red onion 2 tablespoons of chopped almond without the skin 1 teaspoon of honey 2 tablespoons of lemon juice 2 tablespoons of balsamic sauce Start by preparing the salsa. Wash the strawberries, remove the shanks and cube them. Dice the onion and chili pepper. Mix the strawberries with the onion, chili pepper, peppermint and almonds. Spice it up with honey and lemon juice. Leave in the fridge for half an hour. Grill the slices of Halloumi cheese until they are golden. Cut the fresh rolls in half and spread them with butter. Put a lettuce leaf on each half of roll, then a slice of the Halloumi cheese, one tablespoon of salsa, another slice of cheese and two tablespoons of salsa. Spice it up with balsamic sauce. Cover with the other half of the roll. Prepare the second sandwich in the same way. Serve at once while the cheese is still hot. Enjoy your meal!

-
Not sure if the subject line really reflects the situation and my question. Sweetie made a couple of loaves of soda bread the other day, and cut the top of the loaf in order to make a pattern something like THIS. However, the pattern or cut mark didn't show on the finished loaf. I don't know much more other than she said she made the cut "pretty deep." What might be the cause of the cut mark not showing on the finished loaf? Thanks!
-
How to Make Rye Sourdough Bread I don't know what it is about bread, but it is my favorite thing to make and eat. A freshly baked loaf of bread solves a world of problems. I was lucky enough to get to be one of the main bakers when I worked at the Herbfarm. We baked Epi, Baguettes, Rolls, Pretzels and so much more. Rye Sourdough Wood Oven Baked Bread My fondest memory when I worked there was our field trip to the Bread Lab(wait something this cool came out of WSU, of course!) here in Washington. They grow thousands of varieties of wheat and have some pretty cool equipment to test gluten levels, protein, genetics and so on. I nerded out so hard. What came out of that trip was this bread. Now I can't recall the exact flour we got from them, but using a basic bread and rye will do the trick. We used to get a special flour for our 100 mile menu. This was where we were limited to only serving food from 100 miles away. So finding a wheat farm that made actual hulled wheat in 100 miles was a miracle. The year before...the thing we made, was closer to hard tack. Now if you don't have a starter, I recommend starting one! It is a great investment! Rye Sourdough 1000 g flour (60% Bread Flour, 40% Rye) 25 g salt 75 g of honey/molasses 200 g of Rye starter 650 g of water, cold Equipment Baker Scale (or other gram scale) Bench Cutter Bread Razor (you could also use one of those straight razors) Start by taking the cold water, yeast and Honey and mix together and let sit for 10-15 minutes I know, some of you just freaked out, cold water? Won't that kill the yeast. Nope, the yeast just needs to re hydrate. I prefer using cold water to slow the yeast down. That way the lactobacillus in the starter has a good amount of time to start making lactic acid, and really get to flavor town! While that is sitting, I mix the flour and the salt together(How many times I have forgotten to salt the bread). Now mix the two products with a kneading hook for 3-5 minutes, only until thoroughly mixed but not yet at the window pane stage of kneading. Instead, place into a bowl and set a timer for one hour. Then when that hour is up, push the dough down and fold all the corners in Repeat this step 2-3 more times, pending on the outside temperature. If you happen to have those cool bowls to shape round loafs! Awesome, use them. I would break the boules into 3 balls of about 333 grams If not then just put the dough in the fridge and do the steps below the next day. Once you have bouled the bread, can put it into the fridge and let it sit over night Again, this lets the bacteria, really get to work(misconception is the yeast adds the sour flavor, nope, think yogurt!) Now on the next day, heat up whatever form of oven you plan to use. We used a brick oven but if you just have a normal oven, that is fine. Crank it to 450 degrees Fahrenheit. If you have not bouled your bread yet, go back and watch the video and break the dough down into three balls of abut 333 grams. Then place the balls on a lightly greased sheet pan. Let sit for about 45 minutes to 1 hour. If you have used the fancy bowls then turn the the bread out on a lightly greased sheet pan, without the bowl and let temper for 15-30 minutes. If your oven is steam injected, build up a good blast of steam. If not, throw in a few ice cubes and close the door or put a bath of hot water inside. The steam is what creates the sexy crust! Let it build up for a few minutes! Right before you put the bread into the oven use a bread razor to slice the top of the bread. Place the dough balls into the oven and douse with another blast of steam or ice and close the oven. Let them bake for 13 minutes at 450 degrees. Then turn the loaves and bake for another 10 minutes. Remove when the crust is as dark as you want and the internal temperature exceeds 190 degrees Fahrenheit. Now pull out and make sure to let cool off of the sheet pan with room to breath underneath. You don't want your crust steaming! Now here is the hardest part, wait at least 20 minutes before getting into the bread. Also, cutting into bread to early really seems to come out poorly. I would rip the bread until 1-2 hours has passed. Now serve it with your favorite butter, goat butter or whipped duck fat!
-
Hi, I have just discovered and registered on this site. My main cooking and baking concern is that I have been diagnosed with Celiac Disease and haven't been able to eat gluten. BUT I have discovered an exception. When I have visited Continental Europe such as Spain and Russia, I have been able to eat their bread and have had no negative repercussions. Then when I try eating bread in Great Britain and North America I have become sick. My research on the Web has not provided any explanations although I believe the EU has banned GMO grains. I was recently gifted panetonne from a Toronto restaurant called Sud Forno that uses Italian flour and I was able to safely eat it. Another bakery called Forno Cultura advertises that it uses European flour. So I am going to approach them to see if I can buy their flour in bulk. I will let you know how it goes.
-
Host's note: this is part of a large topic that has been split into smaller segments to reduce the load on our servers. The previous segment may be found here: The Bread Topic (2015-2016). I've been trying to settle on a formula for a nice, basic, no frills sourdough which my friends (with zero interest in whole grains) can enjoy, and I think I've found my winner in a country white (10% w/g spelt) with 80% hydration. Mild, mild sourness despite the 12 hour cold proof. I want to try holding back some of the water to see if I can achieve better loft, but otherwise, I am happy with the formula.

-
I want to leave my sourdough (itself, not baked loaves of sourdough bread) for a while (going abroad) but I do not want it to die, can I leave it in the freezer? do you have other ideas?
-
San Diego has a small number of artisanal bread bakeries. Bread & Cie has been my favorite for years, and their breads are now available in many supermarkets, which is very convenient. But it's nice to have some variety. So I was excited to spot a new bakery this weekend in Linda Vista. It's called Pacific Time and it is also a sandwich place with a small market with things like small-batch preserves, local beers, a cheese counter, charcuterie platters, and wine. It's located within a recently renovated strip mall that also hosts Brew Mart & Ballast Point. The bread I bought was a French-type rustic boule, dark, a bit reminiscent of Poilane but less dense. The crust could have been a little more crispy (it felt like the bread had sat around a little bit and softened in the paper bag), but the flavor was wonderful. Here is the bread:
-
The folks behind Modernist Cuisine have announced a projected publication date of March 2017 for their new five-volume set on bread (previously discussed here). Start saving up now!
-
Hello all, In attempt to make it easier to work high hydration dough, I had a thought about using gelatin and water in order to make jello cubes, and incorporate them into the kneaded dough. The idea is that unlike extra water, the jello will not have much adverse effect on the dough texture, stickiness and ease of handling. However, when baked, the gelatin will dissolve and allow the water to boil into steam and effectively increase the hydration, resulting in more aeration, raise and moistness. I tried it once, reducing apx. 7% water from the dough and folding in 7% gel after kneading. However, I mistakenly made too weak of a gel, and it just melted into the dough. Shaping wasn't easier then usual (sticky as always ). The bread did bake as usual, with no ill effects. I think I should try it again, replacing 15% of the water with much stronger jello. I'd like too hear your opinion, am I wasting my time or does it make sense? I thought it might also theoretically work in laminated dough, possibly replacing some of the butter?
-
Ever seen this cooking technique ? A reference with pictures in italian language. Could'nt find any in english. http://cheprofumino.blogspot.it/2009/02/la-nostra-pizzasenza-forno.html
-
The team behind Modernist Cuisine: The Art and Science of Cooking is hard at work on their next multivolume set, which is completely dedicated to bread. For the new book, we’d like to honor some of the greatest regional and hyper-regional breads from around the globe and we would love to hear from the eGullet community to expand our search. In your opinion, what are the breads that your city or region is known for? What are the loaves that you can’t find anywhere else? Example: Stretch bread, Syracuse, NY You can read more about the new book here, and here for more information about who we are and what we do.
-
The team behind Modernist Cuisine: The Art and Science of Cooking is hard at work on their next multivolume set, which is completely dedicated to bread. We’d like to honor some of the greatest bakers and bakeries from around the globe in our new book, and we would love to hear from the eGullet community to expand our search. What are your favorite bakeries for bread? Does the bakery have an iconic bread that they’re known for? Do they use any uncommon ingredients or special techniques to make their bread? Please provide the address of the bakery, name of head baker, and a photo of the bread, if feasible. For example: Country Bread from Tartine in San Francisco, CA – Chad Robertson, baker You can read more about the new book here, and here for more information about who we are and what we do.
-
I live in India and we dont generally get bread flour out here. We have basically AP flour, about 11% protein content. I've tried out recipes i've found on various websites and books, and i've found that lack of gluten tends to become a problem. I have gluten powder available and was wondering if there is a general proportion of gluten powder to add to AP flour to use for breads. It'd be great if someone could help me out, especially if the proportion is in terms of weight rather than volume. Thanks
-
Ive been reading numerous articles, blogs, etc where people mention that they use a Romertopf for baking breads, including the no knead bread. I am still a bit confused because there are mixed commentary on whether to soak or not to soak prior to popping the baker into a cold oven. Can anyone who owns a Romertopf and uses it for no knead share your method for no knead and whether you soak it or just preheat? I would like to make an enlongated version of this bread and have made an ok circular bread with my chamba pot. The Romertopf that I own is unglazed and its the medium size that can hold a whole chicken. (111) i think.
-
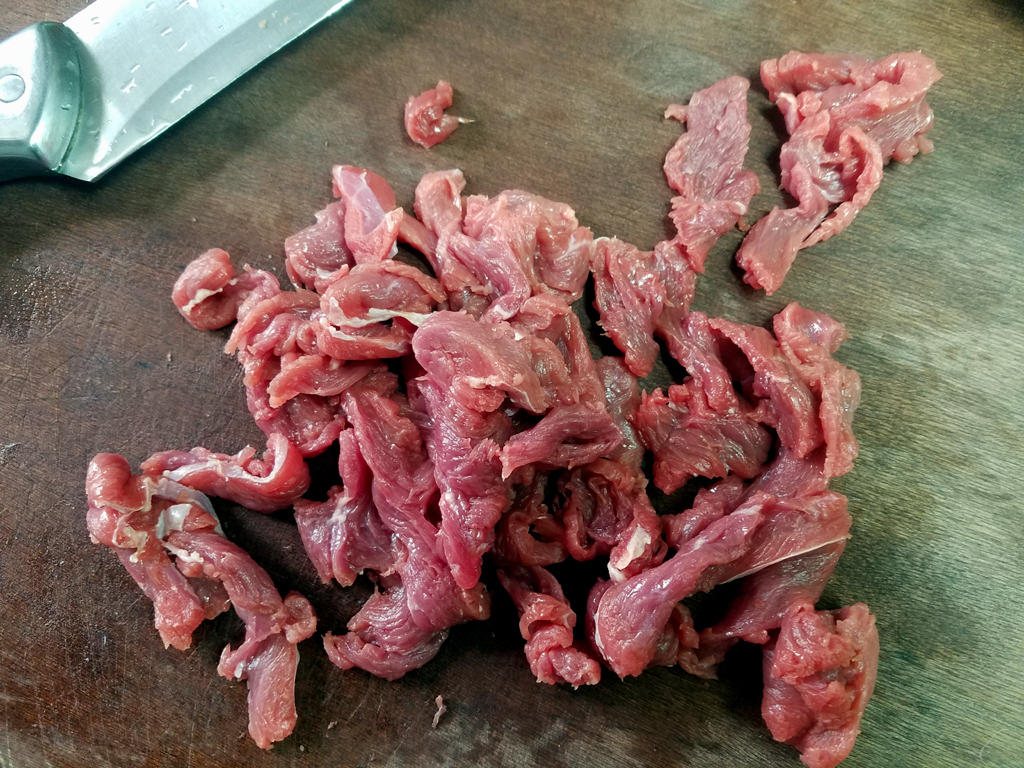
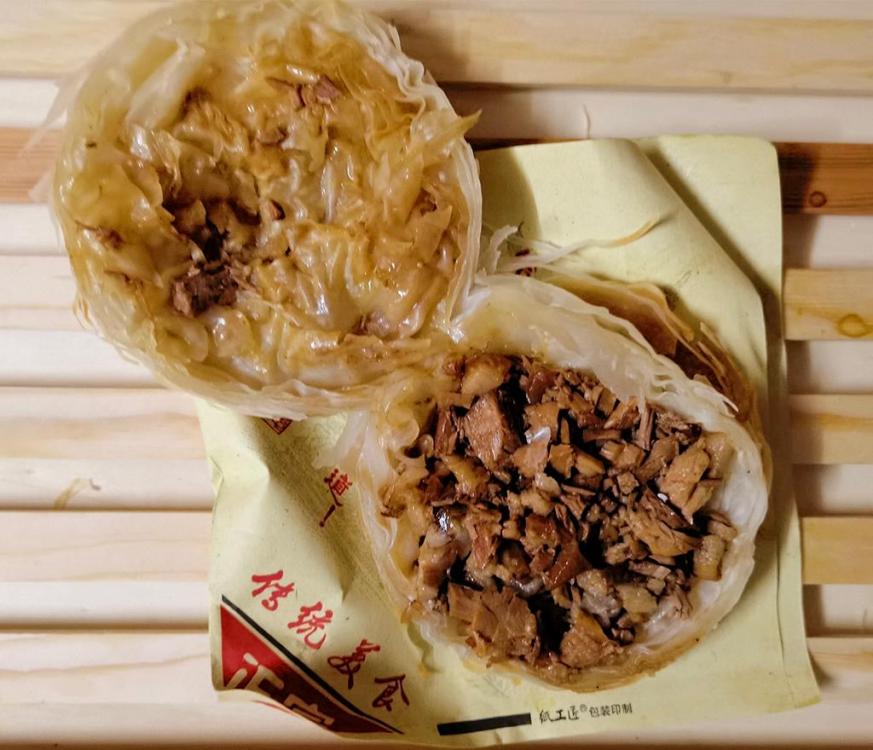
These have been mentioned a couple of times recently on different threads and I felt they deserved one of their own. After all, they did keep me alive when I lived in Xi'an. Rou jia mo (ròu jiá mò; literally "Meat Sandwich") are Chinese sandwiches which originated in Shaanxi Province, but can be found all over China. Away from their point of origin, they tend to be made with long stewed pork belly. However in Xi'an (capital of Shaanxi), there is a large Muslim population so the meat of choice is more usually beef. In nearby Gansu Province, lamb or mutton is more likely. Stewed Belly Pork Rou Jia Mo When I was living in Xi'an in 1996-1997, I lived on these. I was living on campus in North-West University (西北大学) and right outside the school gate was a street lined with cheap food joints, most of which would serve you one. I had one favourite place which I still head to when I visit. First thing I do when I get off the train. What I like to eat is Cumin Beef Rou Jia Mo (孜然牛肉夹馍 zī rán niú ròu jiá mò). The beef is stir fried or grilled/BBQd with cumin and mild green peppers. It is also given a bit of a kick with red chill flakes. Here is a recipe wrested from the owner of my Xi'an favourite. So simple, yet so delicious. Lean Beef Fairly lean beef is cut into slivers Sliced Beef Chopped garlic I use this single clove garlic from Sichuan, but regular garlic does just fine. The beef and garlic are mixed in a bowl and generously sprinkled with ground cumin. This is then moistened with a little light soy sauce and Shaoxing wine. You don't want to flood it. Set aside for as long as you can. Mild Green Chilli Pepper Take one or two mild green peppers and crush with the back of a knife, then slice roughly. You could de-seed if you prefer. I don't bother. Chopped Green Pepper Fire up the wok, add oil (I use rice bran oil, but any vegetable oil except olive oil would be fine) and stir fry the meat mixture until the meat is just done. Frying Tonight Then add the green peppers and fry until they are as you prefer them. I tend to like them still with a bit of crunch, so slightly under-cook them In with the peppers You will, of course, have prepared the bread. The sandwiches are made with a type of flat bread known as 白吉饼 (bái jí bǐng; literally "white lucky cake-shape"). The ones here are store bought but I often make them. Recipe below. Bai Ji Bing Take one and split it. Test the seasoning of the filling, adding salt if necessary. It may not need it because of the soy sauce. Nearly there Cover to make a sandwich and enjoy. You will see that I have used a bunch of kitchen paper to hold the sandwich and to soak up any escaping juices. But it should be fairly dry. The final product. Note: I usually cook the meat and pepper in batches. Enough for one sandwich per person at a time. If we need another (and we usually do) I start the next batch. Bread Recipe 350g plain flour 140ml water 1/2 teaspoon instant yeast Mix the yeast with the flour and stir in the water. Continue stirring until a dough forms. Knead until smooth. Cover with a damp towel or plastic wrap and leave to rise by about one third. (maybe 30-40 minutes). Knead again to remove any air then roll the dough into a log shape around 5cm in diameter, then cut into six portions. Press these into a circle shape using a rolling pin. You want to end up with 1.5cm thick buns. Preheat oven to 190C/370F. Dry fry the buns in a skillet until they take on some colour about a minute or less on each side, then finish in the oven for ten minutes. Allow to cool before using.


-
 Requesting a little assistance. For several years, I’ve been baking bread by a variation of the covered pot method, where I start with the baking vessel at room temp rather than pre-heated. Instead, I do the final rise in the pot and, when ready, put that (covered) into a hot oven. I do it this way for several reasons. First, I live in a small studio apartment without a proper kitchen, so I need a method that will work in a countertop oven. Second, I find transferring proofed dough to a heated pot awkward and nerve wracking (fear of burns). Third, starting with a room temp baking vessel opens up lots of options as regards shapes and sizes, e.g., using a 1/3 steam table pan to make batards. Fourth, although not perfect, the method gives me pretty good results. The reason for this thread is that I’m in the process of updating my personal cookbook (not published, just something I distribute to family and friends) and would like to include this method in the bread chapter. My concern is that, while I assume it will work in a standard oven, I’ve never had a chance to test it; also, it occurs to me the timing might be different. I’d appreciate it if a couple folks (or three) would give it a test run and let me know. To be clear, I’m not trying to convert anyone to this approach. It’s a cheater method and I assume anyone willing to test it probably has a non-cheater one which works better for them. I’m just trying to confirm whether it works in a normal oven. Anyhoo, here are the details. Prepare whatever bread dough you generally use. For the sake of comparing results, it would be helpful if you work up a dough based on 1 lb (450 g) flour, thus producing a dough something like 1 lb 11 oz (760 g) raw weight and a finished loaf of about 1-1/2 lb (675 g). Prepare a baking vessel by oiling lightly, then dusting with rice flour (finely-milled semolina or cornmeal also may be used). My preferred baking vessel is a 3 qt All Clad cassoulet, but any similarly shaped saucier or “chef’s pan” would be just as good. Indeed almost any oven proof pot with a lid will work; it’s mostly for the shape of the baked boule that I prefer the rounded pot. After the first rise, shape dough into a ball, roll in bread or all purpose flour, place in pot, cover and give a second rise. Preheat oven to 450ºF/232ºC. Spritz dough thoroughly with water, slash with a razor or knife, cover and place in oven. After half an hour, reduce heat to 375ºF/191ºC, uncover pot and bake another half hour. Reduce oven to 325ºF/163ºC; remove bread from pot, transfer to a shallow baking pan with a rack and bake a final half hour. Let cool on a wire rack. Note: This is how I’ve written the instructions for the book, which assumes a conventional oven. For a countertop oven, I have to make several adjustments to shield the crust from overcooking. Whether I have correctly backed out those adjustments is one of the things I’m trying to confirm. Feel free, of course, to play with variations on this protocol to your heart’s content, but please do at least one trial as written, so we have a common basis of comparison. Many thanks to any who have the time and interest to give this a whirl.