RandomCrap
-
Posts
11 -
Joined
-
Last visited
-
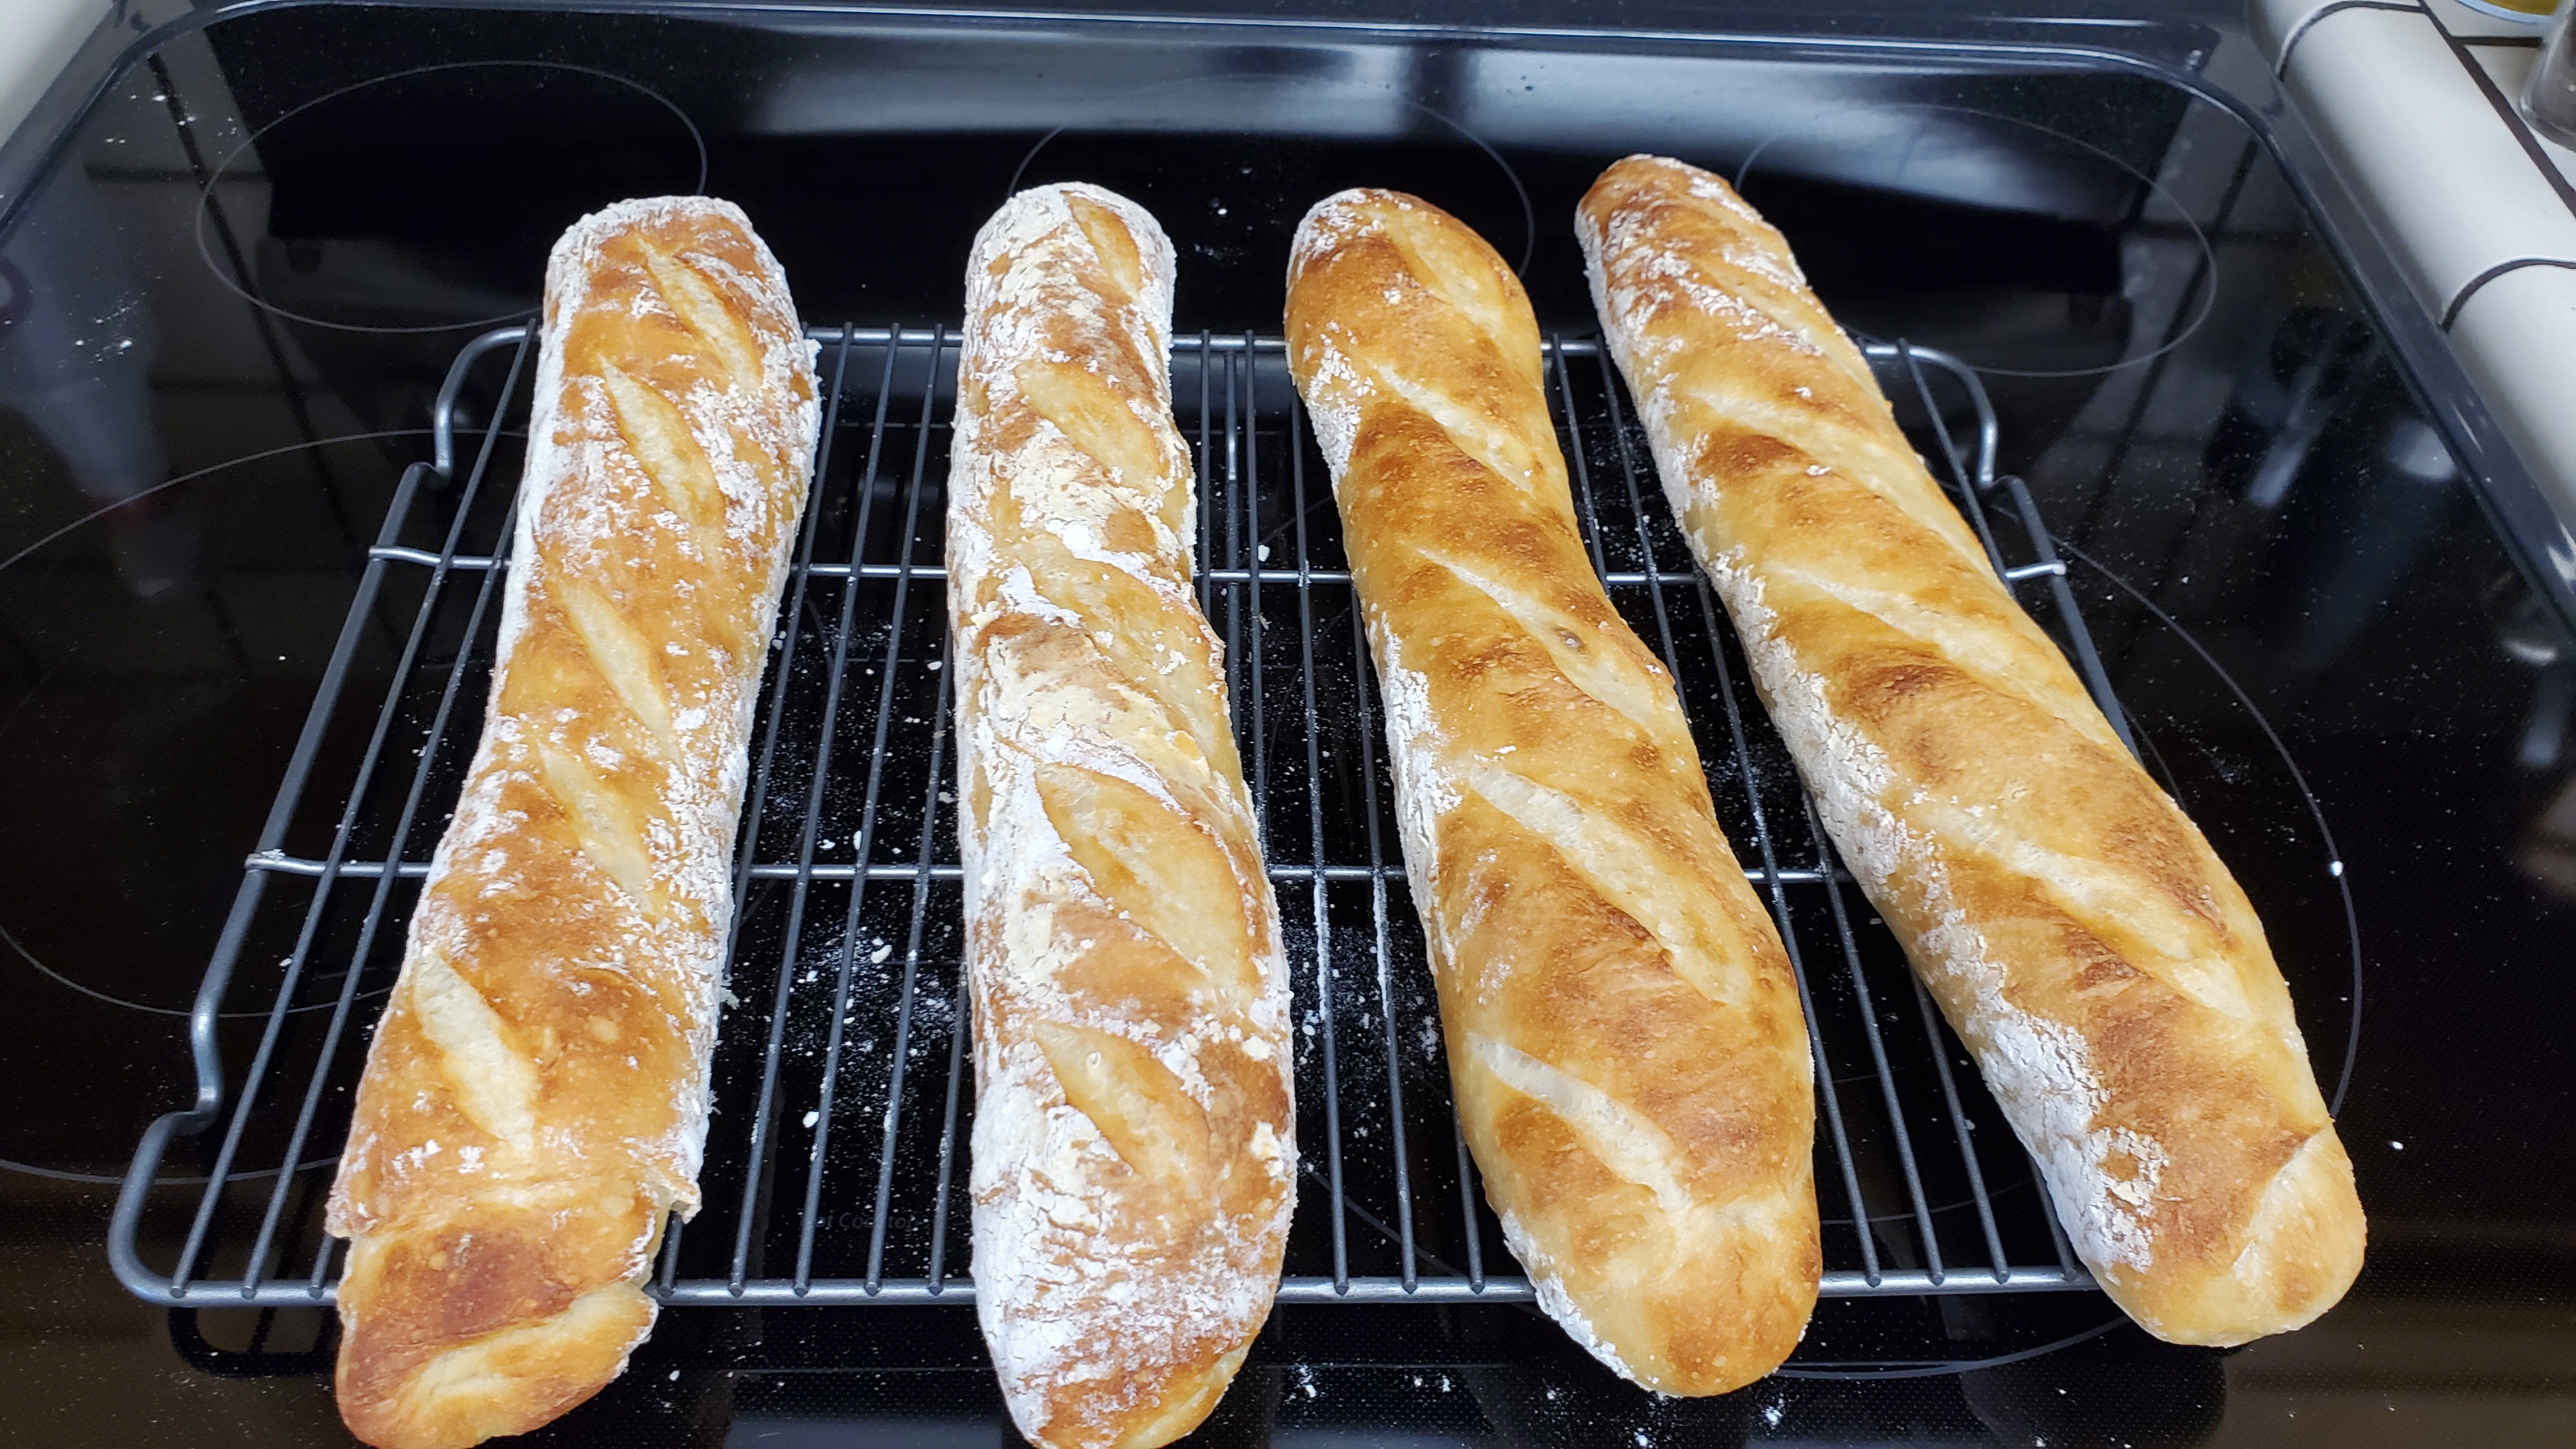
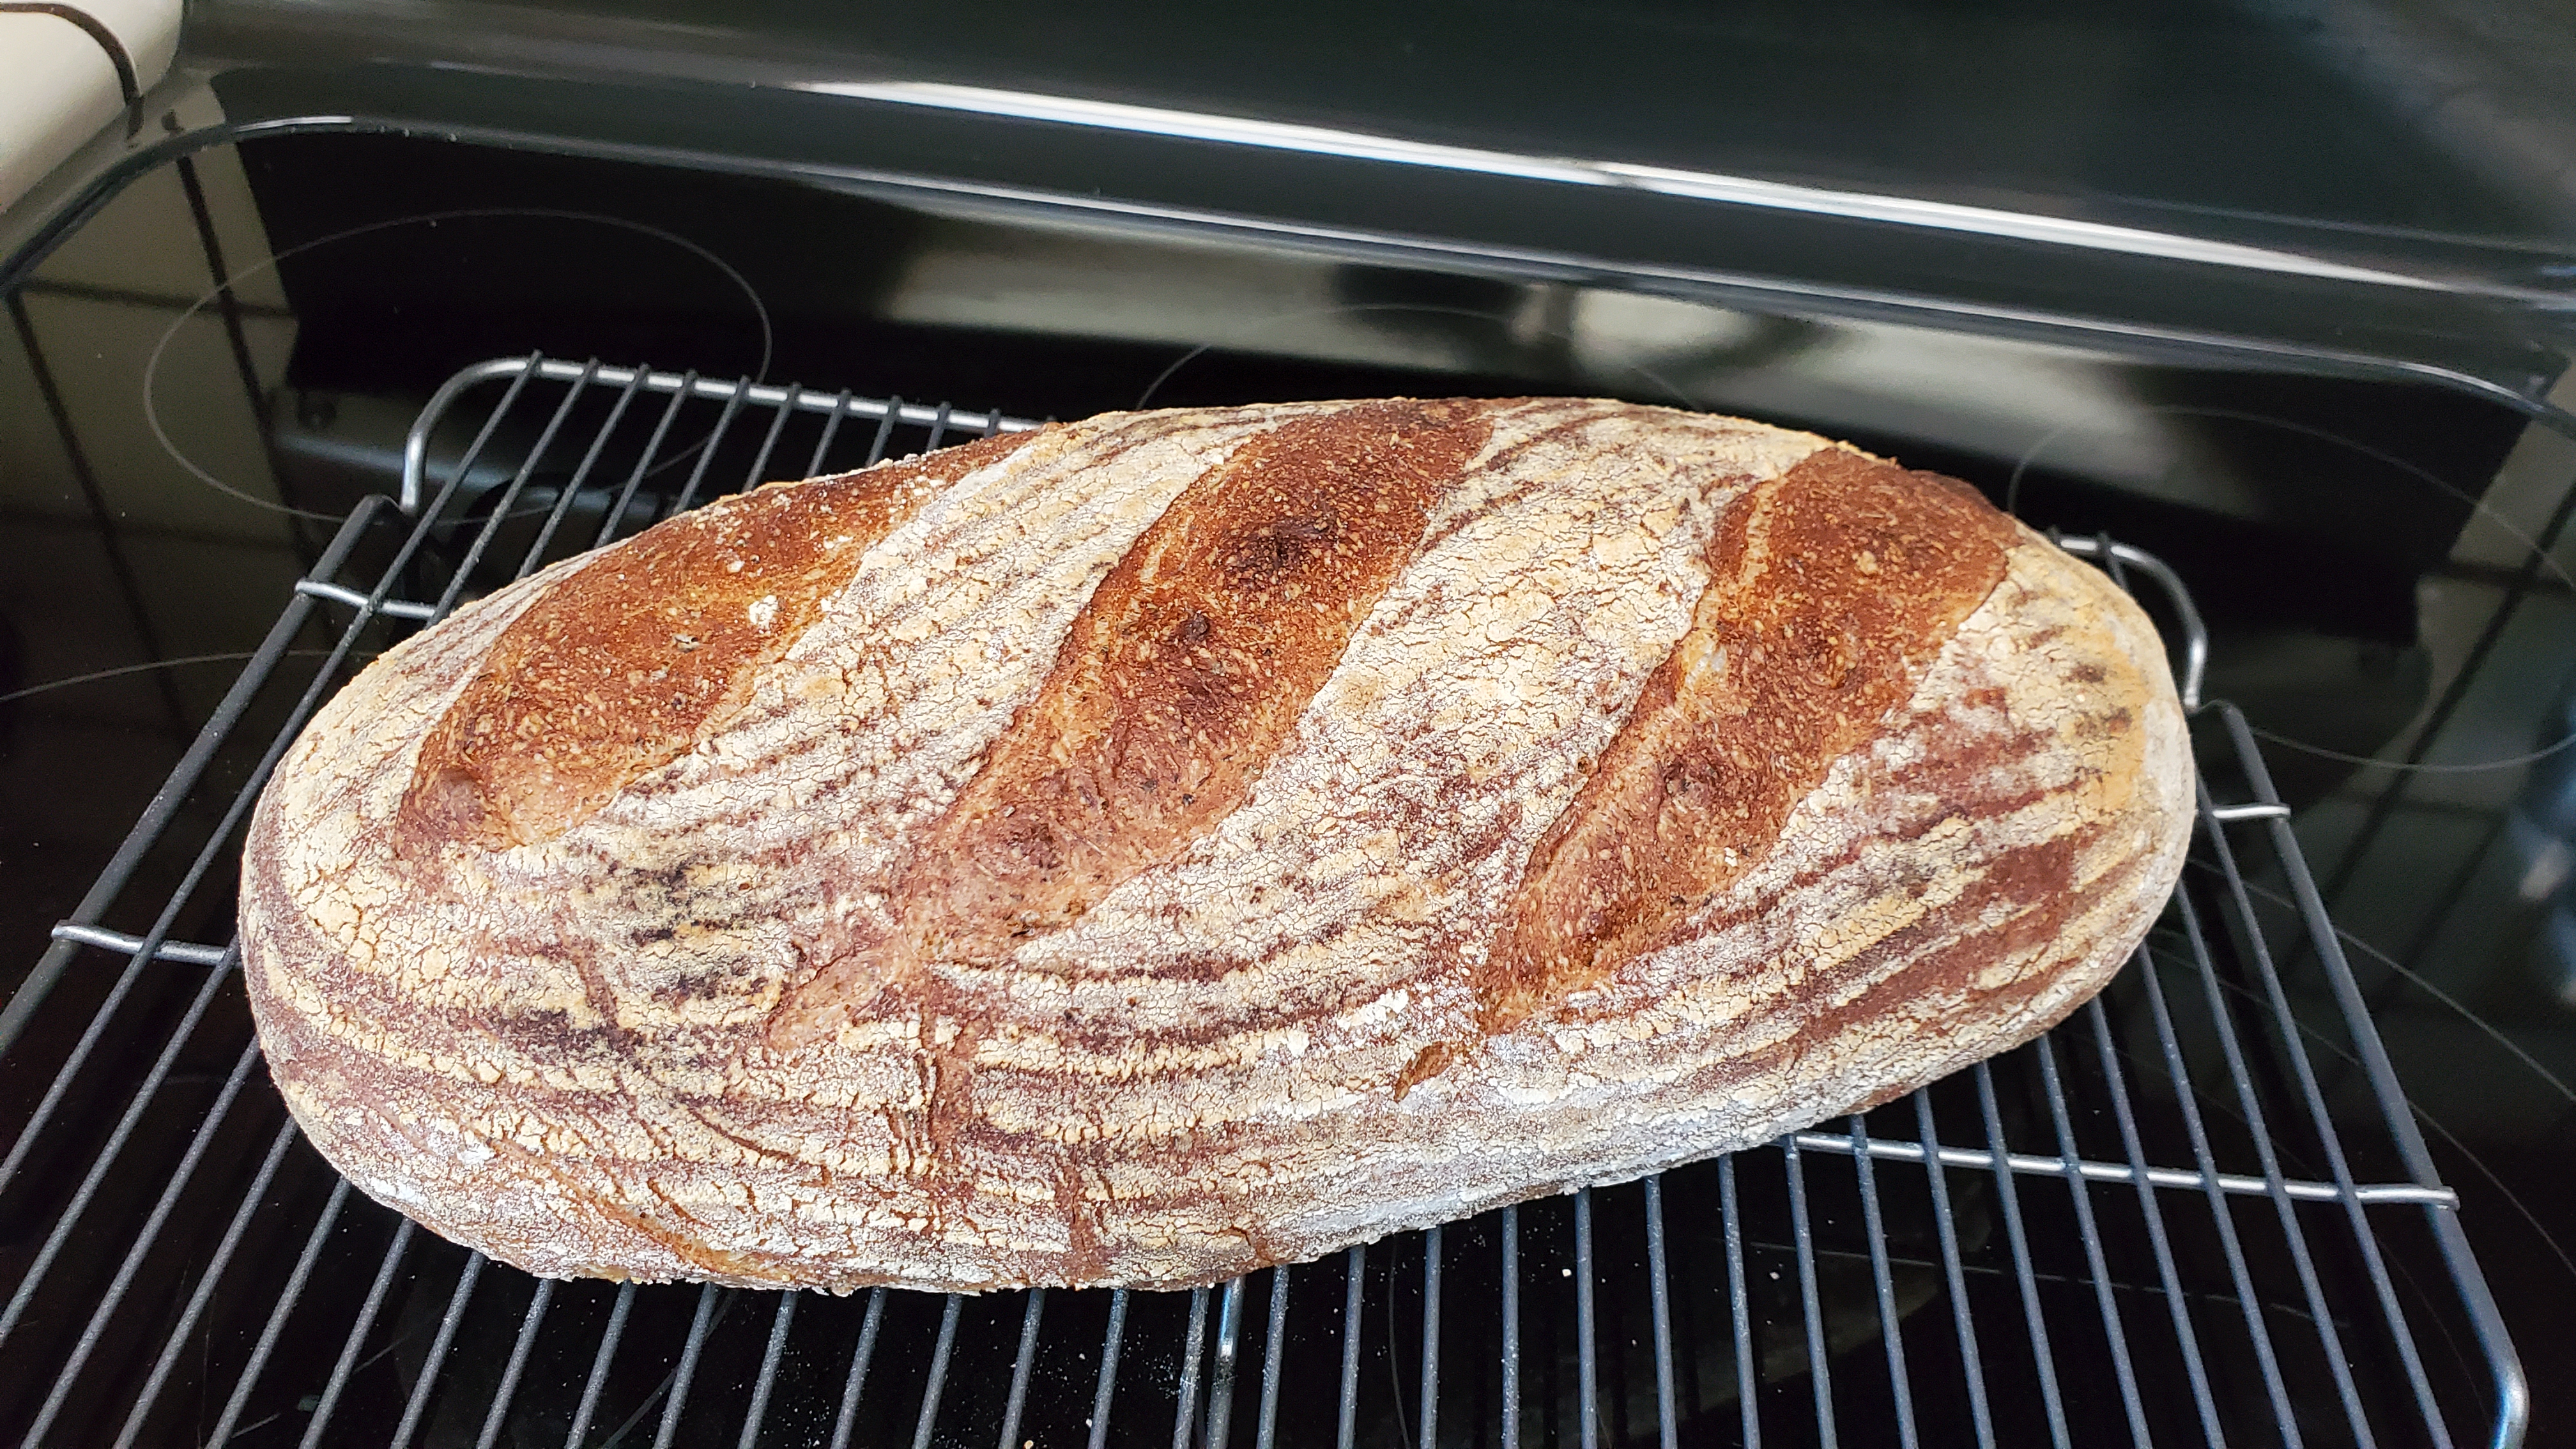
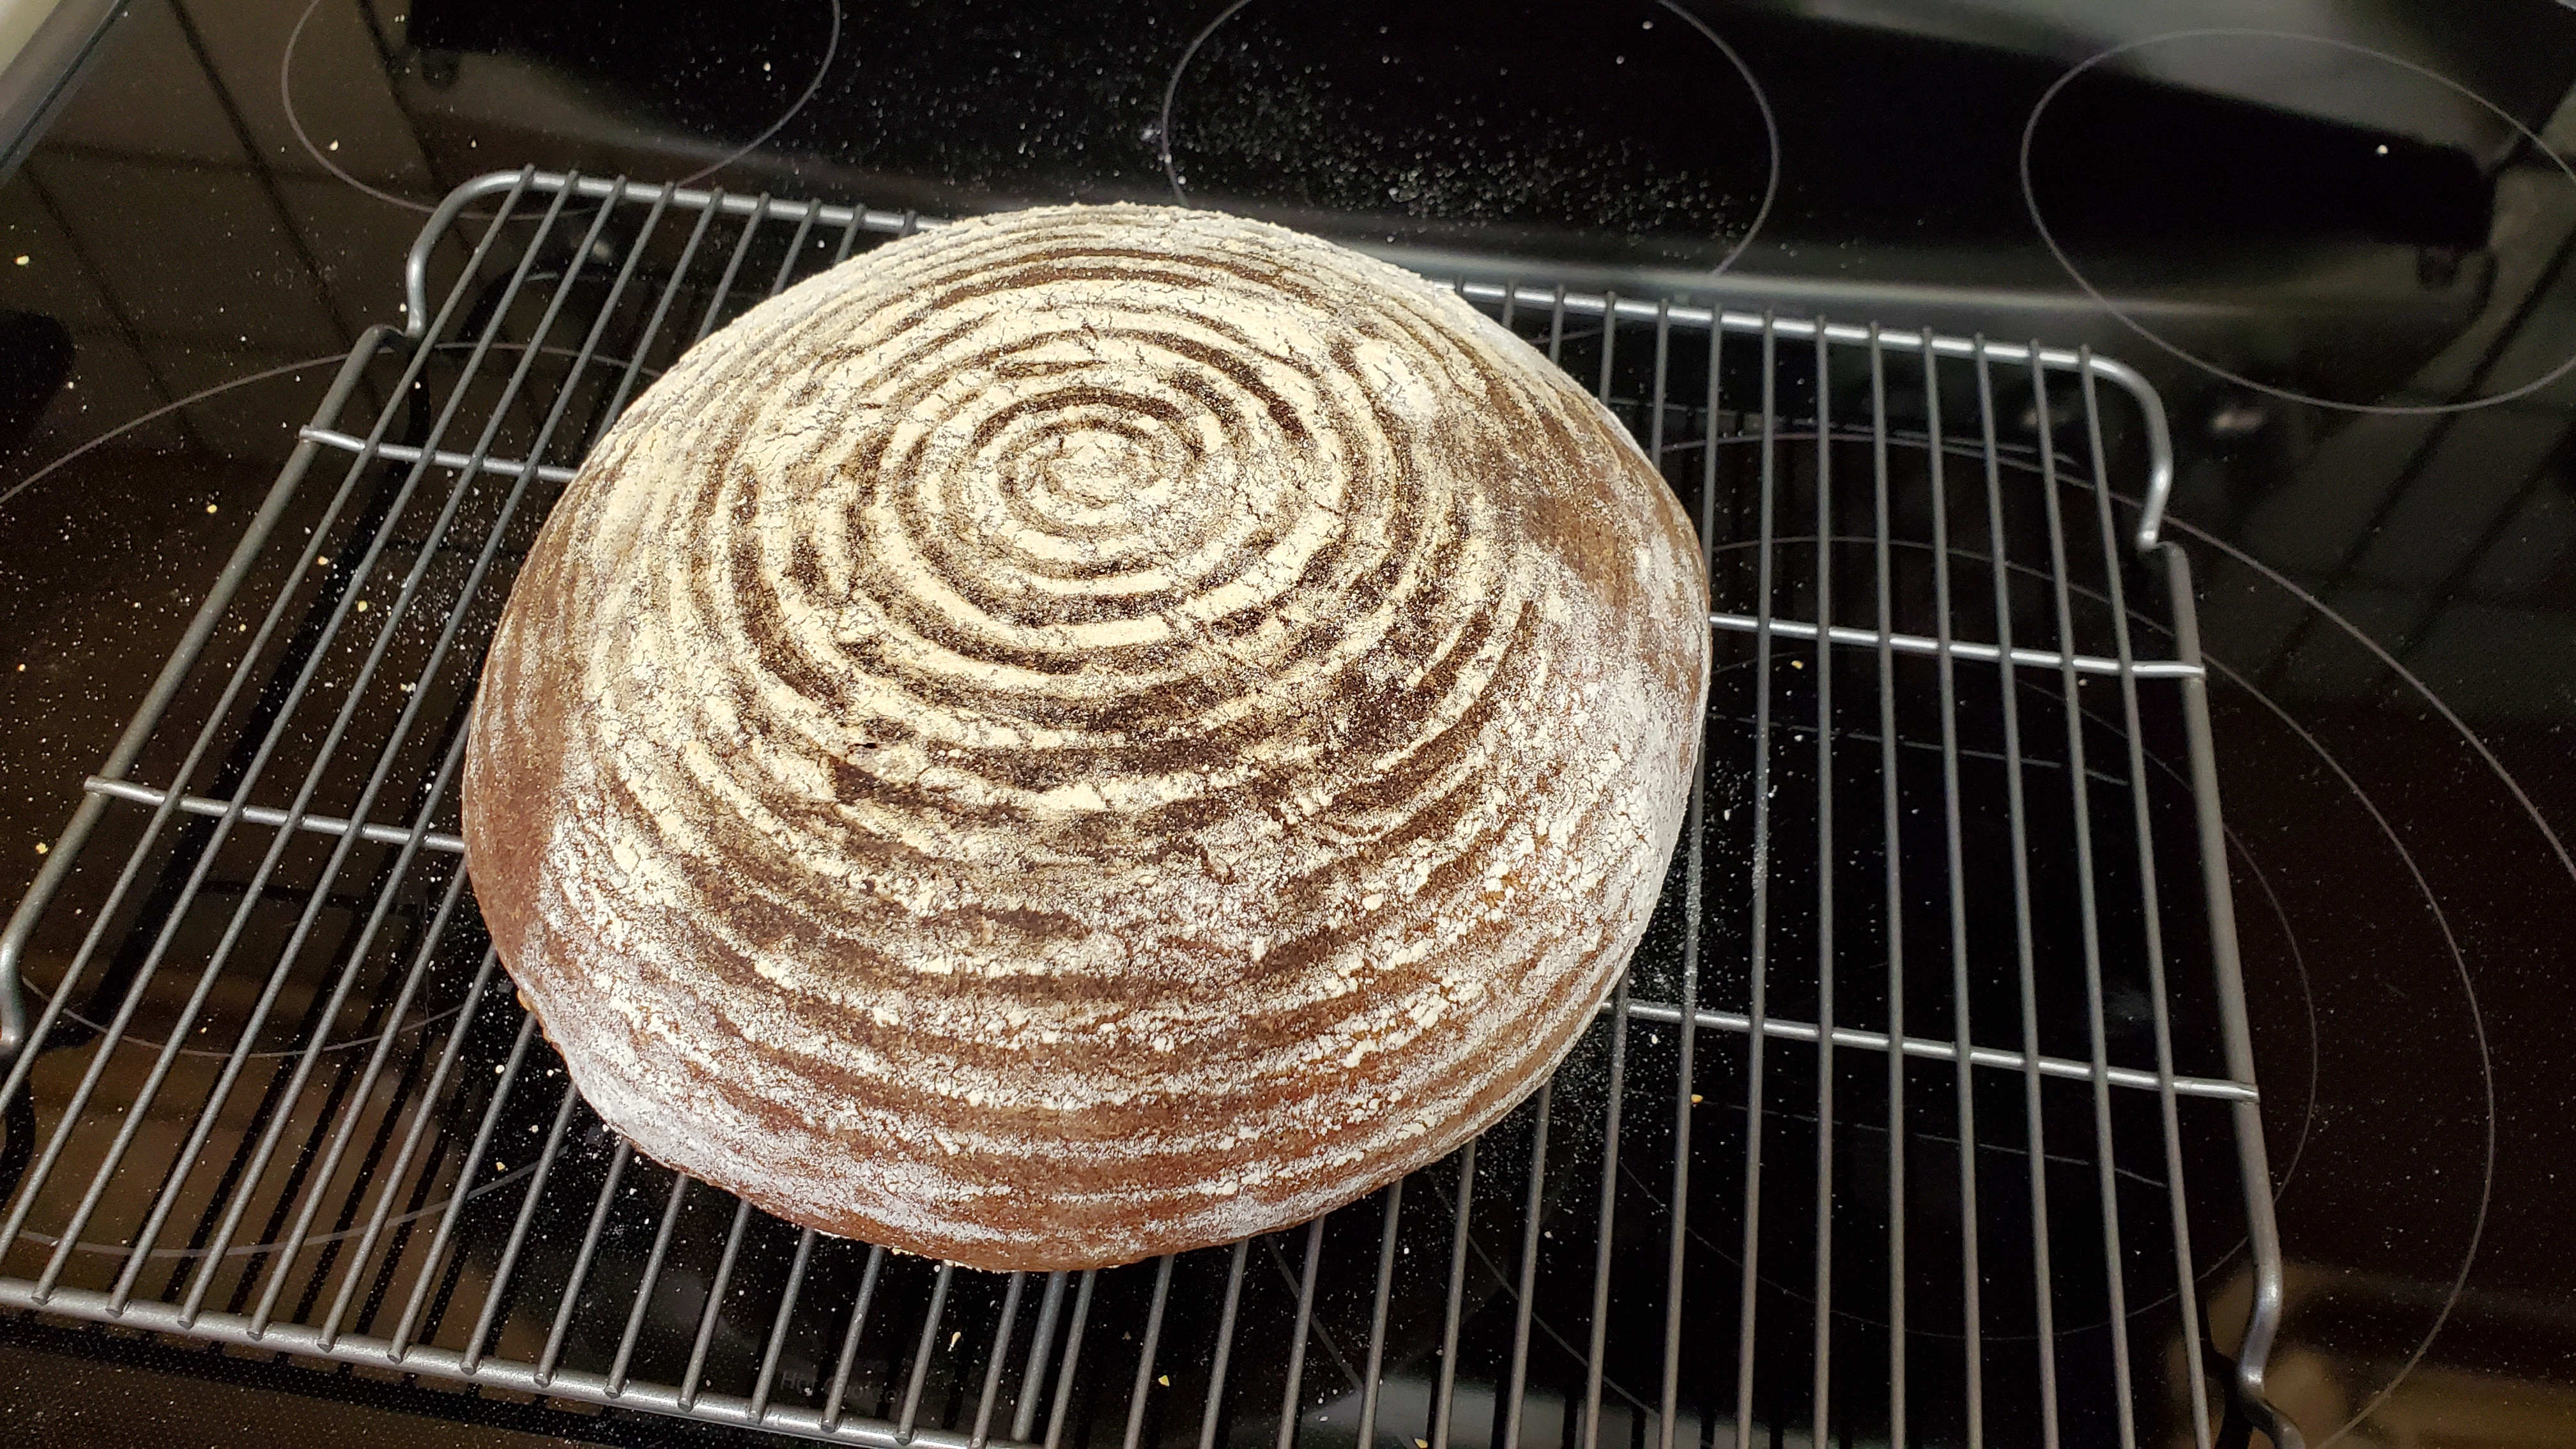
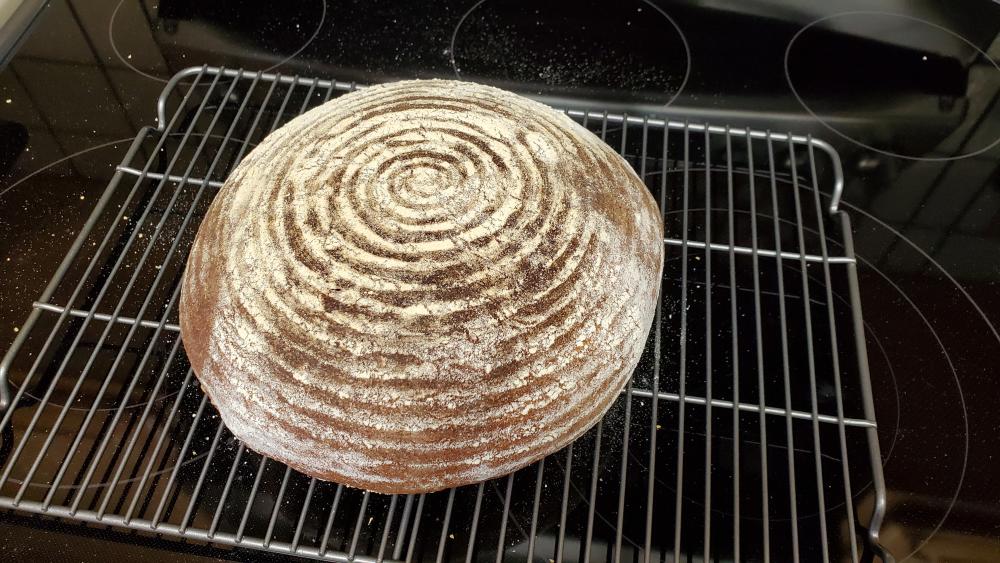
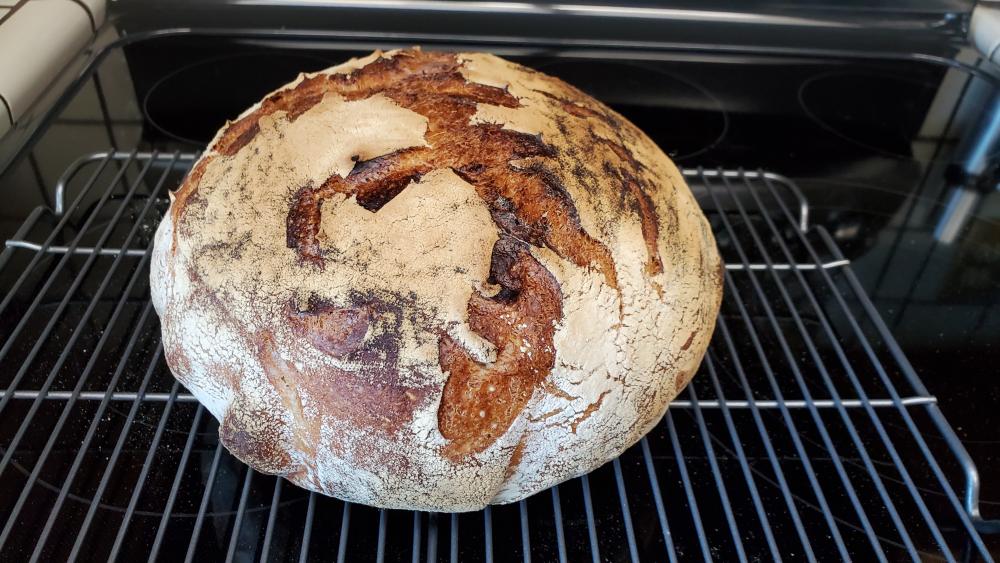
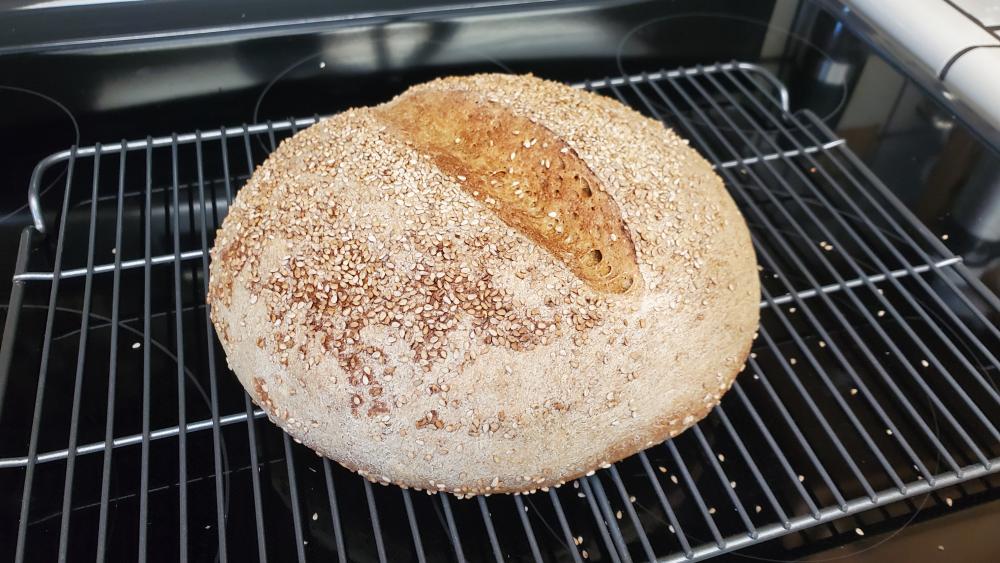
Back on topic... I am having trouble transitioning from baking with commercial flour (usually KA bread flour) to milling my own flour. The taste is incomparably better, but the loaves themselves are still hit or miss. I am using the whole grain - no sifting to remove bran. I mill it 3 times to get it as fine as the commercial flour, then use it immediately. I've read that the flour makes better loaves after a day or two, but the nutritional content is better when fresh. I have had to increase the water content by approximately 15%. Here are some examples. 1. Baguettes made with sifted flour. Good, but I wish to master using the whole grain. 2. Whole grain Italian loaf. Again, tasted great but did not rise as desired. I did get the moisture right here, which helped. 3, 4. A few different recipes. The first used a poolish and the final dough ended up too dry. For the second one I made a biga and a soaker, letting each work for 24 hours. This approach shows promise. I did sift a bit of the bran out of the second one. Both of these were baked in a Dutch oven, the rest on a baking steel. 5. A sandwich loaf. I added extra gluten to this; it appears to help but I'd like to avoid that if I can. This loaf also has some oil added. 6. A boule made with 100% biga. Really difficult to get the dough mixed properly, and I find that a wet poolish is easier for me to work with. I made enough for 2 loaves, and refrigerated half of the dough for a few days. I probably should have baked it a bit darker. 7. Yesterday's bake - the other half of the dough from the previous session. Also a little light, IMHO. Both of these loaves had little to no oven spring. That's my main problem. The crumb is always very even and tastes great, but the loaf is quite dense. I find that my best attempts typically have a poolish for flavor, and I soak the rest of the flour for a day to soften the bran and hydrate things. I like a high-hydration dough, and use stretch-and-fold to develop the gluten. My mixer is a KitchenAide wannabe - a Cuisinart mixer, and it simply does not do well with the dough hook. The hook is much smaller than a KA hook, and does not develop gluten. I have given up on using it. I use a dough whisk to mix things up initially, then hand manipulation, stretch-and-fold or similar techniques. I'd like to use a leaven, but I gave up on feeding one a year ago or so. I am only baking for two, and a daily feeding for a once-a-week bake wasted a lot of flour. I'd like to get back into it eventually, as I love the flavor and the longer shelf life. Once I figure out how to get a consistent rise, I'll probably attack that problem once again. Can anyone with familiarity with fresh-ground flour give me some tips? I have not found much on it on this forum, and every blog post or article I find glosses over the real differences and makes it seem like everything is just the same. In theory, theory and practice are the same. In practice, they're different.


-
I just made some this morning. I've been getting into savory popovers - I smoke cheese, then grate it and put a dollop on the batter before baking. Great Sunday morning...
-
I make popovers almost every weekend, and love them because the ratio of goodness to work is pleasantly high. I cut the recipe down to what is supposed to make 4, although in my pan it makes 5. Thus I get 3 and my wife gets the 2 she wants. One bowl to wash and the pan; easy to make when all I've had is a coffee - what's not to like? 2 large eggs 1 cup milk 3/4 teaspoon salt 1 cup AP flour 2 Tb melted butter The original recipe: 4 large eggs 1 1/2 cups milk 3/4 teaspoon salt 1 1/2 cups all purpose flour 3 tablespoons melted butter I find that I do not need to heat the pan. Preheat the oven to 450. I put a rimmed cookie tray on the lowest shelf to catch any drips, and a non-rimmed one on the highest shelf to keep them from browning too fast. The baking shelf is set low in the oven (1 up from the drip tray). Place the eggs in a bowl and cover with straight hot water from the tap, and let them sit 10 minutes. Coat the pan with butter. I tried oil, but it was hard to get an even coat. The pan is thin enough that it does not need preheating. Whisk together the eggs, milk and salt until completely blended. Add the flour and whisk until frothy with no large lumps. stir the melted butter in quickly. Fill the cups no more than 3/4 full. I like to drop a small handful of grated cheese onto the top of the batter, either Cheddar or Gruyere. Bake for 20 minutes without opening the oven. Reduce the heat to 350 and bake for another 10-15 minutes, until golden brown. In my oven it tends towards the short end of that time.
-
Gorgeous! Looks like custard inside a crispy caramel - just what you want. I often skip the wax, simply because it's already such a process, and simply use clarified butter. Now I'm going to have to go make some more... these look so good. I've been slumming - making popovers - because they are way the heck up there in the taste/effort ratio. That is, dirt easy and really tasty. That St. Honore recipe looks interesting. I've never seen a large one like that. I've read that typically in Europe they bake them darker than in the US; that big one is absolutely carbonized.
-
I have a baking steel in my oven, so it takes a lot of preheating. I put it on 525 or 550 for an hour. After the canneles are in for 10 minutes I lower to 375. I originally used 500/375, but found with my setup that the extra heat helped. (I have 1 thick copper mold and 6 of the nonstick aluminum ones. The copper one is slightly larger and takes a bit longer to bake. If I put all 7 in at once at 500, they did not have enough heat, so I increased the temperature. I use a simple quarter-sheet pan under the molds, to save the steel from drips.
-
*Usually* the pale bottoms are caused by excessive mushrooming of the top - when the canele expands upwards, if it also expands outwards, the wider top no longer allows the pastry to slip downwards in the cup when the temperature is reduced. That leaves a gap at the bottom. An insufficiency of lubrication (butter/ beeswax) can also prevent the slipping and thus leave it hanging. In your case, I don't see evidence of mushrooming. So, either you have insufficient lubrication, or too much. Too much pools in the bottom, and so you don't get the browning. I think the main reason most people freeze the molds is to lock the lube in place. You have a tension going on - the cold mold is heating, the batter is heating and expanding, the hot air on the top of the batter is starting to harden it. It's a race - ideally, the top hardens such that the pastry cannot expand outwards, but still expands up, and the lubrication on the sides allows it to expand upwards. Then the heat fixes the shape, and when you reduce the oven temperature the pastry contracts slightly. The sides of the mold are sloped, so the pastry can drop lower in the mold as it shrinks. Again, you want enough lubrication to allow this, so that the bottom of the pastry gets in contact with the bottom of the mold. The one thing you can control once they are in the oven is the time when you reduce the temperature. Do it too early, and they collapse because they aren't rigid enough. Too late, and the pastry in stuck where it is. If you avoid mushrooming the heads, you have some leeway as to when you drop the temperature. Happy baking. PS Those first ones indeed look perfect. And I bet you ate the second batch with no problems either!
-
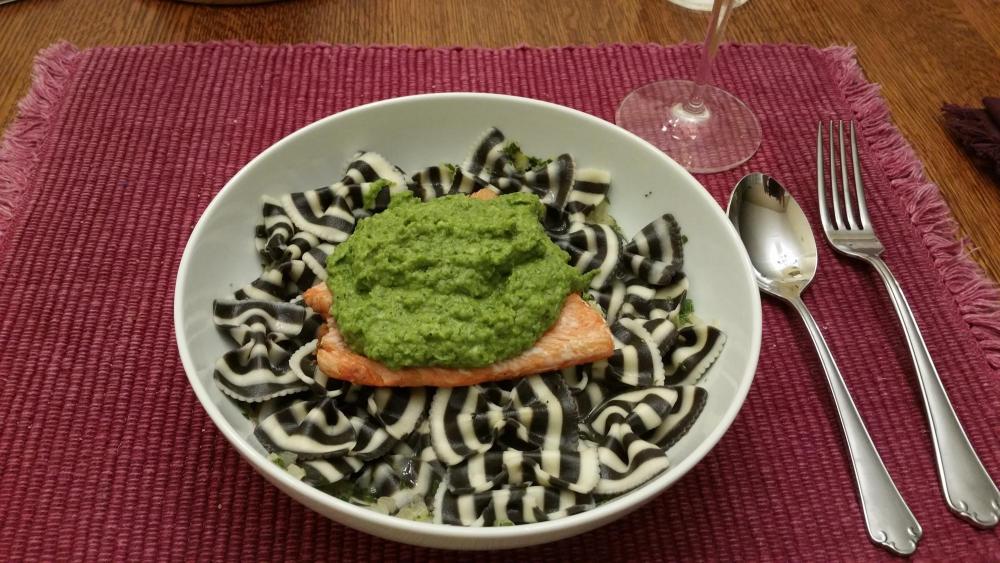
I Forget where I found this recipe, but I've played with it for a long time. This is one of those "if I had a restaurant it would be on the menu" recipes. You can make most of the parts well ahead of time, so actual cooking involves searing the salmon and assembling the dish. A pesto is a nut and an herb, with garlic and oil; this uses frozen peas as the 'nut' and mint as the herb. Ingredients Lemon Broth 1 tbsp olive oil 1 shallot, diced 1/2 lemon, zested (use the lemon you’ll be juicing - so you only need one lemon total) 1 lemon, juiced 1 cup chicken broth 1/2 tbsp chopped fresh mint leaves Pea Pesto 1 cup frozen peas. 2 tbsp fresh mint leaves 1 clove garlic (I always use about 3, but I like garlic) 1/4 cup extra-virgin olive oil 1/4 cup grated Parmesan Salt and Pepper to taste Salmon 2 tbsp olive oil 2 (6-8 ounce) salmon fillets Kosher salt Freshly ground black pepper 1/2 lb pasta of your choice. Orecchiette, rigatoni and penne would all work great. I love using the black-and-white bow ties striped with squid ink. Make the broth: Warm the olive oil in a medium saucepan over medium heat. Add the shallots and saute until tender, about 7 minutes. Add the lemon juice, zest, and broth. Bring to a simmer, and keep warm, covered, over low heat. You can also easily make this ahead of time and just refrigerate until needed, then rewarm. Make the pea pesto: Combine the peas, mint, garlic, salt, and pepper in a food processor and puree. With the machine running, add the olive oil in a steady drizzle. Note that there is no need to thaw the peas. You can do so, and you will get a smoother mix. I like the peas frozen so that the pesto is a bit chunky. Transfer the pea puree to a small bowl and stir in the Parmesan. Set aside. You will want to warm this before you put it on top of the salmon. Not hot, just warm. What I do is pop it in the microwave for about 20 seconds. When it’s all hot and summery out, I can see using this room temperature or slightly chilled. If you're going to reheat, don't put the cheese in until after, as it will get stringy. Make the salmon: Warm the olive oil in a large, heavy skillet over high heat. Season the salmon pieces with salt and pepper. Sear the salmon until a golden crust forms, about 4 to 5 minutes on the first side. This is also a good point to add your pasta to your boiling water and get that cooked. Flip the fish and continue cooking for about 4 more minutes more depending on the thickness of the fish, and how you like it cooked. Remove fish from pan and cover with foil until you are ready for it. Assemble: Add the tablespoon chopped mint to the lemon broth and divide between 2 shallow dishes. Add some pasta to each dish. Don’t pile it on like a big bowl of pasta but more like the little pasta-broth bed for the salmon that it will be. Place a salmon piece in each bowl and add a generous spoonful of pea puree. A mint leaf makes a great garnish. Serve immediately. Since I am normally cooking for two, I save half of the pesto for the next day. Don't mix any cheese in that half, as reheating will make it stringy. And as with most recipes, there really isn't any such thing as too much garlic.
-
A pizza stone will help, but not as much as a steel. It's all about stored heat. Traditional, older ovens have heated surfaces upon which the goods are baked. Typical home ovens put things on a rack. That is a different way to heat - hot air around the item. A stone absorbs heat and radiates it. A steel does the same, but can hold and radiate more. Both help. I would say that you should definitely use your stone. Just remember that it stores heat. That means, you don't start baking when your oven comes up to temperature. You let it keep running, heating your stone. When I use the steel, I preheat the oven for 45 minutes minimum, usually an hour. And yes, I wish the kitchen was cooler. <g> As far as the molds, I go a little more than 1/4" from the top. Play with the value - a hotter oven means you can fill it higher. This is because a hotter oven fixes the top more quickly, preventing the mushroom effect. Although the batter may rise above the mold edges, you want to avoid it expanding outwards, as that wide top prevents it from sliding down, and correctly browning the bottom. All this is easily said, but I'll freely admit that baking these little puppies is a bit of an art. I'm having fun, and even less-than-perfect results are pretty darn tasty!
-
I think you need a temperature both higher and lower. To explain: start at 475 for 15 minutes, then lower to 350 and finish. Depending upon your oven and the number you bake at once, you might even need to go higher. The initial high heat causes the batter to rise. It usually goes over the top of the cups. The thing is, if it stays risen above the cup long enough to harden, that broader 'mushroom' head prevents it from settling back to the bottom of the cup. This prevents the bottom from baking properly. I use a baking steel to really supply heat to the bottom of the molds. If I have 6 or fewer in the oven, 475 works, but any more than that and I use 500. Lately, I think that 500 is the preferred way to go. The batter rises straight up without mushrooming, and when I drop the temperature it lowers back into the mold. Right about that point it when the top crust gets stiff enough to keep it there. As the cannele bakes and loses moisture, it shrinks slightly. If you have a good non-stick coating, the shrinking size lets it slide down the mold, keeping the bottom in contact with the hot metal. I think that avoiding the mushroom head is key to baking the bottoms correctly. Hope this helps. The nice thing about these, even when they look bad they taste good. I have 6 of the nonstick aluminum molds and a single copper mold. The copper one is slightly larger and bakes differently. The aluminum molds take 15 minutes on high heat, then about 30-35 on the lower heat. The copper needs a good 50-60 minutes on the lower heat to bake completely.
-
Beginner's Luck. That's my story and I'm sticking to it. I just baked my first attempt at canneles today and they came out great. Of the 6, 1 had a bit of light butt and 1 was peaked on top, with a bubble inside. All were eminently edible. Made me wonder what all the fuss was about. Of course, that simply means that tomorrow when I bake up the rest of the batter they'll all come out funky, no doubt. I used the recipe from The Perfect Loaf (https://www.theperfectloaf.com/canele/). Variations: I use 2 eggs and 3 yolks, not 2.5 yolks. I added about twice the amount of rum called for. I didn't have any decent vanilla beans so I substituted extract. I have some of the nonstick aluminum molds from Sur La Table. I coated them with clarified butter, not using any wax. I probably didn't even need that. They came out very easily. I let the batter rest from Tuesday evening until Saturday morning. I think this is part of why it worked, but the main reason is the use of a baking steel. I preheated the oven and steel for 1 hour at 475. The molds went on a baking sheet on the steel. Tomorrow, I'll put a sheet of foil on the steel and skip the sheet altogether. The cannele rose about 1cm over the top of the molds, with no mushrooming, then subsided back to the level of the molds. I think that skipping the sheet will make the bottoms crisp up just a bit faster. Total time was 15 minutes at 475 and about 53 minutes at 350. My wife and I ate them all, and only afterwards did I kick myself - no photos. Does this mean it's like a big fish story? I never considered sharing the process with anyone. They looked a lot like these (following picture from the Perfect Loaf article mentioned above) except for the different finish sheen because I did not use beeswax. I have 1 of the $30 copper molds on order, and some beeswax, so I can compare with the aluminum molds. I think that having that hot steel base is the key.