trfl
-
Posts
28 -
Joined
-
Last visited
Content Type
Profiles
Forums
Store
Help Articles
Everything posted by trfl
-
Sorry, no offence was mean to clay bakers! If you are happy with it, nobody should be able to tell you otherwise. For us, what we care is that more people eat healthier and tastier bread at home whether they use LoafNest or not. More people baking at home is a win for everyone. "Industrial area" that would be an adjective that describes most of the Eindhoven thanks to the legacy of being birthplace of Philips. The city is kind of proud of it and many modern buildings are also in the similar architecture. Surely it is not everybody's cup of tea. The food scene here is alright for a city of its size although more or less stagnant. We do have a few 1, 2 Michelin stars in the city and within cycling distance [yes, Netherlands 😀].
-
@blue_dolphin Thank you for taking time to share your experience with LoafNest. We are happy to learn that it worked for you 'as advertized!'. Indeed you can try recipes with more gluten development. If you prefer to do a second raise, it may be worthwhile to get a oblong benneton of around 25cm x 15 cm (10 inch x 6 inch) inner dimension. That would work very well with LoafNest. The price is indeed higher than Kickstarter now thanks to LoafNest being a real product now and to other costs of sales. As a very small company (essentially one-person), we are also yet to achieve economies of scale. But, we are getting there slowly, thanks to word of mouth from supporters like yourself. But if anyone is reading this, just PM us and let us see if we can give you a discount or give insider info about upcoming promotions. 😉 @AlaMoi Indeed, as mentioned by @Duvel, @JoNorvelleWalker clay has overall lower heat capacity. This is mainly due to high density of cast iron compared to clay (which incidentally also makes cast iron heavier for same size). The other disadvantage with clay is that it is a worse conductor than cast iron. So, cast iron is also faster to release stored heat into the dough because it can transport heat (relatievly) faster within itself. So, all things being equal, we expect cast iron would give better result than clay baker. LoafNest's other advantages are the non-stick liner with makes it extremely easy to handle the dough/loaf and allows for a no-shaping method.
-
Spelt is a great grain to work with but it is surely not gluten free. Oftentimes it is used by people who are allergic to wheat proteins (but not allergic/intolerant to gluten). May be hence the wrong association of spelt with gluten free baking. As others mentioned in this thread, it has a nice rich flavor which is a good reason to use it even if you are not allergic to wheat. In general for bread, you can use any whole wheat recipe and replace whole wheat flour 1:1 with spelt flour. We make a nice no-knead, no-shape spelt loaf with LoafNest once in a while. You can see and example on the recipe book (page 24) with 80% hydration.
-
Thank you blue_dolphin, you settled the debate It was a pleasure to see LoafNest in a kitchen half way across the world! We are happy! Hope you had a chance to use LoafNest in another oven where it could fit.
-
LoafNest is only ~6 inch tall so I presume it would fit in the CSO. But it may be a good idea to check with a tape measure the size inside your oven after assembling the lowest rack. Another option is just to use a cast iron casserole (dutch oven) that you know fits in your oven and see if you can make loaves based on LoafNest recipe book. We call it LoafNest recipe book but it is not compulsory to own LoafNest to own the free eBook. LoafNest only makes it easier and better. If you try it without LoafNest, it may be a good idea to scale down hydration of recipes by 10-20% because without LoafNest the loafs may struggle to keep their shape in a large round casserole.
-
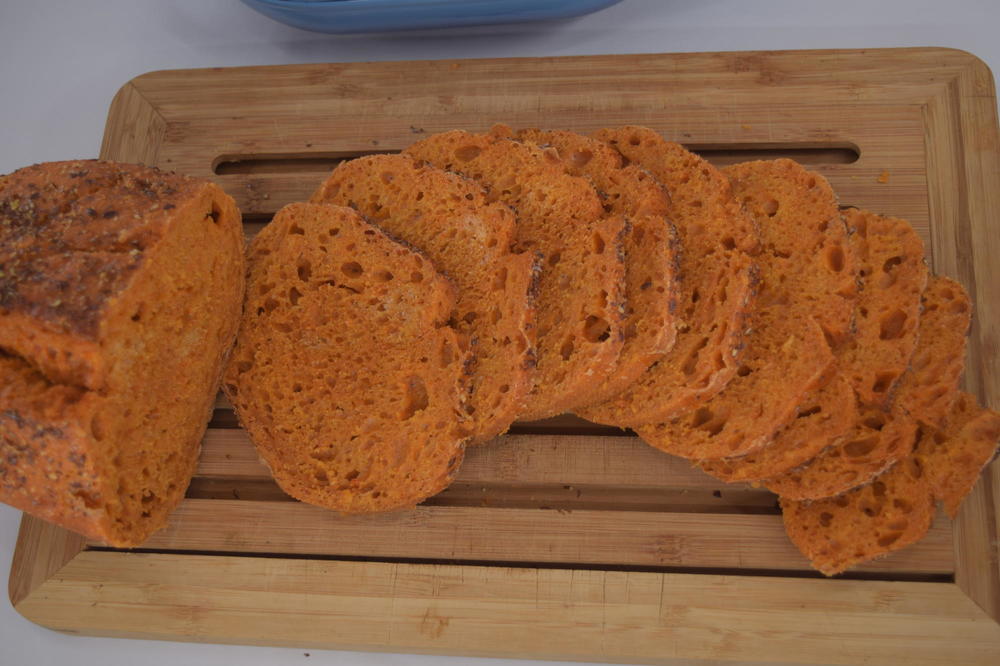
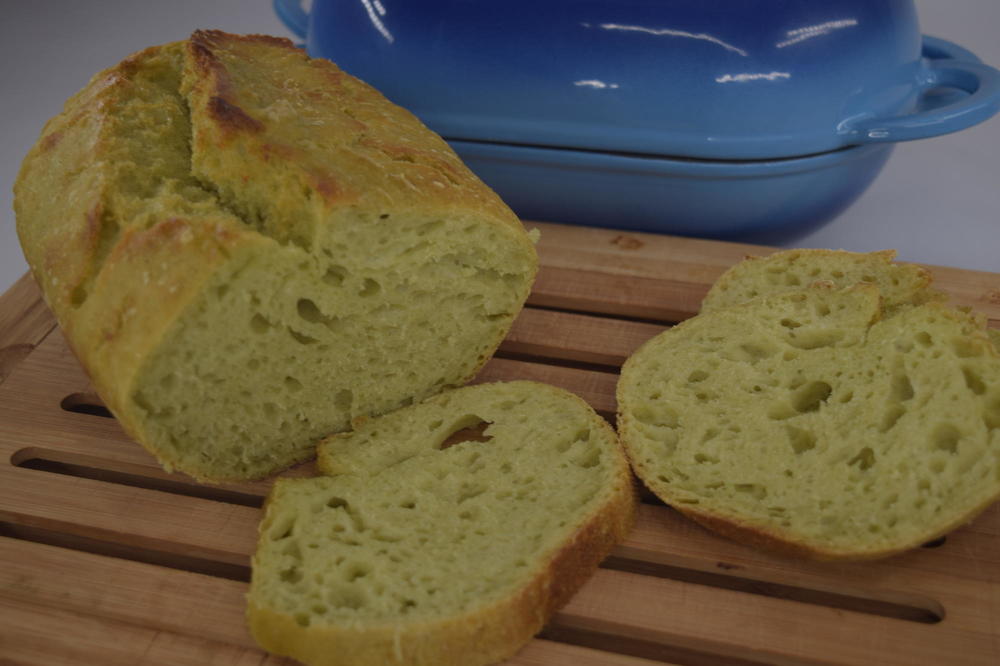
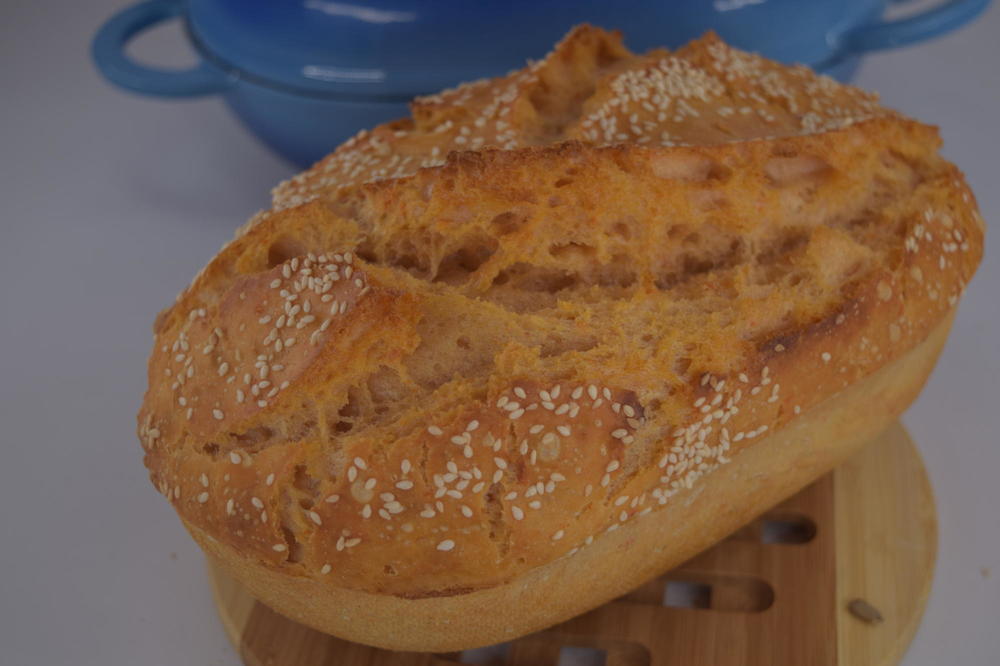
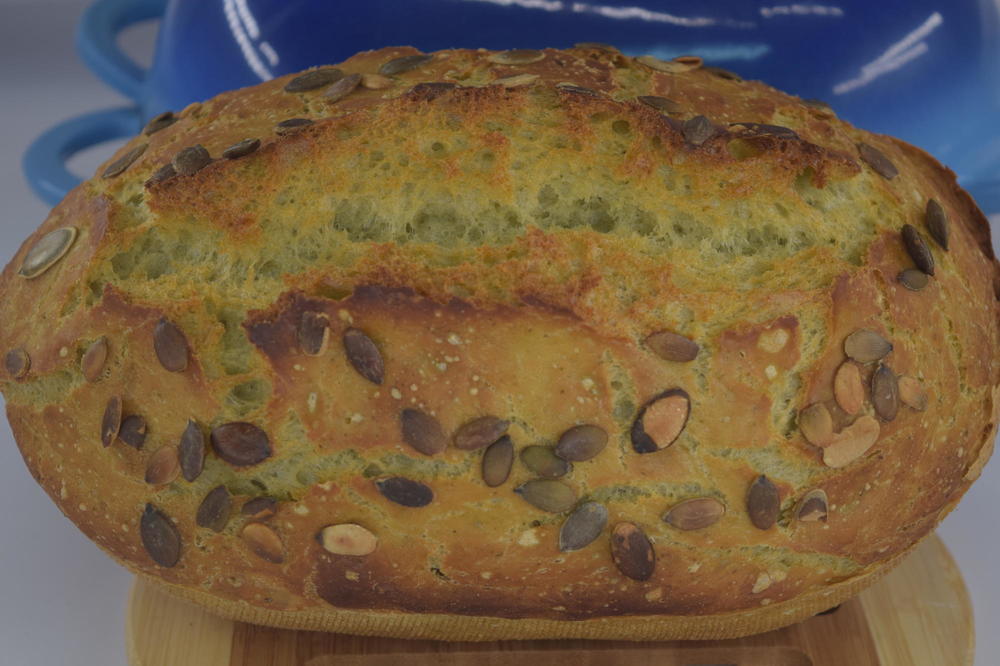
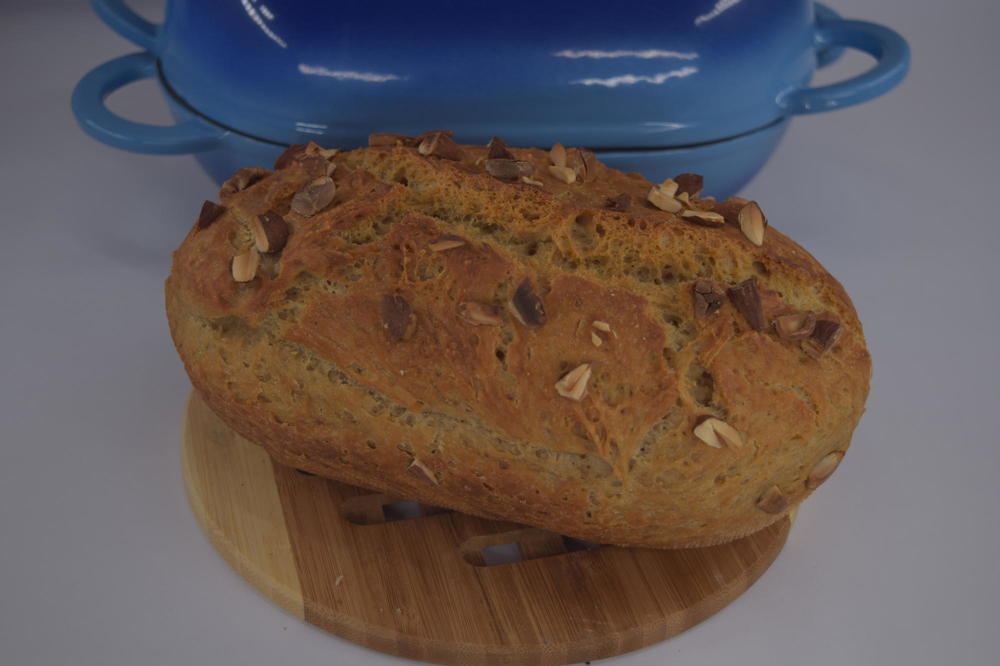
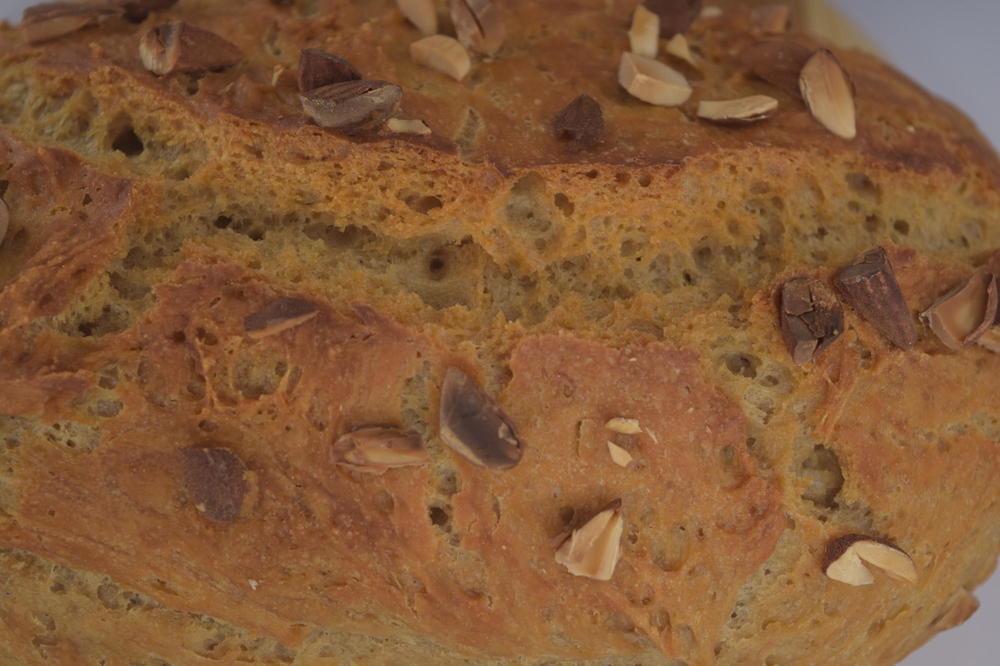
As some on this forum know, we are trying to push boundaries of what is possible with bread making, or how easy it is, or both! A part of this journey for us was breads with (relatively) high percent of vegetable content. As usual, all were no-knead, no-shape method based. We were able to use upto 75 bakers' percent vegetable in some recipes (e.g. Cucumber). Great additional flavors, easy way to include more vegetables in the diet and to top it all, really exotic natural colors! We also found that the texture of the crumb was much softer without any compromise on the crunchiness of the crust. Here are some pictures for you! No-knead bread with red Pimento peppers (~35 baker's percent) With fresh green peas (~35%) Fresh tomatoes (60%) With cucumber (78%) Overall, the recipe outline remains the same as the cucumber bread recipe (found here or in the LoafNest recipe book). Just blend the vegetables fine and mix it into the dough. Compensate for the amount of water added by the vegetable. Also, if the vegetable has higher sugar content, it may need a lower raising time. Thats it! Hope you will love experiementing with your own!,


-

Making a good loaf of bread with Indian Atta flour... finally!
trfl replied to a topic in Pastry & Baking
Thanks for the tip chromedome! Yes, Atta is Durum wheat. Indeed, we tried with semolina for somewhat better results compared to atta. But Semolina is not whole grain, but made only from Endosperm. So, you miss a lot of flavor. Also, since the semolina grains are much coarser, the texture is different too. -
Making a good loaf of bread with Indian Atta flour... finally!
trfl replied to a topic in Pastry & Baking
If you would like to try Atta flour, your best bet would be a nearby (or online) south Asian shop (e.g Indian) It is not very expensive because it is a staple in these cuisines. Ensure that you do buy authentic Atta because at some places normal wheat flour is marketed as Atta flour. We can recommend some main brands like Annapoorna, Aashirwad, Pilsbury or Shaktibhog. Do share your results here when you get a chance! -
EliseD, you have a fair point about LoafNest being quite expensive. LoafNest is quite a high quality product and we being small, we are yet to achieve economies of scale. That is why we decided to keep the focus on our main markets from Kickstarter campaign: US and EU. That way it is reasonably priced in those markets and includes all duties and shipping. And the whole import duties thing does not help anyone either. It is a bit cheaper on our own webshop (https://shop.trfl.nl/usa) but at this moment we do not have a shipping solution that includes Canadian duties and GST. We are working on it though. Will drop a line here via PM when we have something reasonable for our Canadian bakers.
-
This is an interesting story about how it took us about 10 years to make a particular kind of bread. Hopefully, it will resonate with others who have a similar quest here. This story about the Indian Atta bread and its notoriety for breadmaking. For those of us here who are familiar with Indian cooking, you would recognize this as the floor used for Indian flatbreads like Roti. For this reason Atta Flour is the mainstream flour in south Asia. Over the last 10 years, we had been making several attempts (mostly failed ones) to make good bread from Atta. The appeal is very obvious to those who have used atta flour. It is whole wheat flour so, has all the fiber, nutrient and mineral content of whole wheat but unlike western whole wheat bread flour, the milling is very fine. This gives a flour that has the texture of a white flour but all the benefits of a whole wheat without the slightly gritty texture. Moreover, due to the climate, cultivars and geography, the atta flour also has a unique nutty flavor to it. All good, except it is was impossible to make good bread with it. We tried pretty much every rule in the book. Kneading, no-kneading, different starters, different raise conditions, different baking conditions, hand made, bread machine made….. But, no luck. A simple google search will show you similar attempts by other people which more likely than not lead to a dense, gummy loaf. It is for that reason that most of the bread sold in India is made not with Atta but with Maida (a flour that only uses the starchy kernel instead of whole grain) which is equivalent of white flour. After several years of trying, we almost gave up on Atta flour. In parallel we had been working on a product called LoafNest to make bread making convenient [Not posting link here because the intention is to keep commercial interest a bit away and focus on breadmaking]. Some of the members of this forum may remember the thread from earlier in the year. So, during our development of LoafNest, Atta flour came up again but we were really not optimistic about trying it. But we went ahead anyway and results probably speak for themselves. It really worked like a charm and surprised even us, the very creators of the product. The loaf was airy with unique flavor of Atta. Well cooked crumb without any gummy feeling. And a whole wheat loaf without the gritty texture. And of course, no-kneading, shaping or cleanup So, what did we learn about Atta bread making is below: Atta is milled in a different process compared to the western wheat flour. The process is high speed so it gives a finer texture. But the process also damages/opens up starch granules. This results in a higher moisture absorption by starch With this information, here are our hypotheses about why making bread with Atta is hard and why it works with LoafNest. With higher hydration, the flour has less strength and more fluidity so it can not hold its shape well after the raise Weakened starch structure also adds to reduction of structural strength So normally atta flour results in dense loaf due to collapse and gummy crumb due to high hydration With LoafNest the long no-knead fermentation somehow increases gluten strength (compared to a knead-version) With LoafNest since there is no shaping step, the gas formed remains in place and available for expansion later during baking The high contact area with casserole somehow improves heat transfer so that the loaf can baker faster than it can collapse For those who are interested, here is the recipe we were able to use. Note that Atta is really absorptive and we use 100% hydration compared to 80% hydration in a normal recipe for LoafNest. What are your thoughts on these? Do you have a better hypothesis why it works well?
-
Hello fellow bakers, Just wanted to thank everyone on this forum for the wonderful feedback on LoafNest earlier in the year. We also have a really good news to share. LoafNest was relaunched on Kickstarter yesterday and we were funded in 3 hours! Thanks for many folks who came originally from this forum to make it happen. See the new campaign at https://www.kickstarter.com/projects/trfl/loafnest?ref=ewu6er -trfl
-
Hi all, Thanks for the amazing support. The LoafNest campaign is going on with a steady momentum. I thought I would share the first LoafNest product review from a food-scientist/blogger/baker. The review answers a lot of questions raised earlier on eGullet and other fora. There is also a comparison side-by-side of a LoafNest and Cast-iron+baking paper method from the same recipe. You can see it here https://foodcrumbles.com/testing-loafnest-smart-way-bake-beautiful-bread/ Hope you find it informative and possibly convincing to back the project (or spread the word) if you already have not. -trfl
-
Good to learn our observations were consistent with yours and that of ModBread. If I may go a bit technical in my thinking here: To bake a good bread, you need certain amount energy supplied to it with a certain rate (power). With a cold pan, I can imagine the bread has to spend more time in the pan to get the same amount of energy [the oven is heating both the heavy pan and the bread]. This means a lower power. So anything time-dependent will suffer. I can imagine oven spring relates is time dependent since you need to gellify the outer layer a bit while the inner gases are still expanding and the dough is not fully hardened. One can probably improve the time factor by using a very light pan so it is not absorbing the energy. But that would still be inferior since with pre-heated pan you get much more power in the initial minutes on the loaf than your oven alone can provide.
-
We tried this but only once since it was a disaster Our hypothesis is that our failure is due to skipping the second raise. So there are no large gas bubbles that can expand further. But may after our Kickstarter campaign we spend some more time with this. It would be great if we can skip the pre-heating step but still get a reliable result. Even more convenient!
-
Nice thought. In fact this was one of the first things we tried. It works reasonably well but not as perfectly as we would like to see in a good product. The liners themselves are not new. You can buy them here. It is the same company that makes Silpat mats. We worked with them to make a custom liner for us. But we had three problems that necessitated a custom cast iron pan. 1. The liners are very flexible and just about support their own weight. So they are unable to retain the shape when heavy dough is within them. This is normally not a huge problem for lower hydration dough since the dough can support itself to retain its shape. The use of this liners is in professional bakeries that use ~70% hydration at most. We use 80-90% hydration that makes the dough basically a slurry. Also, we skip the second raise step completely so the dough have even less strength when it goes into the liner. So we needed to support it with a liner with a custom shape until the bread became solid enough. 2. The whole idea of using cast iron is to maximize the conductive heat transfer. For a round loaf the bottom area is large enough. But since we wanted to keep a more practical oblong loaf shape, we would use a much smaller contact area at the bottom of the loaf if we did not use a fitted cast iron around it. Now we use the sides as well as bottom for direct heat transfer. 3. Cast iron casseroles come in various sizes, shapes and forms. It was impossible to make one liner that will work even with a majority of them. Finally, the liners themselves are quite expensive (as you can see from the Demarle page I linked above). So beautiful cast iron at slightly higher point is quite a value for money. Hope you will like to support our campaign by backing or sharing with your contacts.
-
Thanks everyone who pitched in with helpful comments and feedback. We are happy to announce that the LoafNest Kickstarter campaign is now live. You can see it on this link. Please back us and help to spread the word to your contacts and social media. Thanks again!
-
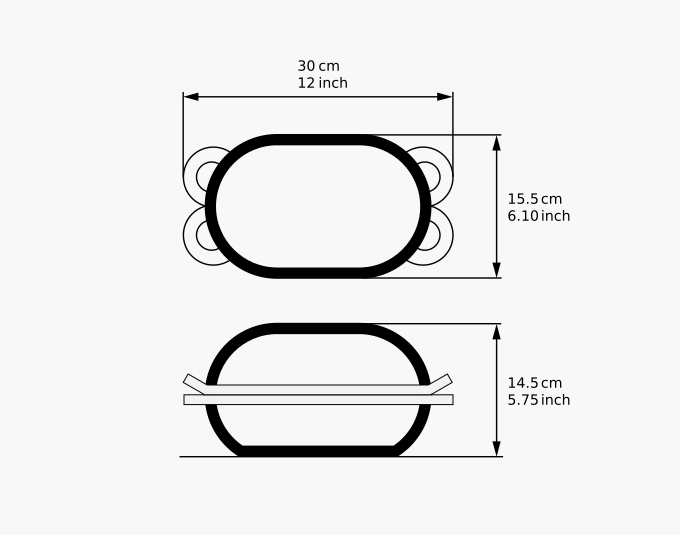
I do understand and empathize with the apprehensions about offset handles. After all, they are a new idea and it is hard to guess if it works for you or not when you have nothing similar to compare against. Only way to know for sure is to use one. We have been using our prototypes for a few months now baking almost every day. We really do not find any issues. Of course, we have normal physical abilities and I can not judge how hard or easy it is going to be for someone with arthritis. We will keep a keen ear on the feedback of the first version. There is a good reason behind those offset handle: * Our lid is taller and heavier than a normal casserole lid. Since the bread raises to almost double its initial height, we had to make it taller and hence heavier. * We need to be able to remove the lid easily when the pan is hot (to place the liner and pour the dough) and put it back again. This step is done wearing gloves or mitts. So, if the handles are lined up, the space between top and bottom handle needs to be quite a lot to allow for thick finger+mits to get into the gap. * If we want to provide such a gap on our product (which is overall about 15cm/6inch) tall, we would end up with a funny looking casserole. Also, there are difficulties in manufacturing handles far away from the rim in cast iron. That is why you almost always see handles on the rim for cast iron. It is possible, but difficult and leads to inferior quality [For enameled sheet iron, like the one in the picture by andiesenji, that is much easier because they are made in a different way]. So, with all these constraints, we came up with offset handles so that both sets of handles can stay on the rim but can still allow easy lid removal and putting it back while wearing thick gloves. I hope I have better explained the background behind offset handles.
-
By better we mean more flavorful, more tasty, more textured bread. Most supermarket bread (at least here in Europe) tastes like cotton. By healthy we mean more appropriate levels of salt and lack of preservatives/additives and having the knowledge of what goes into the bread. For example in the Netherlands, where we live, a recent study found illegal amounts of salt in 'artisan' bread from many bakery chains. [Source] By reducing the barrier to bread baking at home, we believe we help people to achieve better taste and health. Of course, the knowledge of knowing what you eat is invaluable for a healthy lifestyle mindset. By the way, we estimate our loaf costs about 75 cents (ingredients and electricity/gas) whereas an equivalent loaf will cost 2.25 (Supermarket premium bread) to 5.00 Euro (boutique artisan bakery). So, we believe it is also quite economical in the long run.
-
Yes, baguette, dinner role or mini-ciabatta (or other similar breads) are a possibility. If we succeed in our Kickstarter campaign, they surely on our pipeline. Thanks for the suggestion!
-
We chose LoafNest for the reason that the liner does look a bit like a bird's nest and we wanted to give a connotation of a bread loaf 'hatching' out of it. Luckily for us, (from my understanding), trade marks don't work like that. We would be in trouble if a consumer who went to buy a thermostat ends up buying a bread baker instead :). I am simplifying a bit, but that is the intent behind the law. Moreover, we call it LoafNest as one word. Of course, if google came knocking on our doors, we will just change the name because we can not afford the lawyers and they sure can. We think the chance is astronomically low though.
-
Thanks for the encouragement! Hope you signed up on the newsletter to get the earliest deal. Offset handles were indeed a deliberate design choice for better safety and unique design identity. The casserole is multi-usable like any other casserole (as long as you have a heat source that fits) for example for braising. The liner is intended for bread making only though. The silicone liners are rated to last 1000 uses and normally last longer if properly cared for. They don't require special maintenance, just was it in a dishwasher and keep them dry and away from mechanical abuse. We will of course make separate liners available (for example on Amazon) if the Kickstarter campaign is successful.
-
Offset handles may take some getting used to, but they do work really well. We designed them so that you are forced to hold all the 4 handles for a higher stability and safety. The handles are not that large (~1.5 inch / 4cm) so can fit easily into each hand. But I respect your personal preference. It is the Coke v/s Pepsi or as in this forum, blue v/s brown thing Indeed, normally silicone is a very good insulator and the bottom of loaves needs much do be desired. But perforated silicone is a complete different story. Firstly, the liner still leaves still ~60% area uncovered. This allows for much better radiative, conductive and convective heating. Secondly, the perforation allows allows surface moisture to escape that helps to achieve higher temperature as well as good browning. These liners are used in professional/industrial kitchens specifically for bread baking. We are trying to bring it to home kitchen. I posted a crumb picture earlier in the thread. I don't have a side-by-side but I am sure you agree it is a nice crumb. The top and bottom do nest but not all the way since cast iron is quite thick. Also, I would not do it to avoid accidentally scratching/chipping the enamel. On the positive side, we do use it as a bread box to store left over bread. It is beautiful enough (we think) to keep on the counter. You can use it as a normal casserole to steam or braise but I would do that without the liner because the liner is meant to be only for the bread. The 'sealing' without liner is still good enough like a normal casserole. The top of the casserole is designed with condensation groves (you can see it one of the pictures in the gallery on our website) that prevent all the condensation to drip back in one place. Due to the elongated shape, it may be hard to find a suitable stove-top that can fit nicely. We use with a induction stove that has a feature to combine two small heaters into one big heater. You can also use it in an oven. It works as you would expect a normal enameled cast iron to work. At this moment, we don't have a metal rack planned, but I do like the idea. May be in future? There is no worse steam collection due to the shape compared to other dutch ovens. The burn risk depends on the temperature (which is same as any other Dutch oven method) and amount of steam which is smaller in our case since the loaf will occupy most of the available space near the end. Thanks a lot for all the questions, comments and ideas.
-
In our current implementation, we are not expecting any fermentation/proof to take place within the liner. We did try that in an earlier version but since we then had to use a non-perforated liner, the browning and crunchiness of the bottom was affected. It was 'OK' but we were not satisfied with that. In fact this was our first thought since we even wanted to eliminate the 'pour' step and just place the liner with dough into the casserole. But the results we achieved were not upto what we wanted to make. High hydration dough (85+ %) does indeed migrated a little bit into the holes. But since there is casserole stopping the migration immediately and since the dough there is solidified in seconds, it ends up giving those nice bumped pattern I tried to show in an earlier picture.
-
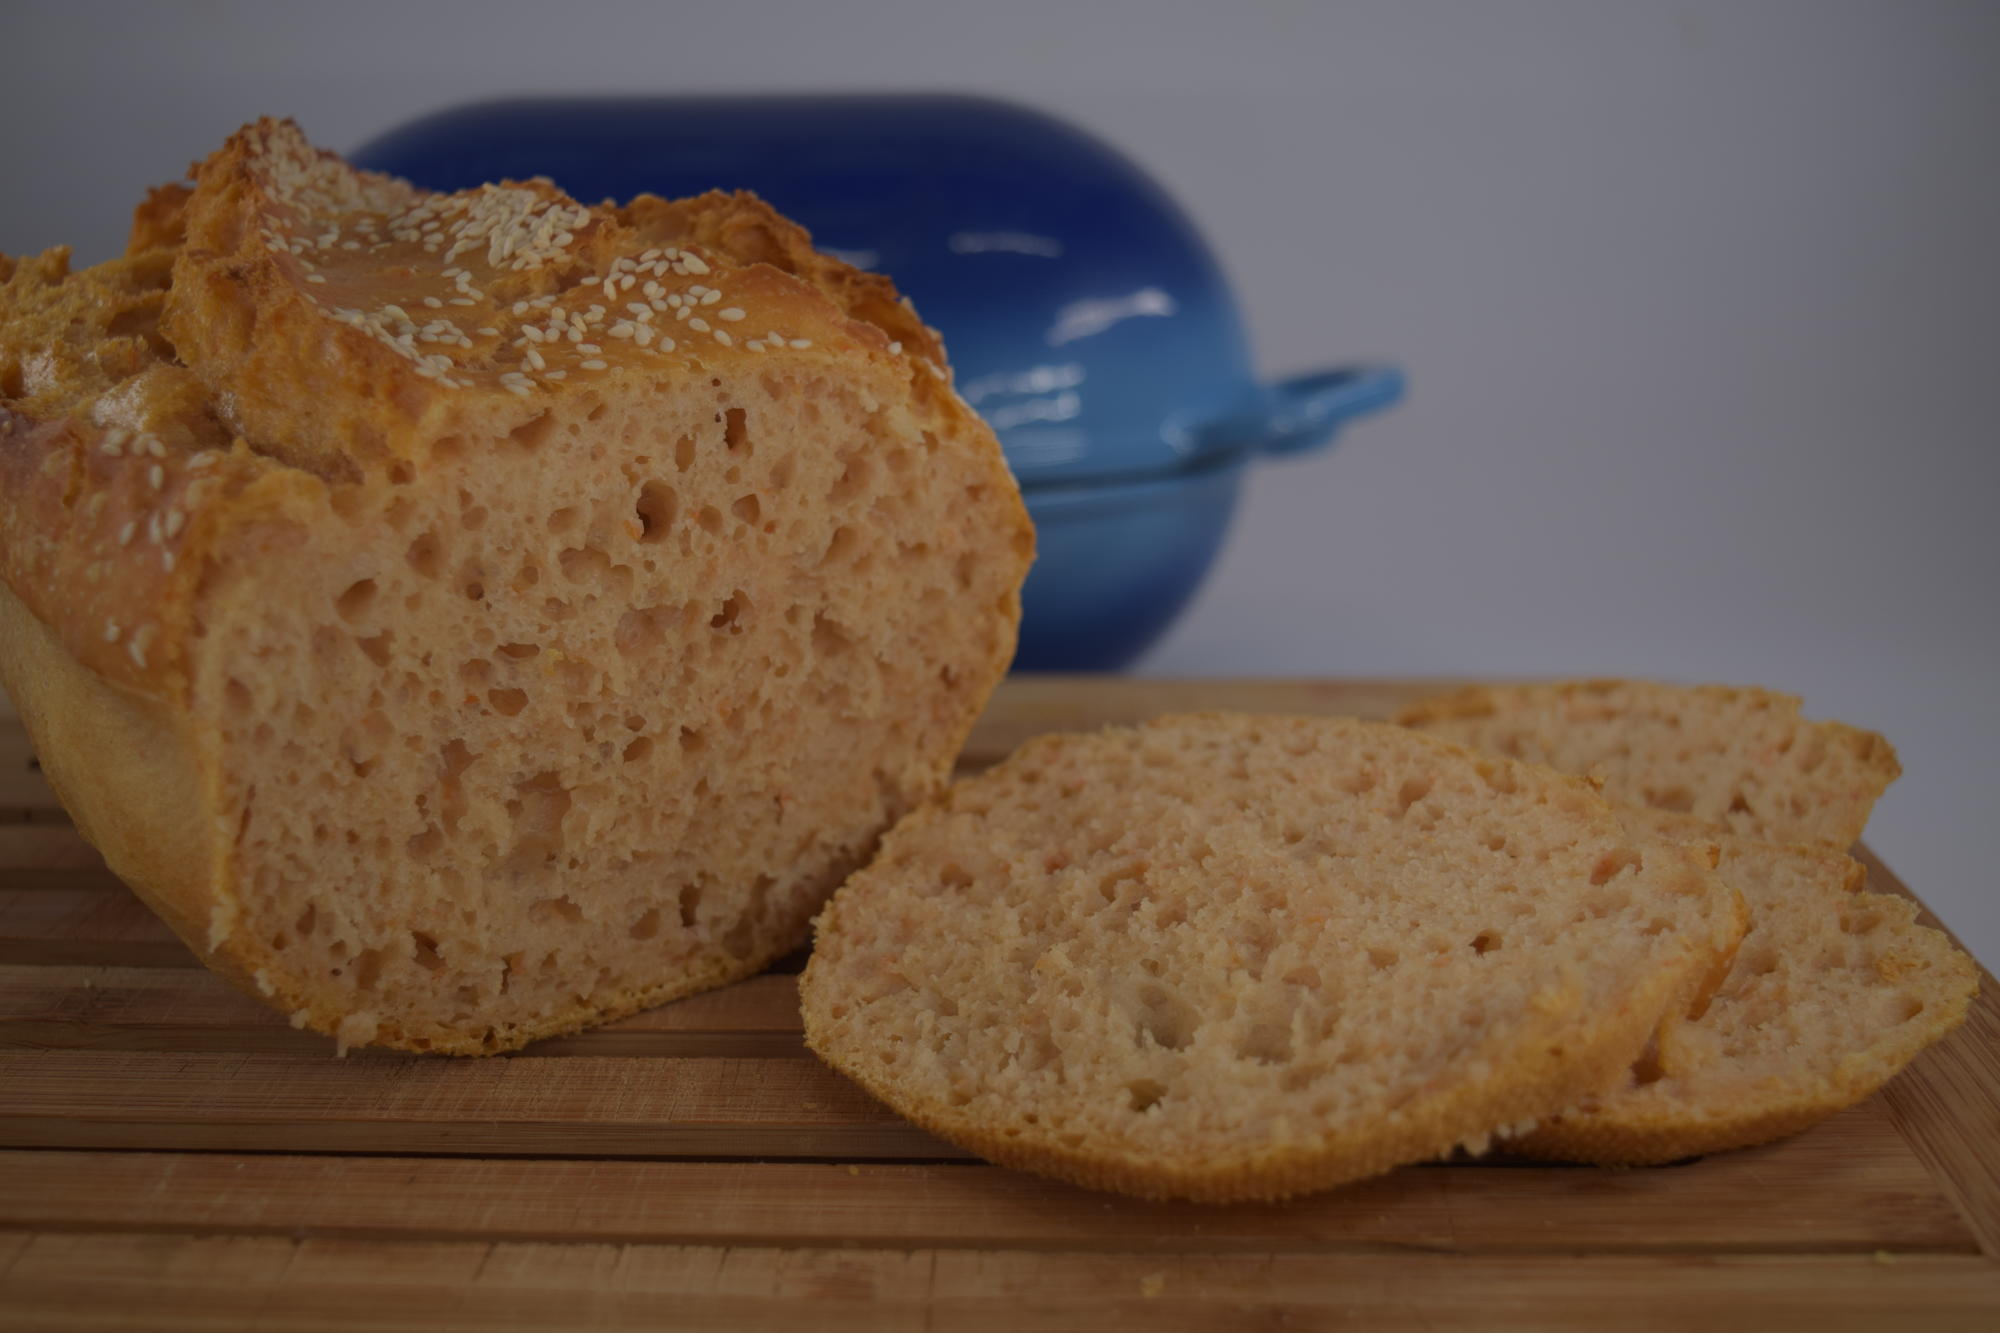
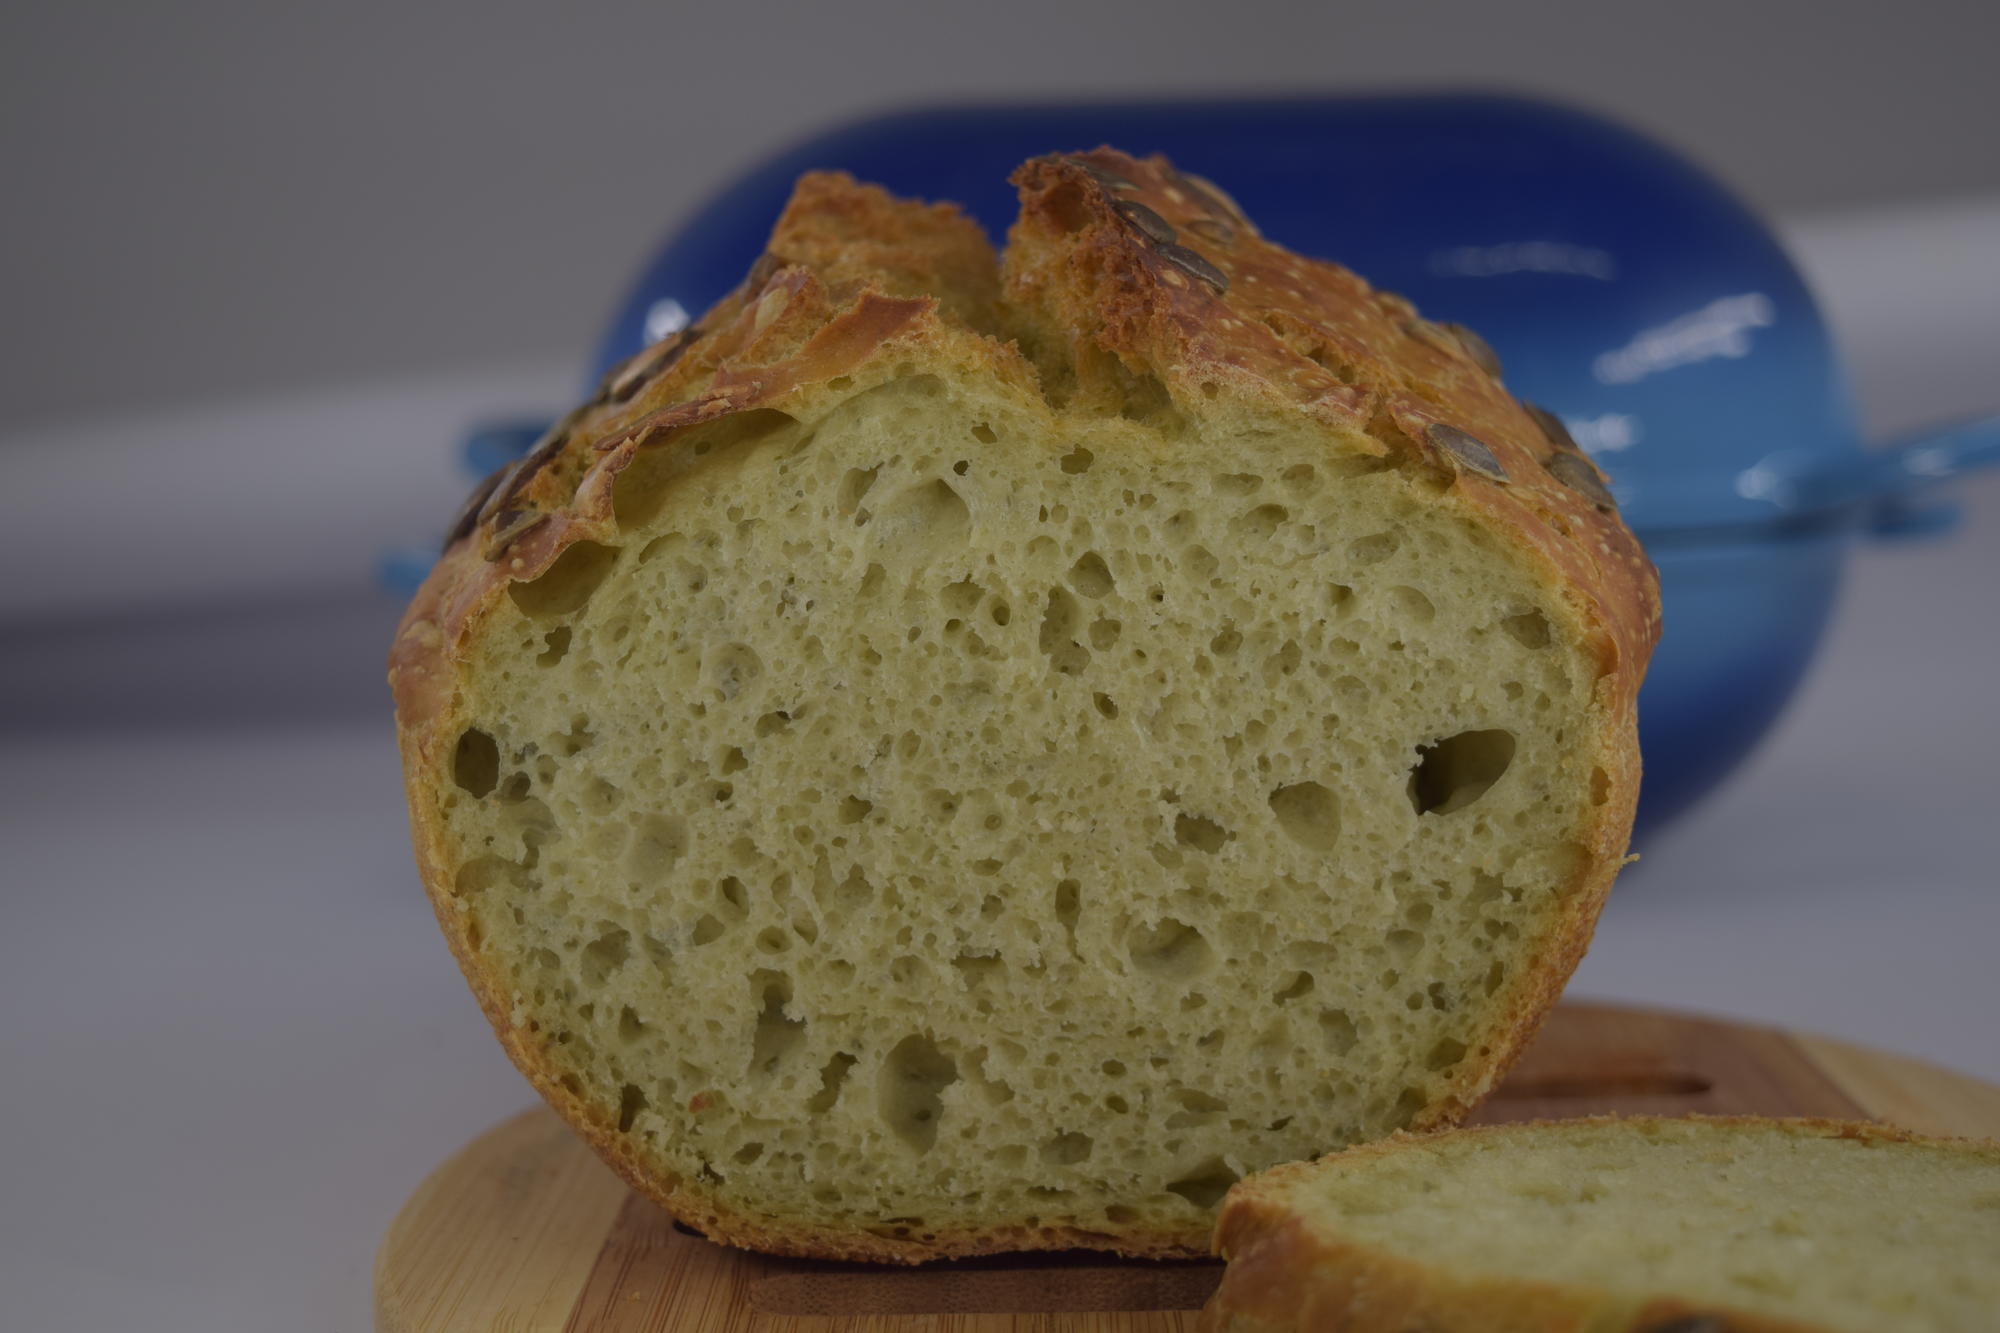
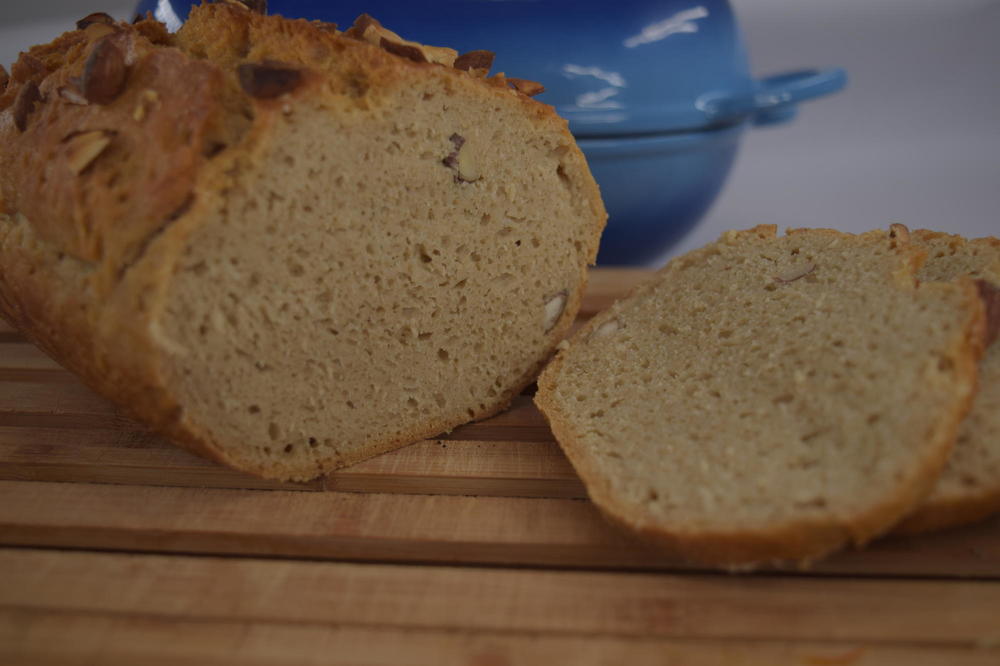
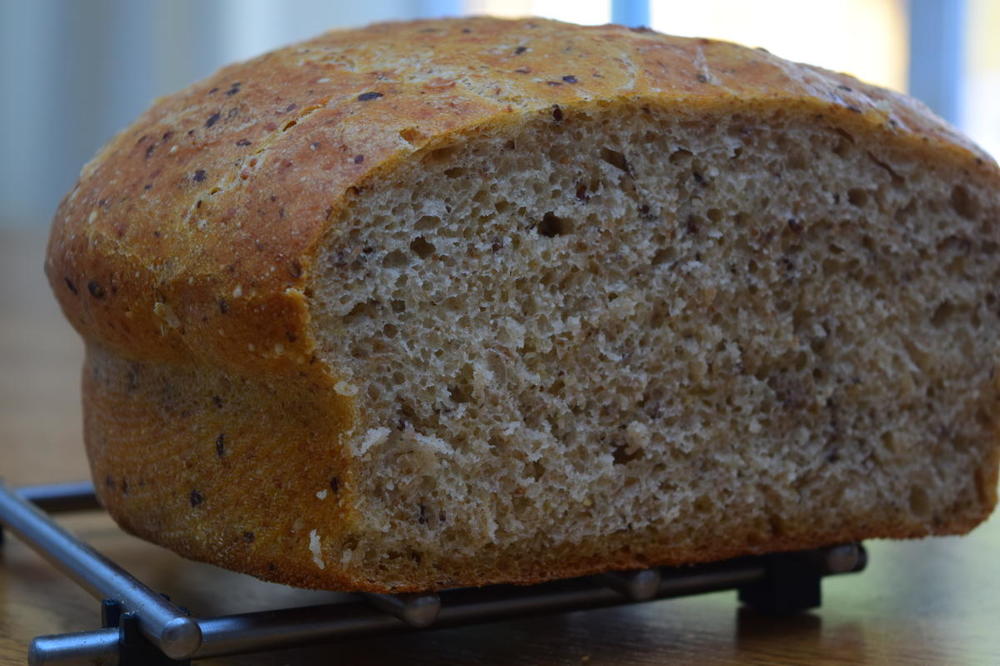
And one last image showing crumb and crust baked in earlier prototype of LoafNest. This was not a no-knead bread but traditional bread baked in our baker.
-
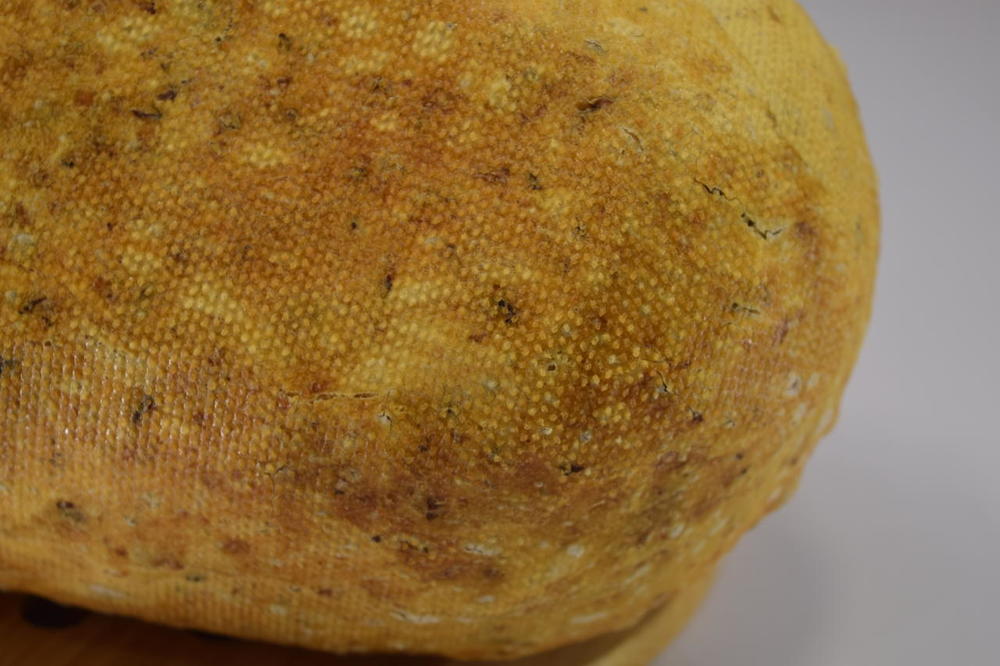
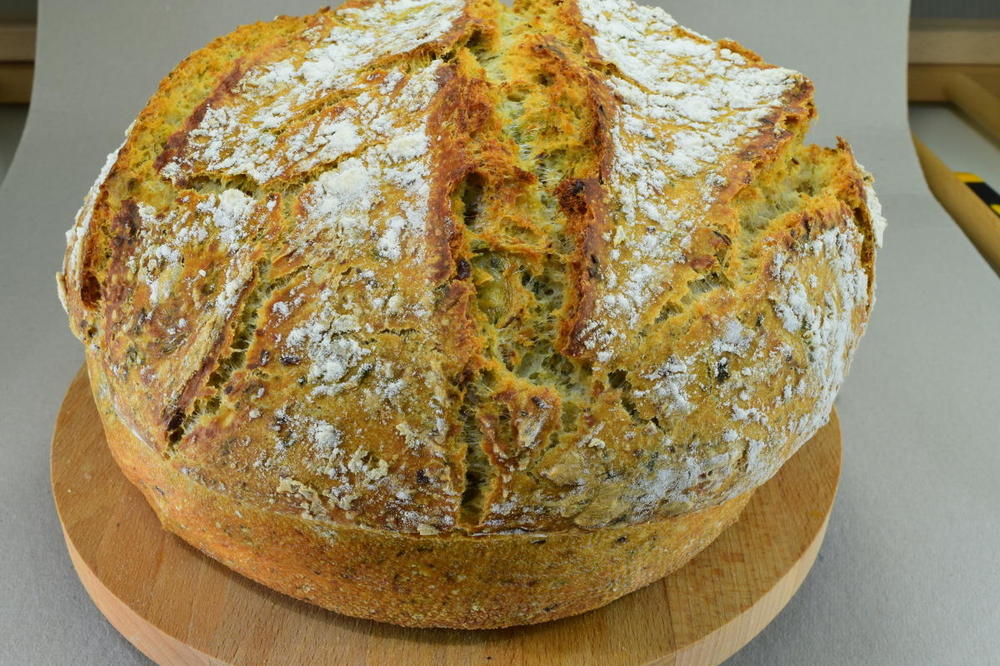
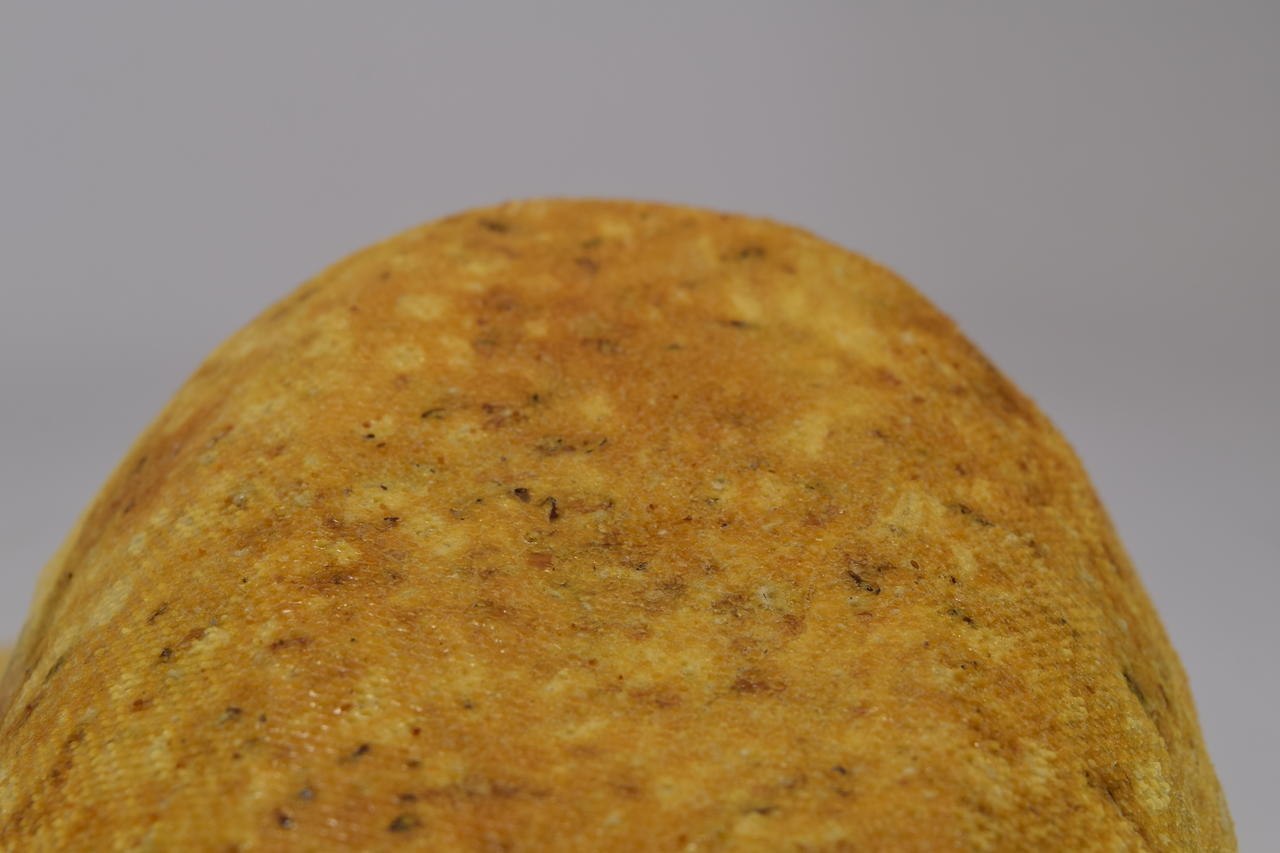
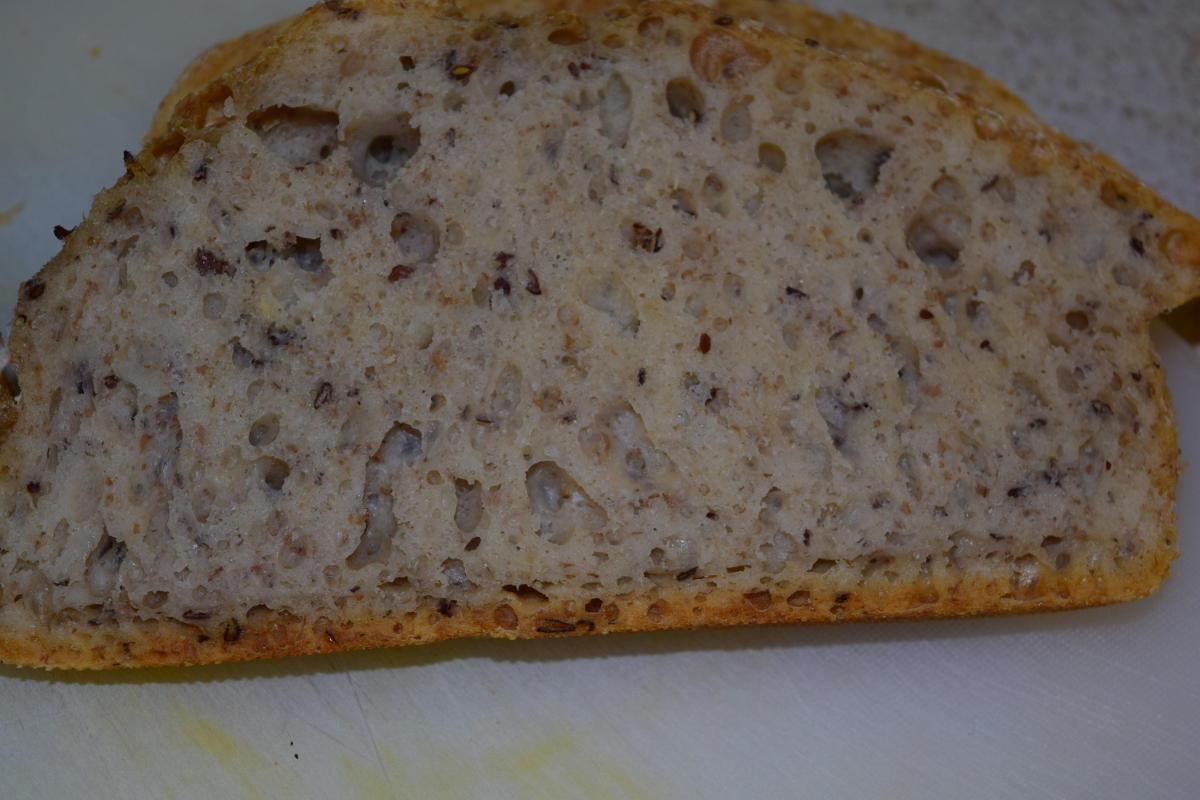
I will come back tomorrow with more detailed answers for the technical questions. In the meanwhile, a couple of shots of the bottom of the loaf. The first two are made with the final product (hence the correct shape). This is the same loaf that is sliced in the gallery on our website. So you can see the browning on bottom is quite close to that of the top. The third image is from an earlier prototype (of different shape). The loaf is normal no-knead loaf. You can again see the browning on the bottom. The perforated mesh gives a nice dotted structure similar to professional tray baked baguettes and loaves. This does not affect the release of the loaf. And lastly, a crumb shot from the older prototype made with our method without second raise. The picture is not good enough for 'marketing' but I am sure folks on this forum can see beyond the stained chopping board