

Trishiad
-
Posts
544 -
Joined
-
Last visited
Content Type
Profiles
Forums
Store
Help Articles
Posts posted by Trishiad
-
-
Welcome to eGullet Anna Skigin! Any tricks to share with me???
Theabroma, I've not made my own molds though I have been eyeing this scupture I have thinking it sure would be pretty in chocolate. I have seen mold making supplies at chef rubber. I have had molds made by Tomric. They made this great little "bar" mold with my logo on it. I should call it a tablet because of it's shape but I just can't seem to take myself that seriously.
Classes are a difficult subject for me. I did an online course which was helpful to me because it gave me some timelines for my exploration. Other than that I really didn't learn what I had hoped to. I spent a lot of time with library books, a lot. I spent a good deal of time looking at and eating the work of other chocolatiers. For me, it is helpful to define what I don't want before I can fully realize what I do want. I spent a great deal of energy buying chocolates and spitting them out. I sent many compliments, asked a lot of questions, and did a lot of spying. I have heard many people raving about the online course I took, it just wasn't what I wanted. You will have to make those decisions based on how you function. I am taking a class at Alber Uster in the Winter because it isn't too expensive and I thought I might be able to refine some of my processes. Because I don't have any "credentials", I sometimes worry that I make it all up a little too much and should probably get some actual Pastry Chef input. Sometimes.
Anyway, books, books, books, and a touch of eG have taught me what I know.
Jump on into a bowl full of chocolate and see what you can come up with.
And I seriously cannot take credit for the dental table. It was Lloyd who led me to it. Without Llyod, I'd still be researching foot massagers.
-
I use a dark in the mid 50's. I find that the higher percentages have more caramel or fruit flavors and aren't really the best with the big flavor of crushed peppermint candies.
-
Okay, seriously, I make artisinal chocolates for a living, right? Every year my father in law hints for months for some peppermint bark. I toss it together with leftover tempered chocolate and let my son whack the peppermints in a bag with a hammer. You can't really screw them up and folks really do love 'em.
-
Toast with butter and jam or cereal (kashi or cheerios usually)
-
I get molds from Tomric but I know you can get them from JB Prince and probably Chef Rubber. Expect to pay about 10 times what you pay for baking store molds but you will not regret it.
Ah, the dental vibrator...I know...I am freakin brilliant!!....Seriously, I asked here at eG and was told exactly where to go. Chef Rubber sells them as Chocolate Vibrating Tables for bunches more than I paid.
-
First, I sure wouldn't use cheesecloth to polish a mold. It's pretty scratchy. If you don't want to make a trip to the fabric store for batting use a nice soft cotton ball. Just make sure it doesn't leave any threads behind.
I do find that warming the mold with a blowdryer just to match the temperature of the chocolate really does produce a shinnier bonbon.
My cocoa butter says to warm it to 33c. I zap it on about 3/4 power for 3 minutes, shake it up and down, and use it.
The bowl and the heating pad are used simply for holding your chocolate at a working temperature. You must temper the chocolate prior to using this set up. You still have to check on it and stir it every little while but you don't have to zap it or wave it over the stove or whatever one might do to bring it back up to temp because it's staying at temp.
-
Okay, rather than you buying a machine and then cursing me because it can fill as many molds as I guessed, I thought I'd do some math:
.5 oz cavity (which is on the large side for a typical bonbon)
32 cavity mold
If you don't drain your chocolate back into the machine you'll be able to fill 10 molds. If you do drain into the machine or you're using a smaller mold or a mold with smaller cavities, you can do more. (i.e. I also have some 24 cavity molds which hold 1/3 ounce per cavity. At 8 oz. per mold I could fill 20, more if I drain back into the pot.)
-
Not sure. I usually have 2 or 3 machines running at a time. Sometimes they have 3 different chocolates in them, sometimes not. Because I don't have a store front requiring a constant supply of product, I do big production days and am working on molds and hand dipping and bars/barks all at once.
A wild guess: at least 20 molds, probably more.
These machines work well for me because I am working on many things at once. If for some reason I do run out and have to temper more, I start the machine and do the dishes that have been stacking up or start on another ganache or caramel or switch over to white chocolate work while I wait for the bittersweet. Sometimes, I start packaging things or trimming labels, cutting ribbon, or I just have a bowl of cereal and sit in the sun, it depends.
-
Hmmm, since I don't often dip just 40 truffles it's hard for me to give you a true answer but I think you could melt a pound or so plus about 4 oz. for seed. You will probably have extra which you could pour onto a sheet of parchment, allow to harden, and use again another day or you could make some bark....
Spread a thin (1/8 to 1/4 inch) layer of chocolate and sprinkle with things like dried or candied fruits, nuts, nibs, sea salt, even crushed up hard candies like lemon heads or peppermints. Let cool and break into irregular pieces.
-
Yeah, people always ask me why I'm not fat, surrounded by all that chocolate. They don't realize one doesn't eat so much chocolate when one smells like chocolate.
The air drying not only helps with dipping but also increases shelf life. There is water in cream and it will evaporate. If you don't give it a chance to evaporate before dipping it will evaporate inside the chocolate shell leaving air pockets perfect for bacteria growth.
Keep in mind when making your ganache in the future that you will need to increase the chocolate when using milk or white chocolates instead of dark or bittersweet.
-
This is most likely either a texture or a temperature issue. If your ganache is too cold when dipped it will begin to expand with the "heat" of the tempered chocolate and cause the coating to crack under the pressure. The same thing can happen if your ganache center is too soft. Softer centers are best left to molded candies unless you want to double dip.
One last possibility, if this same ganache recipe has served you well in the past, is that the coating was too thin. Perhaps you dragged the bottom a little too enthusiastically?
I would try the same recipe again with room temperature ganache balls and careful dipping. If you still have trouble, increase the amount of chocolate in your recipe.
-
Funny thing about that book, it doesn't cost a fortune, it doesn't claim to be high fashion, it doesn't even begin to touch on the elitism that most of the books I own seem to. And yet, I too, love it. It has basic, easy to follow recipes which are quite yummy. No fancy French techniques, just candy. I sell a product based on a recipe from that book that sells tremendously. I almost felt dirty when I made it the first time because it's not exactly innovative. The people can't get enough. Sometimes it's really best to keep it simple.
That said, I prefer a nice cherry in a creamy ganache to gooey fondant.
-
Mommy tempering machine comes from Chocovision and is the third machine I have purchased from them. I always buy refurbished from them and have never had a problem that wasn't quickly and easily fixed. Saves hundred of dollars.
The vibrating table is a dental tool and this one was snagged off of Ebay. I just got it and although it really gets the bubbles out quickly, I did kinda like cranking up the ipod and shaking my booty while the bubbles were releasing.
-
Years ago, I had dinner at the home of a friend. Her mother served truffles for dessert and I was amazed. They were delicious and this woman had actually made them herself. Now I know how easy it was to make those truffles and what it feels like when your friends think you must be made of magic to be able to produce something so luxurious for a simple midday dessert. With the Holidays coming up I thought maybe some of you might like a little "magic".....
1 recipe of ganache makes around 40 truffles
4 oz. of heavy cream
8 oz. of Dark or Bittersweet chocolate plus more for coating
.5 oz of Butter
1 small package of Cocoa powder
With only 4 ingredients, get the best you can.
Use the ganache method you prefer. I bring the cream to a simmer, add chopped chocolate, whirl with the stick blender and then add room temp butter. Sometimes I just stir with a spatula because I don't wanna wash the stick blender. Feel free to replace some of the cream with flavorings, booze, etc.
Pour into a pan lined with parchment and leave to set. Overnight is easiest. Slice into squares and either leave them as is or squish them into fungus shapes or roll them into balls. Again, leave overnight under cover. The ganache should dry out a bit and develop a nice crust.
Temper some chocolate and drop in one ball at a time.
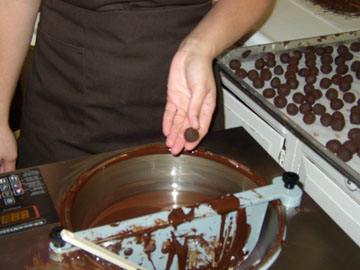
Fish it out with two fingers (or a dipping tool if you must) and roll it around and bounce it over the surface of the bowl of chocolate to allow the tension to remove any excess chocolate.
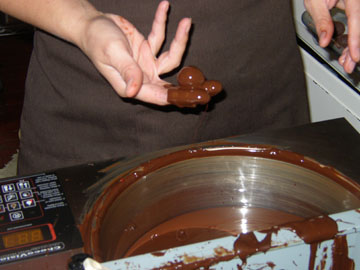
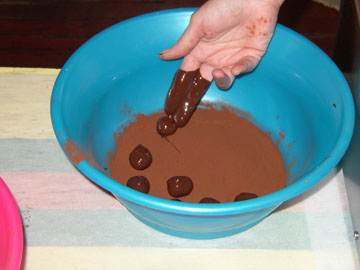
Drop that baby into a bowl full of cocoa or nuts or sugar or nibs or shavings....you get the point....and cover with your dusting medium. Set the entire bowl aside for an hour or so.
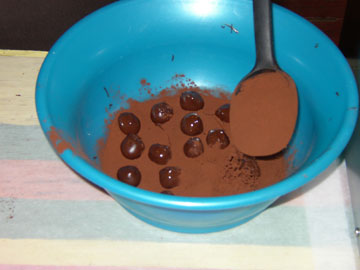
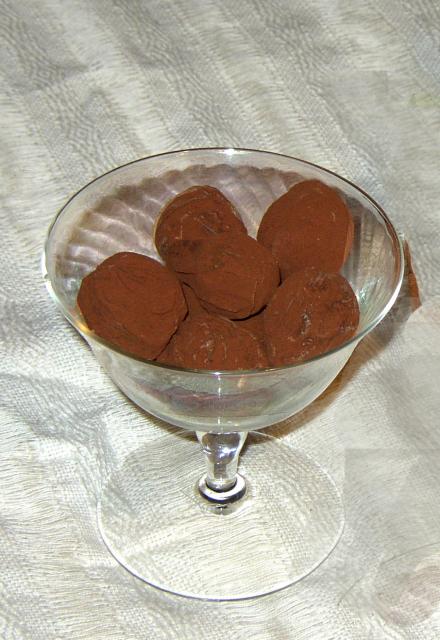
Once set, give your truffles a quick sift
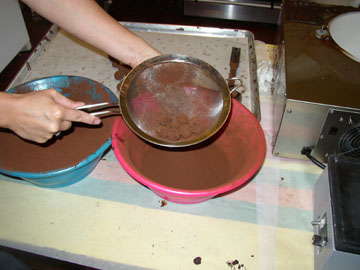
and place them on a serving dish. Stored in a cool dry place (not the fridge) they will keep for a good 2 weeks.
-
I meant to get to this weeks ago and got sidetracked. I apologize and hope that this demo, in conjunction with John's fab demo, will completely demystify molded chocolates. Because I needed Honey to take the photos this was done at home. So, please also accept my apologies for the dog bowls, etc.
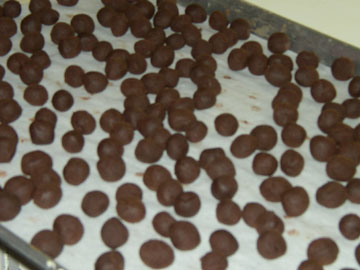
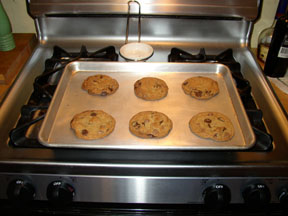
It's usually too cold in the kitchen in the morning to make happy chocolates so instead of wasting precious gas on the heater, I cranked on the oven and made these. Not only do they warm the kitchen to a chocolate favorable 68 degrees but they also make for a nice afternoon snack!
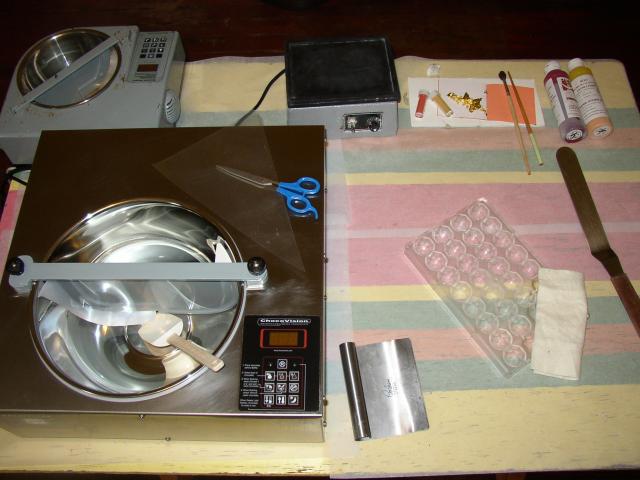
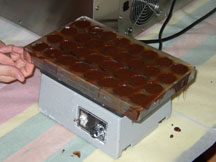
So, here's the stuff: Baby tempering machine, Mommy tempering machine, Vibrating table, gold leaf, luster dusts, PCB colors, Polycarb mold (I get mine from Tomric), natural cotton batting, offset spatula, some paintbrushes, and a rubber scraper all on top of plenty of parchment for easier clean-up. Oh, and a pastry bag and some scissors for the ganache.
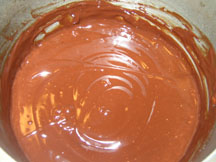
Make yourself a nice ganache so it has time to cool while you get things ready and temper your chocolate. If you're using a machine you will start the tempering process now.
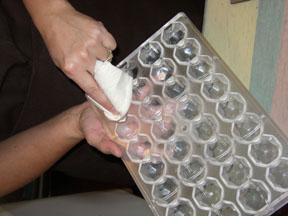
Polish your mold well with the natural cotton batting (found at most fabric stores). It can be washed and used again and again.
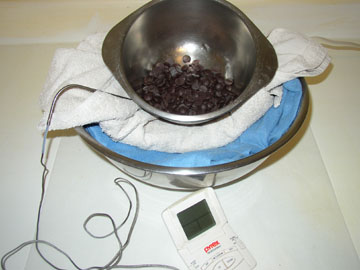
If you're not using a tempering machine you may want to create a set-up like this. Grab a big bowl, put a heating pad in it and set it to low. Add a few towels and a probe thermometer followed by your bowl of tempered chocolate. You can monitor the temp of the bowls and add or subtract towels as needed to maintain a good working temperature.
Just before filling, I hit my molds with a blow dryer just enough to ensure the poly is the same temperature as the chocolate. I find that although the ambient temperature is just right, sometimes the various objects haven't quite warmed up enough. This step will secure a glossy bonbon.
Fun time! Warm some colored cocoa butter in the micro and drop it on your finger or directly into the cavity....

Swirl it around the inside of each cavity. Get creative. Use as many colors as you like and have fun, it's not that serious. You'll notice I smeared some gold leaf into one row of cavities in this same fashion.
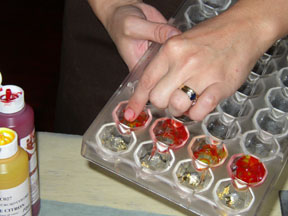
For more complete coverage and that super-trendy, high-color look, use a fluffy brush to coat the entire cavity.

Tap in some luster dust for a little more drama and texture.
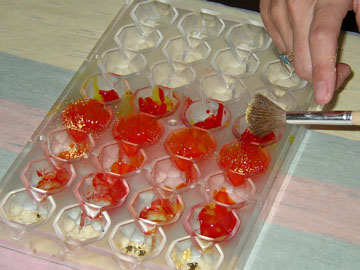
You may prefer to create definition with a different shade of chocolate. I used my favorite tool, my finger, and swirled in some milk chocolate. On the next row I used a spoon to pool some milk chocolate in the bottom of the mold. One could use an airbrush with some white chocolate here too (if one could make friends with her airbrush).
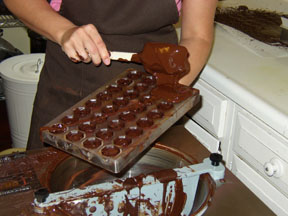
Let these set a bit and fill the entire mold with dark chocolate. I like to use a deep silicone spatula because I can use it again later when cleaning out the bowl. Many chocolatiers prefer a ladle.
Give it a quick scrape with your offset spatula (just so things don't get TOO messy).
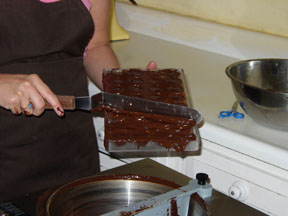
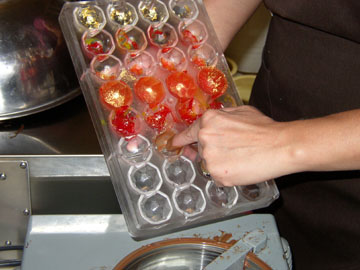
Set the mold on your spiffy "new" vibrating table for a few seconds. OR smack it around violently on the counter, bouncing it from side to side while doing a little dance to release bubbles and get some exercise.
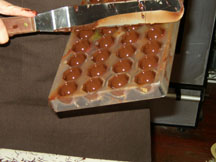
Turn 'er over and dump out the extra. I do this over a sheet of parchment and use the chocolate another day. I worry that pouring it back into my tempered chocolate may upset things. It probably wouldn't but we all have our neurosis.
Swirl that baby around to get out all the extra and make a nice thin shell.
Give it another scrape and set it aside to dry.
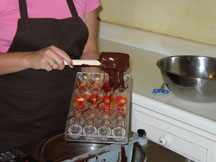
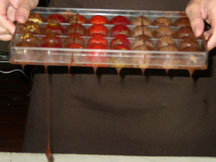
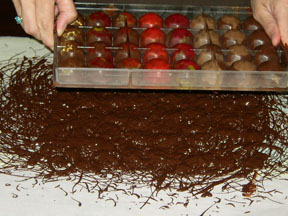
Now the shells have that velvety sheen which means they're dry and are ready to be filled. Fill a pastry bag or a squirt bottle (if you don't mind washing it) with ganache and pipe into the shells. Be sure to leave 1/8 inch of space for the bottom and don't allow the ganache to touch the rim of the shell or the bottom may not adhere properly. In this batch I have piped a drop of ganache, added a glaced cherry and covered it with ganache. Now you want to give your ganache an hour or two to develop a slight crust. If you're working with caramel you may have to wait a day before bottoming.
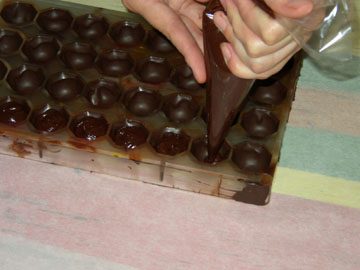
Use your silicone spatula to add chocolate with the same technique you used to fill the shells. Give it a couple of taps and swiftly scrape of the excess. Don't muck about here. The more you mess with it, the less successful your bottoms will be.
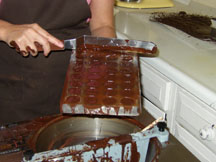
Leave the mold in a cool spot for an hour or so and them turn the bonbons out onto a sheet of parchment. You may have to give it a little whack to get every last one out. Use a gloved hand to place them on a pretty platter or into a gift box.
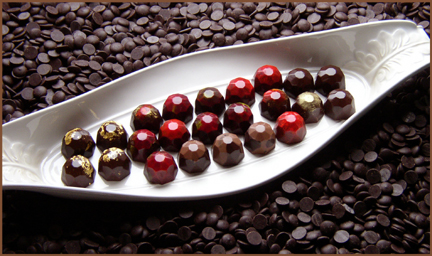
and here's the final presentation! Notice the gold leaf; the colors; the colors with gold dust; the two toned; and even one that got a last minute dusting of lustre. Honey liked the photo so well, he put it on the website!
There are so many options. Have fun, be creative, be silly, and remember, it's all edible.
-
the recipes in this thread look like Cuppa Cuppa Cuppa to me with the fruit cocktail replaced by cherries. I always thought that a cobbler had a biscuity topping. Fruit with lumpy sweetened biscuits baked on top?
-
An awfully lovely menu for a couple of beasties if you ask me. Make some nice things for yourself and feed the beasties what they really want....pasta, pizza, soup, sandwiches. They can prepare any of those items themselves right?
My beastie (okay, he's only 4) dissed my homemade lasagna tonight and opted for a breadstick with butter and a glass of milk for dinner. I should have had a slimming and tremendously timesaving bowl of cereal instead.
-
Sooooo they want cupcakes ?
-
Someone more Advanced than me will have to find it for you but there are photos somewhere on the pastry board from the brunch at the Ritz. Drooling just thinking of the photos.
-
How fun Steve! Did you start with colored cocoa butter and add powder for a different color? Do you think it would work just as well with white chocolate or would that be too thin?
-
I make the pumpkin cheesecake pie with cornmeal crust from Epicurious.com
-
What? tater tots aren't in vogue??? What will I tell my 3 year old?
-
Jenn, it's like an oven with gills! I love it.
Some mornings it's too chilly in the kitchen to temper chocolate so I close the kitchen door and make a batch of cookies to warm things up. The perfect working temp and a snack for later.
-
I think it's your room temp. my caramels would be a gooey mess if left sliced for even 15 minutes in an 80 degree kitchen and we don't have much humidity here.
The potential problem with refrigerating before dipping lies with the temperature and texture difference. As soon as your caramel hits the warmer chocolate it will begin to soften whcih may lead to leaks and geysers of caramel breaking through the chocolate shell.
Further, when dipping something cold like that you won't get the sheen that one looks for in a hand dipped confection.
Recchuiti has the bonus of working in a tall building near the bay with big windows which they can open to quickly cool the kitchen. And again, not much humidity. Even when it's foggy I rarely have the kitchen failures that folks seem to be having in other parts of the country. I'd be curious what would happen if you made a batch at home where it's cooler.
My trip to the 2005 Chocolate Show
in New York: Cooking & Baking
Posted
ick! dust flavored bonbons!!
Megan you rock. Thanks for this post. I have been wanting to go for a few years now and have put it on my goal list for next year.
I had no idea that so much was for sale. What else can one spend more money on?