chefpeon
-
Posts
1,800 -
Joined
-
Last visited
Content Type
Profiles
Forums
Store
Help Articles
Posts posted by chefpeon
-
-
No solution for your shop, but I wear these nice light little hearing protectors that my hubby bought me at Lee Valley.
Hey, I know, jcho can provide a basket of those foamy squeezy ear plugs for all the customers in the shop when the machine is running.
I can see it now.......
jcho: "Hello......may I help you?"
Customer: "What?"
jcho: "I said, May I help you?"
Customer: "What?"
Yep. That'll work.

-
The manufacturer (Union Confectionery) suggested building a soundproofed case, but that's just too much trouble--I haven't used the thing in over a year and am regretting the purchase.
Is there another room you can put it in, or perhaps run the machine after closing or before opening?
-
The sponge looks like a genoise or something similar
I don't know......the crumb of it looks too fine to be genoise........
It might help if you tell us exactly WHAT you are looking for.......are you trying to find out how to make the color pattern? If so, you just take the cake batter and divide it into three parts. Keep one part uncolored, and add colors to the other two parts. Then deposit the batters into the pan side by side and they will bake together. Then for the outside ring, bake another sheet pan of plain batter.
I'm not exactly sure how that "brainy" pattern appears on the underside of the cake, except for what Rickster said about a special mold or pan.
Have you tasted the cake? Or are you just going by the picture?
-
Wow, that's cheap! Only $155 in U.S. dollars!
All I can say is, that if concrete mixers were great for coating candies and nuts, etc, then more pastry chefs would be using them, but so far I haven't seen a trend in that direction......
I'd just be worried about the fact that the concrete mixer would be considered "food grade".
I think I'd probably go for the coffee can on the cordless drill before I went for a concrete mixer...at least I'd know that would be "food safe".

-
The great chocolate recipes I have are weak on the support side! They are not going to stand up to fondant.
I don't understand this. What makes you think your chocolate cake won't "stand up" to fondant? Unless you're dumping 500 lbs of fondant on top of the thing, there are very few, and no cake that I've personally come across, that you can't cover with fondant. I cover my chiffon cakes with fondant all the time.
I also need a stand up buttercream recipe. I really love the merainge(sp) buttercream but it doesn't stand a chance with 500 people in the (large) room.The buttercream layer is important because I need a frosting after everyone pulls the fondant off, the cakes are having to be perfect.
Buttercream is also important to make a smooth surface for the fondant to stick to. You always need to put buttercream on a cake before you cover it with fondant.
Also, are you saying that meringue buttercream doesn't stand up to the heat and humidity of Louisiana? I sort of doubt that the number of people in the reception room will affect the stability of your buttercream.....

You can forego the meringue buttercream for a "straight" buttercream, which is basically this:
1 1/2 cups hot water
1/2 cup vanilla
couple pinches of salt
6 lbs powdered sugar
Mix ingredients to a smooth paste on 20 qt mixer with paddle attachment.
12 lbs butter, unsalted (it can, and should be, cold or cool, NOT room temp!)
Throw the butter in the mixer in chunks and let it whip til smooth, about 15-20 mins.
Now if you don't have a 20 qt mixer you can scale this recipe down of course, and you can also substitute part of the butter with shortening if you need to. You don't have to use ALL shortening, but you may have to, just because of the climate conditions down there.
-
I don't know much about concrete mixers.....but would they actually be cheaper than a coating pan?
If so, that's kind of mind boggling, although I know those coating pans are ridiculously expensive.
Are you talking about one of these?
as compared to one of these?
If so, you can see that in terms of U.S. dollars, if you buy the concrete mixer, you're only saving $91.99. Also, wouldn't you have to worry about the concrete mixer being "food grade"?
-
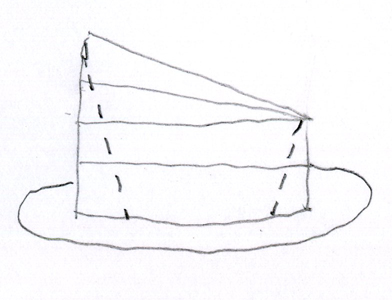
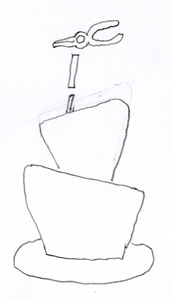
Refer back to my previous post and the previous diagram because the light didn't come on yet. So the second tier from the bottom is sitting at such an angle so that it is actually at an angle to way it baked. It baked straight up and down but it is now sitting at an angle to it's bakage (I just made that word up) because it is resting at an angle on the cake below. Yes?
Uh.....I actually have no idea what you're saying.

All I can say is that the cakes are tilted and carved exactly the same way.
Depending on how you stack them, you can make the cake look like it is leaning over, or that
each tier is off-kilter.
If you stack it so that all the tall sides match up, the cake leans over.
If you stack it so that you match up a short side with a tall side, then the angle of each cake compensates for the tilt of the one below it.
-
I mean is the bottom of the second tier cut at an angle?
Nope! It looks like it is, but it's an illusion.
Click on my blog link below, and you will see some pics of "Pollys" that I have done.
The cake in the middle is stacked so that all of the tall sides are on the same sides to give the cake the leaning look. The last cake picture (Cake De-Luxe) has the tall and short sides opposite each other so that it looks crooked......yet straight.
-
Ok, I'm still draggin' but not enough to sit my butt down in front of the computer and type a little. With lots of coffee. Lots and lots of coffee.
Here's my little demo on how to construct a "mad hatter" cake the easy way. I've done hundreds of these things and this method has NEVER failed me.
As a cake artist, I also believe in giving credit where credit is due. I've always called them "Polly Cakes" after the woman who originated the design, Polly Schoonmaker.
I don't know if this method is the way Polly does them, but it works and it's easier than any other method I've come across. I was quite surprised to see that in Colette Peters' book, her way was also a bit overly complicated. It doesn't have to be that hard. Trust me.
These sketches are very quickly and crudely drawn, because my friend Jeanne needed some quickie instructions at the time, so I made quickie sketches. They may be crude but they do get the point across. Nothing like a visual to demonstrate a technique, eh?
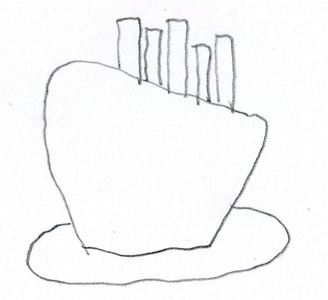
Let's say you're going to do a three tier Polly. The largest tier (the bottom tier) needs to sit directly on a covered plywood, foamcore, or particle board. I don't trust foamcore for the bottom myself, I use only plywood or particle board and cover it with Polyfoil, which I find at floral supply stores.
These cakes need to be somewhat tall, so I always use two cakes per tier, and split each cake. The first one is always split normally, as such:
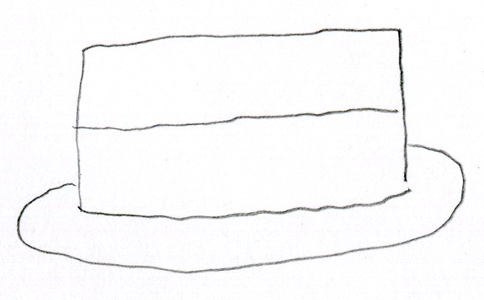
The second cake is split on the bias, like so:
The reason I only split one cake on the bias is so the cake tilts, but doesn't tilt too much, because there is such a thing as tilting too much.
You then stack your cakes as follows, with filling of your choice in between each layer. I like to stay away from slippy slidy fillings like curds, for instance, in these types of cakes. If you must use a slippy slidy filling, don't forget to put a buttercream dam on the outside edge of each layer before you spread the filling on the top of the layer. Notice that the cake layer that is cut on the bias gets put together so that the two thick edges and the two thin edges match up, creating the "tilt".
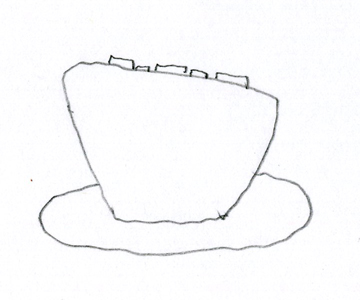
Each cake sits on it's own cardboard! Except for the bottom one that sits directly on the plywood board of course. This is very important for support purposes!
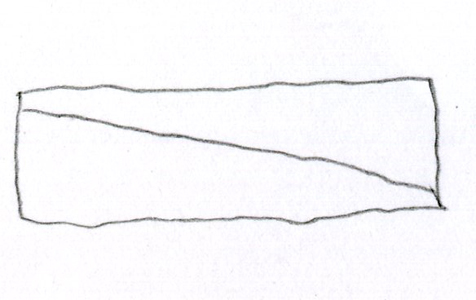
Where I have drawn the dotted lines is where you carve the cake to be narrower at the bottom than the top. Don't be TOO severe in the way you carve it down, or you will possibly have a cake that just might be a little TOO narrow at the bottom, and besides, you don't want to cut away servings. On that note, be sure to remember to down your serving numbers from that of a normally iced tiered cake.
Once I have carved the cake, I cut the cardboard at the bottom of the cake to be flush with the new narrower bottom size. I've used both a cardboard cutting knife and scissors. Whatever works for you.
Once you have all your tiers split, filled, tilted and carved, give 'em all a nice crumb coat with buttercream and chill 'em down. Once chilled, cover each tier with fondant. Depending on your experience this may or may not be an easy job. Next to covering a square cake, I hate covering Pollys with fondant the most. Gotta work fast, and the fondant always has a tendency to crack or break right at the top edge. And it can be tricky to work out folds and creases at the bottom of the narrow part (this is another reason you don't want the narrower part to be too narrow). Make sure your fondant is fresh! Old fondant or fondant that is on the dry side is a major pain in the butt. Really. Another tip is to give your top cake edges a rounded look....it's much easier to work the fondant over a rounded edge than a sharp one.

Once all your tiers are covered with fondant, stick the ones you aren't working with at the moment back in the fridge to stay cold. Starting with the bottom tier (duh), stick bubble tea straws in the cake, straight down til you feel the straw hit the board. Stay within the diameter of the tier of the cake that will be placed on top! How many straws you use is up to you; you need enough to support the weight of the cake, but not so many that it's a nightmare for a cake server to cut. That's why I LOVE bubble tea straws! They are stronger and you can use less. If all you have is bar straws, they work fine too.....you just have to use more of them.
Next, cut the straws with sharp scissors as flush as you can to the surface of the cake like this:
It's ok if the straws stick out a tiny bit. Now here's why the cakes need to stay cold for this process: Melt some white chocolate (you can use dark chocolate too, but white sets up faster).
White chocolate burns really easy, so be careful. Pour a little puddle of it on top of the cut straws. Go get your next tier. Place it on top of the bottom tier and position it how you like. Hold it there for a few seconds til the chocolate sets up enough to hold it on its own. When your cakes are cold, the chocolate sets up fast and easy.
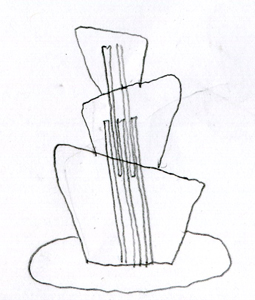
Next, use about 3-4 long bamboo skewers and using the side of a pair of needlenose pliers, hammer the skewers down through the center of the topmost tier down through it's cardboard, and all the way down to the bottom board. The thinness of the skewers and their sharp points allow them to pierce the cardboard very easily. I place about 4 skewers fairly close together in the center of the cake.
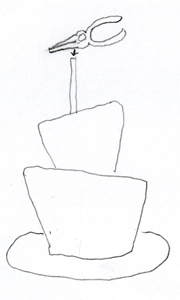
A portion of the skewer should still be sticking up out of the top of the cake. Using your pliers, lift up on the skewer a bit to bring it out a little, then cut it off using the cutting part of your pliers. Then place the cut-off part of the skewer on top of the skewer you just cut (get it?), and again, using the side of your pliers, hammer the cut skewer down so you feel it touch the bottom board again and the skewer should now be below the surface of the cake. See? If it's not, pull it out with your pliers and cut it again, and repeat.
Both the strength of the white chocolate and the stabilization the skewers provide make for a very stable cake.
Here is an illustration of what all the skewers would look like in the cake if you had x-ray vision.
All you have to do with the remaining tiers is repeat the process with inserting the straws, cutting them, putting the white chocolate on, placing your next tier on, holding it til set, then inserting and cutting your skewers. For the topmost tier, I don't worry about the holes that the skewers make because there's usually something that goes on top that will cover them, like a cake topper or flowers or some deal-o. If there is no deal-o, then you can insert tiny pieces of matching fondant into the top holes, moisten your finger, and blend them in.
Hope this helps!!!!
Questions? Ask them here so everybody can see the info!

Cheers.....Annie
-
You need the boards to support the weight of the cake tiers above. Otherwise you'll have a collapsing cake on your hands.
Absolutely. DO NOT forego the cardboard between tiers!!!!!

Giant day at work today. I'm busted. Too tired to watch fireworks even.

I saved my sketches that I sent to Jeanne on how to construct a "mad hatter". I will post them tomorrow, along with basic instructions.
til then.......zzzzzzzzzzzzzz
-
BKeith's method, as linked to by alanamoana, works, but it's overly complicated, and actually not necessary. It was the method previously used by Jeannecake, but she switched over to my method as she described, because, it's so much easier, and quicker. It's also VERY stable.
-
Are we all officially confused yet?
-
Stuff like this drives me nuts.....or should I say......pralines?
Terms in the pastry industry are used so loosely and interchangeably, sometimes I don't know what's what. If someone wants a truffle, are they talking chocolate, or fungus? Where I grew up, bon bons were filled with ice cream. Pralines, to me, always say, "nuts are involved."
At least I've learned enough to question my clients when they ask me for something, because it could mean the complete opposite of what I think they're talking about.............

-
Personally, I think blueberries are pretty bland on their own. I like to doctor them up a little with lemon juice (because they can be too sweet) and cinnamon. I especially think that the flavor of blueberries can get a little lost in a cheesecake.
So if I were making this cheesecake, I would pre-cook the berries much like a pie filling.....a little sugar, cinnamon, lemon juice and cornstarch......cook til thickened, and use at the bottom of your cheesecake, or swirl it in (my preference is to swirl, cause it looks cool).

-
For example, whipping canned milk.
My mother, a bride during WWII knew it whipped, knew what to do to make it whip properly.
Well, I must say I'm ashamed.
My mother was a WWII bride, and if she knew canned milk could be whipped, she certainly never shared that with me.
Fast forward to my adult years where I went to pastry school, and have now spent 18 years in the business. Nobody ever told me that you could whip evaporated milk. I mean, I had cream to work with....why would I want to go to the trouble of whipping evap? This thread is the first I've heard of it, which just means that as much as you think you know, you never know everything.
I'm imagining that perhaps during those WWII years, for some reason, it was much easier to obtain (and afford) evap as compared to heavy cream. That, combined with Jello, made for a fun, delicious, inexpensive dessert.
It's pretty easy to come by a pint of heavy cream these days, so I'd probably whip up some cream as opposed to taking the time to chill a can of evap and whipping that. Sure it would be higher fat, but perhaps a bit richer and yummier.
-
You're right.....the hour thing was sort of off-topic, but I guess I was just trying to say that I don't think it's the hours that attract women to pastry. Whether you're savory or pastry, man or woman, the hours suck, whether it's the shift or the sheer number of them.
From what I've learned about differences in gender, based on what I've observed about male and female co-workers, and also having been married to two different men, I've kind of come to the conclusion that in general, (and I know generalizing can be dangerous), men are more "big picture people" and women tend to be detail people. Of course there are exceptions to every rule! But this is the general tendency that I've come across.
I'm not saying savory isn't detailed, but when you look at baking as compared to cooking, the science of baking depends on minute details. One detail missing (like, for instance, baking powder) and you're in big trouble. There is also a lot of patience and planning ahead involved in pastry, and I think these facets of it come JUST a bit easier to women.
On a personal note, I'm much more comfortable with the pace of pastry. I'm not saying SLOWER pace, I'm saying the WAY it's paced. Not a lot of things in pastry are a la minute like they are on the line. You can't whip out a cake in just a few minutes like you can serve up a lot of hot entrees in less than the time it takes just to bake a cake. I don't like the "everything all at once" part of savory, and that's one of the reasons I'm not in it.
-
I sort of disagree about the "normal hours". For most of my career, impossibly early mornings, graveyards and swing have been the norm. Not only that, but an 8 hour day is a "short" day.
When you go to work at 2 am, you need to be in bed pretty darn early, and that isn't really "family friendly" or if you want any social life, you can kiss that goodbye too. Same applies for graveyard.
I'd say swing is probably the best if you can't get 9-5 in regard to family life, but again, it's not so great for a social life if you're single.
I've been doing pastry 18 years. I've had two 9-5 jobs in all that time, and both times I've been in management. This time is one of those times. I'm the lead pastry chef for a wholesale bakery and retail cafe, so I get to FINALLY enjoy going in at 9 am. However, when I leave is a crapshoot.....I'm lucky if I get out of there by 7pm.......that's a "normal" day.
The 8 hour day still escapes me.........
-
Yipes. Just got off a 14 hour workday and the boss decided to call me over to his house to
ask about extending the shelf life on our breads.
I have a pretty good knowledge of bread and I did artisan bread for two years back in '95 to '97. I've been away from that part of the biz for a while so I'm a bit rusty. The last time I worked with any type of dough conditioners was when I was in pastry school, and that was limited mostly to nonfat milk solid type products.
Apparently boss-man isn't entirely satisfied from our lead bread guy's input regarding extending shelf life, so he decided to pick my brain too. After a 14 hour workday, all I managed to get out besides "uhhhhhh", was "malt syrup?"
I do believe the use of malt syrup makes for a softer and longer shelf life bread, right?
We have a non-diastatic malt powder that we use in some of our doughs, but I don't believe it
has the same effects on the dough as syrup. But I'm not sure. Can someone set me straight?
Can you educate me a bit?
Does anyone out there use a particular brand of dough conditioner they are happy with?
Would you be able to give me a brand name?
My brain hurts.
-
Right, because baking is never stressful, hard work, or has deadlines. I think that there is a perception that pastry is easier, but if you think a good pastry chef doesn't work their ass off, you are wrong.
After a 14 hour day at work today, I will say "damn right we work our asses off!"
-
You go GB! We ethical chefs are totally behind you, but I think you should confront your problem in a more ethical way. In my case, I have drawn a line at doing desserts that cater to the vegan-raw food crowd because, well, carob is vile, for one thing. I told my boss (in a humorous way) that if he asks me to do any of that, I'll quit. I even told him he could fire me on the spot, but he just laughed and totally backed me up. Those people can eat apples for dessert or go somewhere else. The point is, that because of my previous experience of taking my gripes online, instead of to the source of my frustration, I got really burned. This stuff can backfire on you buddy, trust me.
-
Yowza......regarding that link......that's the kind of pastry chef I wish I could be!!!!
Sigh.
Uh.....now I must ask, what is a VIP turndown?

-
Ooooo...link?
No link needed! I'm living proof that a little rantin' and ravin' about your job on eG can indeed get you fired. Not that my bosses were reading eG.....my competition was, and she printed out my rants and, well the rest is history.
Lesson learned. If I have a problem at work, I'll rant to the appropriate people....namely the bosses.
I think what hurt me most is that I thought there was a bit of camaraderie among the pros that post here and it never really occurred to me that someone would be vindictive enough to "out" me. When I made the poor decision to vent in a forum, I experienced just the opposite of said camaraderie. That really stung. It still does.
Anyway, back to the topic at hand.....
There have been a few jobs I've had where I have felt my bosses were less than ethical.....and wouldn't you know, that's what I was ranting about regarding the job I was fired from. It isn't always that easy to just quit a job when you have bills to pay and god forbid, GAS to pay for. The best way to find a job is when you still have a job. When I've been disillusioned by my place of employment, out comes the resume and I start looking. When I land the new job, I give my notice at the old one.
-
He says that whipping the eggs and sugar together helps stabilize the foam and creates a better foam structure once it is tempered with the milk and cream and returned to the saucepan for cooking.
I don't quite understand this. As far as I'm concerned, once you add the egg mixture to the milk or cream and heat it, the foam is gone.
-
At least one eG member has been fired because of what they've posted online...
Annie sez: Listen to prasantrin!
Tiger skin roulade
in Pastry & Baking
Posted
Maybe that batter would be sort of a meringue?