

vengroff
-
Posts
1,832 -
Joined
-
Last visited
Content Type
Profiles
Forums
Store
Help Articles
Posts posted by vengroff
-
-
Today I made Char Siu Take Two.
Awesome looking pork loin. I'm definitely going to have to try your technique.
-
blackp is correct that circulation vs. non-circulation is what really makes the difference. Technically, what I am changing from one machine to the next is something called the surface heat transfer coefficient, also known simply as h. This constant models how heat is transferred from the water into the food. For non-circulators, this constant is lower than for circulators because the circulators do a better job of bringing warm water to the food surface to replace the ever so slightly cooler water that has lost some heat into the food. Non-ciculators rely on the small changes in density of the cooler water to cause it to sink and be replaced by warmer rising water to create natural circulation paths.
Wattage is really only a factor when you start talking about large amounts of water and/or food. You need enough wattage to keep adding heat to the water at the rate it is losing heat so that it does not drop in temperature. The water mainly loses heat into the food, via evaporation at the surface, and through the sides of the bath. Which or these is dominant depends on all kinds of geometric, temperature, and material factors. When the heater doesn't have enough wattage to do a good job of keeping up with these losses you are in trouble.
I don't try to model the effect of underpowered heaters. Instead I assume that people are using appropriately designed and appropriately sized vessels for their heaters. You best bet here is to make sure you stick within the guidelines the manufacturer recommends. If they say they can handle a 50 liter bath and you use 200 liters, you are probably in for a bad experience.
-
This seems like such a great tool --- any chance of porting to a Droid? Pretty please?
The number one request I get. I'm gonna have to break down and buy a droid of one form or another. Can anyone recommend a good cheap plan-free option that will run on WiFi even without a SIM? That's all I probably really need. In any case, it's a tentative 2012 project.
I certainly agree with adding the low temperature starting point -- almost of the time I cook or rewarm from frozen, i.e., -10 to -20C.
See my last post above.
But now, how about adding another very important feature -- chill time?
Wow. Now that could almost be a whole new app, especially with you fancy vodka technique. I may have to give that a try.
-
Understood. Isn't that math already accounted for in the tables for pasteurization available in MC and Douglas' book and the FDA tables?
By my reading, that is exactly what Baldwin does. And for the cases I've checked my numbers match his to within the 15 minute precision he provides. Douglas, if you are on this thread I'd love to hear you chime in with a confirmation.
I thought the way you were going to implement it was much simpler. Just a switch, and a lookup table for the pasteurization time required for each temperature. That time would be added as a secondary timer after the 1st one is complete.
At least, that's how we do it now, is it not? We look at the item thickness, calculate time to core temp, look up pasturization time at that temp, and add it to the "time to core temp".
In Baldwin's pasteurization tables (specifically the ones at http://www.douglasbaldwin.com/sous-vide.html) he uses the heading "Pasteurization Time from 41°F (5°C)." So the time he is giving is not the time you need to add once you reach your target temperature, but the whole time, including the time to get from 5°C to the target. So if you add this time to the time to reach temperature, then you are cooking longer than you really have to in order to pasteurize.
The reason it isn't ideal to simply add a pasteurization time once you reach temperature is that you can't know how close you are to pasteurized when you reach the target temperature without knowing what kind of partial pasteurization occurred on your way to the target temperature. That depends on the temperature curve you followed to get to the target temperature, which in turn depends on your starting temperature, among other things.
The real fundamental tenant of SousVide Dash is to try not to rely on any pre-computation but instead to do as detailed a simulation as possible for exactly the scenario the user has chosen. The app tries to simulate everything that happens temperature and pathogen-wise second by second from the moment the food enters the water bath. I went this way because you can't easily pre-compute every scenario anyone will ever want to try and store it in a table, even if the table is pretty dense and you have decent interpolation.
The desire to fully simulate the cooking process is also why I haven't yet done the cooking from frozen feature that some of you are asking for. There is a fair amount of added complexity that comes into play as ice in food melts. It absorbs a great deal of heat in doing so, in a very different way than water that in simply becoming warmer water does. Thus accurately keeping track of what is going on in a partially frozen, partially thawed piece of food gets a little more complicated.
-
I'd say at LEAST core, if not both. But i would also suggest making the pasteurization time a separate counter that starts once the main counter reaches its end. That way i can see how long to get to core and then how long to pasturize. I'd keep them almost as independent timers. Am I explaining that clearly?
I think I understand. Basically you would like the app to tell you something like, "the core temperature goal will be reached in 45 min, then pasteurization will start and it will be complete one hour after that." So you'd like to see a 45 min timer start, then when it reached zero a 60 min pasteurization timer would start, and when the second timer reached zero the food would be ready.
Assuming this is correct the issue I have with it is that pasteurization starts before you reach the target temperature. It is slower, but it is already happening even before core temperature is reached. You can see this in the pasteurization graphs I posted above. 2-1/2 hours into the cooking process, we are still an hour short of reaching core temperature, but we are at a high enough temperature that pathogens are being reduced. This is shown by the positive slope (up and to the right) of the various colored log reduction curves. As we get closer to and eventually reach our target temperature, the slope gets even steeper, meaning pathogens are dying off even more rapidly, but the process was already underway long before this.
Because pasteurization is a continuous process that starts slowly but well before we reach target temperature I think it might be a little misleading to have the two timers. That would suggest that pasteurization does not begin until we reach the target temperature, which is not the case.
-
Couple more things i would like:
1) Would love to see a "pasteurization" option step. This could be a switch that would add a pasteurization time once the core temp is reached. Time would be based on final item temperature. I realize this might be a bit complicated to add for beef, chicken and fish since the times are difference, but starting with chicken would be great, since that's the one that we all pasteurize and the one that really NEEDS to be cooked to pasteurization. without that option i'm stuck having to remember to add it to the end of the timer and look up how long pasteurization is at each temp.
...
Love the app!
I'm in the process of adding this, and in light of recent discussions in this thread I'd like to ask for some feedback. Specifically, would you be interested in the time required to pasteurize the surface, the core, or an option for one or the other? I've put together the basic code for both, and the results are pretty interesting, especially for large cuts of meat.
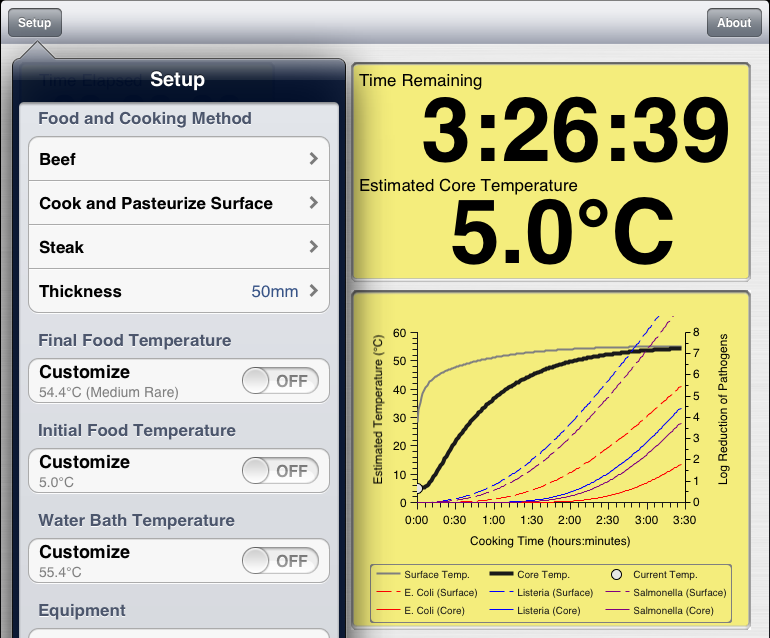
For example, here is a scenario where we are cooking a 50mm steak to 54.4°C in 55.4°C water. This is basically what the app does today.
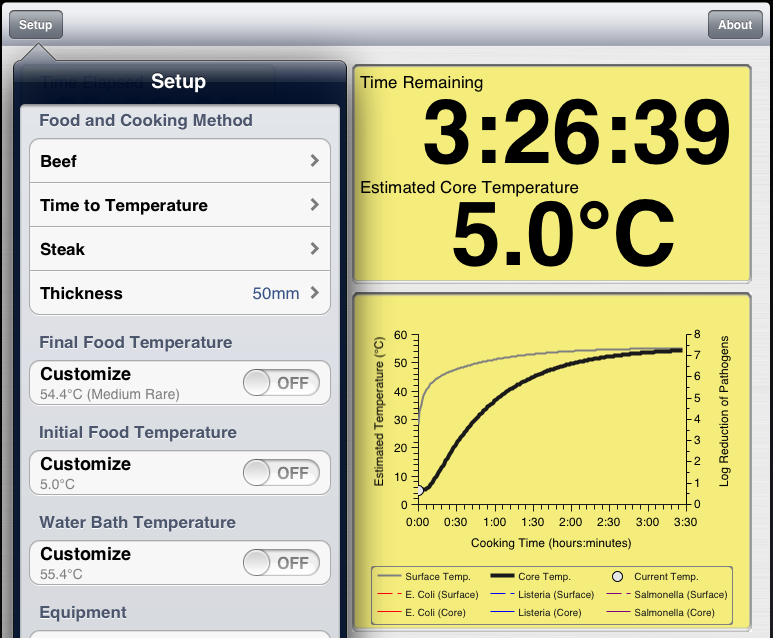
If we look at what it takes to pasteurize the surface, we see that the cooking time does not change at all. The surface has a log reduction of E. Coli of 5 (99.999% reduction) before the core even reaches the final temperature. This is shown be the dashed red line. The other two pathogens have been reduced off the chart by this time. Note that up means more reduction, i.e. less of the pathogen still alive.

If we want to pasteurize all the way to the core because we have reason to believe there are internal pathogens, then we haven't done the job. According to the solid red line, we've only got an E. Coli log reduction of 1.77, or about 98%. If we want to pasteurize all the way to the core, we need more time, as shown below.
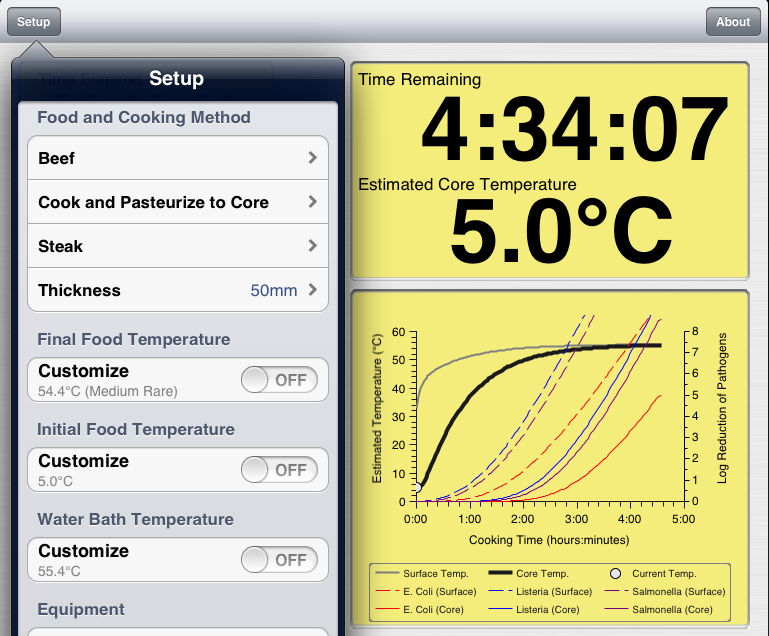
We finally got a log reduction of 5 for E. Coli (the solid red line) over an hour after we had it at the surface. The other pathogens have log reductions off the chart by this time.
So back to the original question. Is this the level of detail and the kind of options you would like to see in the app? Is the surface-only option useful--i.e. do you trust your rancher and butcher that much? Or is core pasteurization what most people want?
Finally, I'm currently going with 5 LR (100,000 to 1) for E. Coli, 6 (1,000,000 to 1) for Listeria, and 6.48 (3,000,000 to 1) for Salmonella. These are the same numbers Baldwin uses, but I'd appreciate any feedback on them.
Thanks in advance.
-
We also did a sous vide turkey. We managed to time it right so that we went from the circulator to a quick trip under the broiler, a short rest and then to the table just as all the sides were ready.
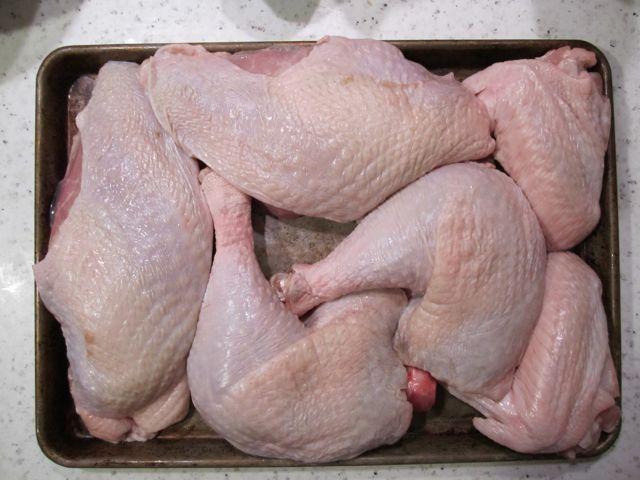
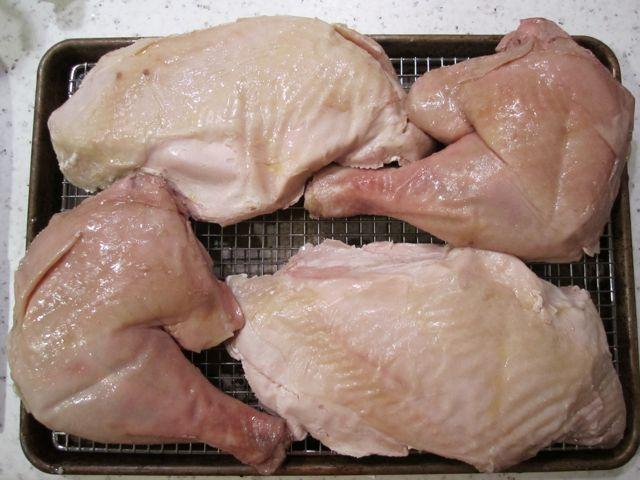
The first step was to break down the turkey, and 18 pounder from Rain Shadow Meats.
The wings, neck, and scraps of meat from the carcass went into the pressure cooker with some aromatics to make stock, some of which would later be reduced to become the base of the gravy.
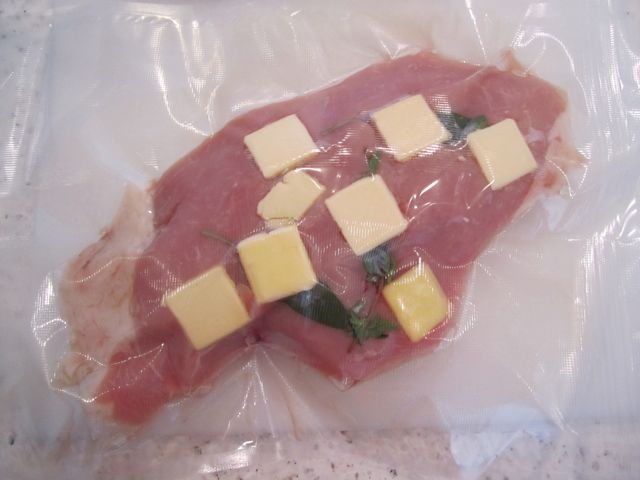
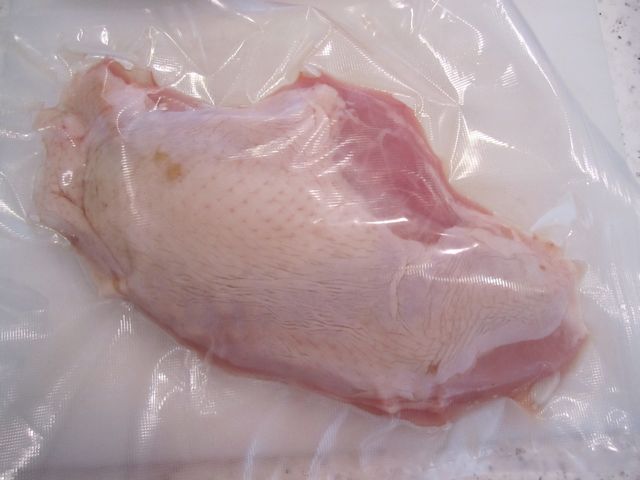
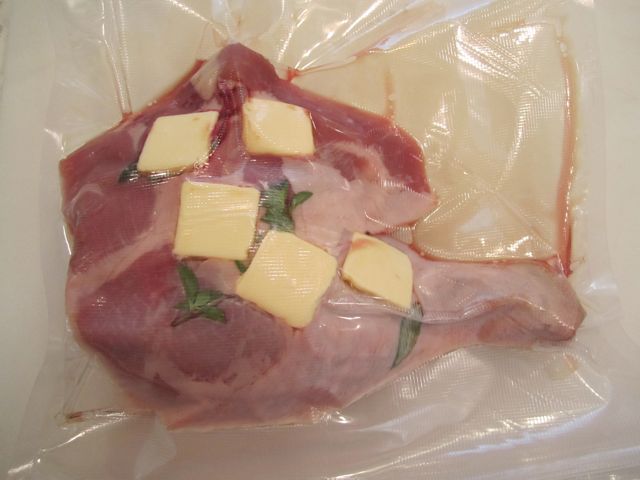
The boneless breasts and whole legs were then bagged with some herbs and a little butter, in place of the duck fat I ended up not having on hand.


Once bagged, all four quarters were 50mm thick. By my calculations with SousVide Dash they would come to 60°C in 61°C water in just over three hours. So 3:30 before we planned to sit down at the table they went into the water.
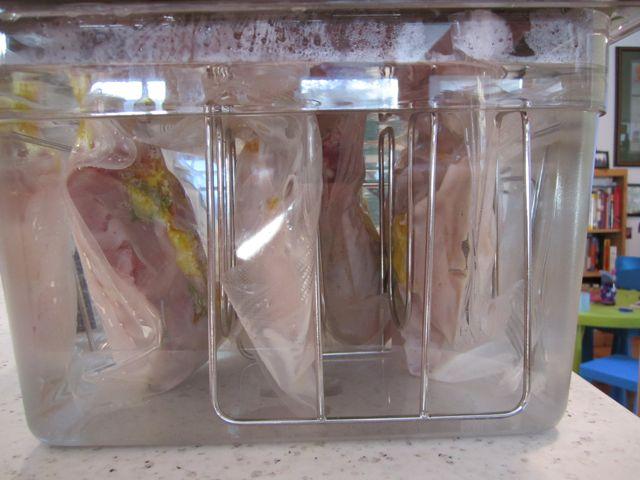
I rotated and rearranged the four bags halfway through just in case there were any hot or cold spots. Three hours later they came out of the bath feeling fulling cooked. The core temperature of both had reached 60°C as I planned. When I cut open the bags, there was an intense aroma from the herbs. Just two sage leaves and a sprig of marjoram had been enough for each bag. Here are the quarters right out of the bags.
From there they went under the broiler to crisp up the skin.
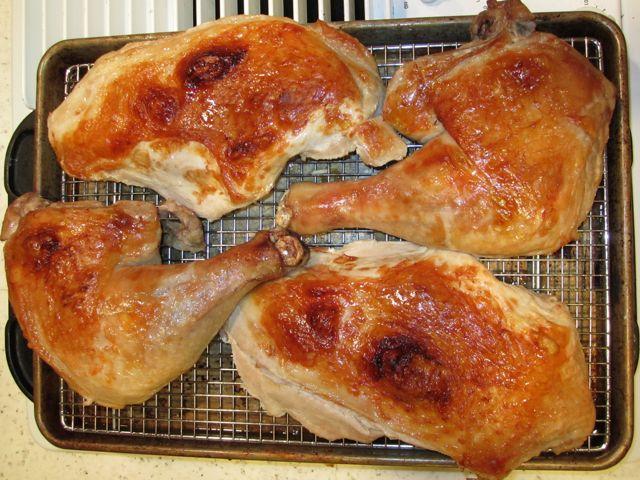
A short rest, and then they were sliced and brought to the table.

And served with traditional sides and gravy made from the stock and juices from the sous vide bags.
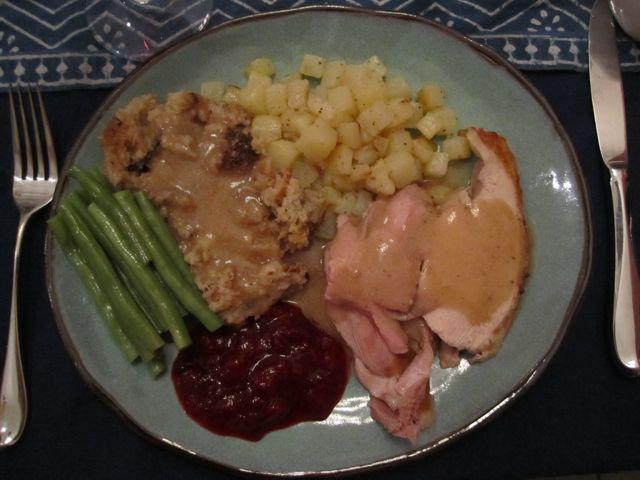
The turkey was a big hit, especially for those accustomed to the standard sawdust-dry breasts on most roasted Thanksgiving turkeys. I think I'll be hard pressed to ever do a turkey any other way.
-
Its not roast turkey:
SV turkey breast @ 140 for 3 hours:
...
it might be good with a light creamy mushroom sauce etc with something else crunchy on the plate.
Did you do anything with the skin? You could crisp it separately either on the stovetop or in the oven then serve it with the breast meat. Crispy fried turkey skin strips sprinkled over the top maybe?
-
The app is now very good as of the update last night which allow overriding the lower temps. Couple more things i would like:
Thanks. I'm glad you like it.
1) Would love to see a "pasteurization" option step. This could be a switch that would add a pasteurization time once the core temp is reached. Time would be based on final item temperature. I realize this might be a bit complicated to add for beef, chicken and fish since the times are difference, but starting with chicken would be great, since that's the one that we all pasteurize and the one that really NEEDS to be cooked to pasteurization. without that option i'm stuck having to remember to add it to the end of the timer and look up how long pasteurization is at each temp.
Great suggestion. I've been thinking this through and reading up on the references in anticipation of doing this. I want to make sure I fully understand things before I add this feature. Probably in 2.0.
2) there are some strange thickness limitations in some items. I understand the need to reach core temp within 4 hours, but a pork chip thickness is limited to 1 15/16 which cooks in about 2hrs 30 mins at 140...and it is conceivable to have thicker chops.
Before the next release we'll do a complete re-review of dimension and temperature limits and make sure they are reasonable. There is at least one other case I'm aware of for fish.
3) Would like the option for thickness in mm
I have good news for you. This is already available. Got to your iPad/iPhone Settings app (the gear icon on the main screen). It has a section for apps and there is an entry there for SousVide Dash. There are two settings you can change. One for temperature measurement in F or C and the other for dimensions in or mm. For devices sold in the US, the app should default to in/F and everywhere else in the world it should default to mm/C. But you can change either one of these settings no matter where you are. So if you want C and in, or F and mm, you can do that.
Love the app!
Thanks again. I'd appreciate a review or rating in the app store.
-
Ok, you guys are right. I should test this before making a blanket statement. I've never seriously looked for a bagging solution to cracking because it is not a problem I have ever had.
The one thing I do, however, is put a pin prick in the air bubble end of the egg. I've done this for years for boiled eggs, long before I ever used sous vide.
-
Received my machine today. I've spent the past week trying to read all the pages of the sous vide threads. It's overwhelming.
My question is: Eggs....can I place them in a zip loc bag without a vacuum to cook in case one breaks. If I can, do I have to fill the bag with some of the water?
I would not recommend this, and I would definitely not put the eggs in bags filled with water. In general, you want the water to circulate freely around your food as it cooks. If there is water in a bag with the food then that water is not circulating around the bath back to the heating element.
I would not worry too much, though. I cook eggs regularly and breakage has never been a problem.
-
My solution to the nesting problem is to use gnocchetti instead of orecchiette. They catch most sauces just the same way, but don't tend to catch each other as much while cooking because they are a little more oblong.
-
I suspect you're right, but, is this not basically a physics problem? And if we weren't talking about a ham, but rather something scientifically important wouldn't there be an effort made to answer it?
Yes, you are right that it is basically a physics problem. The theory behind it is well understood. The heat equation is the usual starting point for solving problems like this. But of course the devil is in the details, especially, but not exclusively, the boundary conditions that explain what is going on at the surface in terms of heat transfer to or from the surrounding environment.
Another angle you should bear in mind is that for most cooking methods there is not a single uniform internal temperature when the food is done. The surface of a large piece of cooked food is almost always hotter than the very center, in some cases by a lot. Sous-vide cooking is one of the few methods that avoids this problem, which is one of its advantages.
-
Vengroff, I contacted the farmer and this is what she said:
" I used the formula on this site http://www.thepigsite.com/articles/541/weighing-a-pig-without-a-scale. He has a 53 inch girth and 59 inch length. Using the formula 53 inches squared gives me 2,809 multiplied by length gives me 165,731, divided by 400 equals 414.33 pounds. His weight. Hanging weight is usually 75%, this web site says 72%. So multiply 414.33 pounds by 72% and that will give a hanging weight of 298.52 pounds."
That makes sense. I was thinking hanging weight. In any case, if your experience is anything like mine was you will be amazed just how large and unruly a hog that size is on the butchering table.
-
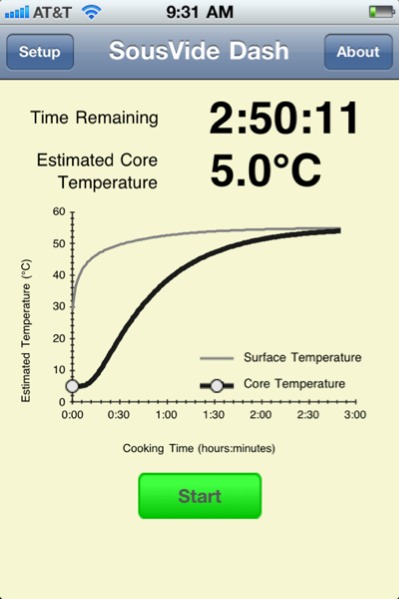
I believe it is 5.0 degrees C as the initial core temp. ,not the final temp.
Yes, that is correct. The little circle moves along the graph to show you an estimate of the core temperature over time.
Vengroff, is that app approved in teh app store?
Yes, it is in the app store as of last week. I have also submitted an update that fixes some bugs on iOS 5 and adds the ability to choose temperature display in F or C and dimensions in inches or mm by going to the Settings app. Should be out in a few days.
-
I agree with others that 400+ lbs is a monster hog. The biggest I've ever handled whole was 325 lb. It took four of us to carry it, not just because of the weight but also the sheer size.
If you decide to back out of using the whole head but are going to be curing, you can still make some great guanciale from the jowels.
-
I would go whole at 55 for 3 hours.
I agree.
-
I've been thinking about getting a Belkin kitchen cabinet mount for my iPad. Anyone have one and care to comment on whether you have found it useful? I mostly use it for browsing recipes on the web, rather than as a tool for organizing my own. I think if I had a better place to keep it visible but off the counter I'd use it a lot more.
I also think SousVide Dash is a pretty cool app if you do any sous vide cooking, but in the interest of full disclosure, I have to point out that I wrote it.
-
Piggybacking on this question:
I will be in Seattle for a few days this July (on either side of an Alaska cruise) and would love to have some good cocktails while there. But since I will have the family in tow, I can't really go to bars. Are there any restaurants in Seattle which both serve excellent cocktails and will welcome a well-behaved, seafood-loving 8-year-old?
Here are some options you might want to consider:
Anchovies and Olives - Good variety of thoughtfully prepared seafood. House-made ginger beer for a great dark and stormy. If your 8-year old is adventurous, you can go for things like carbonara with cured tuna heart.
Restaurant Zoe - An early pioneer of high-quality cocktails in a restaurant setting. They are planning to move to a new location soon, so check your dates against their move schedule.
Taste at SAM - Much more than a typical art museum restaurant. Creative cocktails including a farm-to-glass program and creative regional cuisine.
The majority of serious restaurants in Seattle now recognize the importance of a quality cocktail program. Call or check online, but these days almost any place you go expecting an excellent meal should have at least a decent cocktail program.
-
Thanks for the class. I thoroughly enjoyed it and am looking forward to many great pressure cooked meals in the future.
-
In my experience, prices in grocery stores vary tremendously depending on location and market niche, whereas farmers' markets are more consistent for in-season items. The result is that you can find groceries that are more or less expensive than farmers' markets without too much trouble.
For example, the two groceries studied in the Seattle University study cited in the Atlantic article, Broadway QFC and Madison Market, both have above average prices for Seattle. They are on Capitol Hill, which is relatively dense and has higher retail rents than many other neighborhoods. So it's not surprising they came in a little above farmers' market prices. But only a mile or so away, in the less affluent Central Area there is a discount grocery outlet that specializes in liquidating near-expired frozen and canned goods. They also get some fresh produce that needs to be moved quickly. On top of that, they host a weekly farmers' market in their parking lot. The produce in the store is much cheaper than the farmers' market outside, but the quality is not nearly as good. The farmers' market prices and quality are comparable to others in the area.
If you only shopped in the core retail section of Capitol Hill, you might conclude farmers' markets are a bargain. But if you only shopped in the Central Area you would conclude that they are substantially more expensive.
-
I had a dinner at Gramercy Tavern a while ago where we were served a piece of fish (maybe halibut?) atop some kind of purée of broccoli that was intensely GREEN.
Maybe you could do something similar? Sort of like a broth-like sauce?
Halibut and peas is a classic springtime combination. This weekend I extended it to halibut, peas, and carrots. I dusted the halibut with carrot powder, sous vided it, then served it atop beurre blanc and sprinkled peas over the top. The carrot came out brighter orange - almost day glow - and sweeter than I expected, so next time I'll probably skip it. But a few peas definitely go a long way when paired with halibut.
-
See the Weekly's cover story here: http://www.seattleweekly.com/2011-04-27/food/ethan-stowell-empire-builder/
Parts of the story took me back to Union's heyday. I remember the squab and foie dish like I had it yesterday.
So is Ethan the new Tom?
-
I just read the coffee chapter and I loved it. I'm glad to see it given the space it deserves in a book like this.
I remember my one and only god shot. It was at Stumptown's Pike St. shop in Seattle. I've been there quite a few times and the shots are always great, but something about that one day elevated it to the next level. It had a progression of distinct individually discernable flavors, caramel, apricot, toasted brioche, and dark chocolate, all with an incredible richness and depth.
I also liked the jabs taken at Michelin-starred restaurants that drop the ball with their coffee service. I wonder why more restaurants that offer espresso don't just buy Nespresso machines. The same staff that pull wildly erratic shots today could at least produce something consistently good. Not excellent, but always good. And it certainly requires no training to drop a cartridge into the machine and push a button.
As I turned the pages I kept hoping to see the story of the Clover vacuum press machine. Once the darling of independent shops, it quickly fell out of fashion when Starbucks bought the Coffee Equipment Company that designed and manufactured it. But it was, and still is, a very well engineered solution to the problem of producing a consistently top-notch cup of brewed coffee.


Going Cold Turkey
in Cooking
Posted
I have the exact same concern. SV it is going to take well over the six hour guideline for pasteurization. I personally would be very hesitant about trying to sous vide anything larger than half a turkey. Quarters are fine, but whole seems pretty off limits to me.