vengroff
-
Posts
1,832 -
Joined
-
Last visited
Content Type
Profiles
Forums
Store
Help Articles
Everything posted by vengroff
-
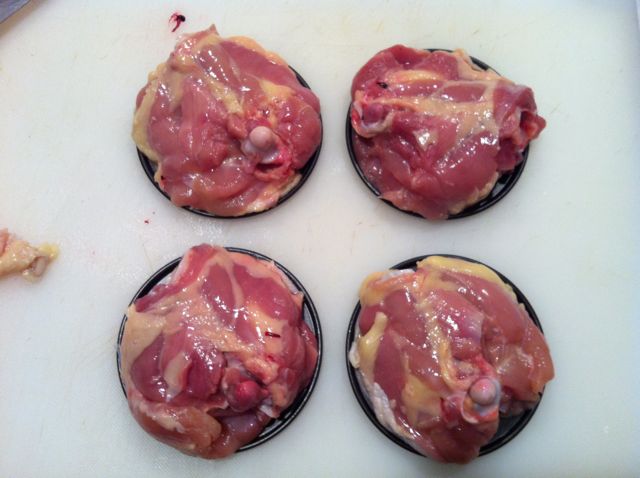
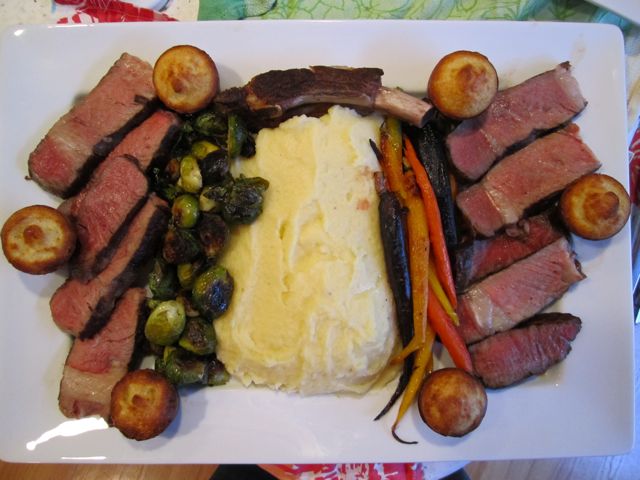
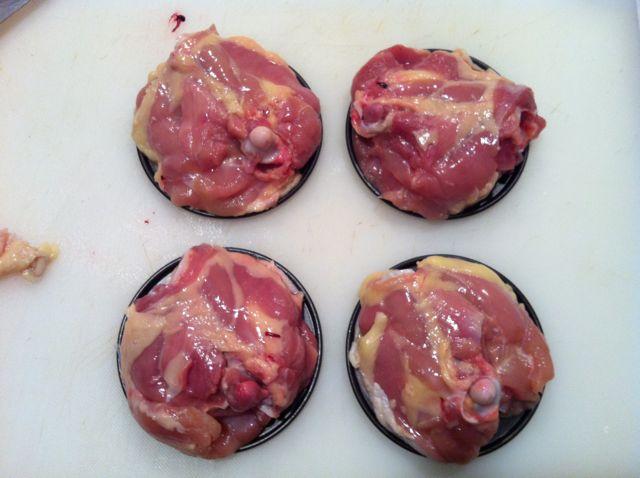
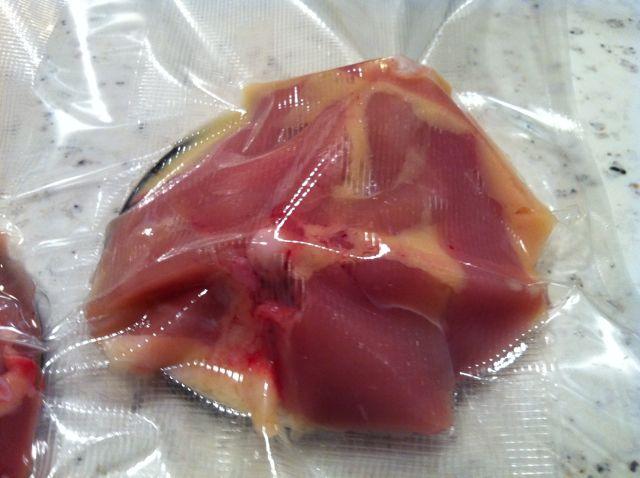
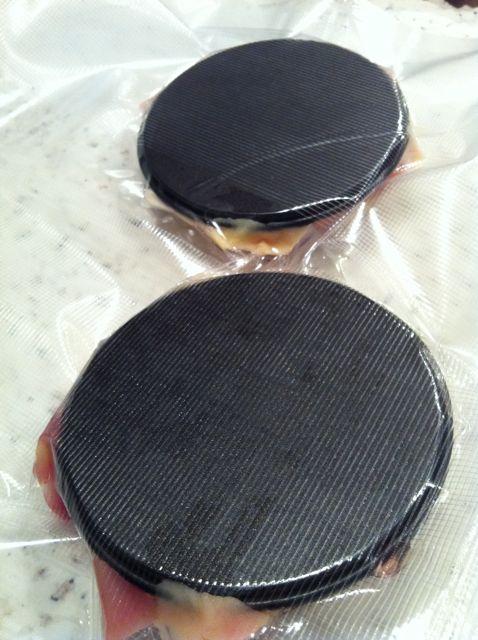
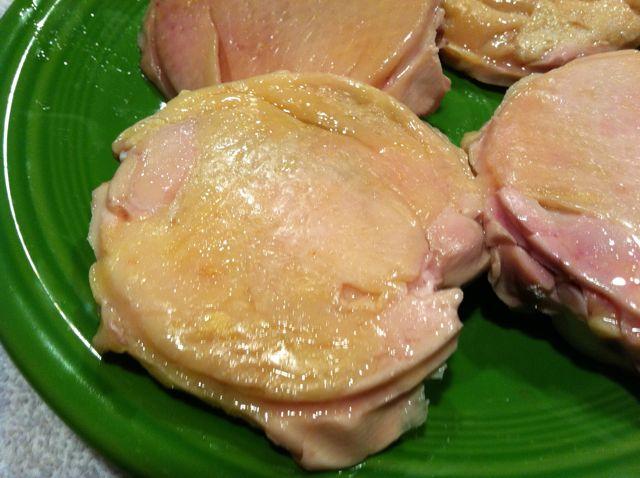
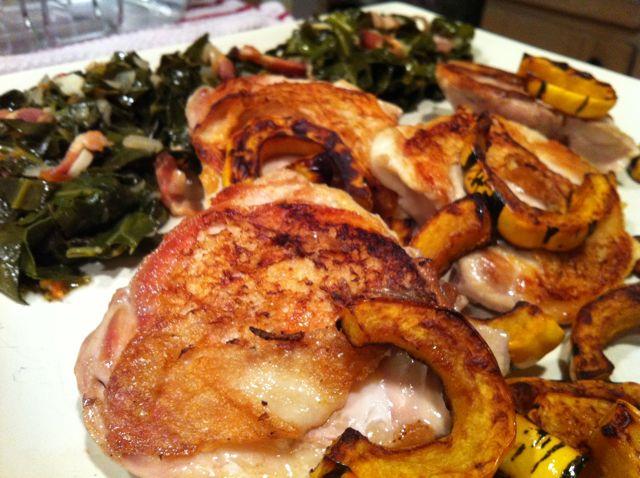
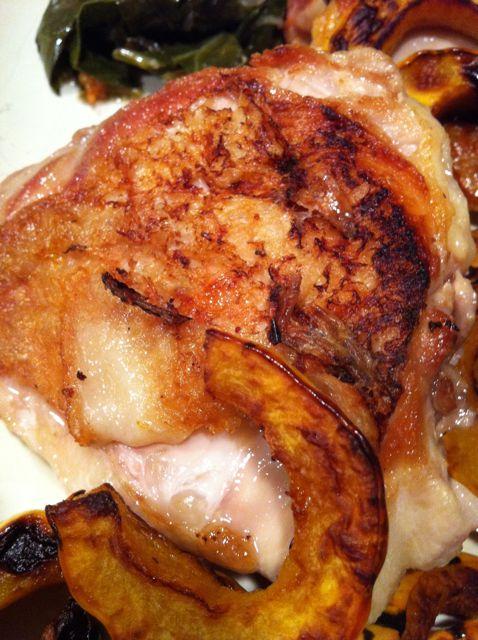
One of the other problems that crops up for people when searing sous-vide foods is geometry. If you don't have a nice flat surface on the food, then it's harder to get a nice crisp sear on it, even if you have plenty of heat capacity. Oil solves the problem at a micro level, filling voids in bumpy surfaces, but at the macro level the shape of the food matters too. We've all rolled food around to try to crisp it evenly on all sides. Today I decided to tackle the geometry problem head on by producing as flat a surface as I possibly could while the food was in the circulator. The idea is that it would be all ready to sear nicely when it came out. Just to be extra hard on myself, I did my first experiment with skin-on chicken, a notorious sous-vide nightmare that many avoid entirely. How did I do it? I needed something solid and rigid to flatten the surface of the skin in the bag. Whatever was going to do that also needed not to interfere with heat transfer in any significant way. My solution was to use the bottoms of some small springform pans I have. They were just the right size, and their rounded edges were unlikely to cut the plastic bags, even under vacuum. I bagged skin-on bone-in chicken thighs with the skin pressed against the metal disks. Here is what they looked like before I bagged them. I trimmed some of the excess skin so it would not wrap around the underside of the thighs, which was not protected by the disks. Next I bagged them up. A side benefit of the metal disks was that it was really easy to get the thighs into the bags and place them where I wanted them. Here's what they looked like, top and bottom, after vacuuming and sealing. From there it was into the circulator 61°C for a little under 90 minutes. After they came out of the bag, they were firm enough that the skin side held its nice round flat shape nicely. As you can see it had shrunk a little bit and exposed a bit of flesh. Next time I'll be a little more careful about trimming the skin so it is perfectly round. Since this was just an initial experiment, I didn't really put the effort in. There was a fair amount of fat in and around the skin, so I patted a bit of it off and then seared them on dry cast iron. In retrospect, I might have done better with a very thin layer of grape seed oil, as the fat in the skin was not sufficient to 100% prevent sticking. But it worked well enough for a first try. No question the skin was crisp. Here is what the final product looked like, served family style with some roasted delicata squash and pressure cooked collards with smoky bacon. All in all a very encouraging first attempt with this technique. I was more than happy with it as a family meal. With a little more practice and care, I think it could even be turned into something elegant.
-
I have done them, but I don't recall the details -- only that I broke the tip off my Shun paring knife, which cost me $106 to replace, because I couldn't find my clam opener in my too-busy kitchen drawer! The Sous Vide Dash app suggests 12:08 in a water bath of 56C for whole, 10mm clams, which sounds reasonable for smaller clams. I have done them according to the app. They were cooked just fine, but I don't think I did anything interesting enough seasoning-wise. Just a little lemon zest and a few drops of olive oil if I recall. I generally prefer to steam manilla clams over a good chorizo-tomato-garlic broth and serve with plenty of grilled crusty bread. If some of the same flavors were sealed in the bag, it would probably be interesting. You have to shell them before you bag them, or at least that's what I did. I haven't made them myself, but I have also eaten sous-vide oysters. A very quick cook at a low temperature (sorry I don't have the details) gave them a mildly cooked consistency but kept the briny taste of oysters on the half shell intact. [Edit: corrected a typo.]
-
There are two things you want out of your searing device. First, you want high-temperature, which is pretty obvious. Second, you want a lot of thermal mass so that the temperature doesn't drop when it comes in contact with the food. I use a big rectangular cast-iron griddle that covers two burners. I heat it for at least 30 minutes, which gets it up to 500+°F. It's big and heavy, so it won't cool down much when the food hits it. One way to test temperature before adding any oil is with a drop of water. If the water evaporates into steam after about half a second to a second of contact, the surface is hot, but still not hot enough. At even higher temperature, the water droplet will dance on a supporting layer of steam that keeps most of it from direct contact with the metal. It will actually remain liquid for several seconds. That's what you are looking for. Now add your rice bran or grape seed oil and then add the meat about 5 seconds later.
-

Polyscience Sous Vide Toolbox (formerly known as SousVide Dash)
vengroff replied to a topic in Cookbooks & References
Or maybe the camera? I'm decidedly old-school low-tech when it comes to measurement: http://www.sousvidedash.com/2011/12/measuring-sous-vide-food-thickness-with-plastic-calipers/ -
Polyscience Sous Vide Toolbox (formerly known as SousVide Dash)
vengroff replied to a topic in Cookbooks & References
Specing it out for 2012. No firm commitment on dates yet, but definitely in the exploratory phase. -
Polyscience Sous Vide Toolbox (formerly known as SousVide Dash)
vengroff replied to a topic in Cookbooks & References
Thanks, Elsie. Yes, you can change the units. Quit the app entirely, then go to settings on the home screen (the gear icon). There is a section for app settings. Scroll down to SousVide Dash and you will find options for C/F and mm/in. Choose the units you want, then restart SousVide Dash. If SousVide Dash is in the background when you change settings, instead of completely closed, then you may not see the change take effect immediately. Change the food settings to force it and you should be good. -
I received a copy as a Christmas present. When I first flipped through it after unwrapping I was afraid it might be a little too arty for me, but my first impression was completely wrong. This morning I sat down and started reading it and I think it is a phenomenal book. It's not a cookbook in any standard sense of the word. Instead it's a lavishly illustrated journey into the minds of a pair of great chefs and some of their best friends, colleagues, and suppliers. In prose and pictures it covers what H. Sean Brock and Johnny Iuzzini want their food to be, why they want it to be that way, what they want it to mean to people, and the obsessive lengths they go to in order to make it happen. I'm halfway through volume 1 at this point, and I love it.
-
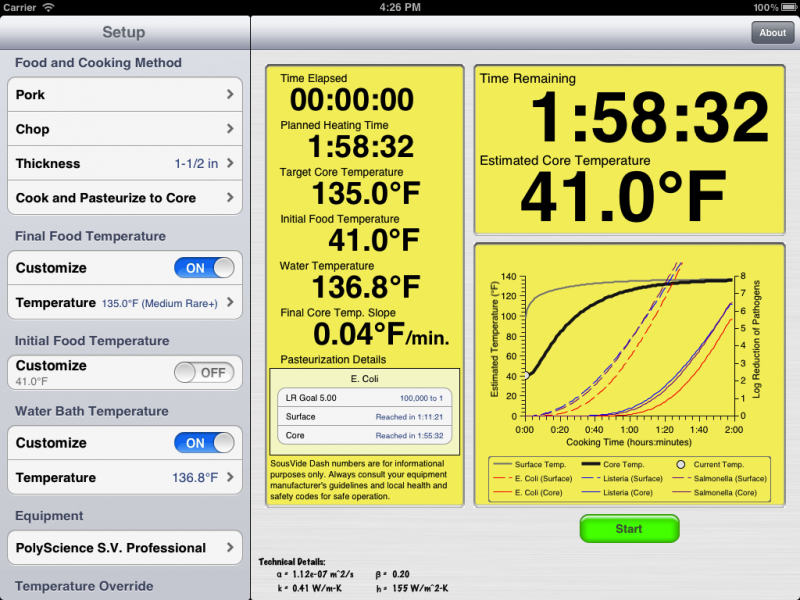
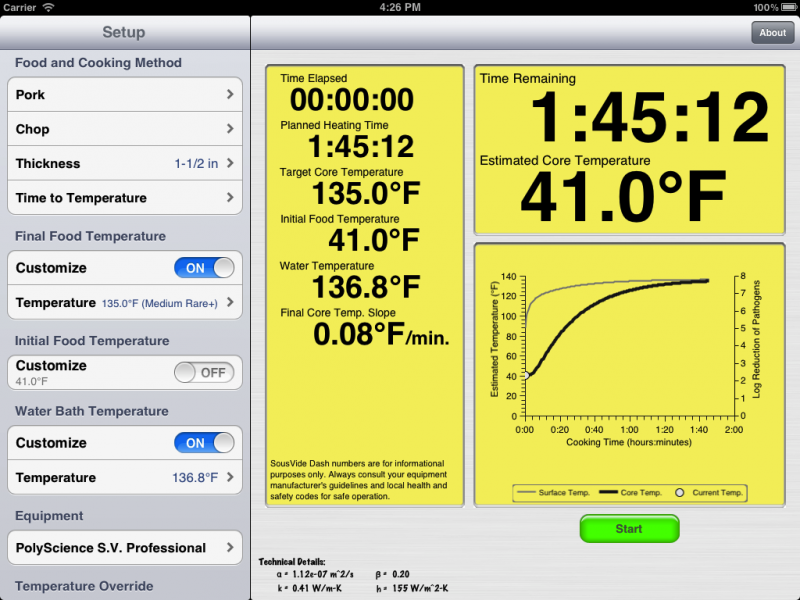
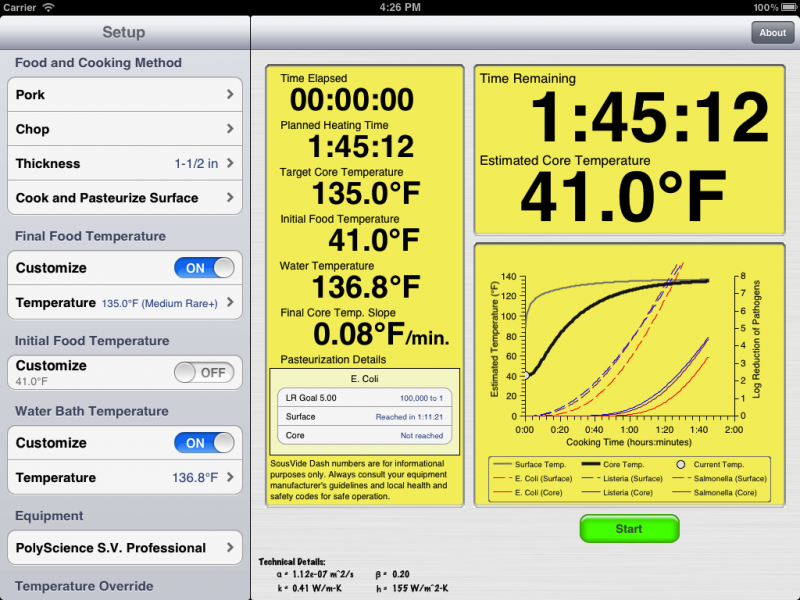
Unless you have reason to believe your chops are going to be especially tough, 12 hours seems like overkill. By my calculations with my SousVide Dash app, you can get to temperature in 1:45: As far as pasteurization goes, it should already be accomplished at the surface by then: If you want to pasteurize to the core, you need a little more time, just under two hours: See the app itself for more details on exactly what pathogens it is modeling and what the reductions are in these times. If you want to go longer for tenderization purposes you can, but I tend to find it unnecessary. But it's a matter of taste, so you may want to try some different times and see what you like. Even better, fire up you circulator eight hours before you want to eat, then drop one chop in every two hours (making sure to mark the bags). Pull them all at the same time, sear and taste test them side by side to see what you personally prefer. Now you'll have the perfect time for you every subsequent time.

-
Polyscience Sous Vide Toolbox (formerly known as SousVide Dash)
vengroff replied to a topic in Cookbooks & References
I created it for my own use, and recently released it in the app store. Needless to say I'm a little biased, but the app works well for me. It looks like there are not enough Canadian ratings for Apple to publish them yet, but you can see the US ratings and reviews at http://itunes.apple.com/us/app/sousvide-dash/id476999798?mt=8. As of this writing, the current version (2.0) has three five star reviews and five five star ratings and nothing at all giving it four stars or less. I'm quite proud of that feedback, but still working on adding features and improvements for upcoming releases. You can get more details and see a video quick start guide at www.sousvidedash.com. -
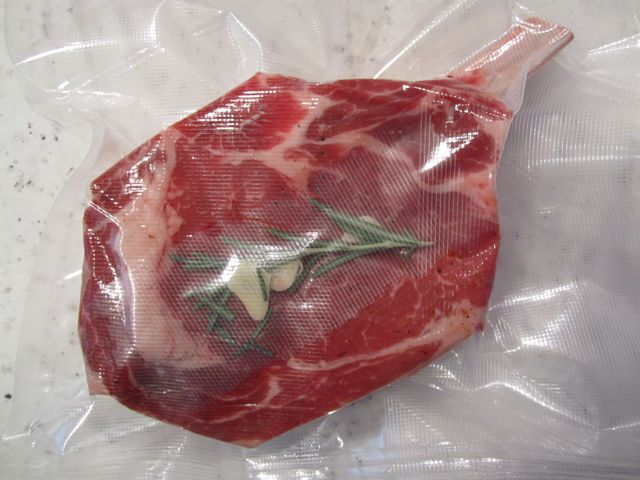
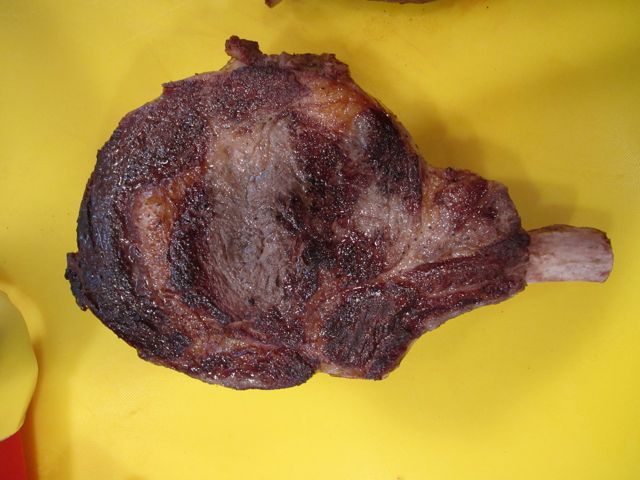
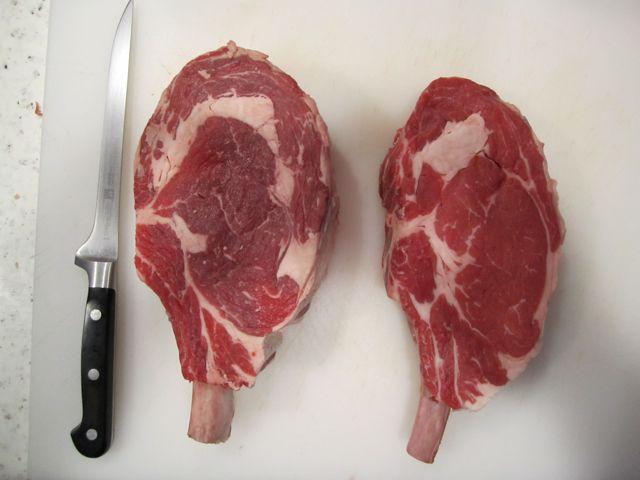
I did something close to this Christmas day with a couple of cotes de beouf. The thicker one was 58mm, the thinner one 55. SVD said just under three hours to a temp of 54.4C, just over four hours to pasteurize. I went for six hours to tenderize it a bit more, but still leave some structure. Here are a few photos: Trimmed: Bagged: Cooked: Seared: Served: Gone:


-
I agree with Douglas that it gets difficult to compute for a dry oven. A combi oven would be easier, but not many people have those. On the other hand, it would be hard to do worse than the typical X minutes per pound guidelines one often sees for roasts, turkeys, and so on. Those guidelines don't even get the shape of the curve right. A formula like X minutes per weight to the two thirds power would be a lot closer to reality. Maybe that one small formula could be the basis for a simple app for those who currently use the less accurate method but would rather not do the math involving fractional exponents.
-
Certainly a whole one would. At 63mm it sounded like he might have cut a thinner one, i.e. just a rib or two. But maybe i misunderstood the geometry. The bigger point is simply that you do have to take shape into account.
-
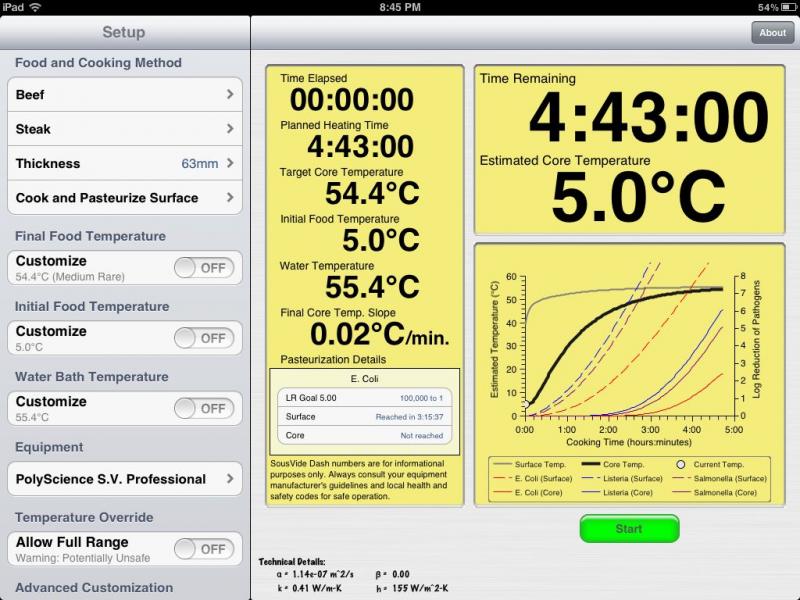
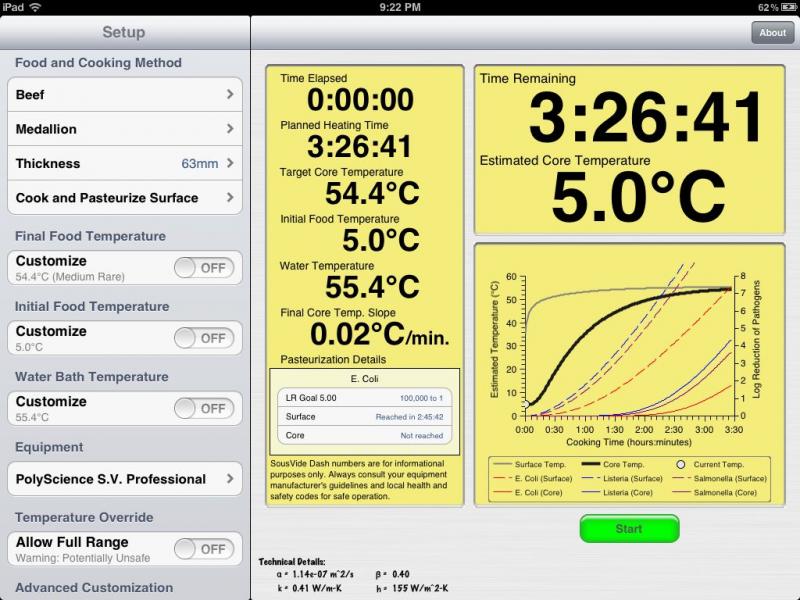
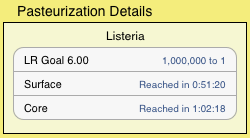
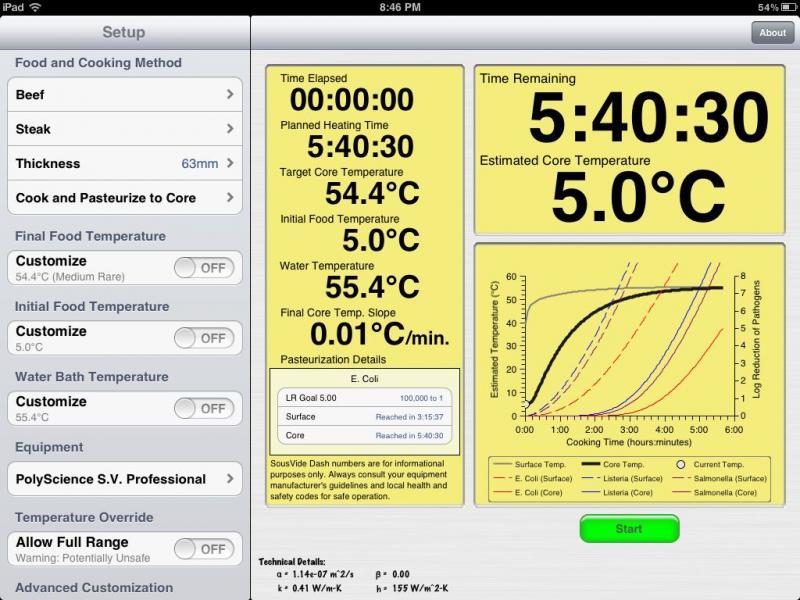
The case you are describing is a really interesting one because it inverts the relationship we normally assume exists between time to temperature and time to pasteurize. By this I mean that the surface of the meat is pasteurized before the core reaches temperature. For think cuts like this where this could be an issue it is always worth trying one of the pasteurization options in SVD just to see what happens. Here's a screen shot of SVD for a situation like this: We get a 100,000 to 1 reduction of E. Coli at the surface in 3h:15m but we don't reach medium rare at the core until 4h:43m. Looking at the curves, it looks like we might even be able to hit pasteurization within the six hour safety window. If we change the setting to pasteurize to core, we see that we do just make it in time. So we can actually pasteurize all the way to the core within the six hour window even though we can't reach final core temperature in the four hour window. The other thing to note is that the numbers for steaks are computed assuming a shape that is much wider than it is thick. Depending on how your meat is cut, it may be something closer in shape to a medallion (somewhere around half as thick as it is in diameter), which will actually reduce the cooking time quite a bit. Shape really has a tremendous influence in cases like this.


-
I cut the big end of the egg off then insert a spoon between the shell and the egg white. I then spin it around the egg to separate the white from the shell on all sides. From there it usually pours out pretty easily. If it doesn't, I crack the shell a little more until it does. The key is having a spoon that is as close to the profile of the egg as possible.
-
This thread has been fantastically educational on the subject of cooking eggs in water baths. It's the first place I learned about the fast-cook method, which is now my go to way of cooking eggs in a circulator. I cook in 77°C water to a core yolk temperature of 62°C. It gives me the combination of relatively firm whites and a spreadable jammy yolk in 14 minutes, plus or minus depending on the exact size of the egg. I've summarized what I learned here and elsewhere about the fast-cook technique and what has been incorporated into the SousVide Dash app in a blog post and video. I hope it is useful and interesting to you.
-
I get most of my spices from World Spice in Pike Place Market in Seattle. They have dried onion in several different forms, including powder, granulated, and flakes. I buy from them locally, but they also do mail order. [Edit: Wrong web site link the first time.]
-
Per Modernist Cuisine, you don't want to cook venison SV using the equilibrium temperature technique. It takes too long, and becomes mushy (due to enzyme activity I think) and gamy. So in order to cook it more quickly, you set the water bath higher than the target temperature and pull it out according to a strict timetable (and let it rest). I have used this approach with both venison and wild boar. When you do it this way, the meat closer to the surface ends up reaching a higher temperature than the final core temperature. It is closer to the water temperature. Essentially you have the effect you see with traditional roasting techniques where e.g. the first half a centimeter below the surface is medium when the core is medium rare. But it is not nearly as pronounced unless your water bath is extremely hot. You can make some very interesting tradeoffs between the mushy/livery result and the non-uniform doneness by varying the temperature. But you always have to compute the right time to reach the core temperature you want and pull it out immediately when you reach it. I've had good luck with water 3-5°C over the final desired core temperature and a cooking time that will bring the core to 0.5-1°C below what I'm really aiming for. Remember that if the temperature is not uniform when you pull it, which it isn't in this case, that it will come to an intermediate equilibrium while resting. The other way to get around mushiness is to use very thin pieces of meat that don't take long to reach equilibrium. But you may not want to do that with a nice tenderloin. I haven't tried it.
-
Wow! I'm extremely flattered. Now I just have to figure out how to get a commission from apple.... I think that's a good idea. Now that the core functionality is in place we can start thinking about extensions like that. Another good suggestion. Maybe a 30 minute buffer in which it is still willing to display the time but issue a warning? My biggest concern here, and the reason for the current limits, is that I don't want a novice to go and cook a ten hour salmonella bomb thinking the app said it would be OK. Low. I'll look into this. Maybe an advanced setting. We'll also need to get some data on how things go in an ice bath. It's essentially a different piece of equipment with it's own unique properties. I thought this would be difficult but not impossible. Douglas Baldwin's recent comments scared me off a bit. It would definitely need some very thorough testing. Thanks for your excellent feedback.
-
And just for completeness there is now a SousVide Dash Quick Start video on YouTube.
-
Apple says updates can take 24h to reach all their servers, but it's usually a lot less. If you go into the App Store on the phone is the version listed as 2.0 release on Dec 9? If so you should be able to hit the update button and get it. I definitely see the new version in the app store on both my iPad and iPhone at this point.
-
For those of you who have been asking about pasteurization curves, SousVide Dash 2.0 is now available. Please upgrade and enjoy. I look forward to your feedback.
-
House-made lemonade is quite commonly made from jugs of pasteurized lemon juice (e.g. Odwalla) as opposed to juice squeezed from lemons on site. Maybe not quite as egregious as the mozzarella case, but probably not what most consumers think they are getting.
-
In the first release with pasteurization I put in data for common pathogens in the foods in which they commonly occur. So, for example, in beef that means E. Coli, Listeria, and Salmonella. For chicken it means Listeria and Salmonella. I suspect I will add more as I gather more data. You can't turn individual pathogens on and off; or any given food the app simply reports on everything I could find data for. It's one more setting to add some flexibility, but there are a lot of settings already, so I want to slow down a little and not make the UI that much more complex by adding more unless I really need them. Aside from the graphs like the ones I showed above, each pathogen has a little summary like this: You can flick your finger in that little area to scroll through the pathogens and look at the ones that interest you most. For me, the graph is actually the more interesting way to look at it, but I did want to provide the numbers too. Although the app started out as something simple to augment the existing published tables for my own personal hobby use, it has now kind of taken on a life of its own with the various new features added since the initial release. The pre-release QA script, for example, is now close to fifty steps and I'm sure it doesn't test everything and hasn't uncovered every last bug. I'm now in the mode of trying to simplify things a bit for the new or casual user. There is so much information on the main screen and settings now that it can be a little overwhelming for people just getting started. I'm kicking around some ideas to make it simpler without losing any of the functionality advanced users like you are clamoring for. I did make some changes there, especially since the app now allows six hours for pasteurization settings, vs. the original four hours without, which means bigger items can be accommodated. There is likely more of that to come in future updates as well. Thanks to you and all the others here who have provided feedback to make the app that much better.

-
I completely agree. Indeed this is the kind of sous vide cooking I do far more often than 48-hour short ribs or similar.
-
You suggested the recommended cooking times for tenderization, correct? Pasteurization is rolling out soon and that will probably come next.